


Overwhelmed with the idea of baking Homemade Sourdough Bread? This easy overnight recipe is here to make your bread-baking dreams a reality! Perfect for beginners, it’s a no-fuss, easy recipe with step-by-step instructions and a handy printable guide to walk you through each part of the process.
This is the BEST Sourdough Bread Recipe
While some might consider me a sourdough newbie, I’ve baked thousands of loaves and worked with sourdough starters since I was a kid making sourdough pancakes with my family. Over the years, I’ve refined this recipe into my weekly go-to loaf and shared it with so many friends (and their friends!) who now bake it regularly, too. It’s literally traveled across the country!
This recipe makes a 500-gram loaf, ideal for medium-sized families. Want to adjust the size? Use the scale button on the recipe card to make it bigger or smaller. Don’t worry about leftovers—sourdough freezes beautifully once cooled. Whether you’re at sea level or high altitude, my trusted recipe testers have tested and approved this recipe.
No sourdough starter yet? Don’t panic! I’ve shared my starter with dozens of friends, who’ve shared it with dozens more, and so on—sourdough starter has a way of connecting people! If you can’t find someone nearby to share, you can buy a starter online or even better, make your own with my How to Make a Sourdough Starter guide.
This recipe was inspired by my wonderful blogging friend and bread-baking expert, Hostess at Heart, whose expertise gave me the foundation for creating this beginner-friendly version. With patience and this easy-to-follow method, you’ll pull a golden, crackly loaf of homemade sourdough bread from your oven in no time. Let’s bake!
What is Sourdough Bread?
Sourdough bread is made using a fermented mixture of flour and water, called a “starter,” instead of commercial yeast for its rise. This starter is packed with natural microorganisms, including wild yeast, which give the bread its signature tangy flavor and help it rise. The fermentation process also alters the gluten structure, making sourdough baked goods easier to digest for some people with gluten sensitivities.
Let’s be real—sourdough can feel scary, but it doesn’t have to be! We bakers often overcomplicate things, but I’ve been testing and tweaking this recipe for over 4 years, and I’m here to tell you that you can bake artisan bread!
I’ve encouraged dozens of friends and family to try sourdough, and now they bake more often than I do! Let’s take the guesswork out and get you baking your first loaf of sourdough bread. You’ve got this—let’s go!
- Precision, Not Perfection: Yes, we use a kitchen scale (highly recommended), but it’s not the end of the world if you’re off by a gram or two. Try to keep your measurements within 2–3 grams of the recipe. Don’t stress if your flour is 501g or your water is 287g—it’s all good!
- Timing Is Flexible: Sourdough involves a lot of waiting, but you don’t have to stick to a rigid schedule. Feed your starter when it fits your day, and work the timing around your life. If your starter rises, deflates, and needs to be fed again—yay! More discard for pancakes or sourdough banana bread.
- Overnight Hacks: Feed your starter mid-day and start bulk fermentation (fancy word for mixing everything together) in the evening (around 7–8 PM) and let it rest in a cool spot. Not ready to bake first thing in the morning? Pop the dough into the fridge for a long cold fermentation (8–48 hours). It will still rise, and the flavor will only get better. Remember that for best results, your bread should cool 4-6 hours before slicing!
- Morning Method: Feed your starter before bed, let it get bubbly overnight, and mix your dough in the morning. After a 6–8-hour rise, bake in the afternoon and let it cool overnight. It’s my favorite rhythm, especially during cooler months!
- The Cool Down Is Crucial: I get it—the smell of fresh sourdough is amazing, but give your bread 4–6 hours to cool completely. This allows the bread to finish baking and the steam to settle, so the bread doesn’t become gummy. Sliced it too soon? It’s happened to me, I have to hide my loaves from my hubby. No worries—toast those slices to get the crisp back.
Homemade Sourdough Bread ingredients
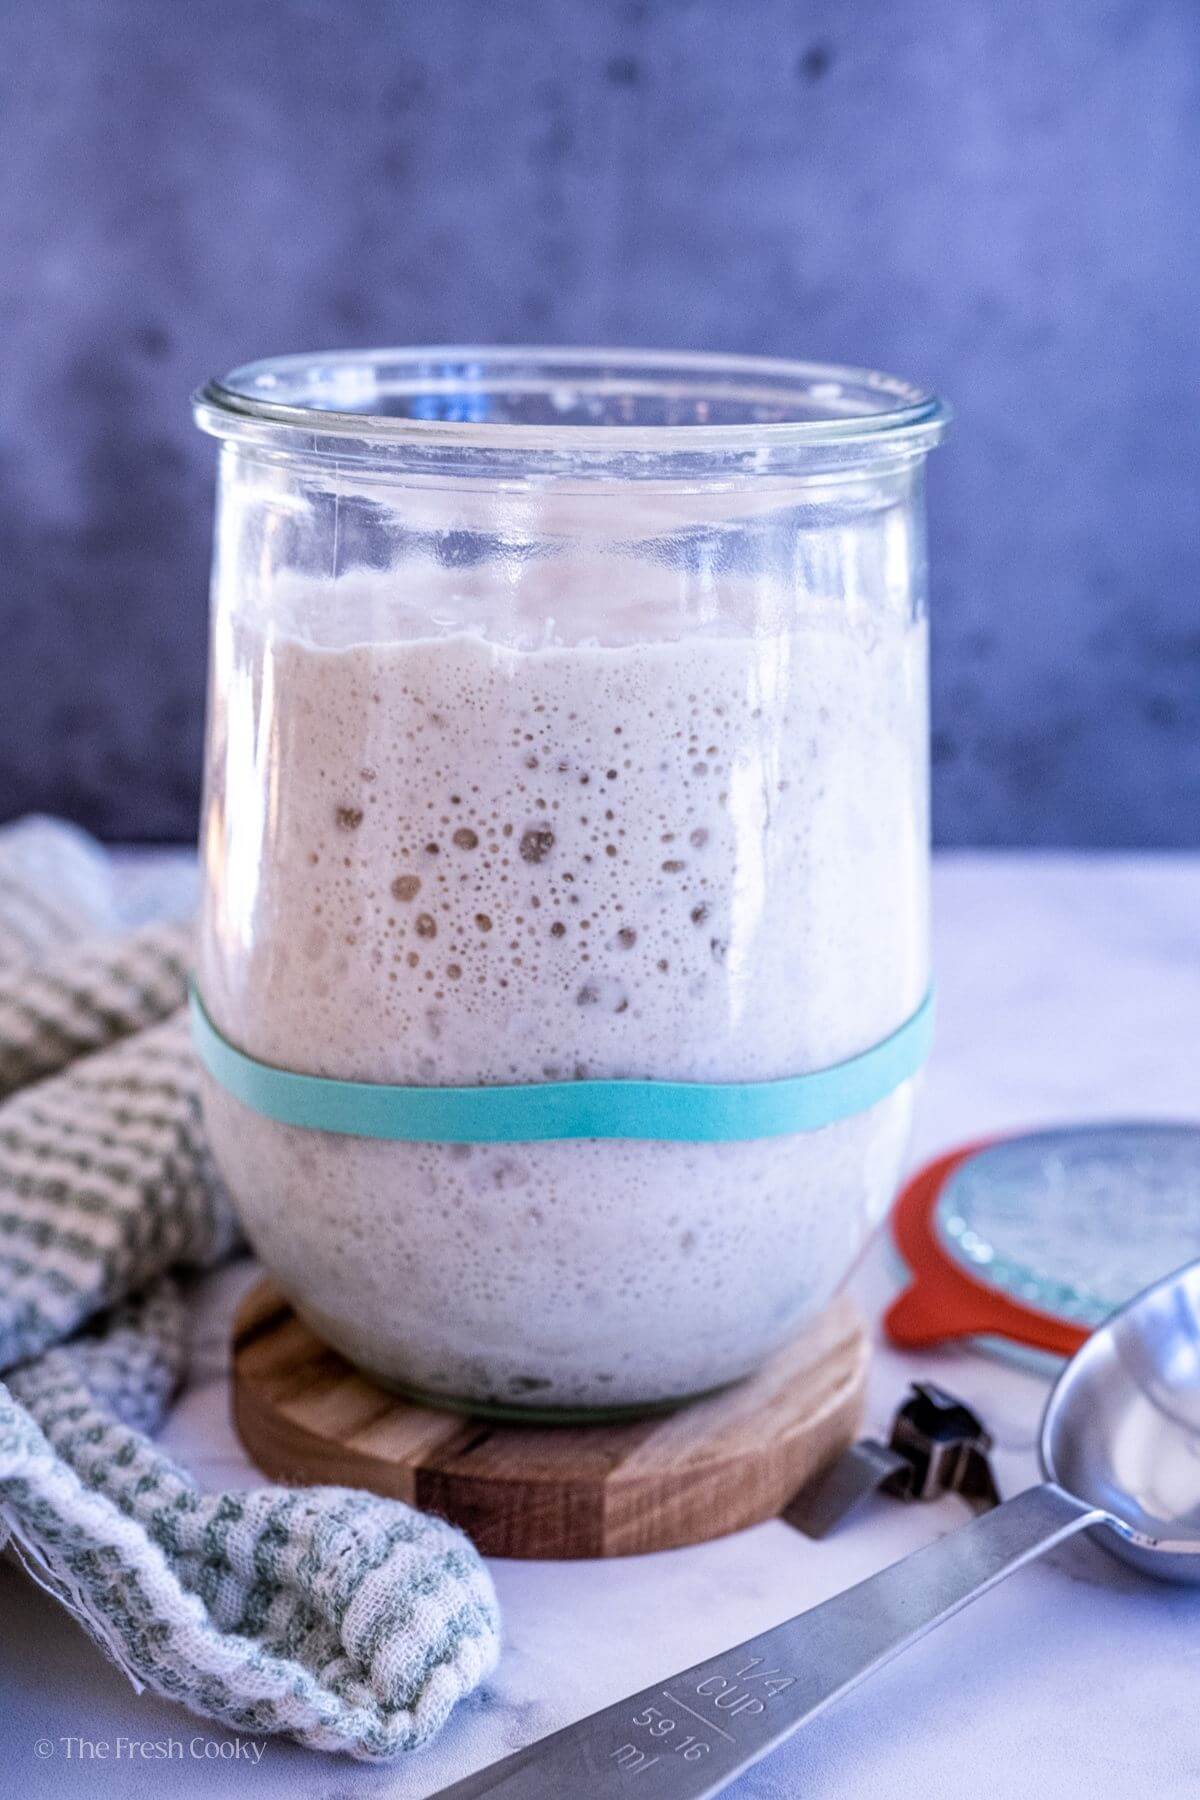
- Sourdough Starter: Make sure it is bubbly and ready to use! If you aren’t sure, you can take a small piece of it and place it in a cup or bowl of water to see if it floats. If it floats, it is ready to bake with! Learn how to troubleshoot your starter in my Sourdough Starter Guide.
- Flour: I prefer using organic bread flour and will occasionally add a little rye flour or whole wheat flour. You may also use unbleached, all-purpose flour, but it won’t yield as good of a loaf.
- Kosher Salt: Salt adds flavor to the bread! Please don’t skip it!
- Water: Filtered water is best here. Make sure it is room temperature! But not RO water (reverse osmosis); it strips out too many minerals. You can dechlorinate tap water by allowing it to sit on the counter for 24 hours. I’ll go more into that process below.
Get the full recipe in the recipe card below.
Sourdough Starter
To make a sourdough loaf, you need a sourdough starter! This is just fermented flour and water that is a natural leavening agent for the bread. If you don’t have a starter already going, check out my post on how to make a sourdough starter!
Before using the starter in this overnight sourdough bread recipe, you will need to make sure it is active and ready to use. You will probably have to feed it, and once it is nice and bubbly you can do the float test by placing a little bit of it in a bowl of water and making sure that it floats!
If it’s thin, runny or a little sluggish, it just means your starter is still “hungry” and needs to be fed again, take the time to feed it well.
Supplies needed
- Active Sourdough Starter: The foundation of your bread; ask for a neighbor or friend to split their starter, buy, or make your own. Most sourdough bakers are more than happy to share their starter with you!
- Kitchen Scale: For precise ingredient measurements in grams. This is my favorite.
- Large Mixing Bowl: Big enough to handle the rising dough; I love these Mason Cash bowls.
- Bench Scraper: Perfect for handling sticky dough and cleaning your work surface.
- Dutch Oven (or Alternative Baking Vessel): A lidded pot (4–6 quarts) for creating steam and achieving a perfect crust. Here’s an economical one if you don’t have one. But these are my favorites!
- Parchment Paper: Prevents sticking and makes transferring dough easy.
- Dough Whisk or Wooden Spoon: Ideal for mixing wet dough.
- Sharp Knife or Lame: For scoring the dough before baking.
- Instant-Read Thermometer (Optional): To make sure your bread is fully baked (internal temp: 205–210°F).
- Plastic Wrap: This is used to cover dough during proofing, sourdough proofing covers or you can use an unused shower cap.
What size Dutch oven for sourdough?
The best size Dutch oven for a 500-gram sourdough loaf is a 4–5 quart pot. It’s just the right size to give your loaf room to rise without spreading out too much. Plus, it creates that steamy environment you need for the perfect crust.
If you’re planning to bake larger loaves down the road, you might consider a 5–6 quart Dutch oven, but honestly, for this size loaf, the 4–5 quart range is ideal. It’s like the Goldilocks of Dutch ovens—not too big, not too small—just right!
Sourdough Bread Terms Explained
Sourdough bread recipes are full of fancy words, but don’t let them scare you! Here’s a guide to help you understand what they mean:
- Autolyse (or Autolyze): Pronounced “aw-toe-lease,” this is when you mix the flour and water and let it rest before adding other ingredients. This helps gluten develop naturally and makes the dough stretchy and smooth. Good news for beginners: we skip this step in our recipe to keep things simple.
- Active Sourdough Starter: A starter fed with flour and water and left to bubble up and double in size. Think of it as your sourdough engine.
- Sourdough Discard: The part of the starter you remove before feeding. Don’t toss it out! Use it for recipes like Sourdough Discard Banana Bread, Sourdough English Muffins or Overnight Sourdough Pancakes.
- Bulk Fermentation: The longest rest when your dough rises and the wild yeast gets to work. This is when your dough gets its lift and flavor—basically, the yeast is having a party in your dough. This can be done at room temp or in the fridge.
- Hooch: The brownish-gray liquid on top of your starter when it’s been in the fridge too long. It means your starter is hungry and needs a feeding. Stir it back in for a tangier bread, or pour it off if you prefer a milder flavor.
- Bread Lame: (Pronounced “Lahm”) A razor blade on a handle used to score designs into your bread. You don’t need one to start; a sharp knife works fine, but this tool comes in handy if you get into decorating your loaves.
- Dough Whisk: That weird-looking whisk (aka Danish Whisk) that comes with bread-making kits. It’s great for mixing your dough in the early stages, but a wooden spoon works just as well.
- Bannetons: A basket (usually rattan) that helps shape your dough as it rises, often used for proofing in the fridge. Since we’re not proofing in the fridge, we don’t use a banneton for this recipe.
- Dutch Oven: A heavy-lidded pot (usually cast iron) to bake sourdough bread. Use between a 4–6 quart (4–5 liter) Dutch oven. While you may use an aluminum roaster, it doesn’t hold heat well, and you won’t get the same results. This is my favorite (also great for soups) and my favorite budget Dutch oven. No matter the lidded pot you use, make sure it’s oven safe up to 475-500°F (260° C).
How to Make Dutch Oven Sourdough Bread
Step 1: Day Before Bread Baking – Feed the starter 4-6 hours before starting
Stir the starter, discard half (save in fridge separately for discard recipes if desired), then feed with 100 grams of bread flour and 100 grams of room temperature water, stir vigorously, cover loosely, and allow to rise in a warm location 4-6 hours, until doubled (70-75° F or 21-27° C).

- I usually place it on any counter during the warm months, and it will rise.
- During the cool months, I place my jar into the oven set on the proof setting (about 75° F – 24° C) If you don’t have a proof setting, preheat the oven to 100°F (38° C) and TURN OFF, wait a few minutes, place starter inside to rise. I don’t recommend using the oven lightbulb, as it can get very hot and actually bake your starter (don’t ask me how I know this 😉 ), the top of the fridge, or near another appliance that is warm.
- Other great ways to create a proofing spot: many countertop ovens, such as this Breville have a proof setting, and you can use the yogurt function on an Instant Pot.
Starter Tips
- If your starter hasn’t been used in a while, it may need 2-3 feedings before it’s ready.
- Starters can develop a brown liquid on top, called “hooch”. This is not harmful and may be stirred into the starter or poured off. Hooch is the result of the fermentation process and is a combination of water and alcohol.
- Stirring the hooch into the starter will yield a more sour, sourdough bread.
Step 2: Day 1 – Prep the dough
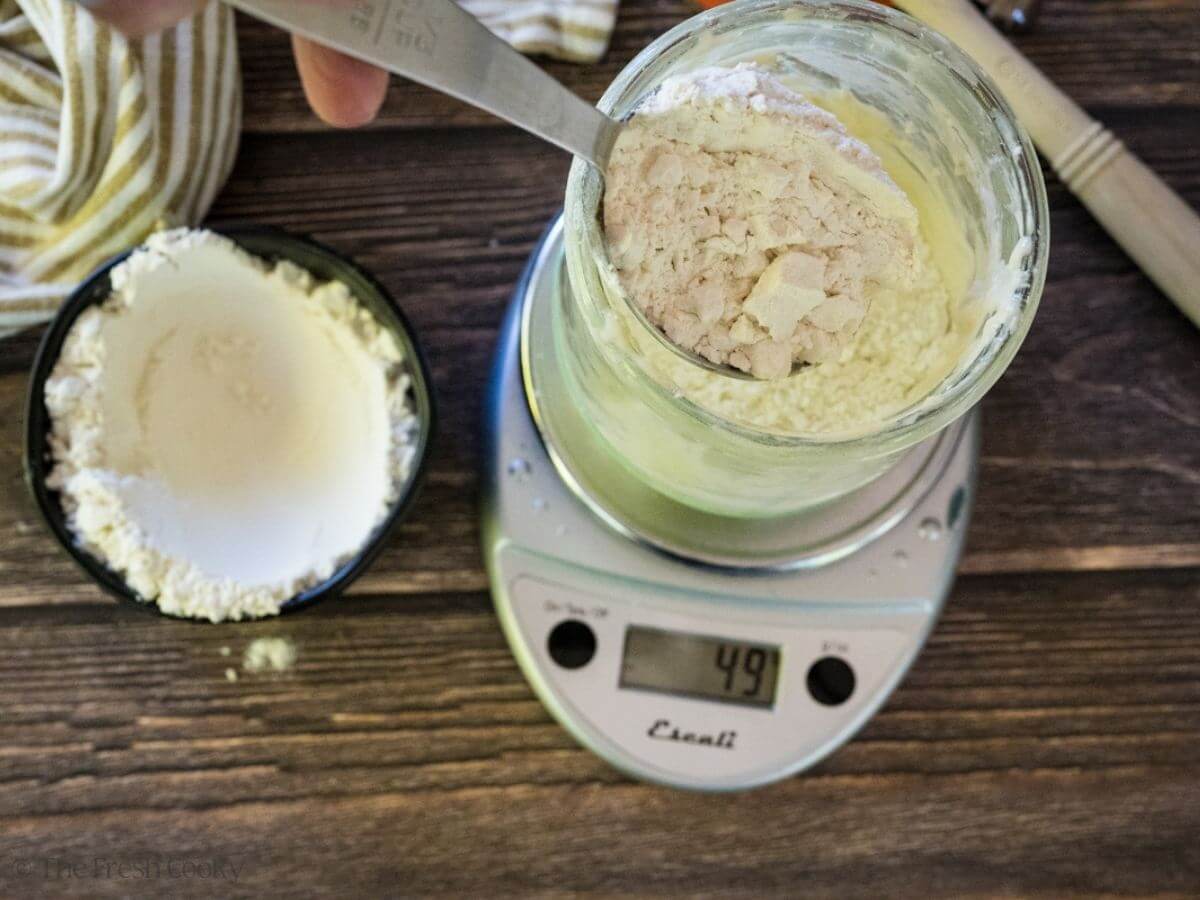
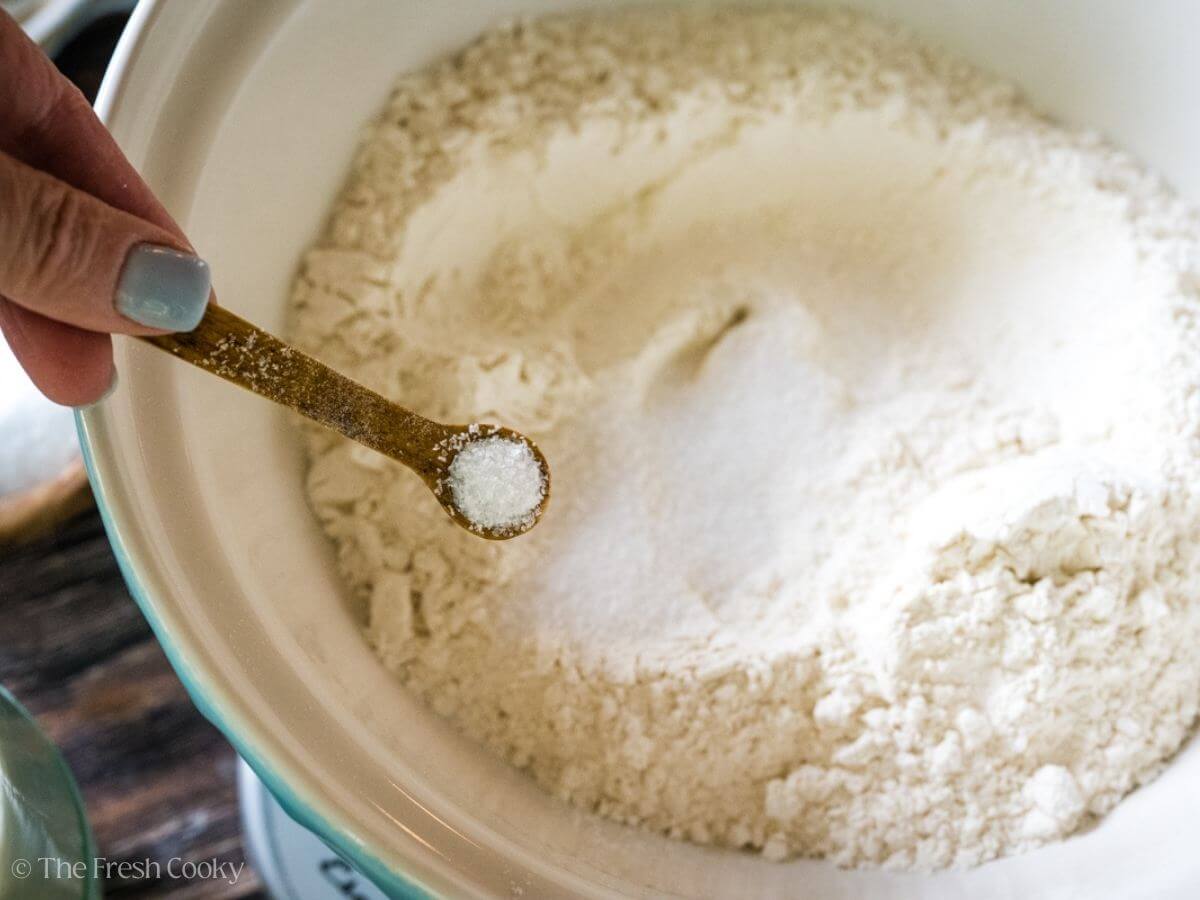
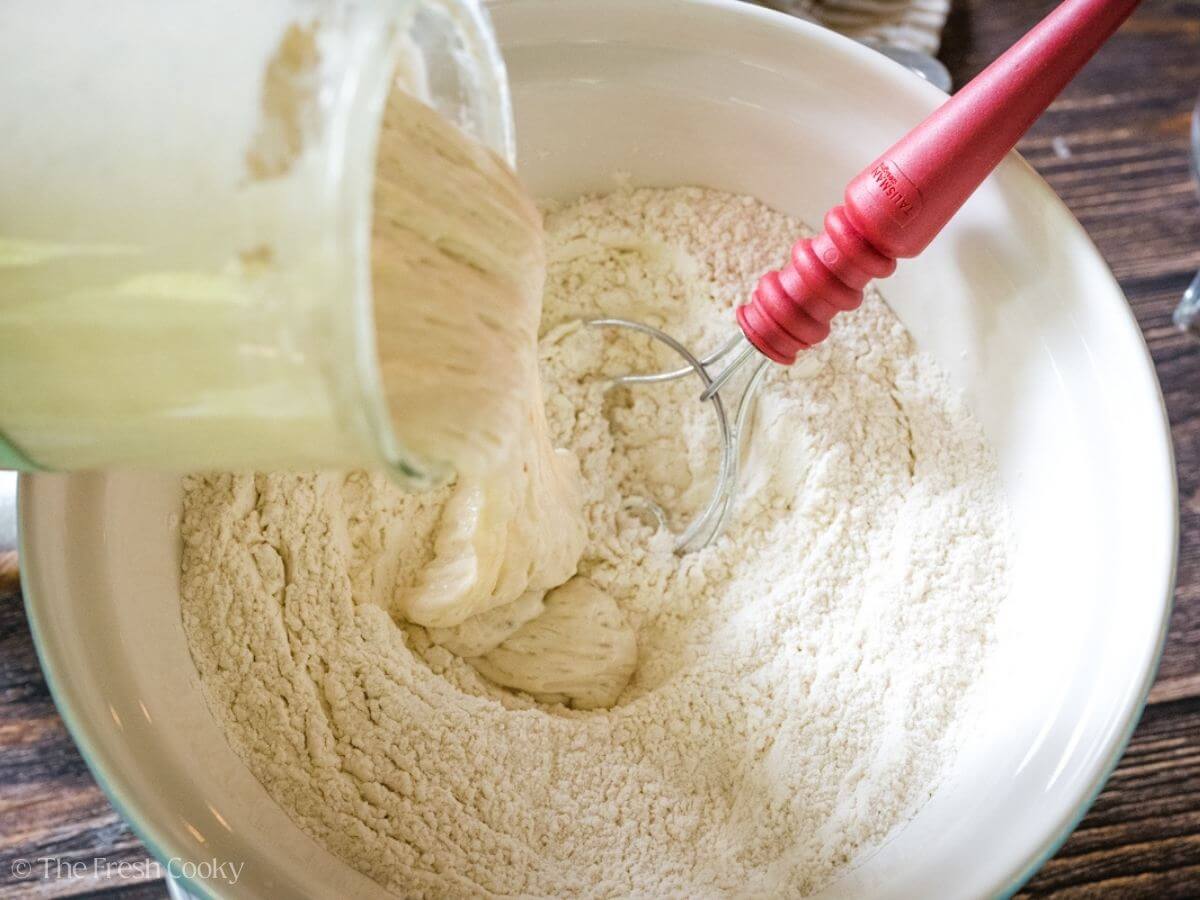
In a large glass or ceramic bowl (metal can react with the fermentation process), add 500 grams of flour and 9 grams of salt and stir to mix.
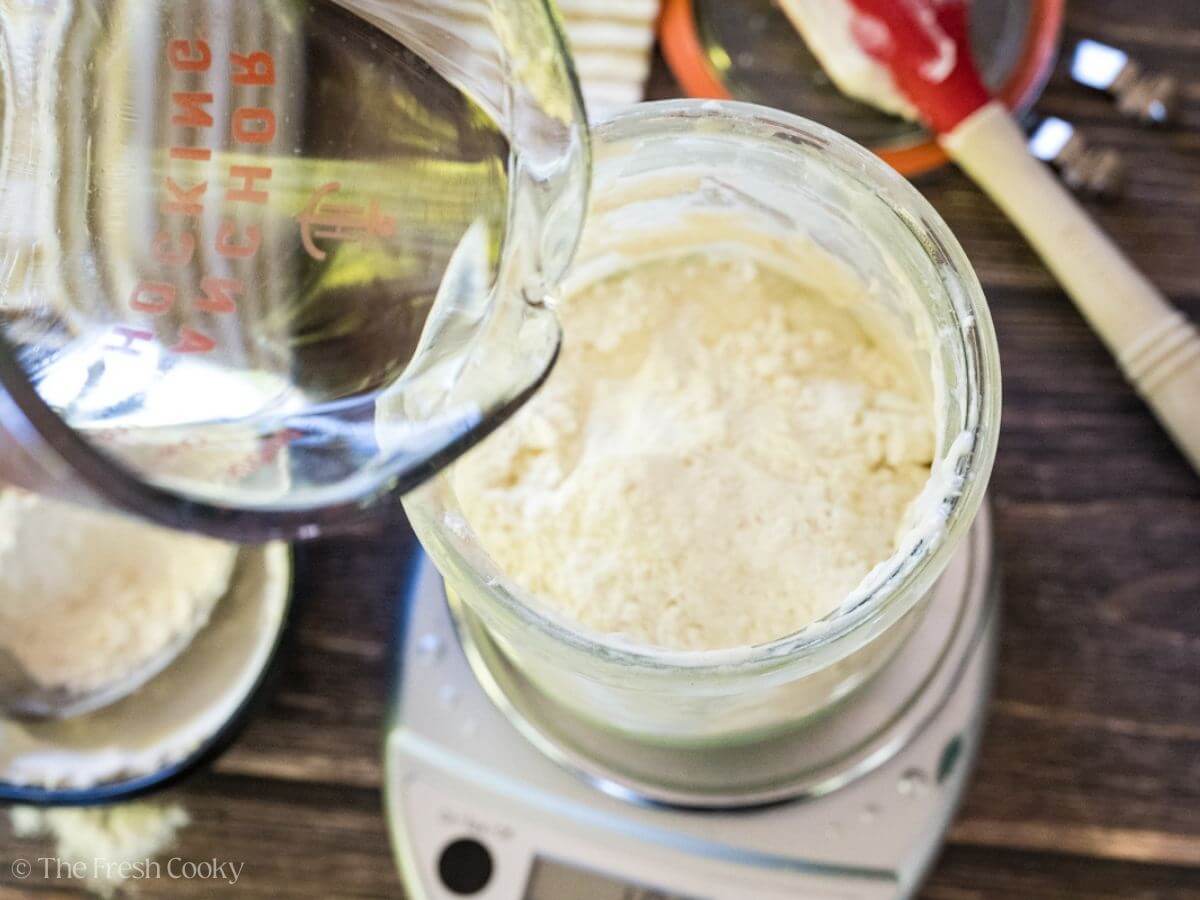
Next add 150 grams of bubbly starter and 285 grams of room temperature filtered (but not RO) water.
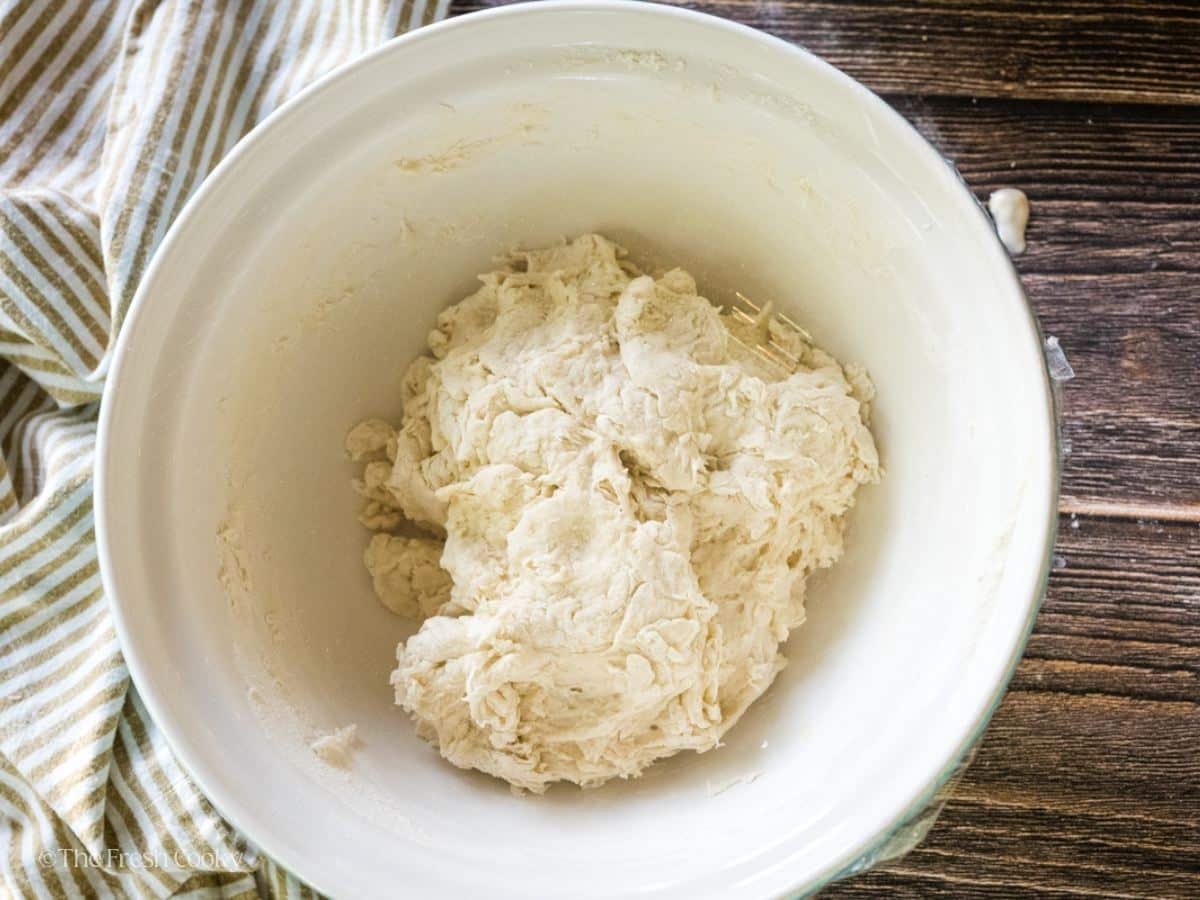
I use a Danish dough whisk to mix or “squelch” all of the ingredients together, just for a minute or so, it’s very dry, feel free to do this part by hand as well. Cover tightly with plastic wrap or a bowl cover and allow the dough to rest for 30 minutes.


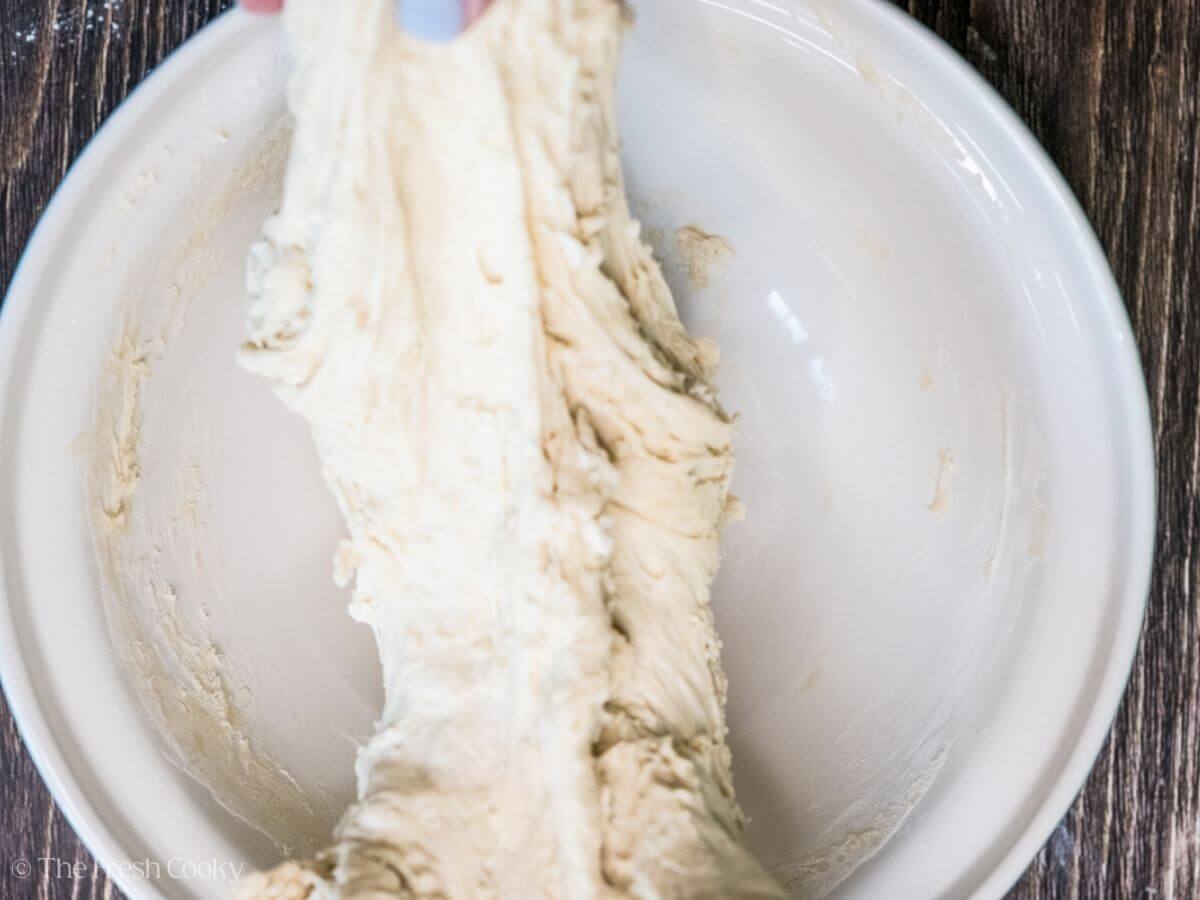
Step 3: Stretch and Fold
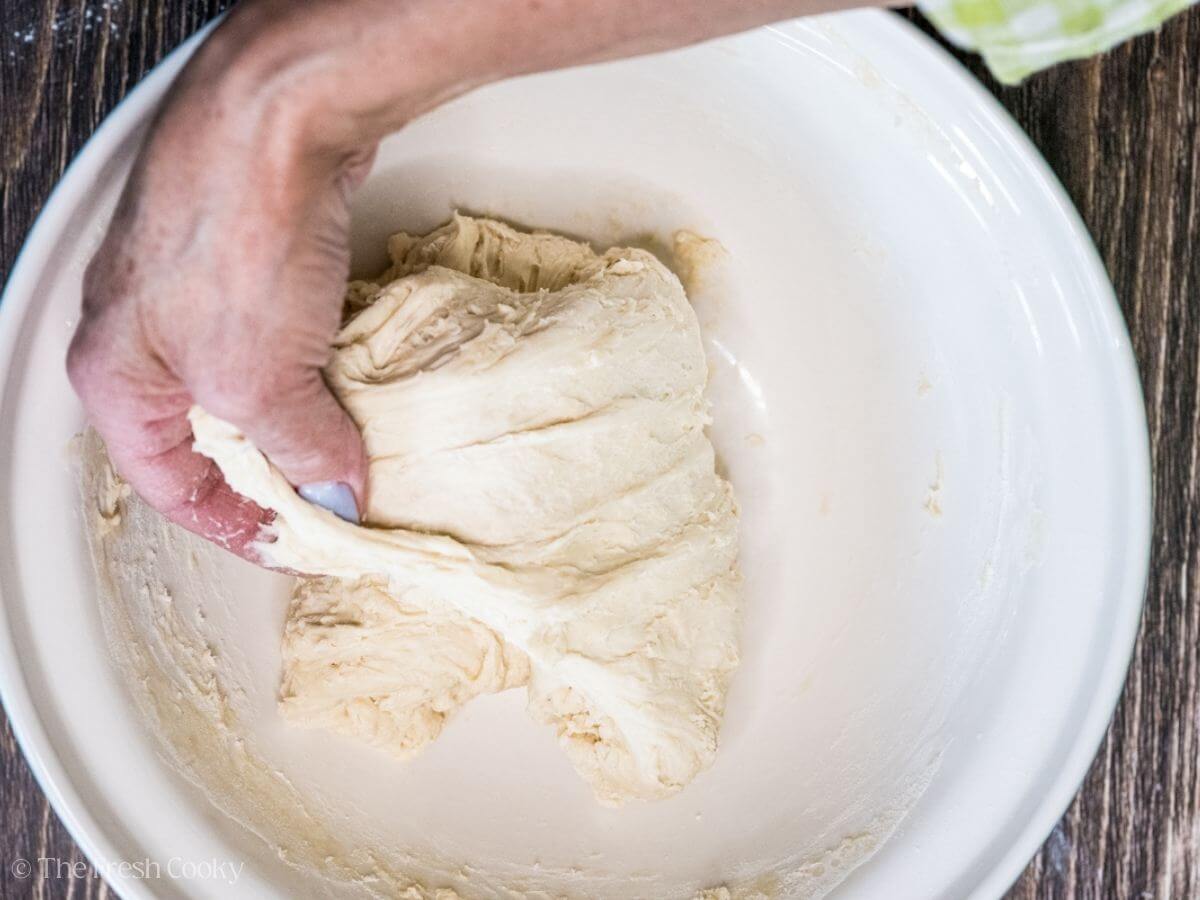
Now, with wet hands (the dough won’t stick to you as much), grab two sides of the dough with your hands, stretch outward, and then fold in on itself; turn a quarter turn, and do the same thing; repeat about 4-5 times.
Cover and allow to rest on the counter overnight for baking the next day (or 6-8 hours) until it’s doubled. If needed, you can place it in the fridge in the morning if you don’t have time to bake it until later.


Step 4: Next Day! Preheat Oven
Preheat Your Oven and Dutch Oven: Preheat your oven about an hour before baking to ensure it’s fully up to temperature. Place a 4-quart (or larger) lidded Dutch oven inside while it heats.
Make sure the oven rack allows enough clearance for the Dutch oven to sit in about the middle of the oven. Set the oven to 475°F (245°C) for sea level or 500°F (260°C) for high altitudes.
Why Preheating Matters: The goal is to get the Dutch oven super hot. When your cold sourdough dough hits the hot pot, the intense heat creates steam, which is key for achieving that perfect, chewy, golden crust.
Step 5: Shape your sourdough loaf and let it rest
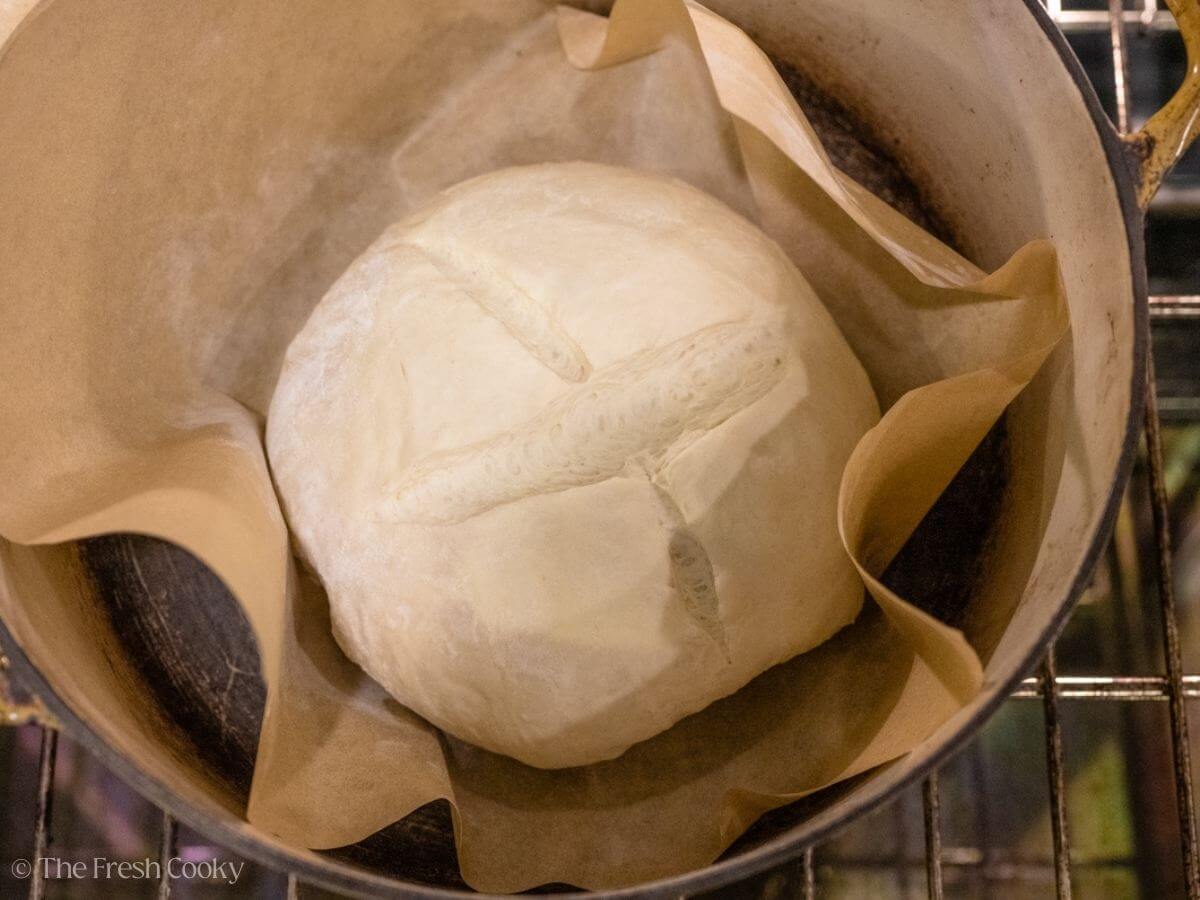
Prepare Your Dough: About 30 minutes into preheating your oven, it’s time to shape your dough. Gently remove the dough from the bowl onto lightly floured surface or piece of parchment paper, carefully preserving the air bubbles. The best way to remove the dough, is to tip your container towards the parchment, and using a sturdy spatula, ease it away from the bowl and it will drop onto the parchment.

Use a firm rubber spatula or scraper to ease the dough onto a lightly floured marble surface or piece of parchment paper. Avoid punching down the dough; keeping those bubbles intact is key to a light and airy loaf.

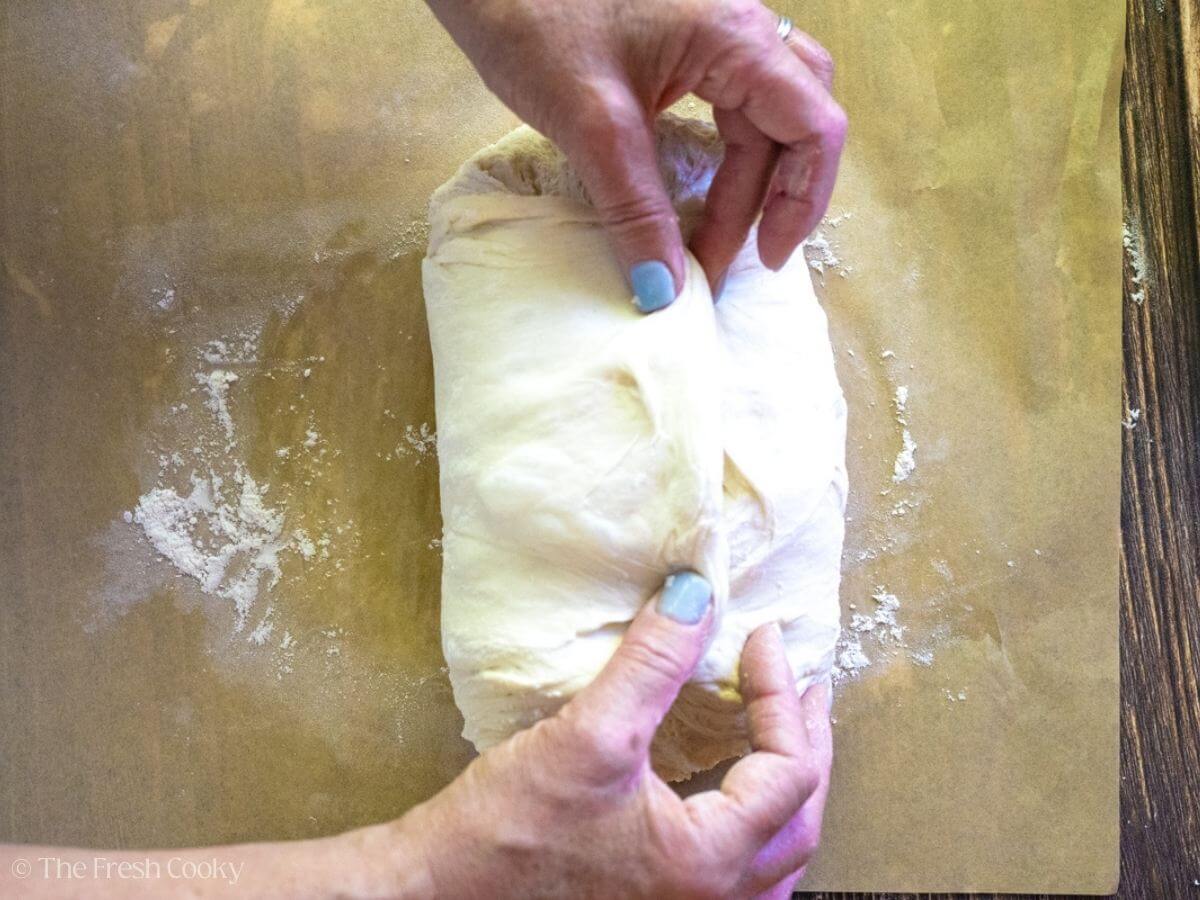
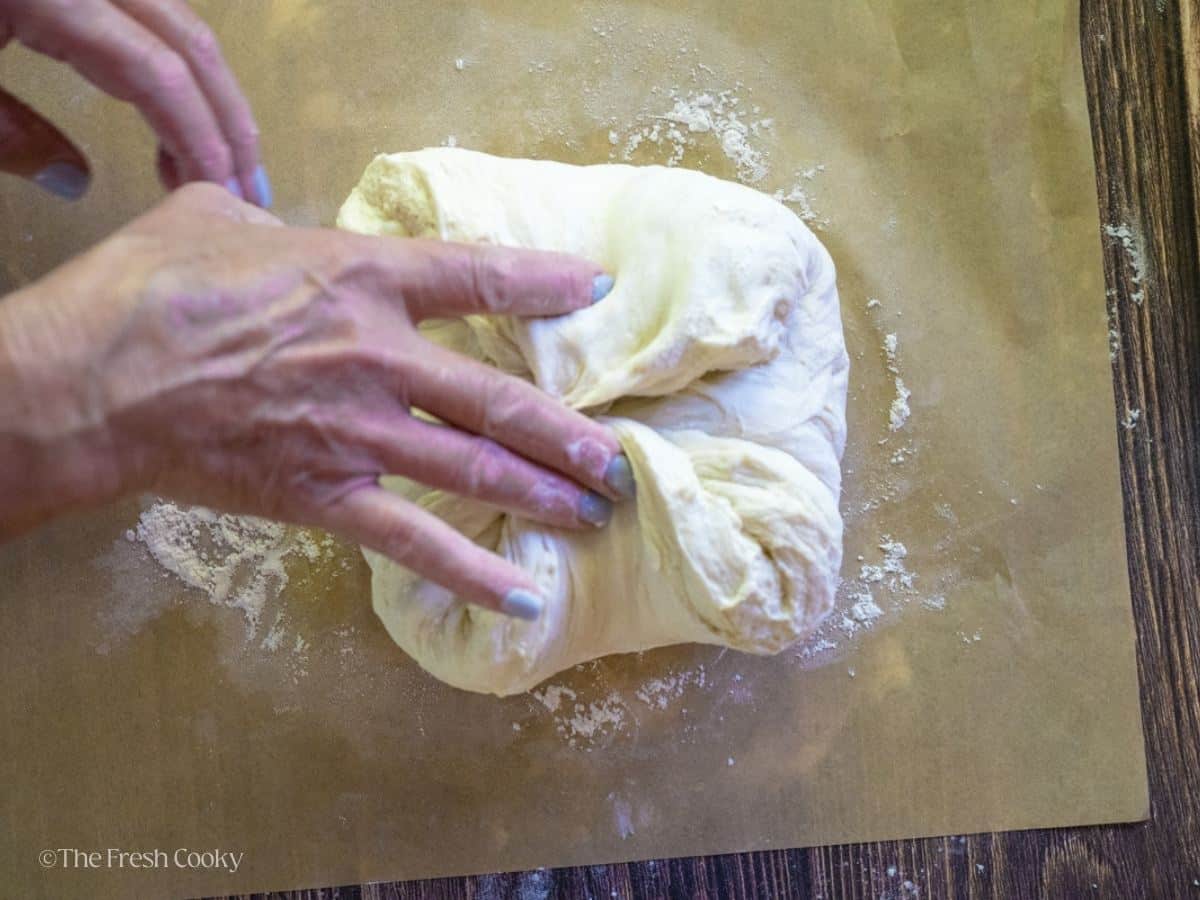
Shape Your Loaf: To shape, gently pull the outer thirds of the dough into the center. Turn the dough over, and use your hands to tuck and turn the bottom under as you shape it into a tight loaf. You can make a round loaf (boule) or an oval loaf (batard), depending on your preference.
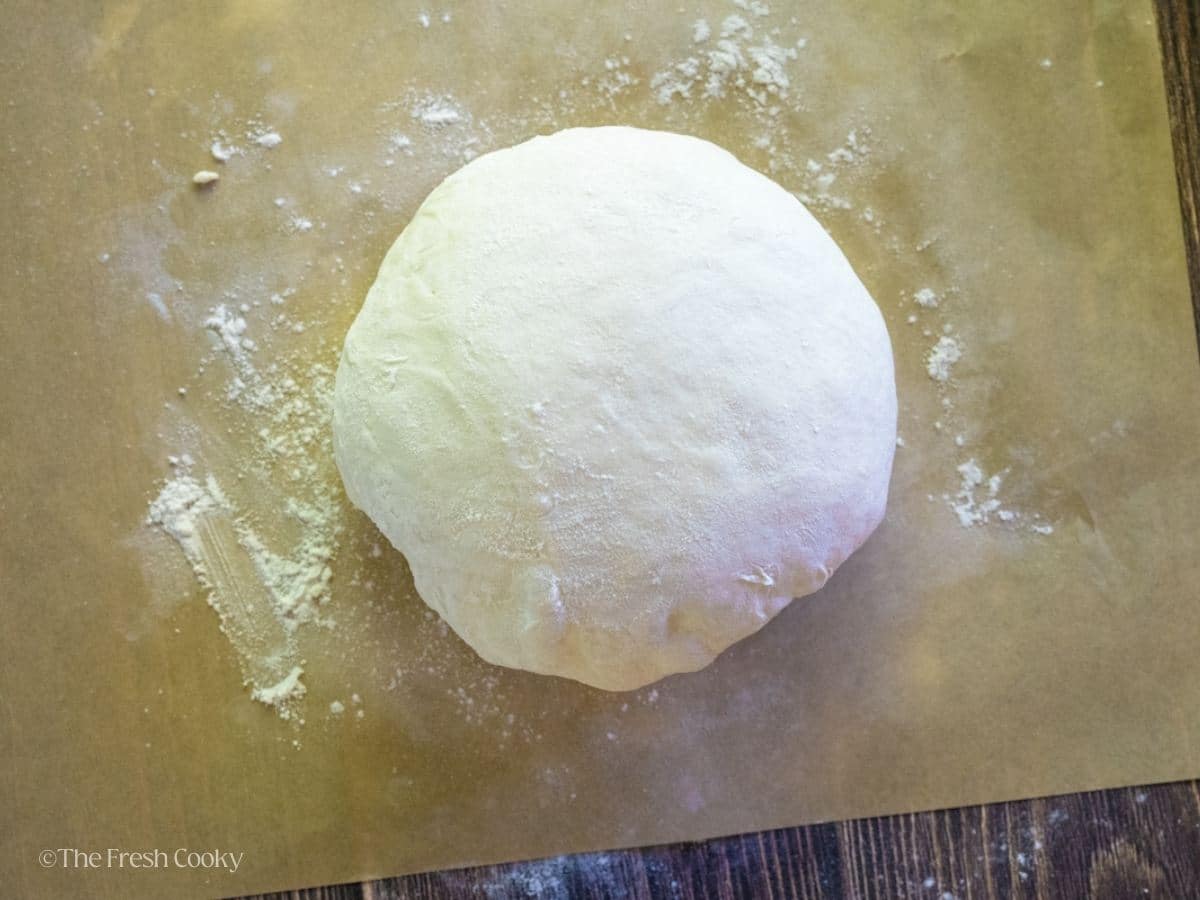
Cover and Rest: Lightly dust the top of your loaf with flour, then cover it with the non-wet side of your plastic wrap or a clean tea towel. Let the dough rest for 30 minutes to relax and rise slightly—it won’t rise much during this step.
Double-Check Preheating: If you haven’t started preheating your oven and Dutch oven yet, now is the time! A fully preheated oven is crucial for achieving the perfect crust.
Step 6: It’s Time to Bake Your Sourdough
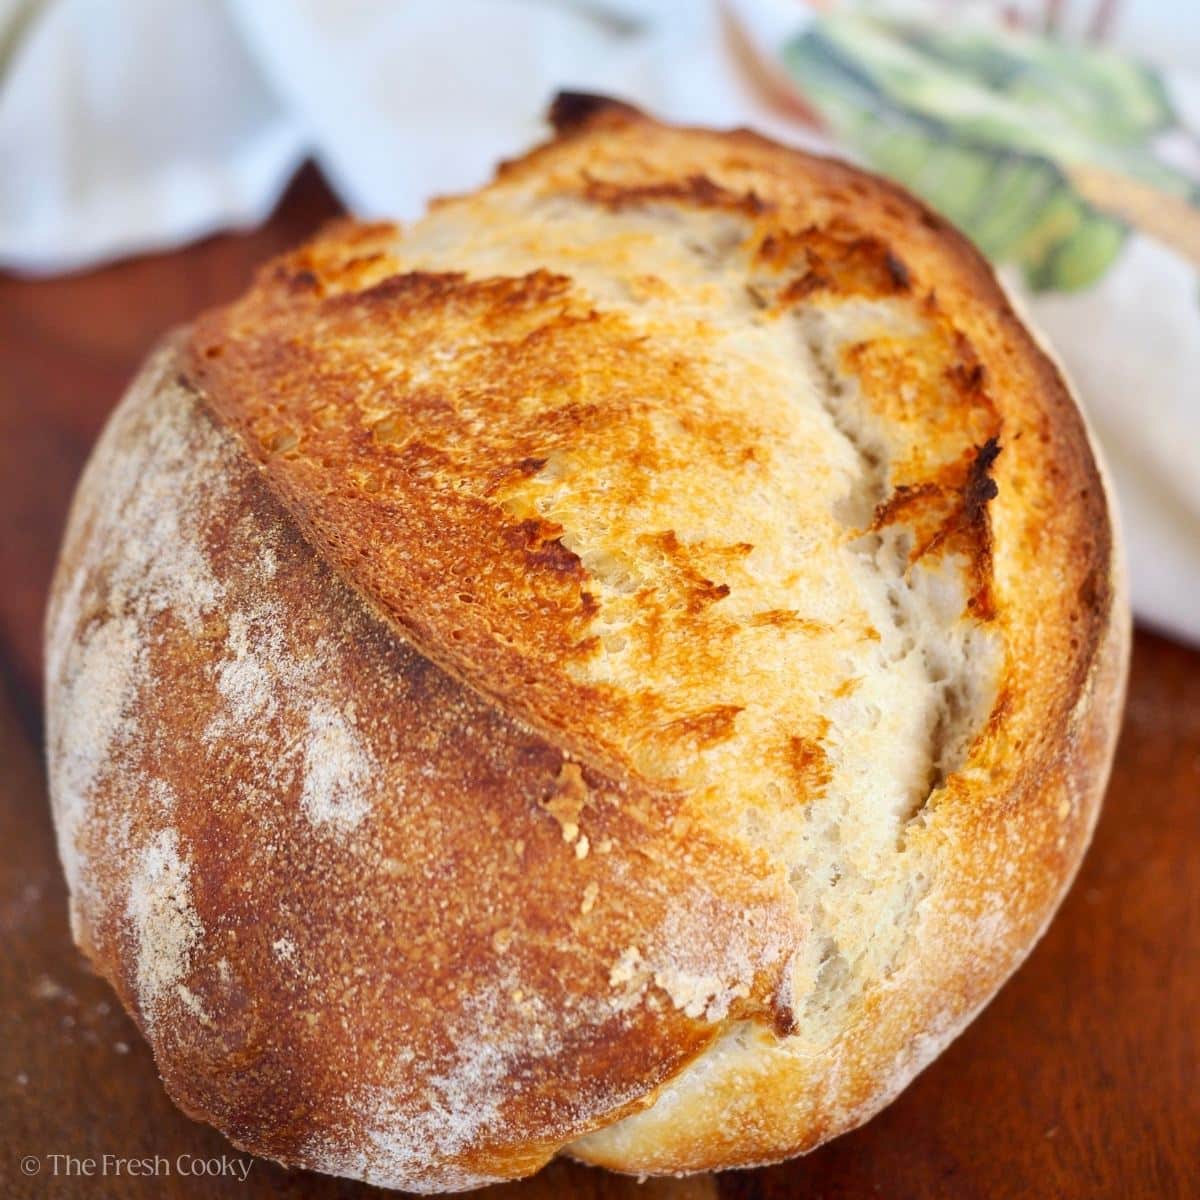
Score That Loaf: Take off the plastic wrap or towel, and grab a sharp knife or a lame. Time to add your finishing touch! A single deep slash down the middle works just fine, but if you’re feeling adventurous, go ahead and try some fun designs. Your loaf, your art!
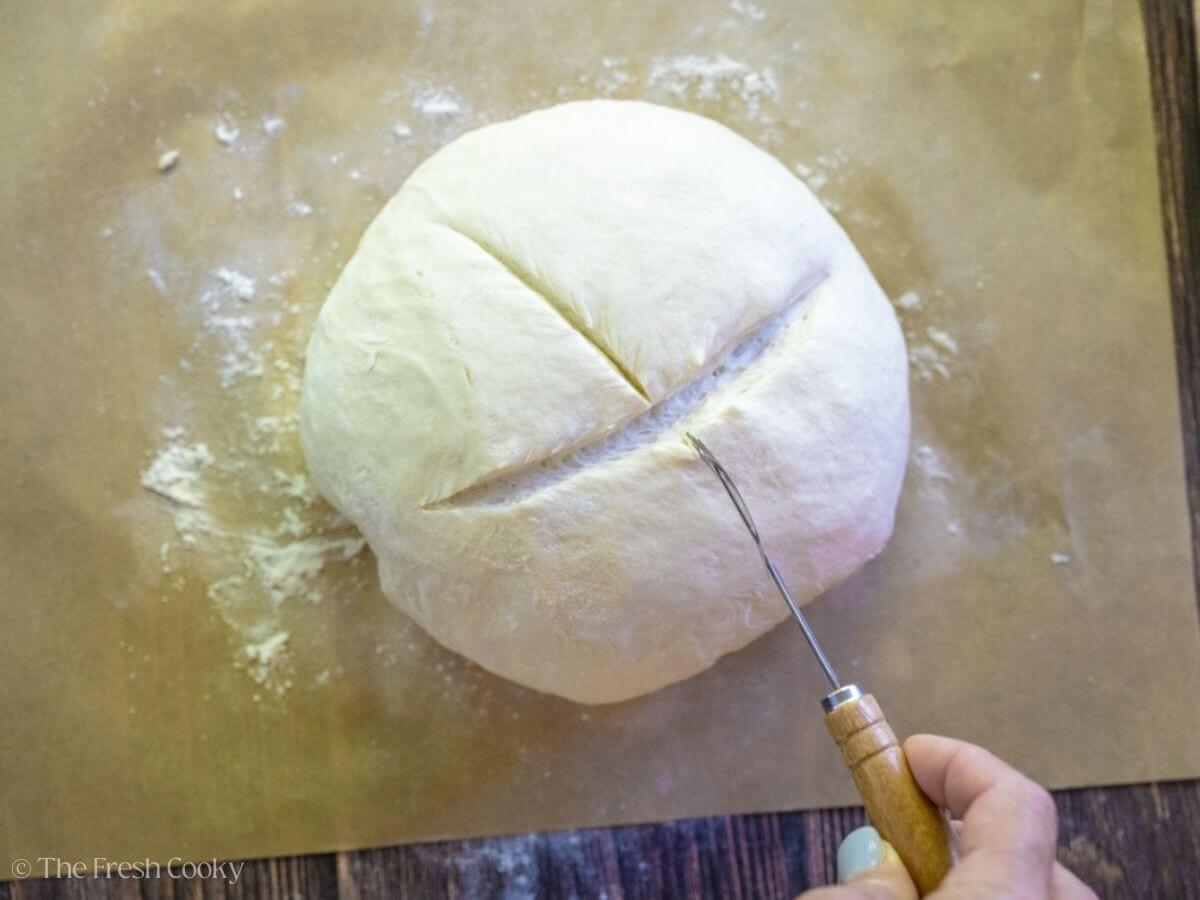
How to score Sourdough Bread
Scoring (or slashing) your bread before baking isn’t just decorative – it helps control how the bread expands during baking. Use a sharp blade or bread lame to make clean cuts about ¼-inch deep. Common patterns include a single slash, cross pattern, or wheat stalk design!
Into the Oven It Goes: Use the parchment paper as a cradle to move your dough closer to the oven. With a hot pad, carefully remove the lid from your blazing-hot Dutch oven (hot stuff—literally!). Gently set the parchment and dough inside, replace the lid, and close the oven door. High five—you’re almost there!
Bake to Perfection: Drop the oven temperature to 425°F (220°C) for sea level or 450°F (230°C) for high altitudes. Bake with the lid on for 20 minutes to let your loaf get that amazing initial rise and crust.
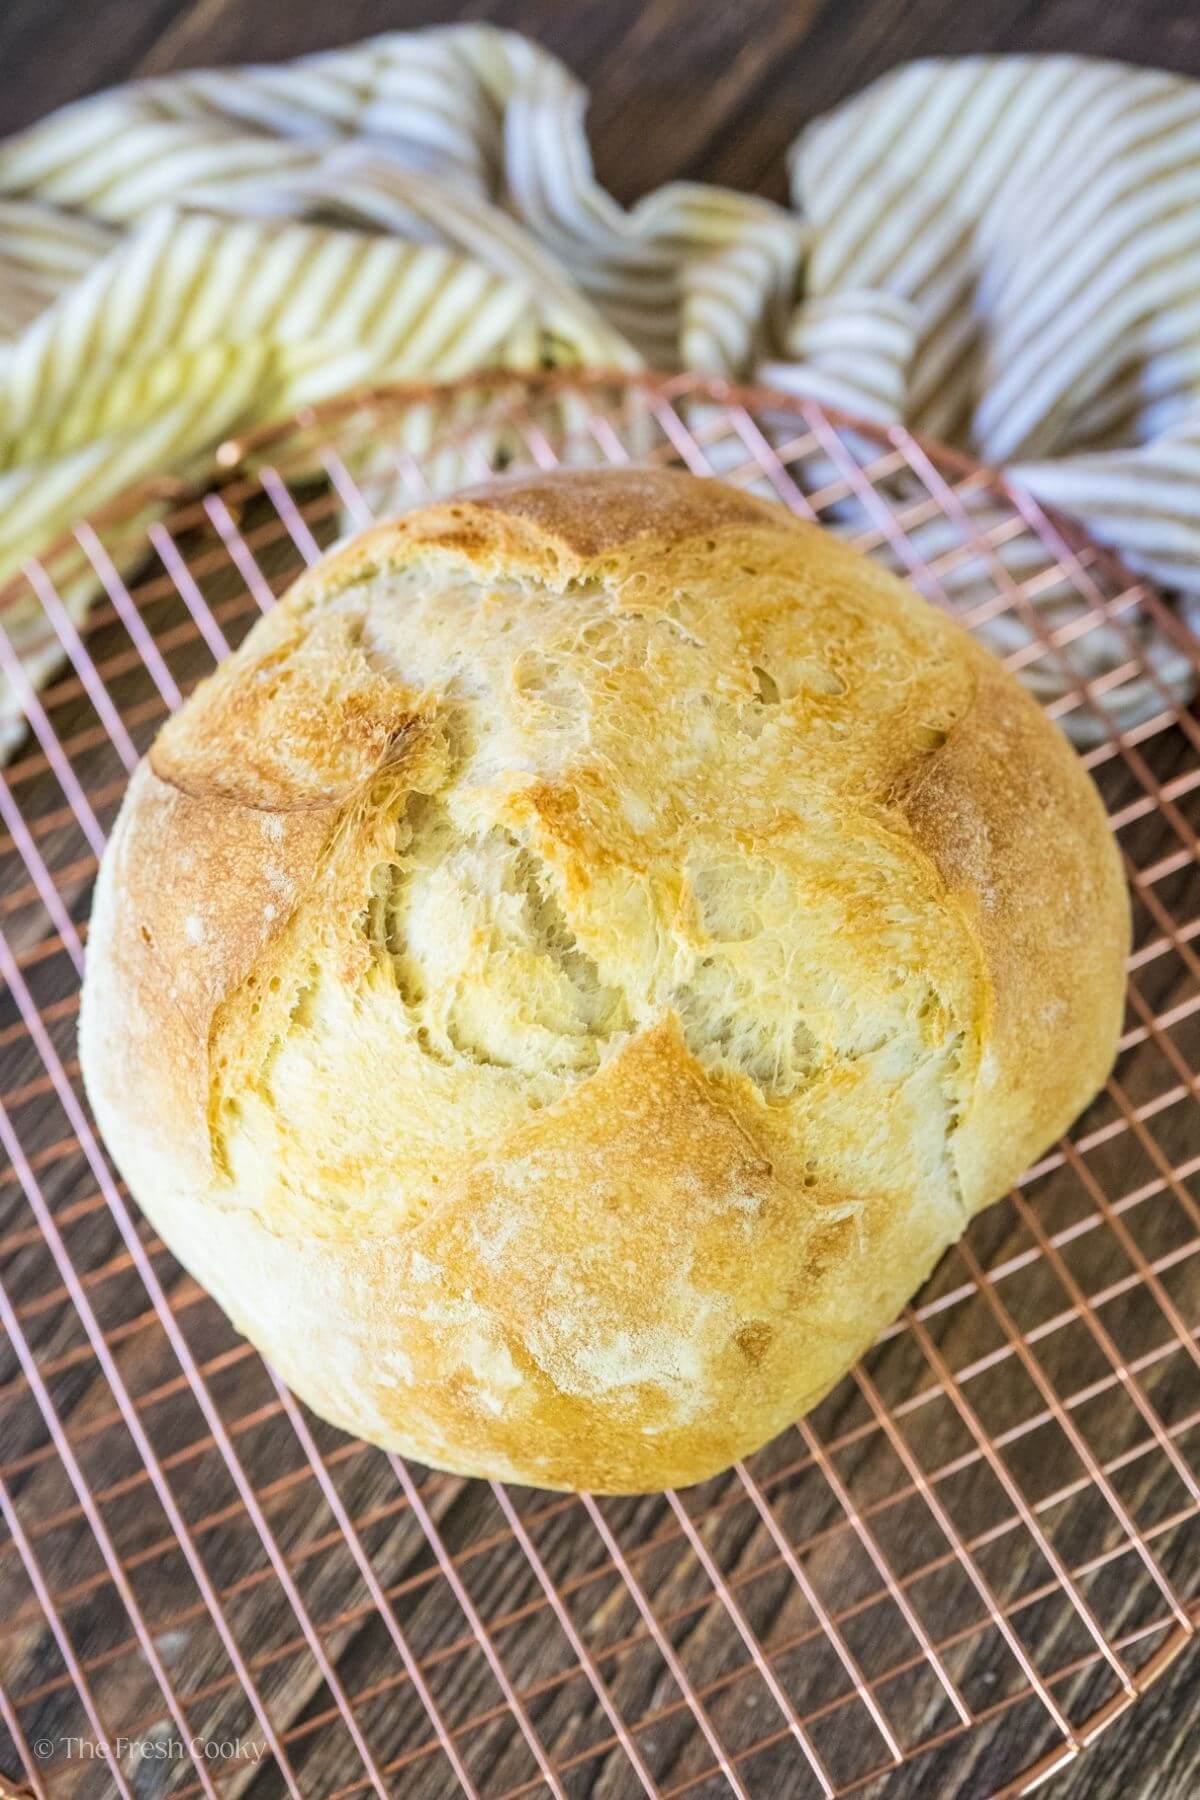
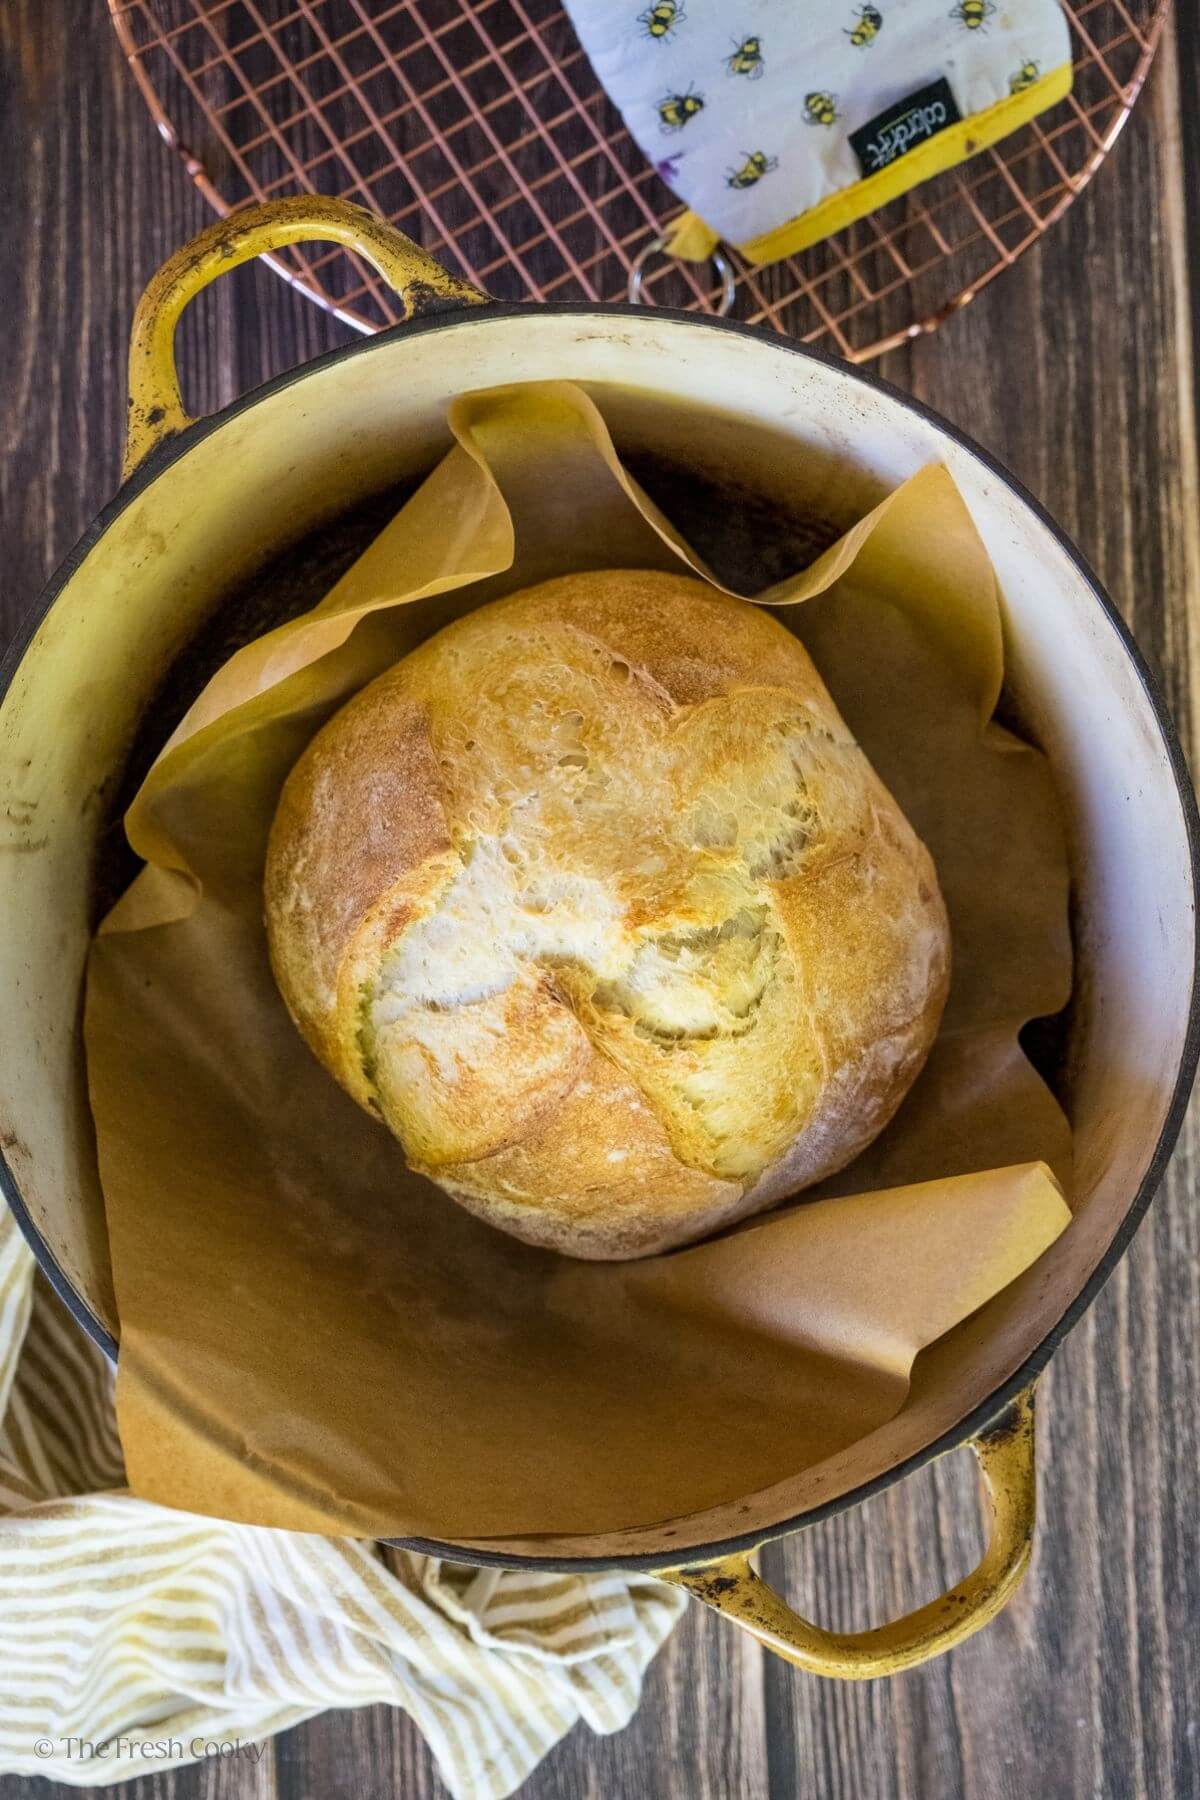
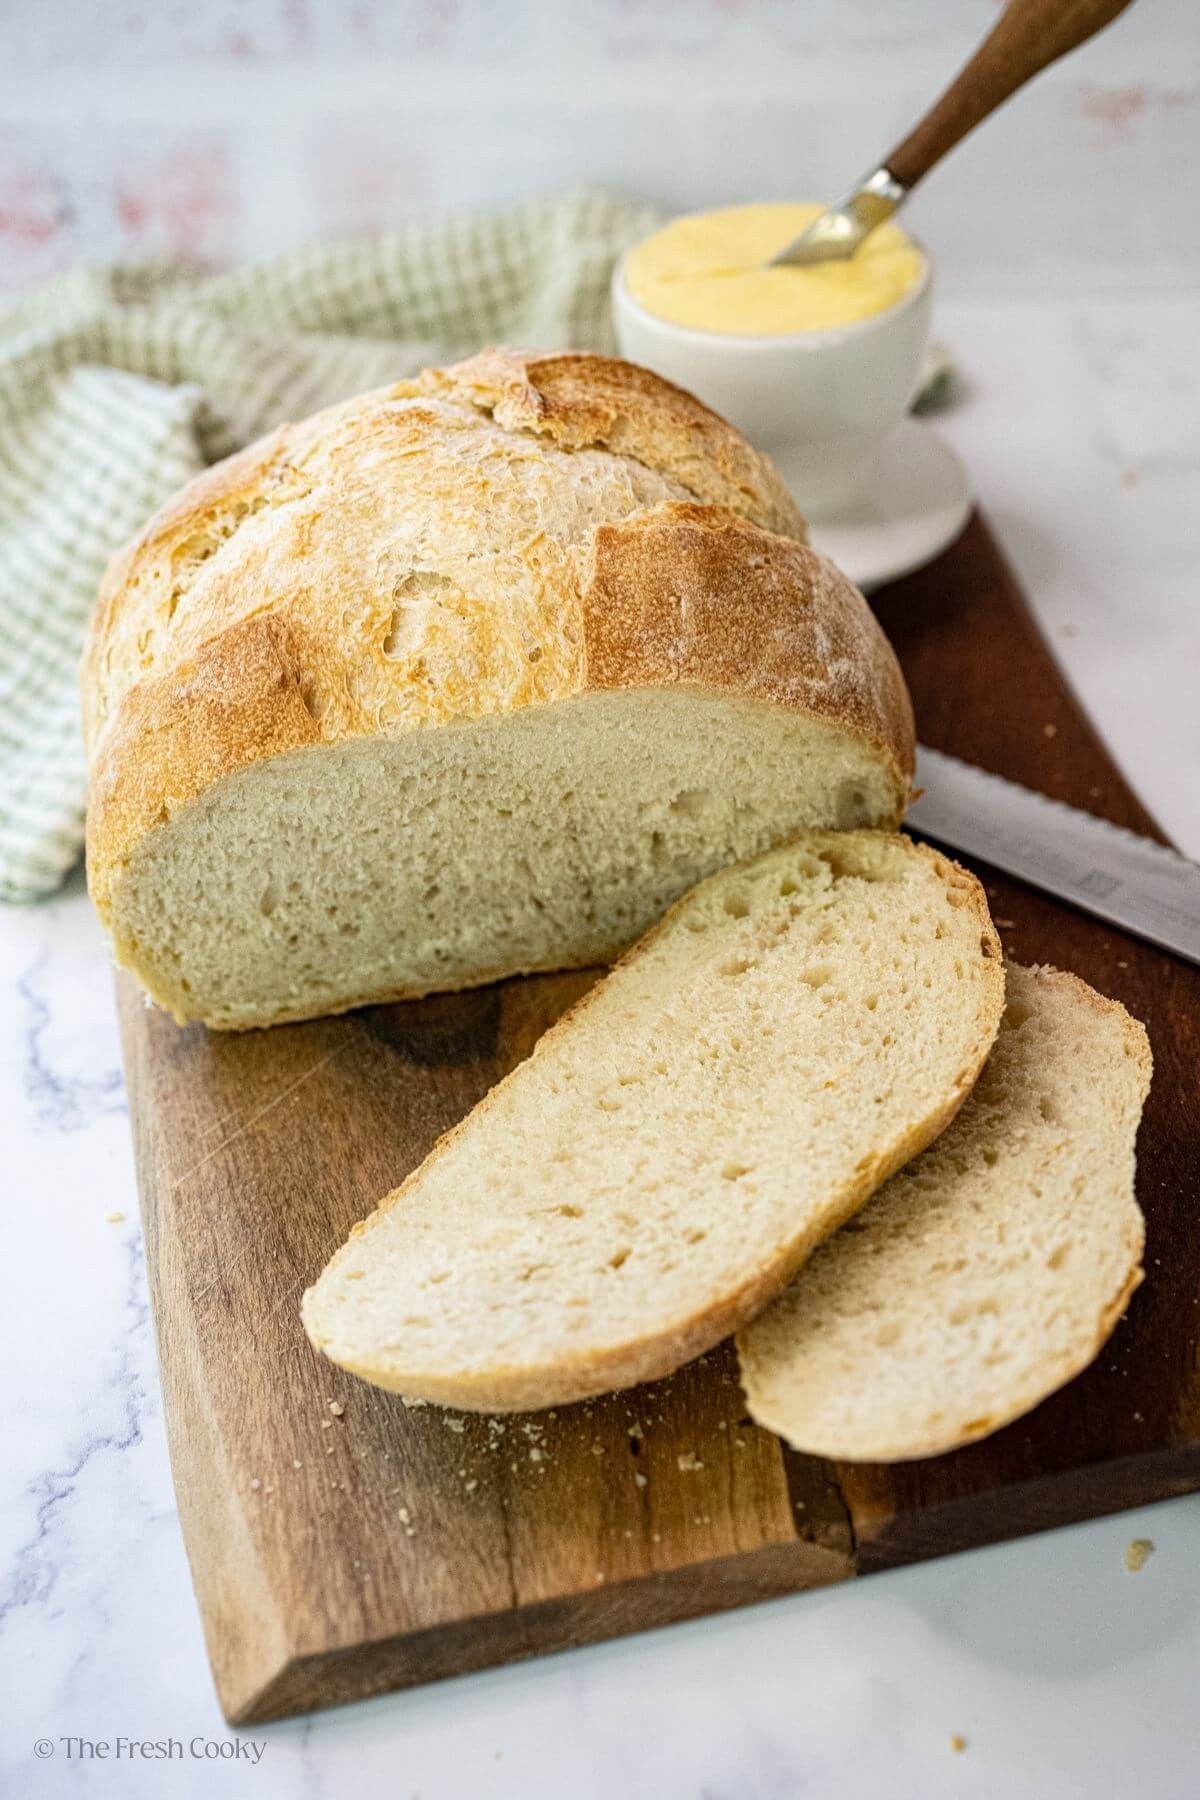
Let It Brown: After 20 minutes, carefully remove the lid. Continue baking uncovered for another 20–25 minutes, until the loaf is golden brown, sounds hollow when tapped on the bottom, or hits an internal temp of 205–210°F (96–99°C). Remove from the Dutch oven (using the parchment paper) and cool on wire rack.

Be Patient—Let It Cool: Ideally, let your bread cool on a wire rack for 4–6 hours before slicing. Why? Because bread keeps baking after it leaves the oven (just like cookies, cakes, and brownies!). Slice too soon, and you’ll have a gummy, sticky center. If that happens, no worries—toast those slices in the toaster, and they’ll taste like pure heaven. So, plan ahead and enjoy the wait—your bread deserves it!
How to know when Sourdough Bread is done
- The “Knock” Test: Thump the bottom of your loaf—it should sound hollow and feel light in your hands. It might need more time if it sounds dense or feels heavy (or it could be under-fermented—see below).
- Golden and Gorgeous: Look for a golden, blistered crust. A well-done sourdough loaf practically glows with perfection!
- The Temperature Check: For foolproof results, use an instant-read thermometer. Insert it into the center of your loaf; it’s done when it reads 205–210°F (96–99°C). This method is especially handy if you’re unsure about the “knock” test.
- The Heavenly Smell Test: Your house should smell like a bakery—warm, yeasty, bread bliss wafting everywhere.
- Listen for the Magic: My absolute favorite part—when you take the bread out of the Dutch oven, it should “snap and crackle” as it cools. Lean in and listen to your bread’s happy little symphony. It’s the best!
Quick Note: If your bread feels gummy, no matter how long you bake it, it might have been under-fermented. It happens! Don’t sweat it—toast the slices and savor that sourdough goodness.
Basic Sourdough Bread Recipe Variations
Sourdough bread is incredibly versatile. Try different flour combinations like whole wheat, rye, or spelt for unique flavors and textures.
You can also fold in fillings like nuts, dried fruit, sesame seeds, herbs, olives, or cheese. Fold in these fillings while you are folding and stretching the dough to make sure they can get fully incorporated. Keep in mind that you might have to bake the loaf for longer if you add fillings with moisture!
I like to use a combination of 450 grams of bread flour and 50 grams of rye flour, adding 1 tablespoon of caraway seeds for a delightful European-style bread.
How to bake sourdough without a Dutch oven
No Dutch Oven? If you don’t have a Dutch oven, you can use a roaster or any oven-safe pot with a lid, the heavier the better! Starting with a cold pot is an option, but preheating the pot in a hot oven delivers the best results. You won’t get quite the same chewy crust, but it will suffice.
To Bake on a Baking Stone or Steel (No Dutch Oven)
- Preheat: Place your baking stone or steel on the center rack and a cast-iron skillet (or cake pan with lava rocks) on the lower rack. Preheat the oven to 500°F (260°C). Try to offset the skillet and stone so the steam can flow around the bread.
- Prepare the Loaf: Turn your loaf out onto parchment paper and score the top.
- Bake: Using a baker’s peel or inverted baking sheet, slide the loaf (with the parchment) onto the stone. Wearing an oven mitt, carefully pour about 1 cup of water into the hot skillet. Steam will billow, so quickly close the oven door to trap it. Immediately reduce the temperature to 475°F (245°C) and bake for 25 minutes.
- Finish Baking: Reduce the temperature to 450°F (230°C) and bake for another 20 minutes, or until the loaf is browned and the crust is firm.
- Cool: Remove the bread from the oven and cool completely on a wire rack before slicing. Patience is key—let it set for the best results!
Sourdough Dutch Oven Tips
- Monitor Growth: When feeding my sourdough starter to activate it for baking, I always place a rubber band on my jar at the top of the fresh starter to measure its growth. That way I know when it has doubled in size!
- Float Test: Do the float test to ensure your starter is ready. Place a dime-sized dollop of starter into a glass of water. If it floats, it is ready; if it sinks, it needs more time or is over-proofed.
- Flour Options: Bread flour contains more protein than all-purpose flour, providing better structure for your sourdough loaf. You can also experiment with adding a variety of flours, whole wheat flour, light or dark rye flour, Einkorn, 00 Flour (imported is best) are all flours I use, typically in combination with bread flour.
- All-Purpose Flour: If using all-purpose flour, make sure it’s unbleached, you don’t need additives or chemicals in your bread. In a pinch I have used that often, the loaf will still be beautiful and taste great, but your texture might be a bit different. Watch for over-proofing.

Troubleshooting Tips
- Runny Starter or Dough: Starving starter. Feed your starter following the discard half, add 100 grams of flour and 100 grams of filtered water. Do the float test (the starter should float in water) to make sure it’s fed and ready. Use a kitchen scale for accurate measurements so you don’t end up with overly wet dough.
- Dense, Flat Bread: Under-fermented. Make sure your starter is strong and let the dough bulk ferment until it doubles in size and feels airy, marshmallowy, not just by the clock.
- Sticky, Gummy Bread: Over-fermented or sliced too soon. Let bread cool for 4–6 hours after baking. For over-fermentation, reduce proofing time, especially in warm environments.
- Not Enough Oven Spring: Poor shaping, under-proofing, oven not preheated long enough or not scoring. Shape tightly, proof until the dough springs back when poked, and always score to allow for expansion.
- Burnt Bottom or Pale Top: Burnt bottoms mean the oven is too hot or the bread is too close to the heat source. Use an oven thermometer and place the Dutch oven on the middle rack. Pale tops? Bake uncovered longer or increase the temperature at the end.
- Hooch on Starter: Hooch is a non-harmful liquid gray liquid that forms on the top of your starter and it means it’s hungry. Stir it back in for tangier bread or pour it off for a milder loaf. Feed your starter more often, especially in warm weather.
- Dough Sticking to Everything: Flour your hands and work surface lightly but don’t over-flour. Let dough rest for 5–10 minutes if it’s too sticky to handle, and use a bench scraper to manage tough spots.

Handy Starter Care and Baking Cheatsheet
Want a quick reference guide for sourdough starter care (feeding, troubleshooting, and storage) and baking how-to? Click the button below, enter your email, and I’ll send the free printable guide straight to your inbox!

What to Make with Sourdough Bread
Sourdough bread is incredibly versatile! Its tangy flavor, chewy texture, and hearty crust make it a perfect base for all sorts meals and snacks. Here are some delicious ideas:
- Toast: Classic sourdough toast topped with butter, jam, or avocado is simple and satisfying. Honestly, this is our favorite way to enjoy this delicious bread!
- Sandwiches: Use sourdough for grilled cheese, deli sandwiches, Patty melt or a hearty BLT.
- Soup Pairing: Its crusty edges make it ideal for dipping into soups, stews, and chilis.
- French Toast: The firm texture soaks up the custard beautifully, making an elevated version of this breakfast classic.
- Bread Bowls: Hollow out a round loaf to fill with soups, dips, or even mac and cheese.
- Croutons: Cube day-old sourdough, toss with butter or olive oil and seasonings, and bake until crispy for salads or soups.
- Bread Pudding: Use sourdough chunks for a savory or sweet take on this comforting dish.
- Pizza or Flatbread Base: Roll the dough thin for a tangy, crispy crust.
- Paninis or Melts: Sourdough holds up beautifully to hot, pressed sandwiches.
- Crostini or Bruschetta: Slice thinly, toast, and top with your favorite spreads or fresh toppings.
- Stuffing or Dressing: Cut into cubes or tear into small pieces, and allow to dry on a tray for your favorite stuffing recipe.
What to Eat with Sourdough Bread
Anything! I love to serve my bread with soups or stews like my minestrone soup or lemon chicken soup. It is also great to serve on a charcuterie board or with an antipasto dip as an appetizer! You could also make garlic bread with your sourdough and serve it with classic Italian spaghetti. The options are totally endless! But we probably love it best, toasted, slathered with good Irish butter and maybe a little jam!

How to Store Sourdough Bread
Cool completely before storing! In my experience, storing sourdough bread in a good bread box retains the right amount of moisture to keep your bread fresh and soft. Storing in the fridge can dry out your bread, instead opt for freezing (see below). If you go through your sourdough fast, just leave it on the breadboard, cut side down.
How long does sourdough bread last?
Fresh sourdough bread stays good at room temperature for 4-5 days when stored in a bread box or bag. If you don’t plan on eating it within that time, it’s best to freeze it! I often cut my loaf in half and freeze the other half.
Can you freeze sourdough bread?
Yes! For longer storage, make sure the bread is completely cooled, then slice it in half if desired, wrap well in plastic wrap (twice) and again in foil, then placing it in a Freezer baggie. Freeze for up to 3 months in an airtight container or freezer bag. Thaw at room temperature.

Sourdough Sandwich Bread Recipe FAQs
The short answer is no, unless you use a gluten-free starter and bake with gluten-free flours. Traditional sourdough bread is made with wheat or rye flour, both of which contain gluten.
However, many people with gluten sensitivity (not celiac disease) find sourdough bread easier to digest. The fermentation process breaks down some of the gluten and other proteins, as well as reducing fructans, which are a type of carbohydrate that can cause digestive issues. This makes sourdough bread more tolerable for some people with non-celiac gluten sensitivity (NCGS).
That said, sourdough bread is not safe for individuals with celiac disease or severe gluten intolerance, as it still contains gluten. Always consult with a healthcare professional if you’re unsure about whether sourdough is suitable for your diet.
Sourdough bread has a one-of-a-kind flavor that’s tangy, slightly sour, and packed with character, thanks to the natural fermentation process. The crust is crisp and golden, while the inside is soft, chewy, and airy, with just a hint of nuttiness. It’s the perfect balance of savory and sour—so good, you’ll want to eat it plain!
While I do share tips for baking sourdough without a Dutch oven, using a Dutch oven (preferably cast iron) is your best bet for perfect results. The enclosed environment traps steam, giving your bread that signature crusty exterior and chewy interior. If you don’t have a Dutch oven, no worries—I’ve got you covered with alternative methods too!
Our favorite bread recipes

More Popular Recipes from The Fresh Cooky
Like this recipe?
Don’t forget to give it a ⭐️⭐️⭐️⭐️⭐️ star rating and leave a comment below the recipe!
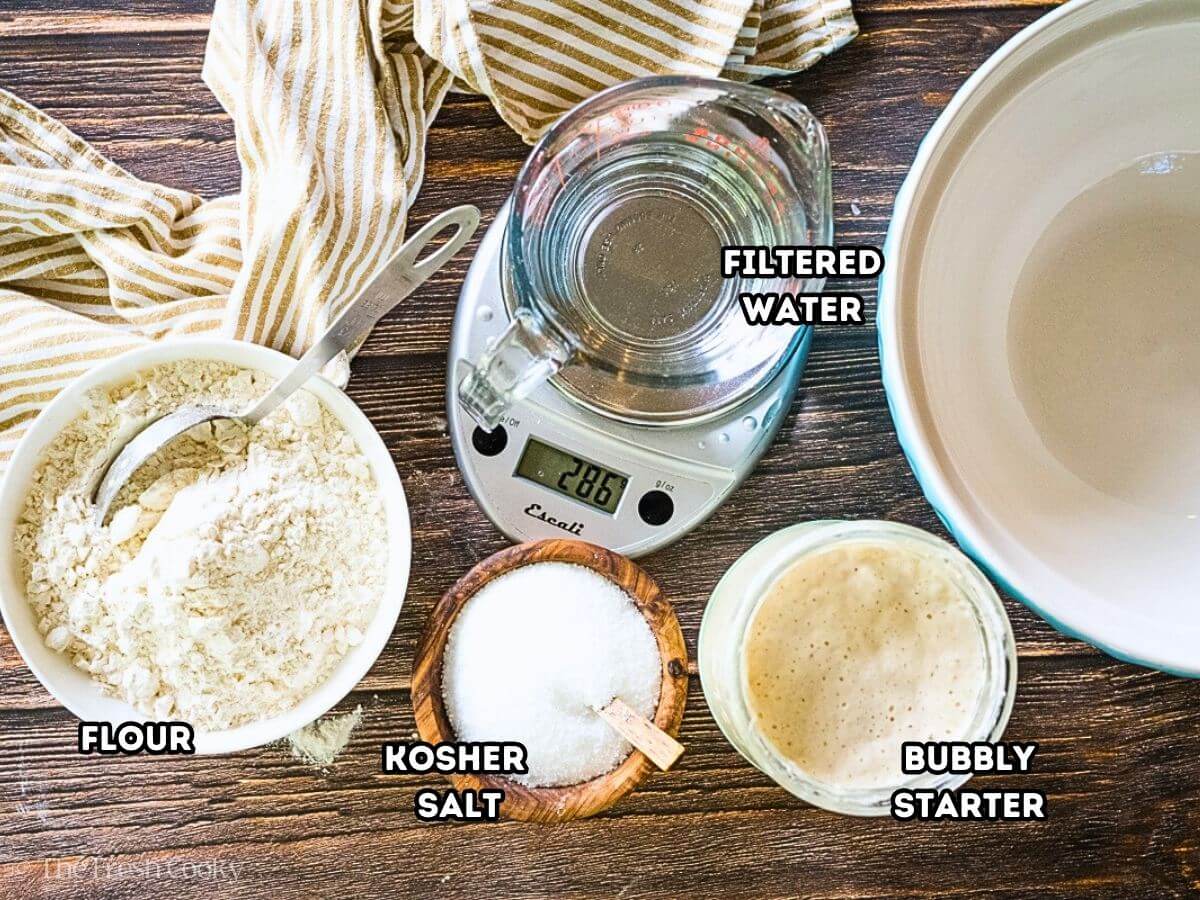
Ingredients
- 150 grams bubbly Sourdough starter fed and ready to use, see note 1
- 500 grams bread flour See note 2
- 9 grams kosher salt Or fine sea salt.
- 285 grams filtered water room temperature, see note 3
Instructions
- Feed your starter; stir the starter, discard half (or save for discard recipes), then feed with 100 grams of bread flour and 100 grams of room temperature filtered water (not RO reverse osmosis- see note 3), stir vigorously, cover loosely, and allow to rise in a warm location (70-75° F or 21-27° C) for 4-6 hours.
- In a large ceramic or glass bowl (metal can react with the fermentation process) add 500 grams of flour, 9 grams of salt and stir to mix.500 grams bread flour, 9 grams kosher salt
- Next add 150 grams of bubbly starter and 285 grams of room temperature filtered (not RO) water. See note 3.150 grams bubbly Sourdough starter, 285 grams filtered water
- Use a Danish dough whisk or wooden spoon to mix or “squelch” all of the ingredients together, just for a minute or so, it’s very dry, feel free to do this part by hand as well. Cover tightly with plastic wrap and allow to rest for 30 minutes.
- Now, grab two sides of the dough with your hands, stretch outward and then fold in on itself, turn a quarter turn and do the same thing; repeat about 4-5 times. This is called stretch and fold. Return to the bowl, cover and allow to rest on the counter overnight for baking the next day (or 6-8 hours) until it’s doubled. If needed, you can place it in the fridge in the morning if you don’t have time to bake it until later, this will keep it from overproofing. *If after assembling you realize you won't have time to back it for awhile, proof the sourdough (bulk fermentation) in the fridge in a well covered bowl or banneton for up to 48 hours.
The Next Day
Preheated Oven (traditional style-see below for cold oven start)
- Preheat Your Oven and Dutch Oven: Preheating your oven about an hour before baking to ensure it’s fully up to temperature. Set the oven to 475°F (245°C) for sea level. Place a 4-quart (or larger) lidded Dutch oven inside while it heats. Make sure the oven rack is in the lower third of the oven, with enough clearance for the pot. Do not put the rack on the bottom, your bread bottom will burn.
- Prepare Your Dough: About 30 minutes into preheating your oven, it’s time to shape your dough. Gently remove the dough from the bowl, being careful to preserve the air bubbles. Use a firm rubber spatula or scraper to ease the dough onto a marble surface or a lightly floured piece of parchment paper. Avoid punching down the dough; keeping those bubbles intact is key to a light and airy loaf.
- Shape Your Loaf: To shape, gently pull the outer thirds of the dough into the center. Turn the dough over, and use your hands to tuck and turn the bottom under as you shape it into a tight loaf. You can make a round loaf (boule) or an oval loaf (batard), depending on your preference.
- Cover and Rest: Lightly dust the top of your loaf with flour, then cover it with the non-wet side of your plastic wrap or a clean tea towel. Let the dough rest for 30 minutes to relax and rise slightly—it won’t rise much during this step.
- If you haven’t started preheating your oven and Dutch oven yet, now is the time to do so. A fully preheated oven is crucial for achieving the perfect crust.
- Score the Loaf: Take off the plastic wrap or towel, and grab a sharp knife or a lame. A single deep slash down the middle works just fine, but if you’re feeling adventurous, go ahead and try some fun designs. You can get creative as you get confident!
Cold Oven start
- Instead of preheating your oven, place your Dutch oven in a cold oven, add your dough in parchment sling, cover and turn oven to 425°F (220 ° C) and bake covered for 50 minutes, then uncover and bake an additional 10-15 minutes until the bread reaches 200-210°. Remove and let cool a couple hours before slicing.
Preheated Oven directions
- Into the Oven It Goes: Use the parchment paper as a cradle to move your dough closer to the oven. Using an oven mitt, carefully remove the lid from your blazing-hot Dutch oven. Gently set the parchment and dough inside, replace the lid, and close the oven door.
- Bake: Drop the oven temperature to 425°F (220°C) for sea level. Bake with the lid on for 20 minutes to let your loaf get that amazing initial rise and crust.
- After 20 minutes, carefully remove the lid (remember the lid is hot!). Continue baking uncovered for another 20–25 minutes, until the loaf is golden brown, sounds hollow when tapped on the bottom, or hits an internal temp of 205–210°F (96–99°C). Remove from the Dutch oven (using the parchment paper sling) and cool on wire rack.
- Be Patient; Let It Cool: Ideally, let your bread cool on a wire rack for 4–6 hours before slicing. Why? Because bread keeps baking after it leaves the oven. Slice too soon, and you’ll have a gummy, sticky center. If that happens, no worries—just toast those slices in the toaster, and they’ll taste like pure heaven. If you just have to dive into your divine bread, allow it to cool for a minimum of an hour or longer before slicing.
Notes
-
A properly fed and active sourdough starter is key to great bread. Here’s what to look for and how to get your starter ready:
- Feeding and Rising: Your starter should be fed and allowed to rise for 4–6 hours or until it has increased by about 30% or doubled in size.
- Strengthening Your Starter: If your starter is still runny after feeding, it’s likely hungry and needs another 1–2 feedings to strengthen itself.
- Float Test: To check if your starter is ready, pinch off a dime-sized piece and drop it into a small bowl of water.
- If it sinks, your starter needs more time or another feeding.
- If it floats, it’s typically ready to use!
- Flours: I prefer using organic bread flour and occasionally adding a little rye flour (50 grams in place of 50g of bread flour) or whole wheat flour. You may also use unbleached, all-purpose flour, but it won’t yield as good as a bread loaf.
- Filtered Water (dechlorinating): You want your water to be room temperature, not hot and not cold. If you have Reverse Osmosis (RO) water, it strips out too many minerals for a healthy starter. Alternately, you may dechlorinate tap water; by allowing it to sit out uncovered for 24 hours for the chlorine to dissipate. To dechlorinate water by boiling, boil it for at least 15–20 minutes. This process helps remove chlorine as it evaporates during boiling. For sourdough baking or any fermentation process, dechlorinated water is essential to avoid harming your starter’s wild yeast and bacteria!
- Be sure to read my Sourdough Starter post, where I go into more detail about caring for your starter, troubleshooting your starter and more.
To Bake on a Baking Stone or Steel (No Dutch Oven)
- Preheat: Place the baking stone/steel on the center rack and a cast-iron skillet (or pan with lava rocks) on the lower rack. Preheat to 500°F (260°C), offsetting the skillet for steam flow.
- Bake: Slide the prepared, rested loaf (including parchment paper) onto the stone using a baker’s peel or inverted cookie sheet and carefully pour 1 cup of water into the hot skillet. Quickly close the oven to trap the steam. Reduce the oven temperature to 475°F (245°C) and bake for 25 minutes.
- Finish Baking: Lower the temperature to 450°F (230°C) and bake for another 20 minutes, until the loaf is browned and firm.
- Cool: Cool completely on a wire rack before slicing—patience pays off!
- Flour: 500g / 3½ cups
- Water: 285g / 1¼ cups
- Starter: 150g / ⅔ cup
- Salt: 9g / 1½ tsp
How to Store Sourdough Bread
- Cool Completely: Always let the bread cool fully before storing to maintain texture.
- Room Temperature: Use a bread box to keep it fresh for 4–5 days. Avoid the fridge, as it dries out the bread. If you go through your sourdough quickly, store cut side down on a breadboard.
- Freezing: For longer storage, slice the cooled loaf in half or keep it whole, wrap it tightly in plastic wrap (twice), then in foil, and place in a freezer bag. Freeze for up to 3 months and thaw at room temperature.
Nutrition


Beth
When my dear friend gave me a sourdough starter (thank you so much Kathleen!!), I thought, “oh no….now I have to do this!” Well…..it’s the BEST!!! Not hard at all, and I especially appreciate Kathleens relaxed encouragement as I was always intimidated by the prospect of making sourdough!! I make at least 1-2 loaves a week, because it is the perfect compliment to sharing or hosting any meal!!! Love the smell in the house as it’s baking too! NOT HARD!! My family thanks you too, Kathleen!
Thank you so much Beth, this means so so much to me!
Brooke
Is there any waiting time between stretch and folds? Or do you do the 4-5 at the same time? I’ve seen other recipes that say to do it 15-30 min apart. I just want to make sure on your recipe that I’m doing it correctly 🙂
Hi Brooke, that is what makes this recipe different from the rest, it’s a little more laid back, so know you don’t wait between. Stretch and fold it 4-5 times (at one time) then let it rest. Can you do more? Absolutely! If you have time and want to space them 20-30 minutes apart and finish by the end of your second hour. Hope that helps!! Happy baking! Can’t wait to hear what you think!
Linda D Cox
Getting ready to try the recipe
Yay, Linda!! Come back and let me know what you think!!
Sheila
I am a sourdough “newbie” and so love finding recipes like yours that walk me through the process from start-to-finish with tips and tricks all along the way. I make my first sourdough loaf in a cast iron Dutch oven using your recipe and it turned out perfectly! I love the crispy crust and can’t believe how easy it really is to make homemade bread! Thank you!!
This makes my heart truly so happy, Sheila! Thank you!! Happy sourdough-ing!