
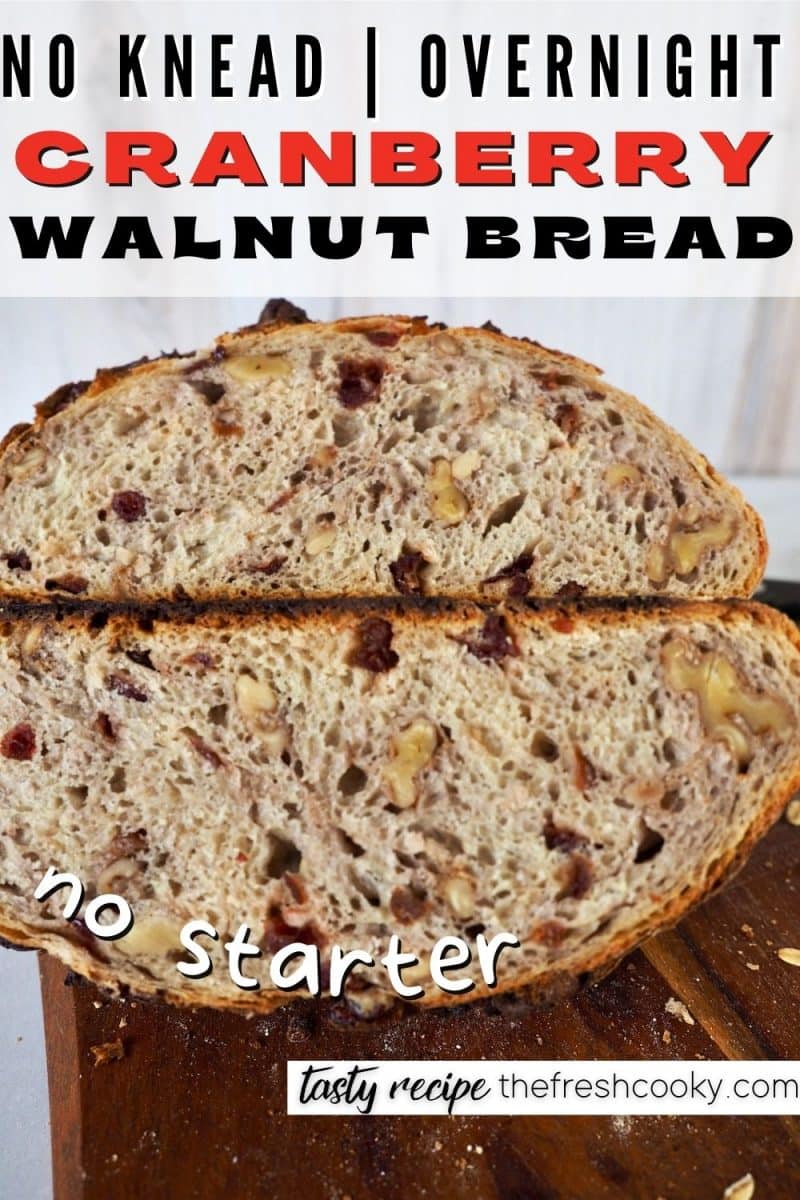
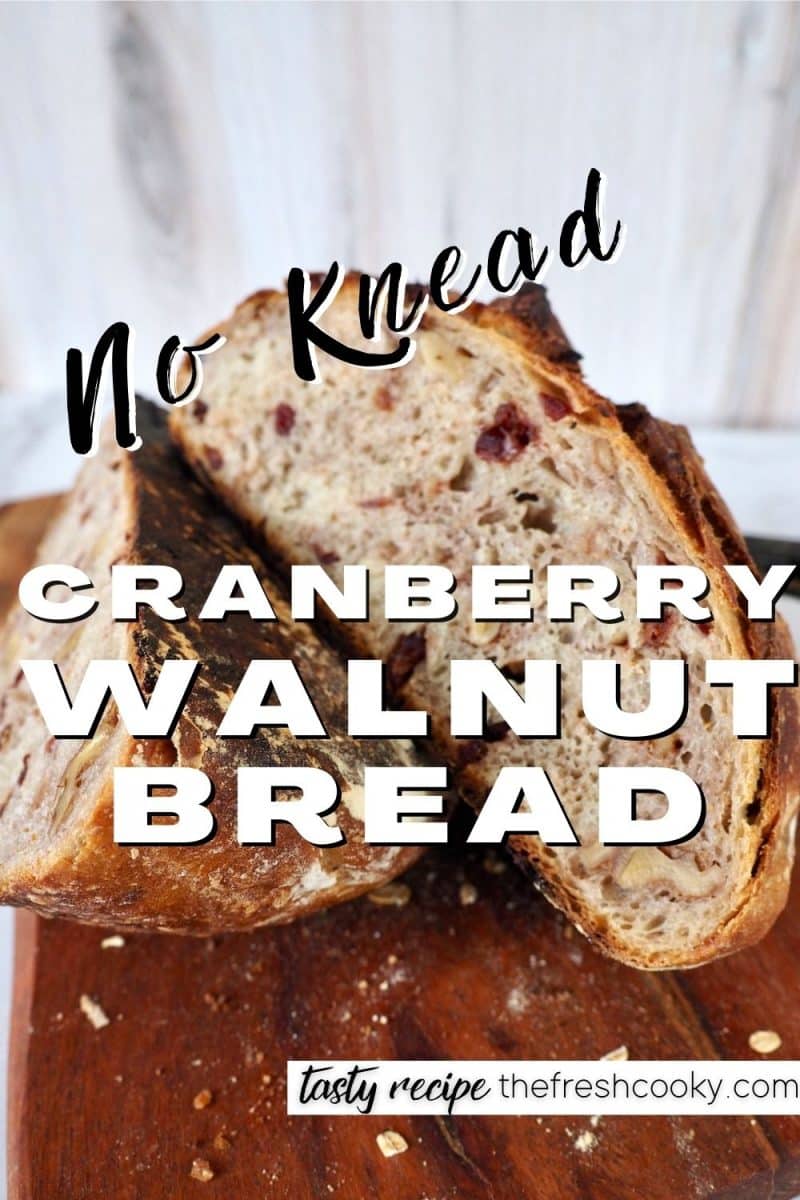
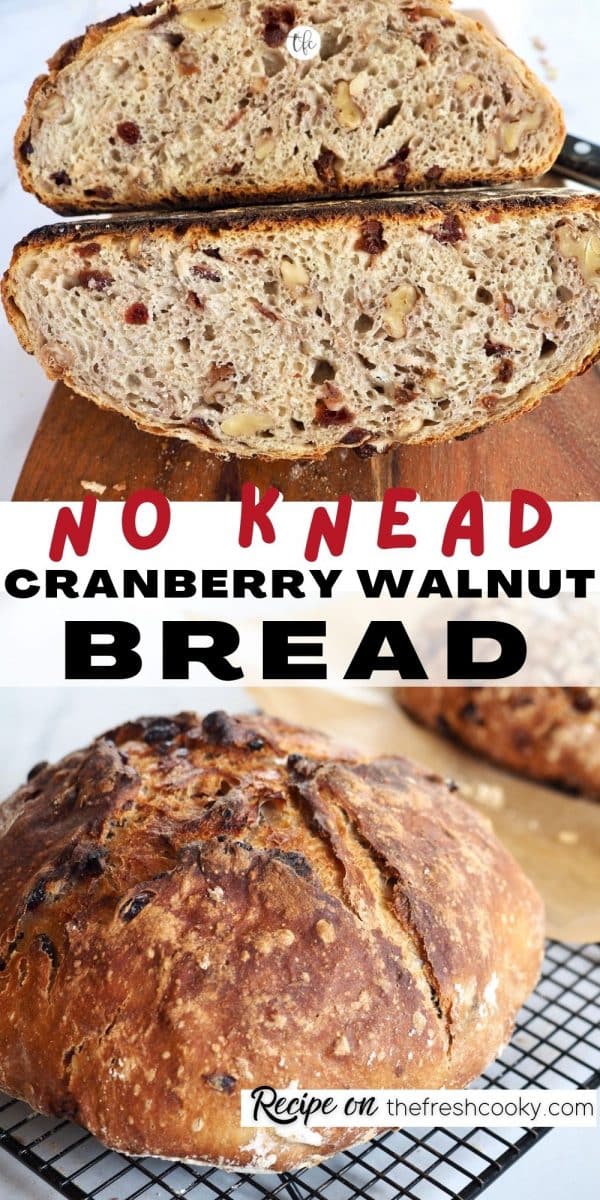
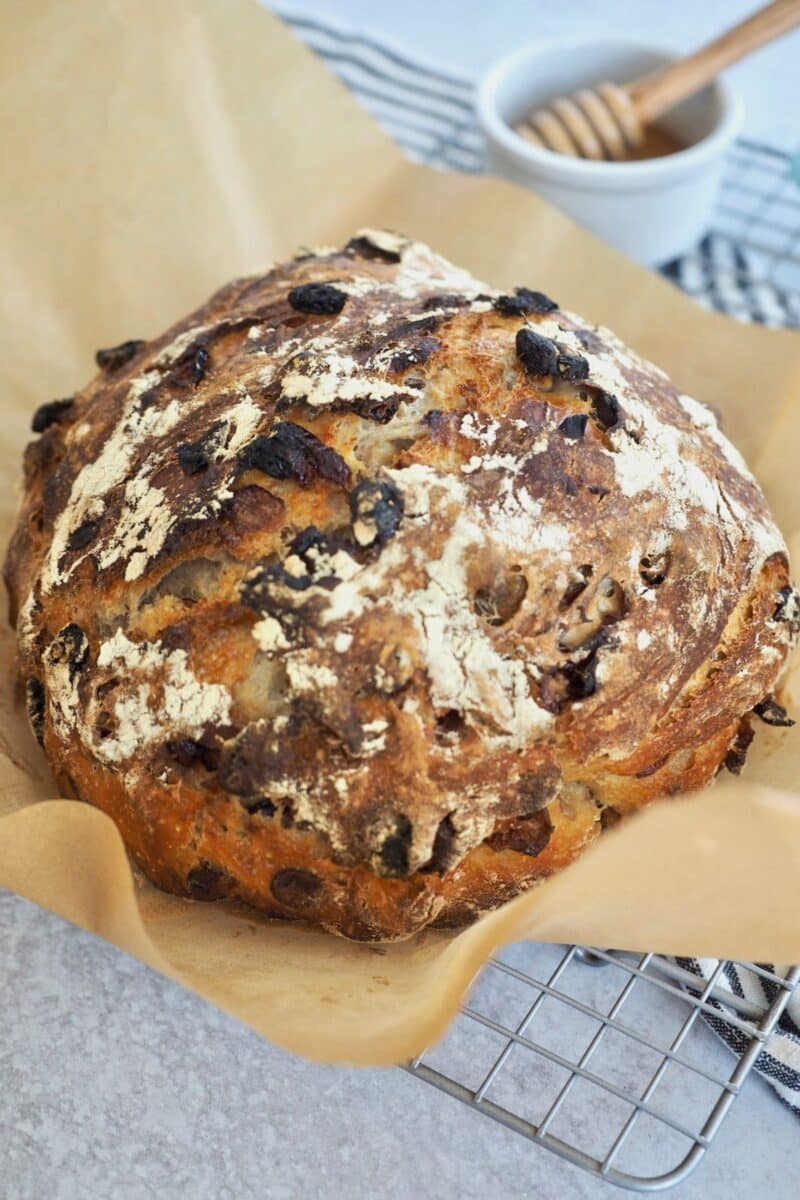
This crusty no-knead cranberry nut bread is so delicious and easy that it will turn anyone into a bread baker! With just 7 simple pantry ingredients, this yeast bread recipe requires minimal hands-on time and no starter. The result? A mouth-watering, crusty loaf that you’ll want to make again and again.
Whether you’re just starting or have been baking for years, my success tips and FAQs will help you nail this bread every time. Trust me, this is a recipe you’ll want to make over and over. First published in 2020, I’ve added even more helpful tips to make sure you get the best results.
⭐️⭐️⭐️⭐️⭐️ Lisa Raved: “This turned out Awesome!! I made a few changes, added some orange zest, and set it on the windowsill in the sun, took an hour to double in size. Then put it in the parchment and into the oven only 10 min later. . . came out AMAZING. I make it every week now for my family ..they LOVE it!!!“

I’ve baked hundreds of these Cranberry Walnut Bread loaves, sharing them with neighbors and perfecting the recipe. Through years of trial and error, I’ve worked out all the kinks in making yeasted bread, so you don’t have to worry. My goal is to take the fear out of baking with yeast, offering you a foolproof recipe that delivers delicious results every time. Trust me, you’re in good hands with this one!
⭐️⭐️⭐️⭐️⭐️ Susan said: Super easy recipe. The bread is fantastic and I love the texture. I used fresh cranberries because that’s what I had on hand. What about making a savory version with olives and herbs? Would that work? ~ Susan
Copycat Costco + Whole Foods Cranberry Walnut Bread
Have you ever tried Costco’s or Whole Foods Cranberry Walnut bread? They are fabulous, but now you can make your own copycat version for so MUCH CHEAPER and call yourself a bread baker too!
The first time we tried a bread like this was at When Pigs Fly Breads in Freeport, ME, while visiting my husband’s family. They have several throughout New England. I was hooked and have been experimenting ever since!
What Is Artisan Bread?
Artisan bread brings to mind skilled bakers who craft their loaves by hand, using just the basics: flour, water, yeast, salt, and time.
This term covers a range of breads, including hearth breads (baked without a pan) and sourdough.
Artisan breads are often baked in special ovens that use radiant heat and steam, giving them a crusty exterior, an open crumb structure, and a rustic, decorative finish with scoring or a dusting of flour. But don’t worry, we’ll mimic that steam oven by using our Dutch Oven.
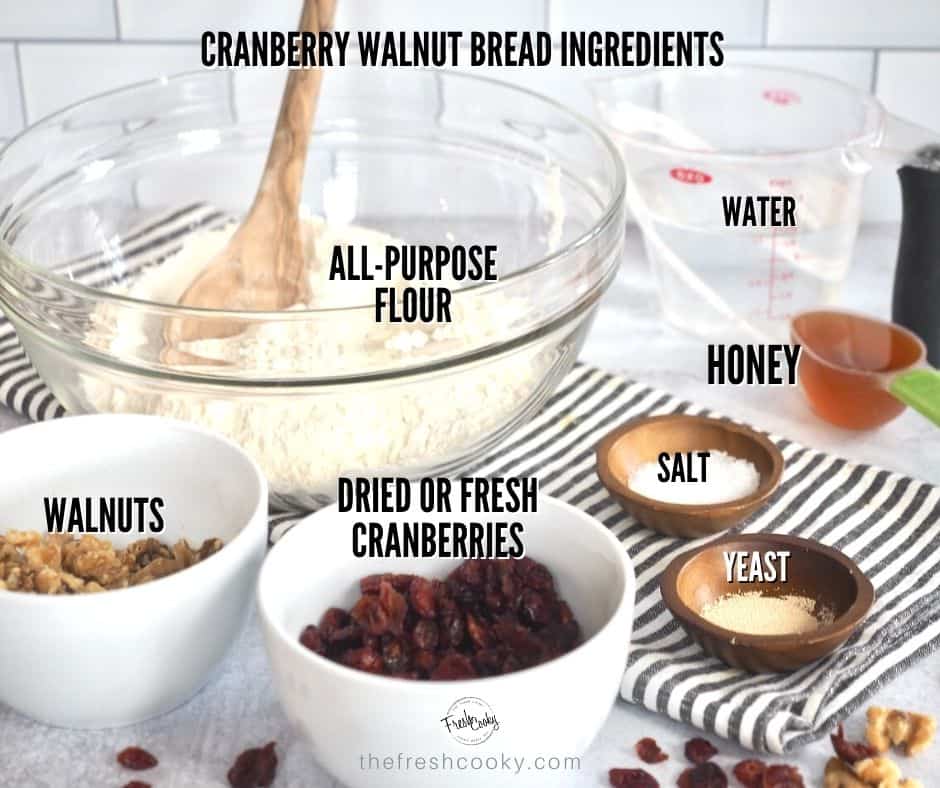
Cranberry Walnut Bread Recipe Ingredients
- All-purpose flour: No fussy flour here! I use unbleached organic all-purpose flour. You can also use bread flour, yielding a slightly chewier loaf.
- Instant Yeast: You can use either instant or active dry yeast, but I highly recommend instant yeast (“rapid rise” or “quick rise” yeast) for this recipe. My go-to is Saf Instant Yeast—it’s a reliable favorite. You only need ½ teaspoon since the long rise time does all the heavy lifting!
- Kosher Salt: Kosher salt will give you the best flavors!
- Chopped Nuts: Use walnuts or pecans or your favorite nut here, roast and cool them ahead of time if desired.
- Dried or Fresh Cranberries: I have used both, and I like both; fresh definitely have more of a tart bite to them, but they are delicious.
- Water: Use water between 90-120° F when pouring yeast mixed into dry ingredients. An instant-read thermometer works great for this!
- Honey: I like raw and unfiltered honey. I always encourage people to purchase local honey; it has allergy benefits!
Get the full recipe in the recipe card below.
Equipment Needed for No-Knead Bread
- Mixing Bowl: Use a large, sturdy bowl—3 quarts minimum, but 4 quarts gives more room. Glass or ceramic is ideal.
- Parchment Paper & Wooden Spoon: Essential tools for easy handling and mixing.
- Dutch Oven: Key for browning and creating a crusty, rustic surface while keeping the inside chewy. Ensure it’s high-heat oven-safe. The Lodge Dutch Oven is a budget-friendly option.
How to make Cranberry Walnut Bread
Making an 18-hour rise time bread might sound daunting, but it’s actually one of the easiest and most rewarding baking experiences you can have! The long rise time does most of the work for you, developing incredible flavor and texture with minimal effort on your part.
You’ll mix up the dough in just minutes, then let it rest overnight—no kneading required. When you wake up, you’ll be just a few steps away from a beautiful, crusty loaf that will impress anyone. Trust me, if you can stir a spoon, you can make this bread!
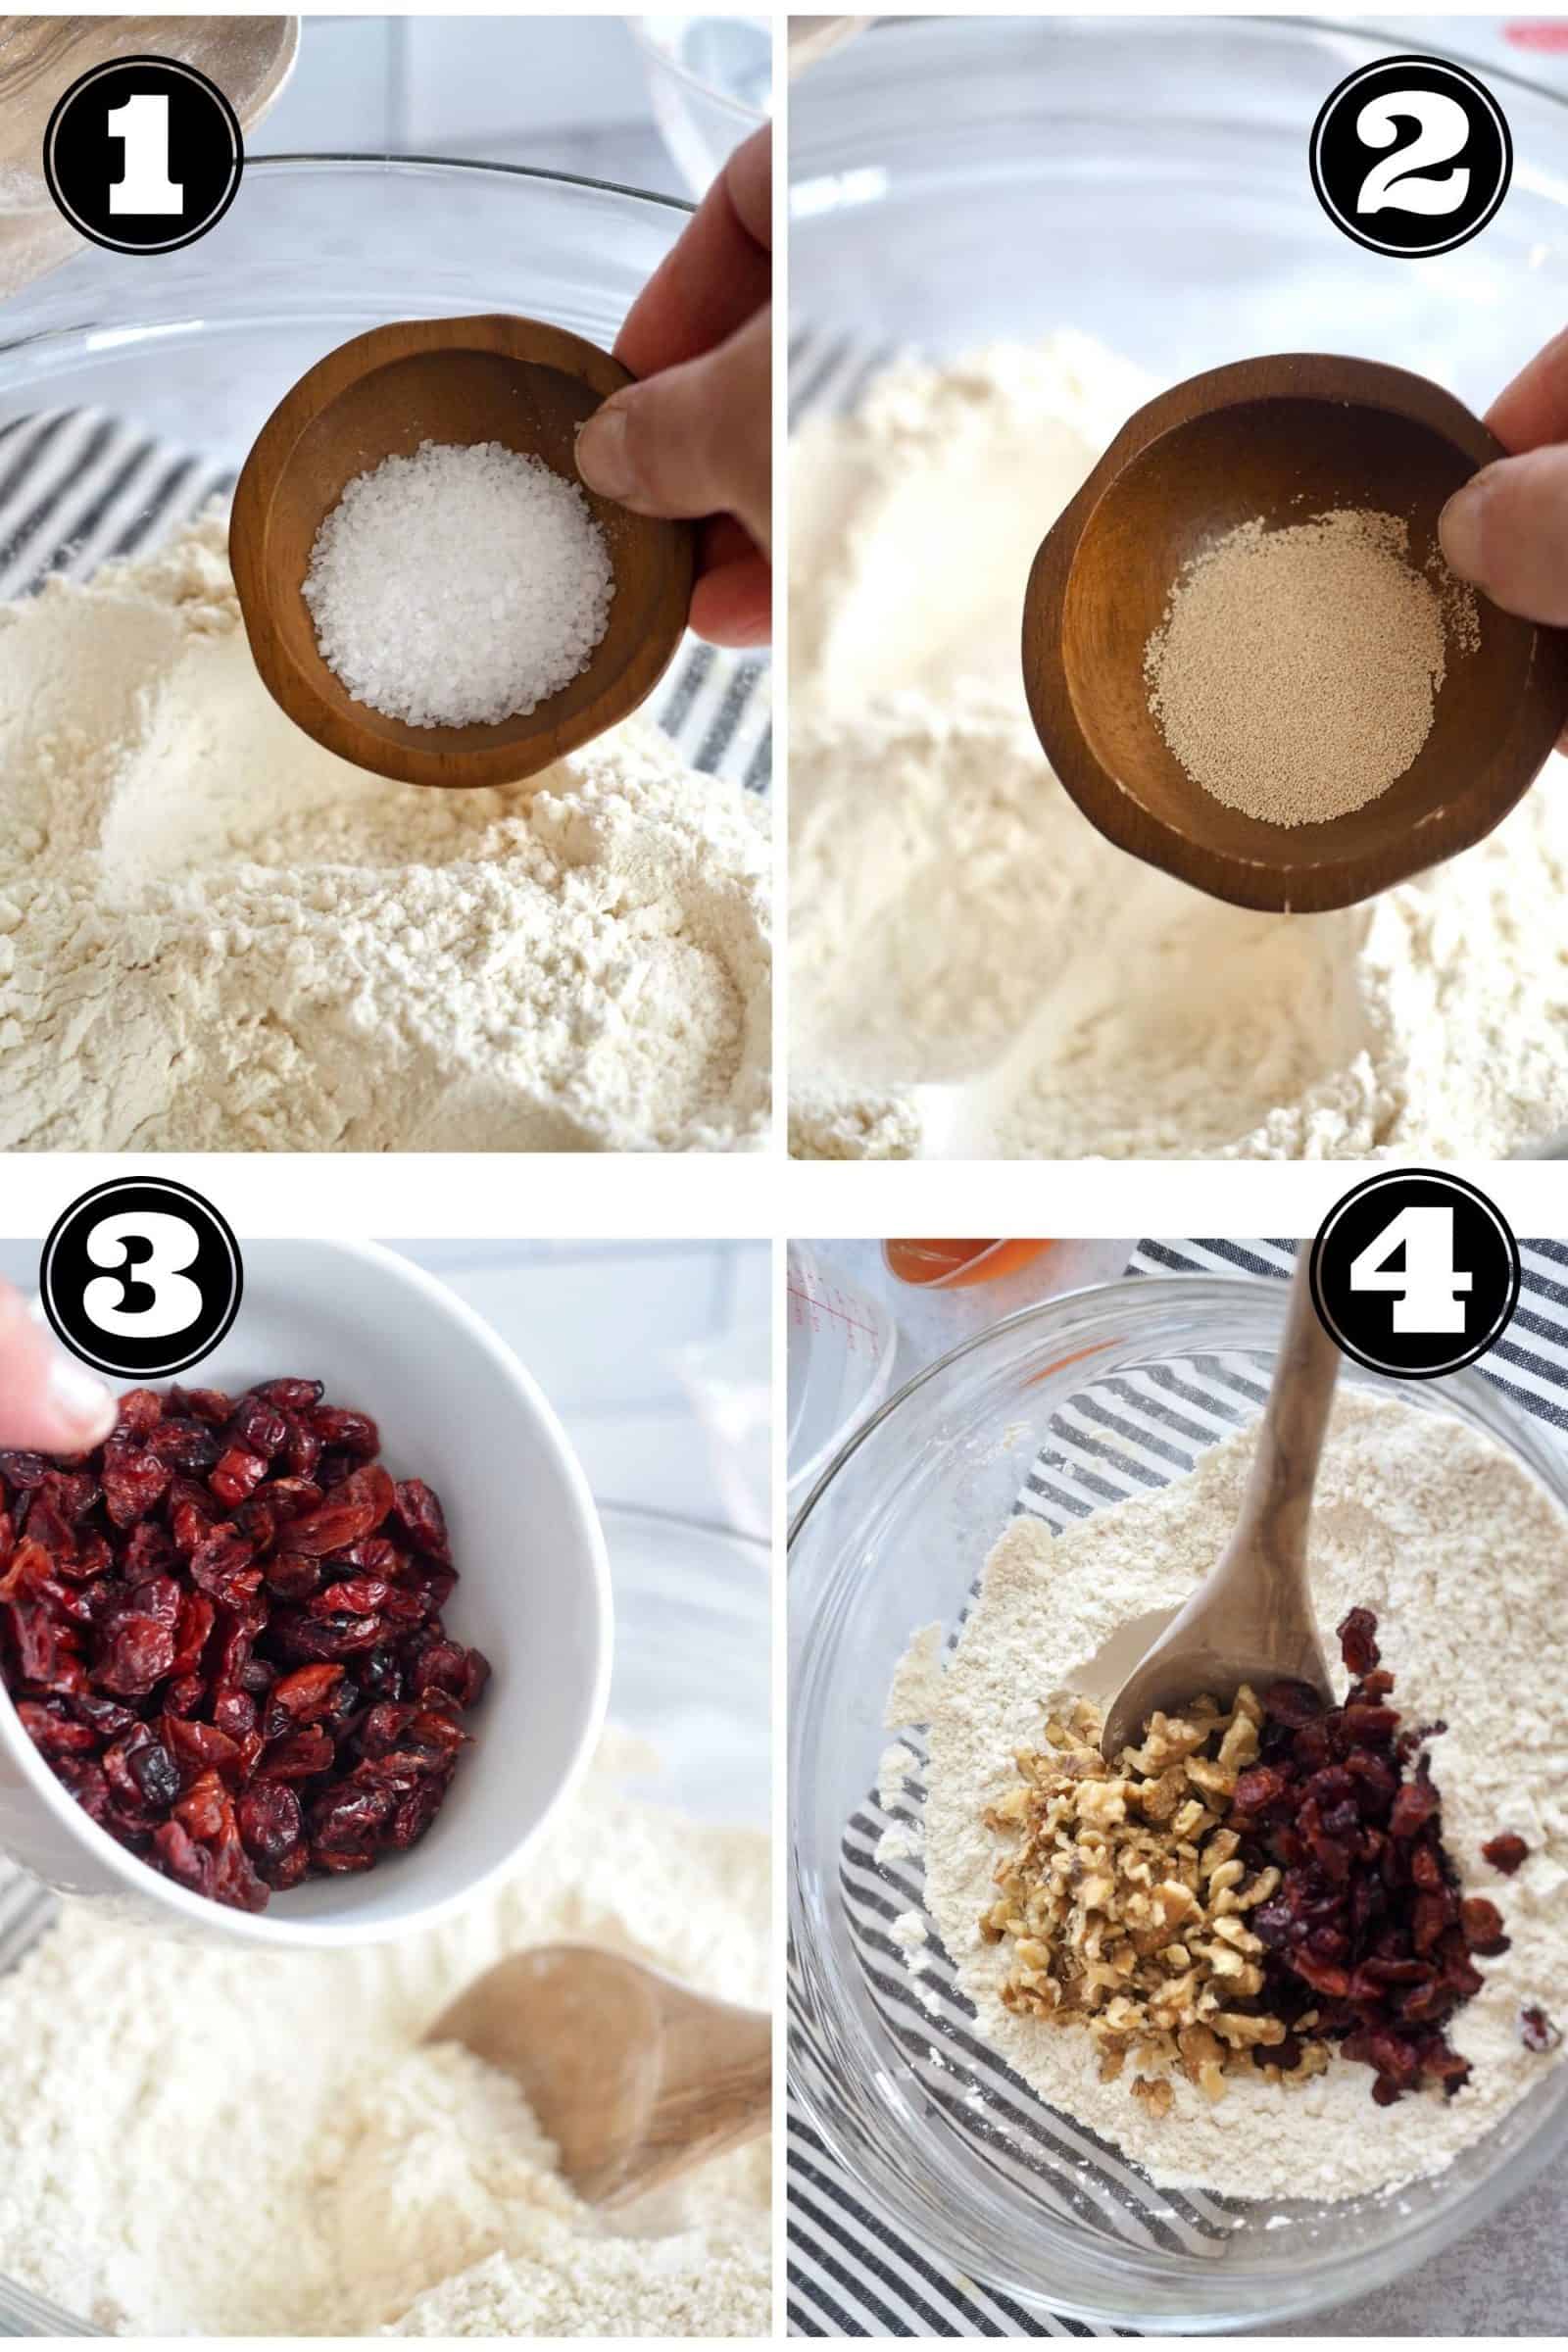
Step 1: Mix Dry Ingredients
Using a large wooden spoon, mix all the dry ingredients: flour, salt, yeast, nuts, and cranberries, in a large bowl.
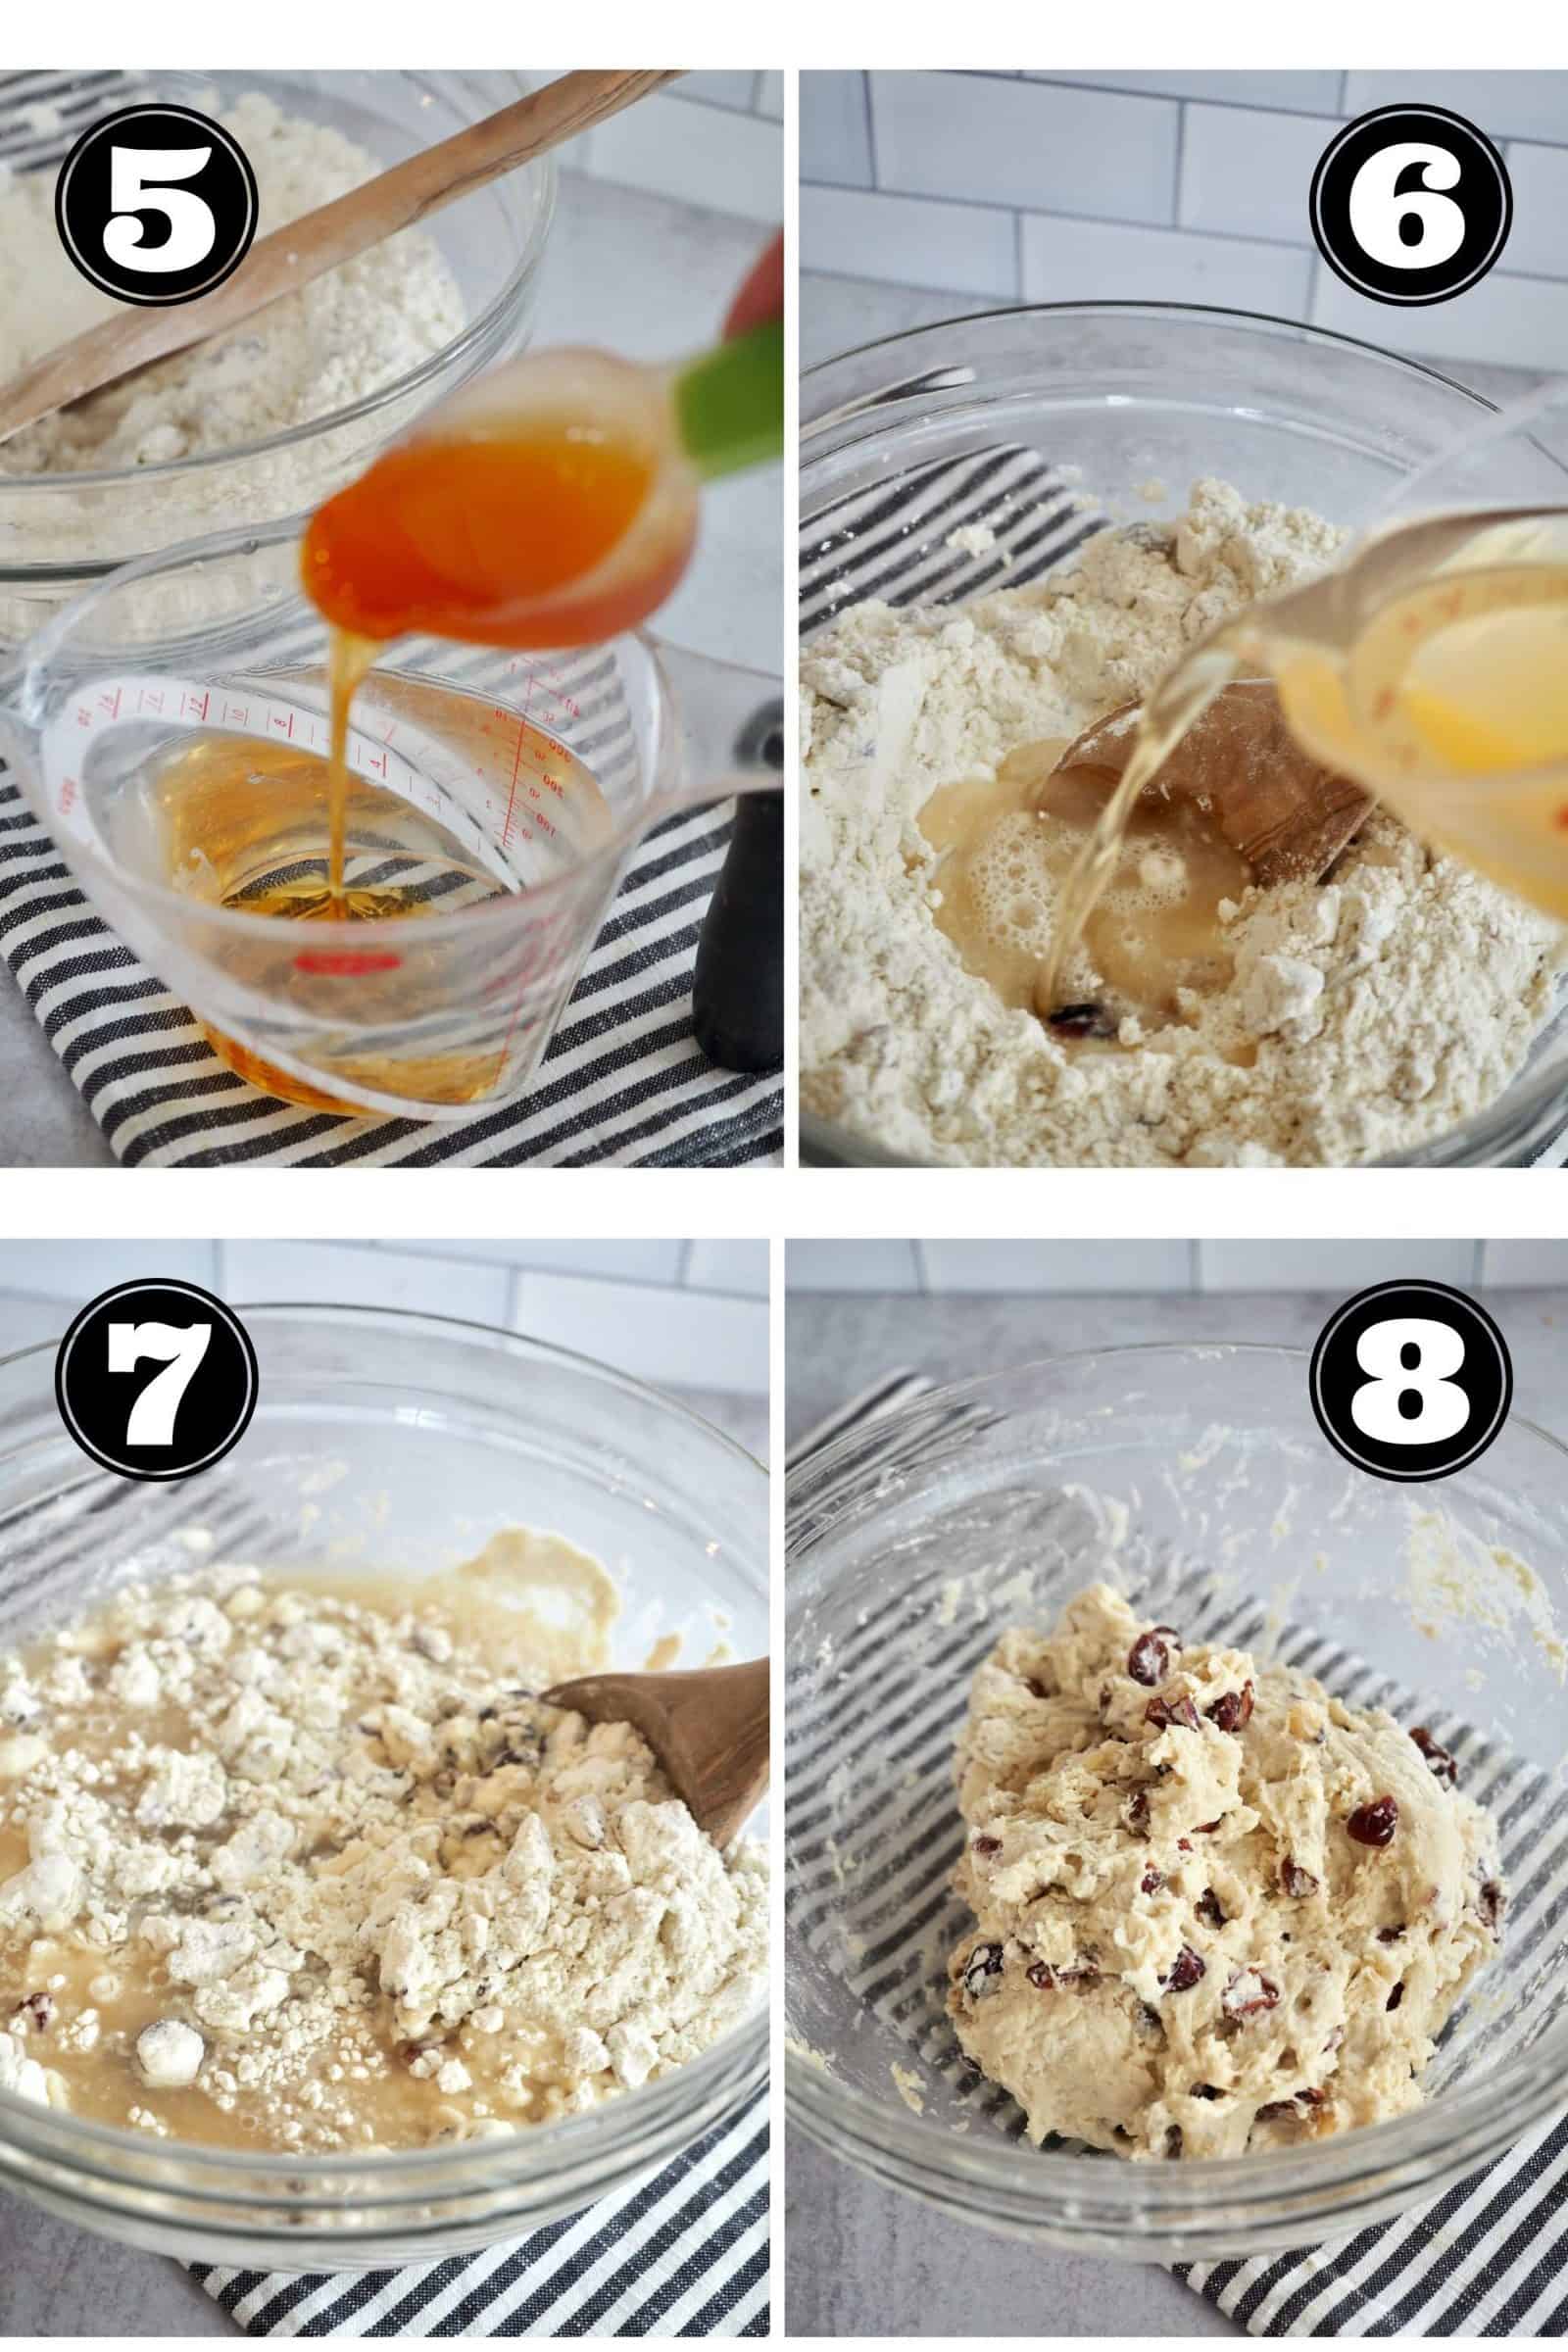
Step 2: Add Liquid Ingredients
Add honey to warm water, stirring to combine. Add to dry ingredients and stir until moist—the dough will be very sticky.
Step 3: Cover and ferment
Cover the bowl tightly with plastic wrap—it will double in size. Place the bowl in a warm, draft-free spot for 12-18 hours (yes, hours!).
Allow it to rise until doubled in size. If your house is warmer, this may happen sooner. It should be nice and bubbly on top.
Step 4: Bake the next day
Once the dough has doubled in size and is bubbly like shown below, preheat your oven.
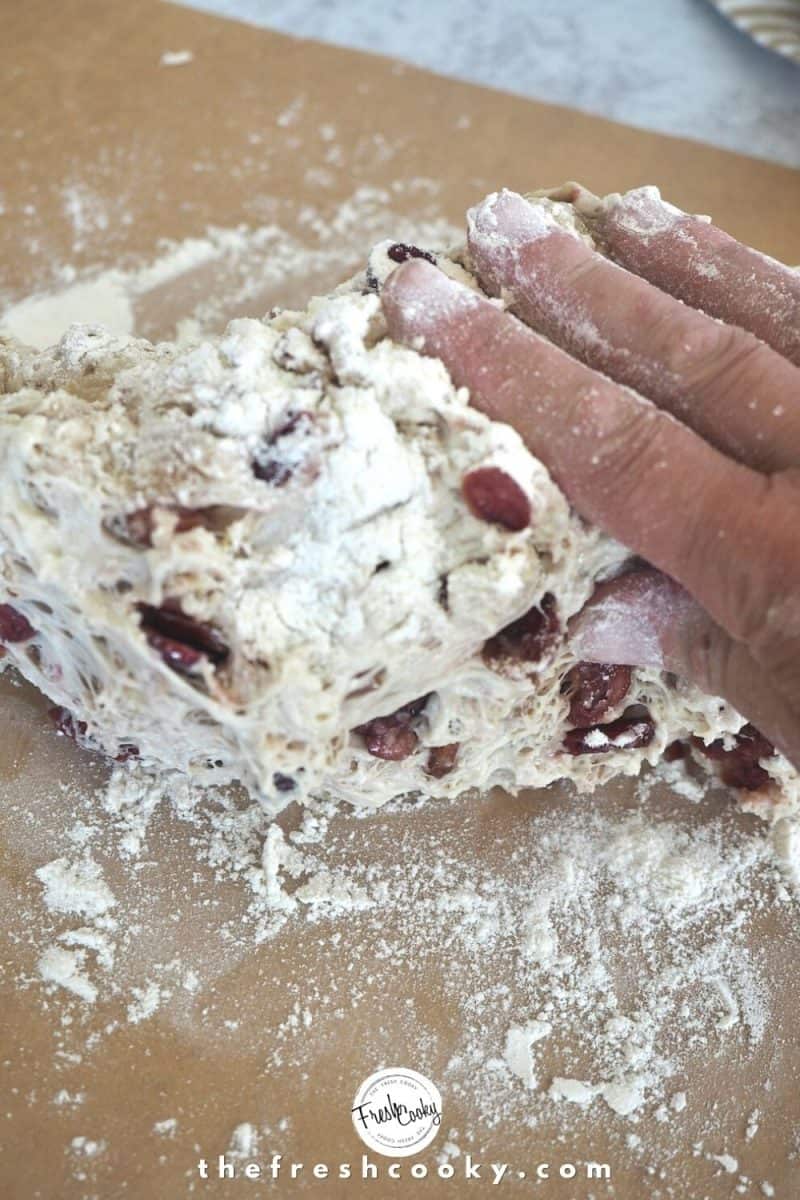
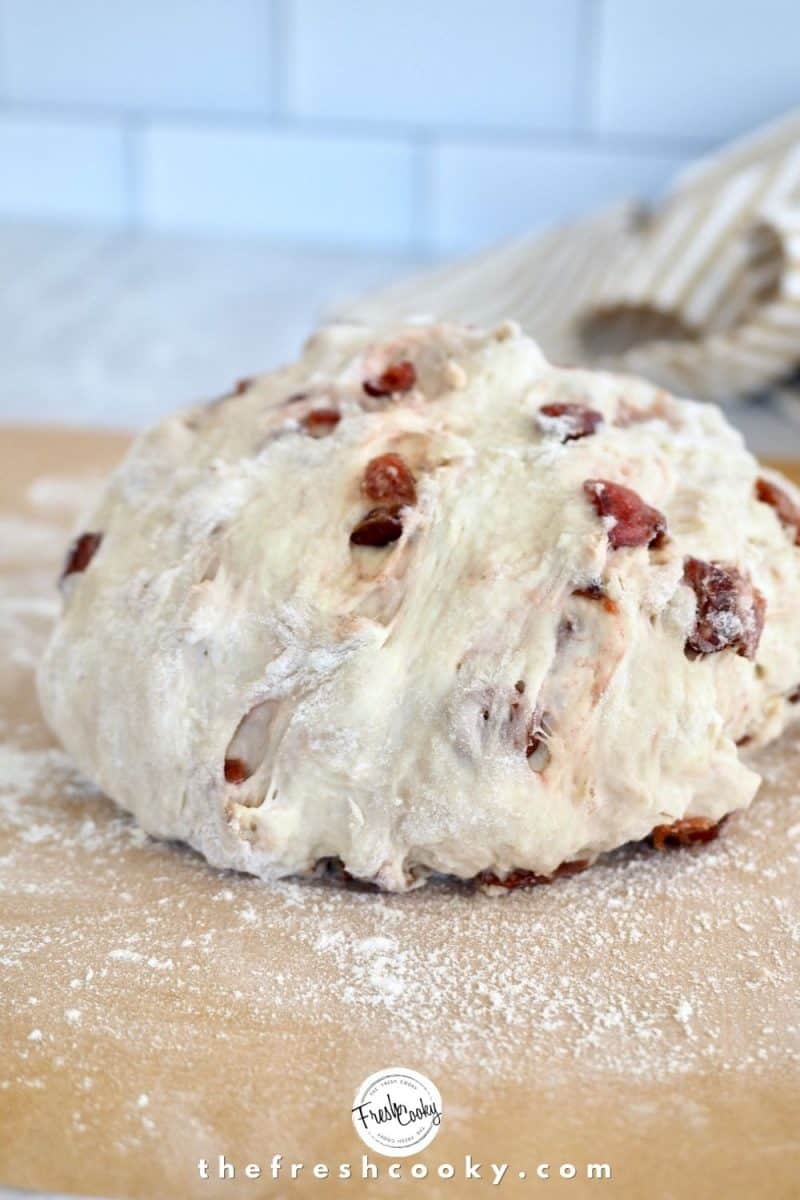
Carefully transfer the dough onto a flour-dusted piece of parchment paper using floured hands—it will be floopy and sticky (a very scientific term, of course!). Gently shape it into a ball.

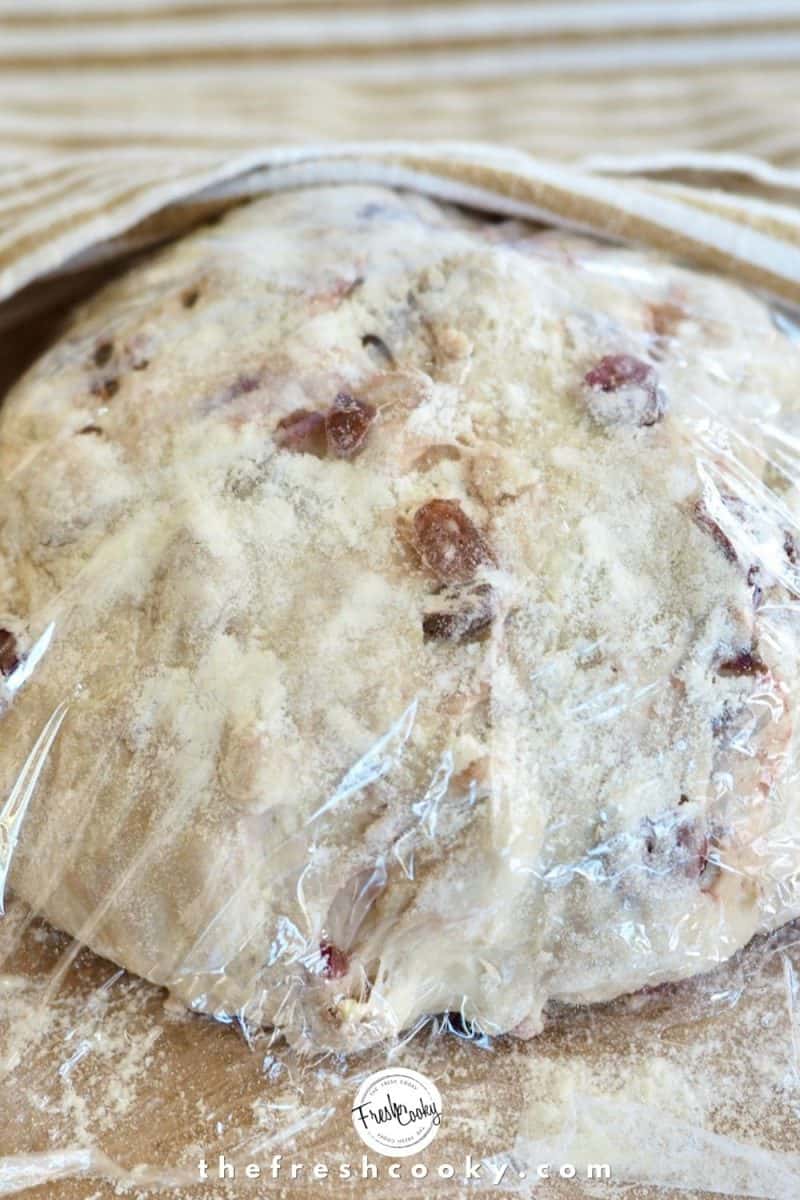
Cover the shaped dough with plastic wrap (sprinkle a little flour on top of your dough if it’s still really sticky). Let rise for another 30-45 minutes, allowing your oven to preheat with the Dutch Oven inside!
Remove the plastic wrap. Don’t worry if the dough doesn’t look like it has risen too much; it will puff up once it hits the heat of the oven. And if desired, score the top with a knife or lame.
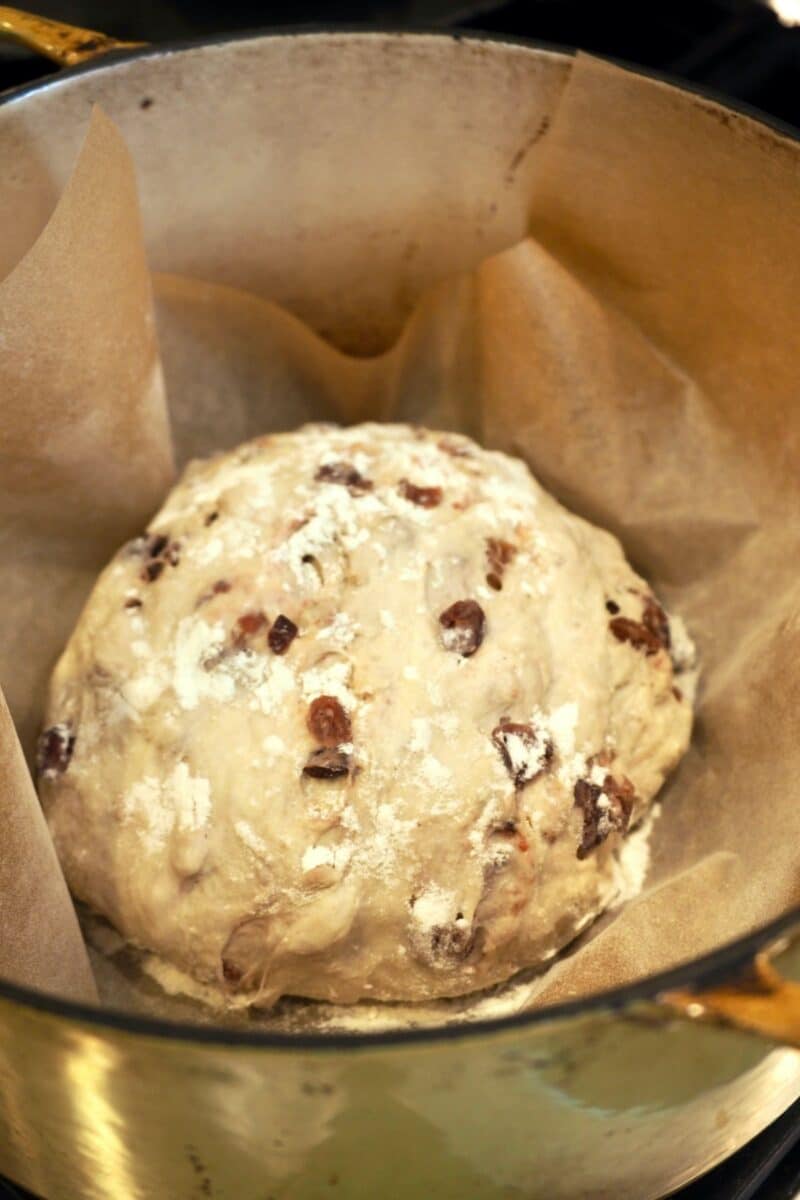
CAREFULLY (it’s really hot!) remove the pot from the oven and set the lid aside. Use the excess parchment paper as a sling to gently transfer the dough into the Dutch oven. Cover with the lid (also hot!) and return to the oven for 25 minutes—no peeking! This is when the crust develops.
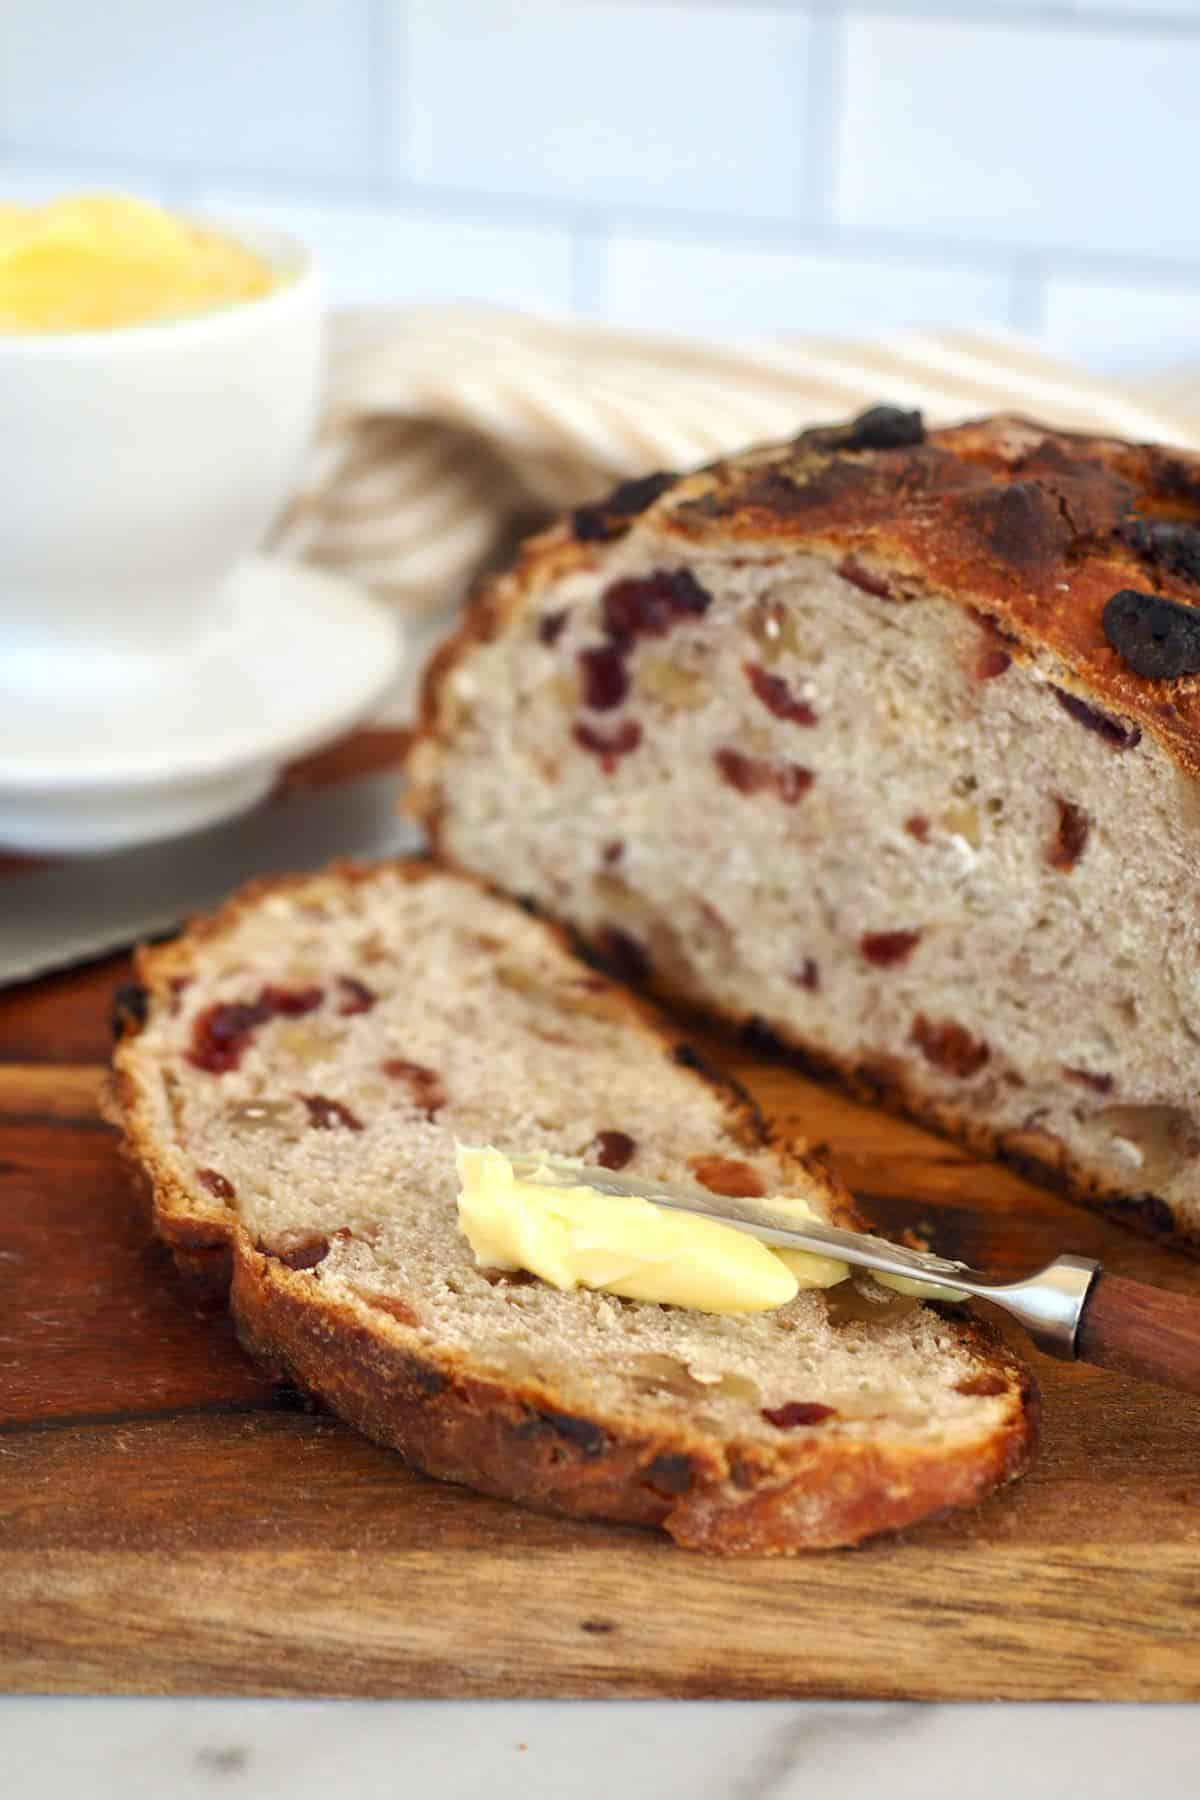
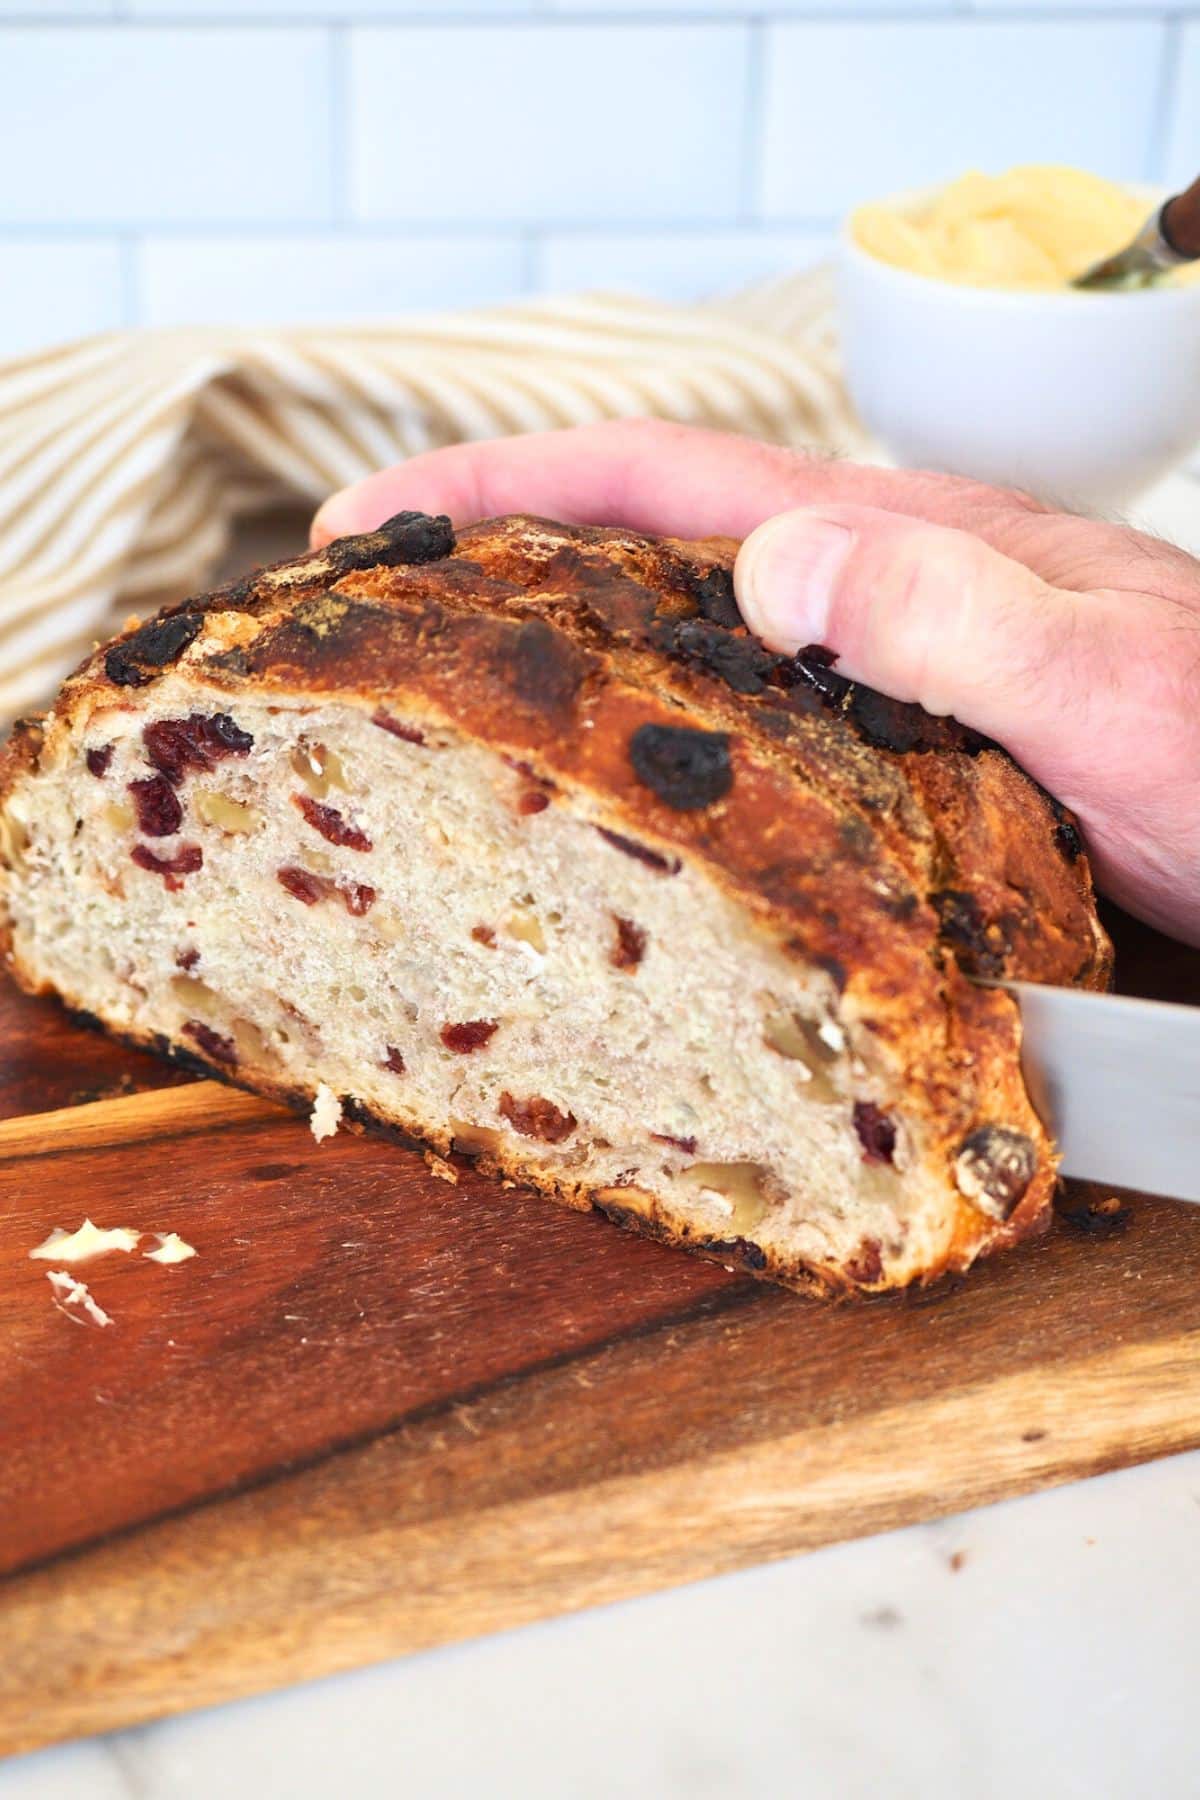
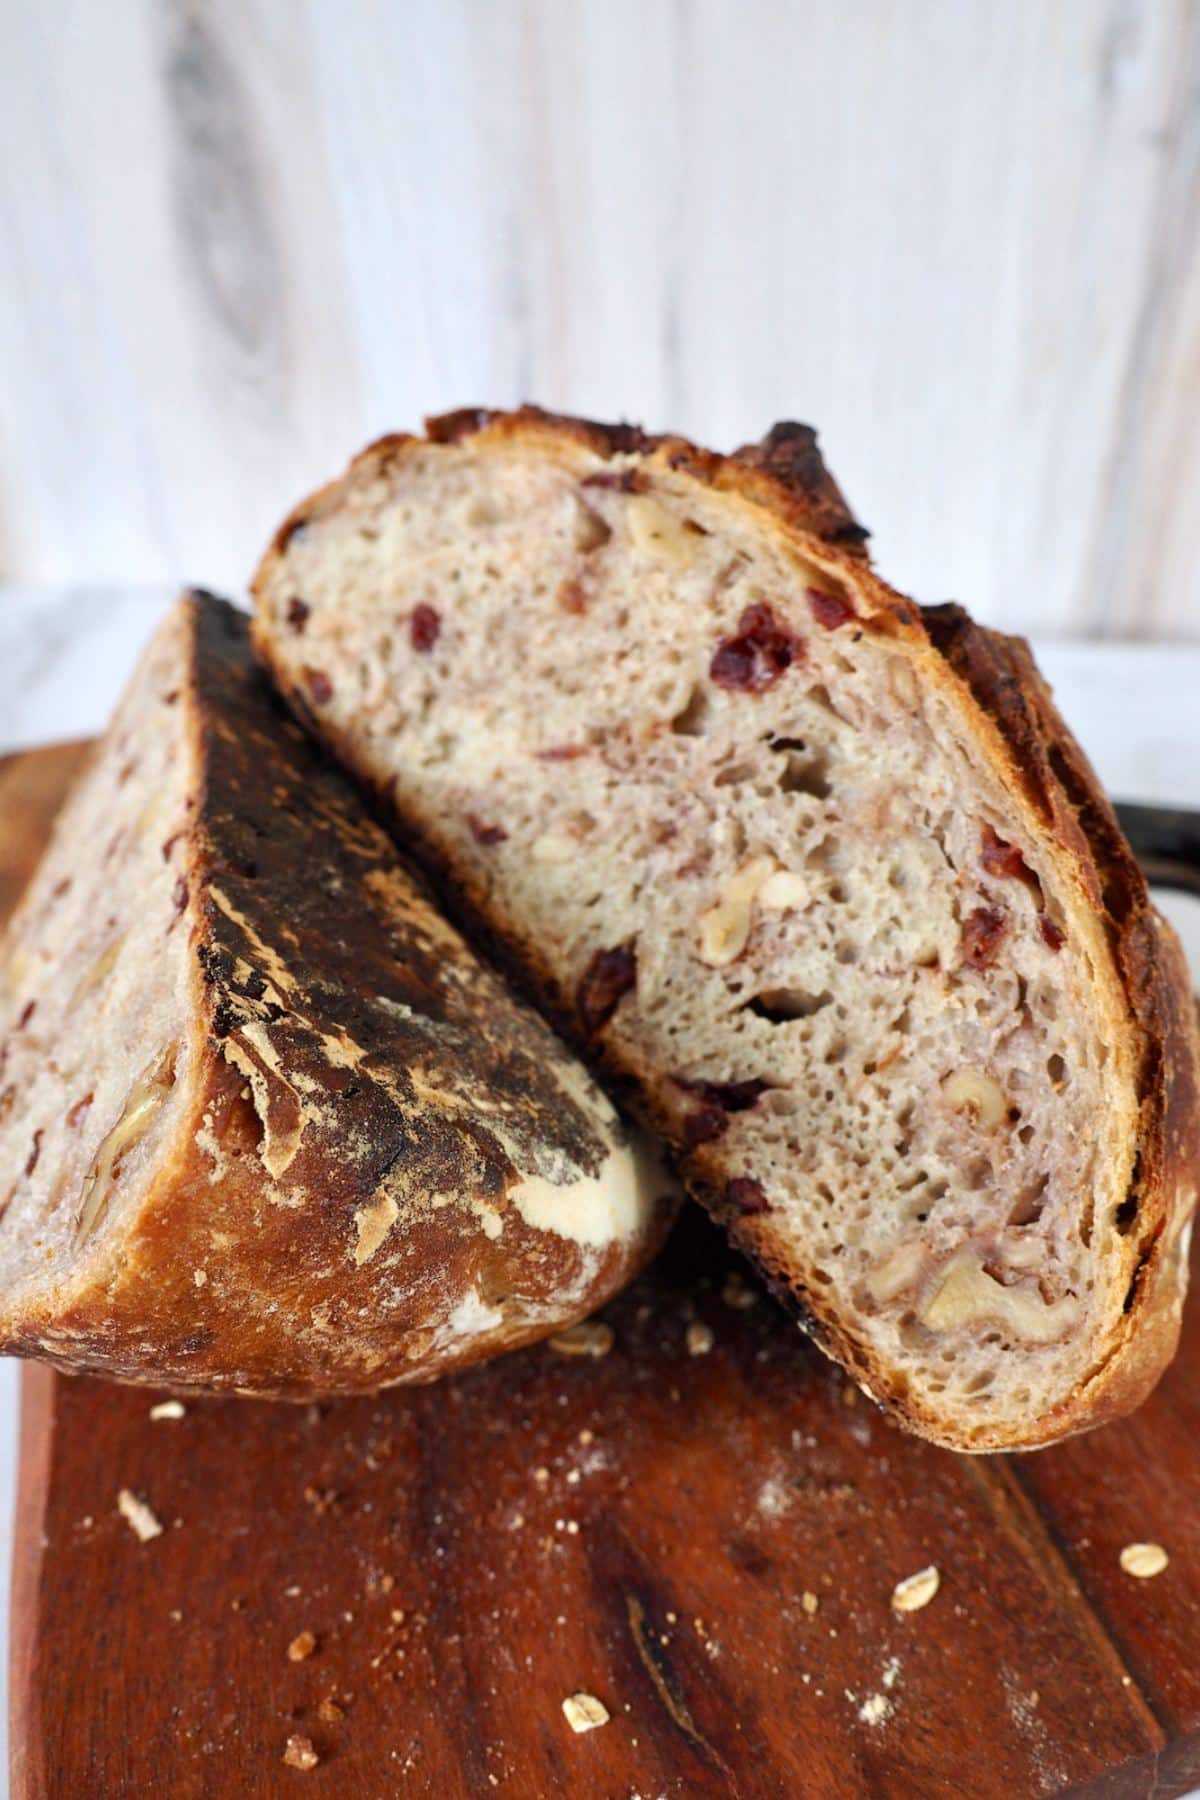
Remove the lid and bake for an additional 20-25 minutes or so, until the center reaches about 200-210°F (93-99°C.) Using the parchment paper, carefully remove the cake from the Dutch oven and place it on a wire rack to cool completely.
How to test for doneness: Give the warm bread a light tap—if it sounds hollow, it’s ready! For a more precise check, use an instant-read thermometer; the bread is done when the center reaches 200-210°F (93-99°C.)
Resist cutting into the bread until it has cooled. Breads continue to bake while cooling, and if you cut into one too soon, it could become gummy inside.
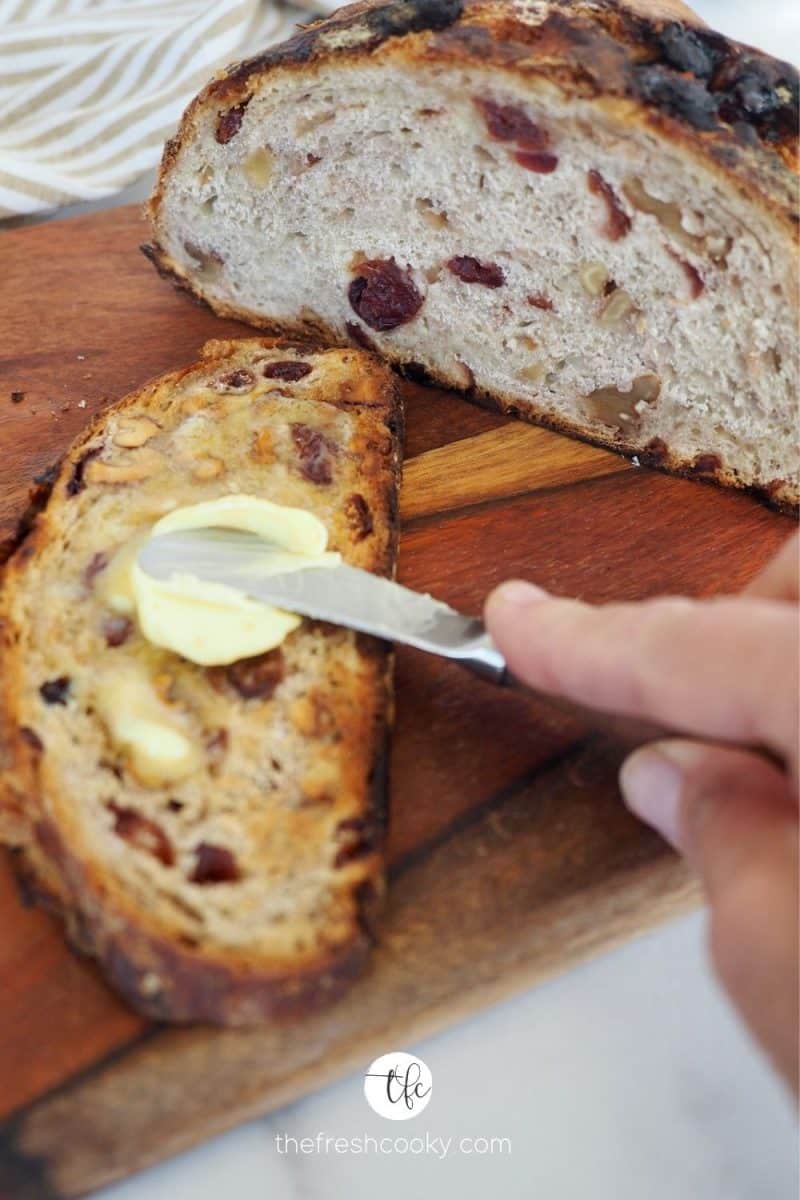
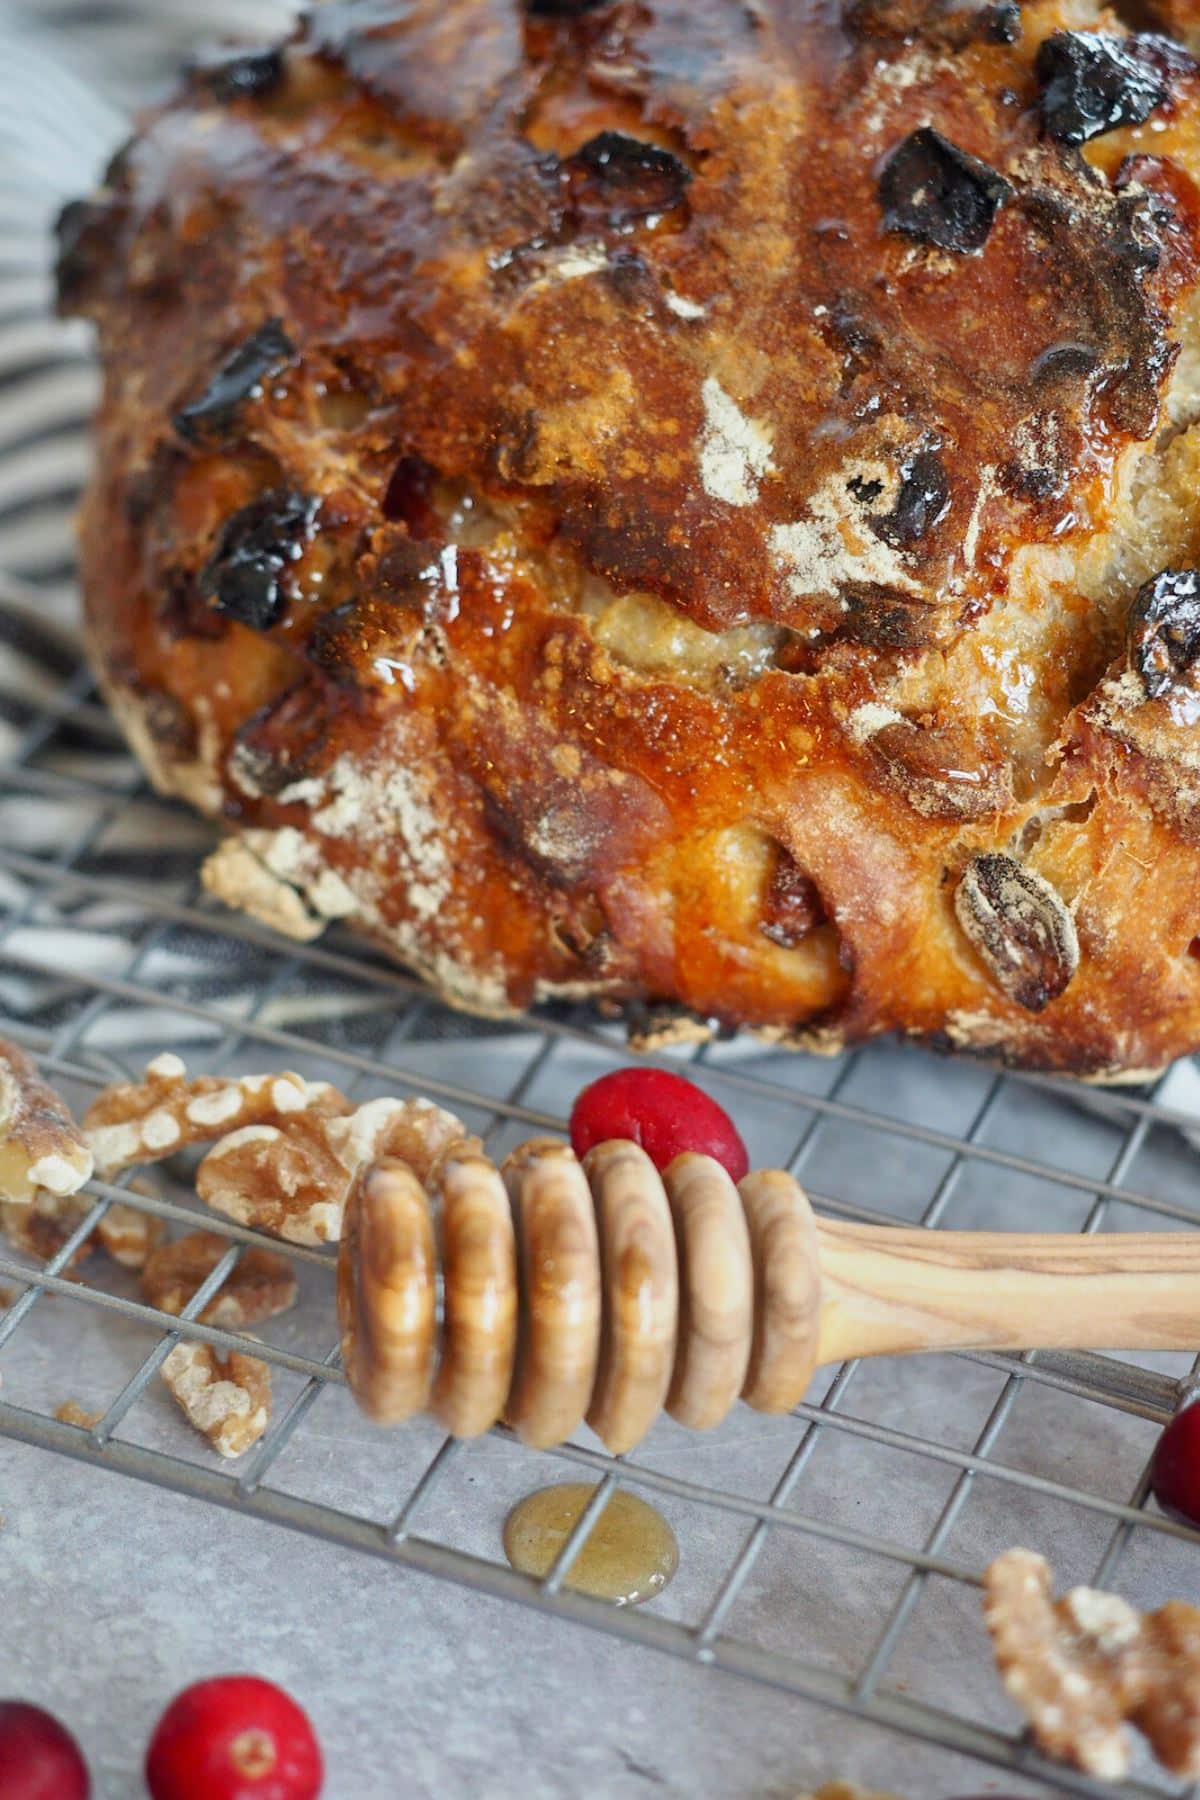
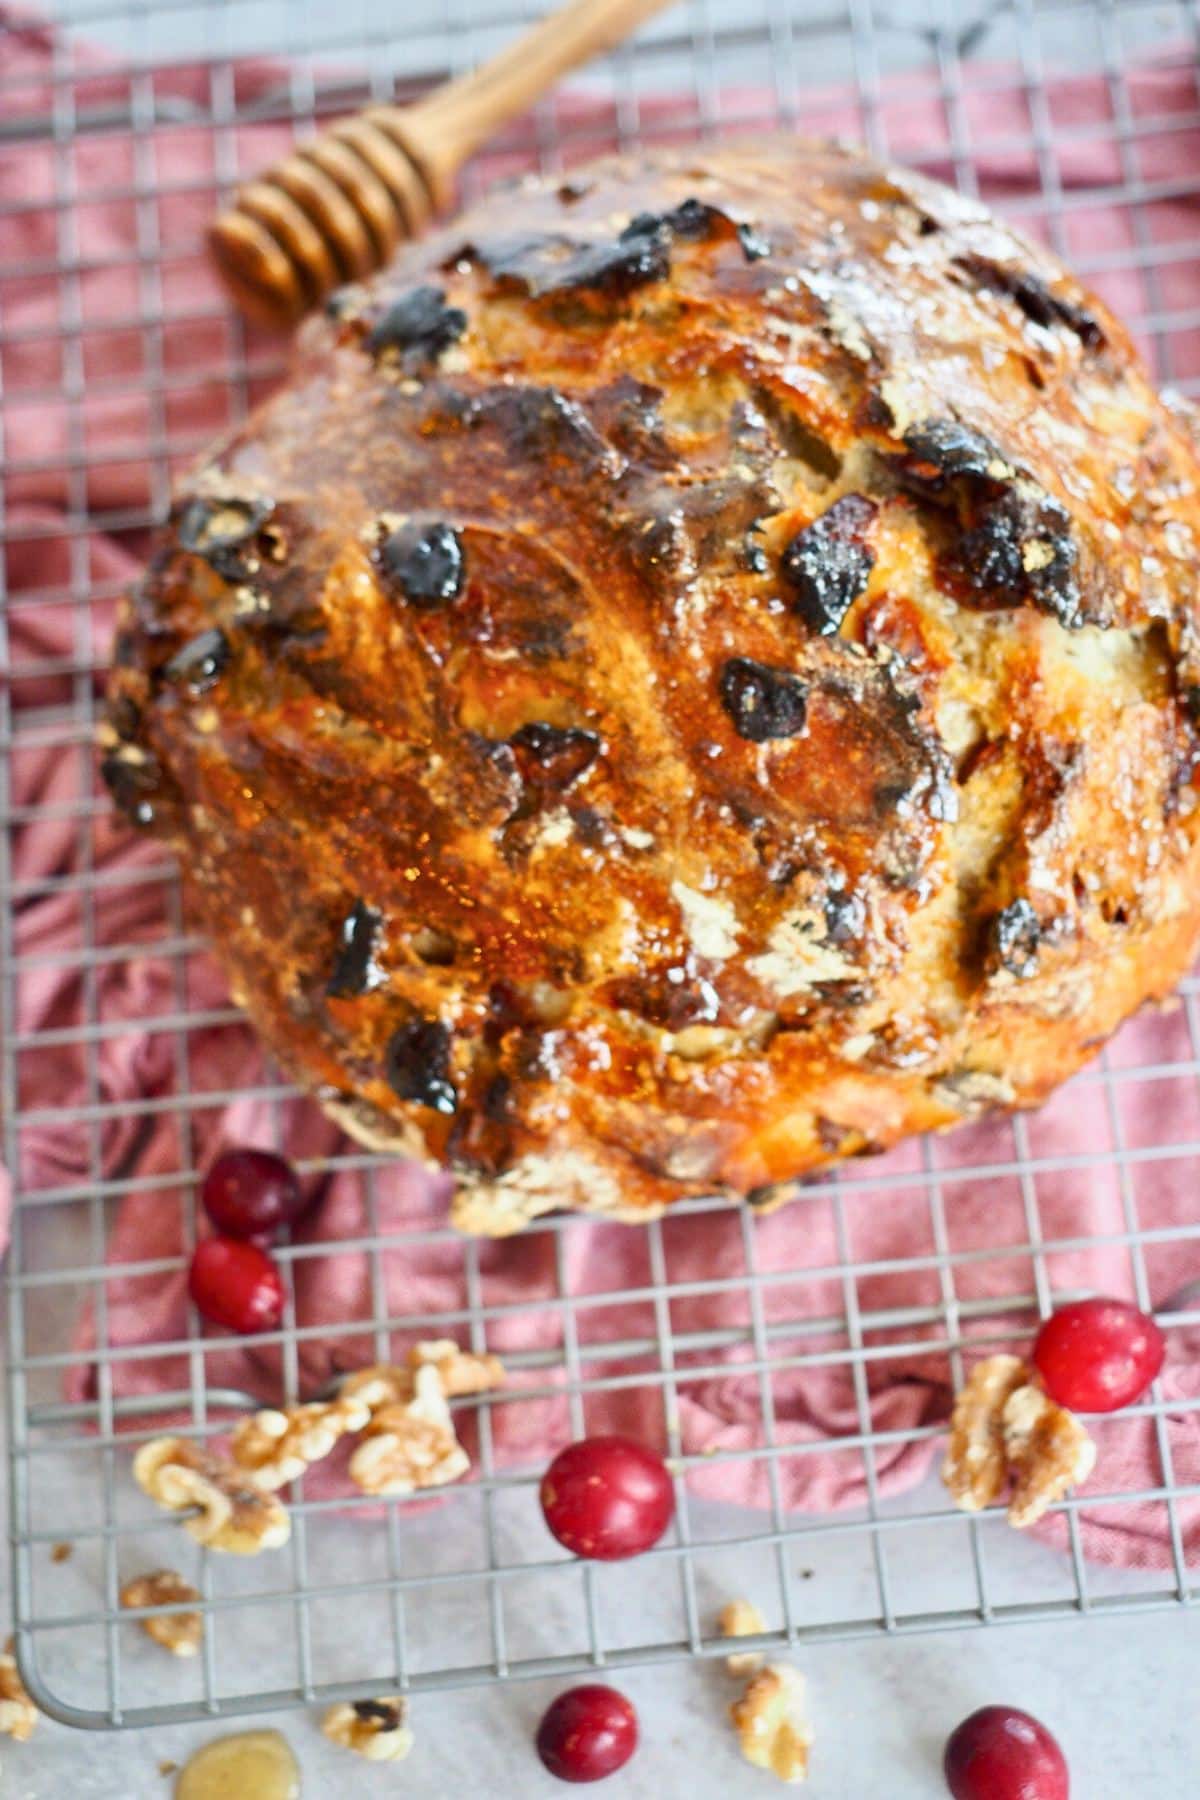
If desired for a softer, sweeter crust, brush with a little honey.
Success Tips for the Cranberry Nut Bread
- Use Fresh Ingredients: Ensure your yeast is fresh. If in doubt, proof a small amount first.
- Hydrate Properly: The dough should be sticky, not dry—resist the urge to add extra flour.
- Long Rise Time: Let the dough rise overnight (12-18 hours) for deep flavors and a chewy texture. Note: If your kitchen is very warm, check the dough a bit earlier to avoid overproofing, which can affect the bread’s texture. If it doubles in size, go ahead and bake it or store in the fridge overnight and bake in the morning.
- Shape with Care: After the long rise, gently fold the dough into a round shape to preserve air bubbles.
- Preheat: Preheat your Dutch oven, baking sheet, or pot before adding your dough for a crispy crust.
- Score the Dough: Slash the top before baking to allow proper expansion and create a rustic look.
- Steam for Crust: If not using a Dutch oven, add a pan of boiling water to the bottom rack to help create a crisp, golden crust.
- Cool Completely: Let the bread cool on a wire rack before slicing to ensure the interior sets properly.
No Dutch oven? No problem! You can still achieve a beautiful crusty loaf with these simple steps:
- Use a heavy-lidded pot or a round pan: Place your rounded dough on a parchment-lined baking pan or another large heavy, lidded pot.
- Preheat & Rest: While the oven preheats and your loaf rests, boil 3 cups of water.
- Create Steam: Once the oven is preheated, place the pan of dough on the center rack.
- Steam for Crust: Place a shallow metal baking pan, roasting pan, or cast-iron skillet (avoid using glass) on the bottom oven rack. Carefully pour 3 cups of boiling water into the pan, then quickly close the oven door to trap the steam inside.
Cranberry Nut Bread Substitutions
- Dried Fruit Substitutions: Swap out dried cranberries with raisins, blueberries, cherries, apples, dates, or even chocolate chunks! Any dried fruit should work beautifully—get creative!
- Fresh Fruit Options: Fresh cranberries will add a tart twist—just give them a rough chop first. Fresh blueberries might work too, though I haven’t tried yet.
- Nut-Free Variation: If you need a nut-free version like I do when my oldest (who has a tree nut allergy) is home, omit the nuts. You can always add extra dried fruit if you like.
- Nut Substitutions: If you prefer, substitute walnuts with pecans, almonds, hazelnuts, or even cashews or sunflower seeds (though a rough chop is best for the nuts; skip that step for sunflower seeds).
- Boost Flavor: To enhance the flavor of the nuts, toast them beforehand for a deeper, roasted flavor. Just be sure to let them cool completely before adding them to the dough.
- Citrus Zest: Toss in some orange or lemon zest for a bright flavor!
- Make It Vegan: Swap honey for maple syrup to make the bread vegan-friendly.
- Whole Wheat Success: A reader has had great results using whole wheat flour, so feel free to try that too!
Storage Tips for Cranberry and Walnut Bread
If you eat the bread within 2-3 days, there’s no need to refrigerate, especially in cooler months. Just keep it in a sealed bag or linen bread bag. After that, refrigerate since it has no preservatives.
You can also freeze cranberry nut bread for up to 4 months—just be sure it’s completely cooled and sealed in an airtight bag.
Ways to Use and Gift Cranberry Nut Bread
We love making leftover turkey sandwiches using this bread. They’re even better with a little fresh cranberry relish on them, toasted or grilled. AMAZING!
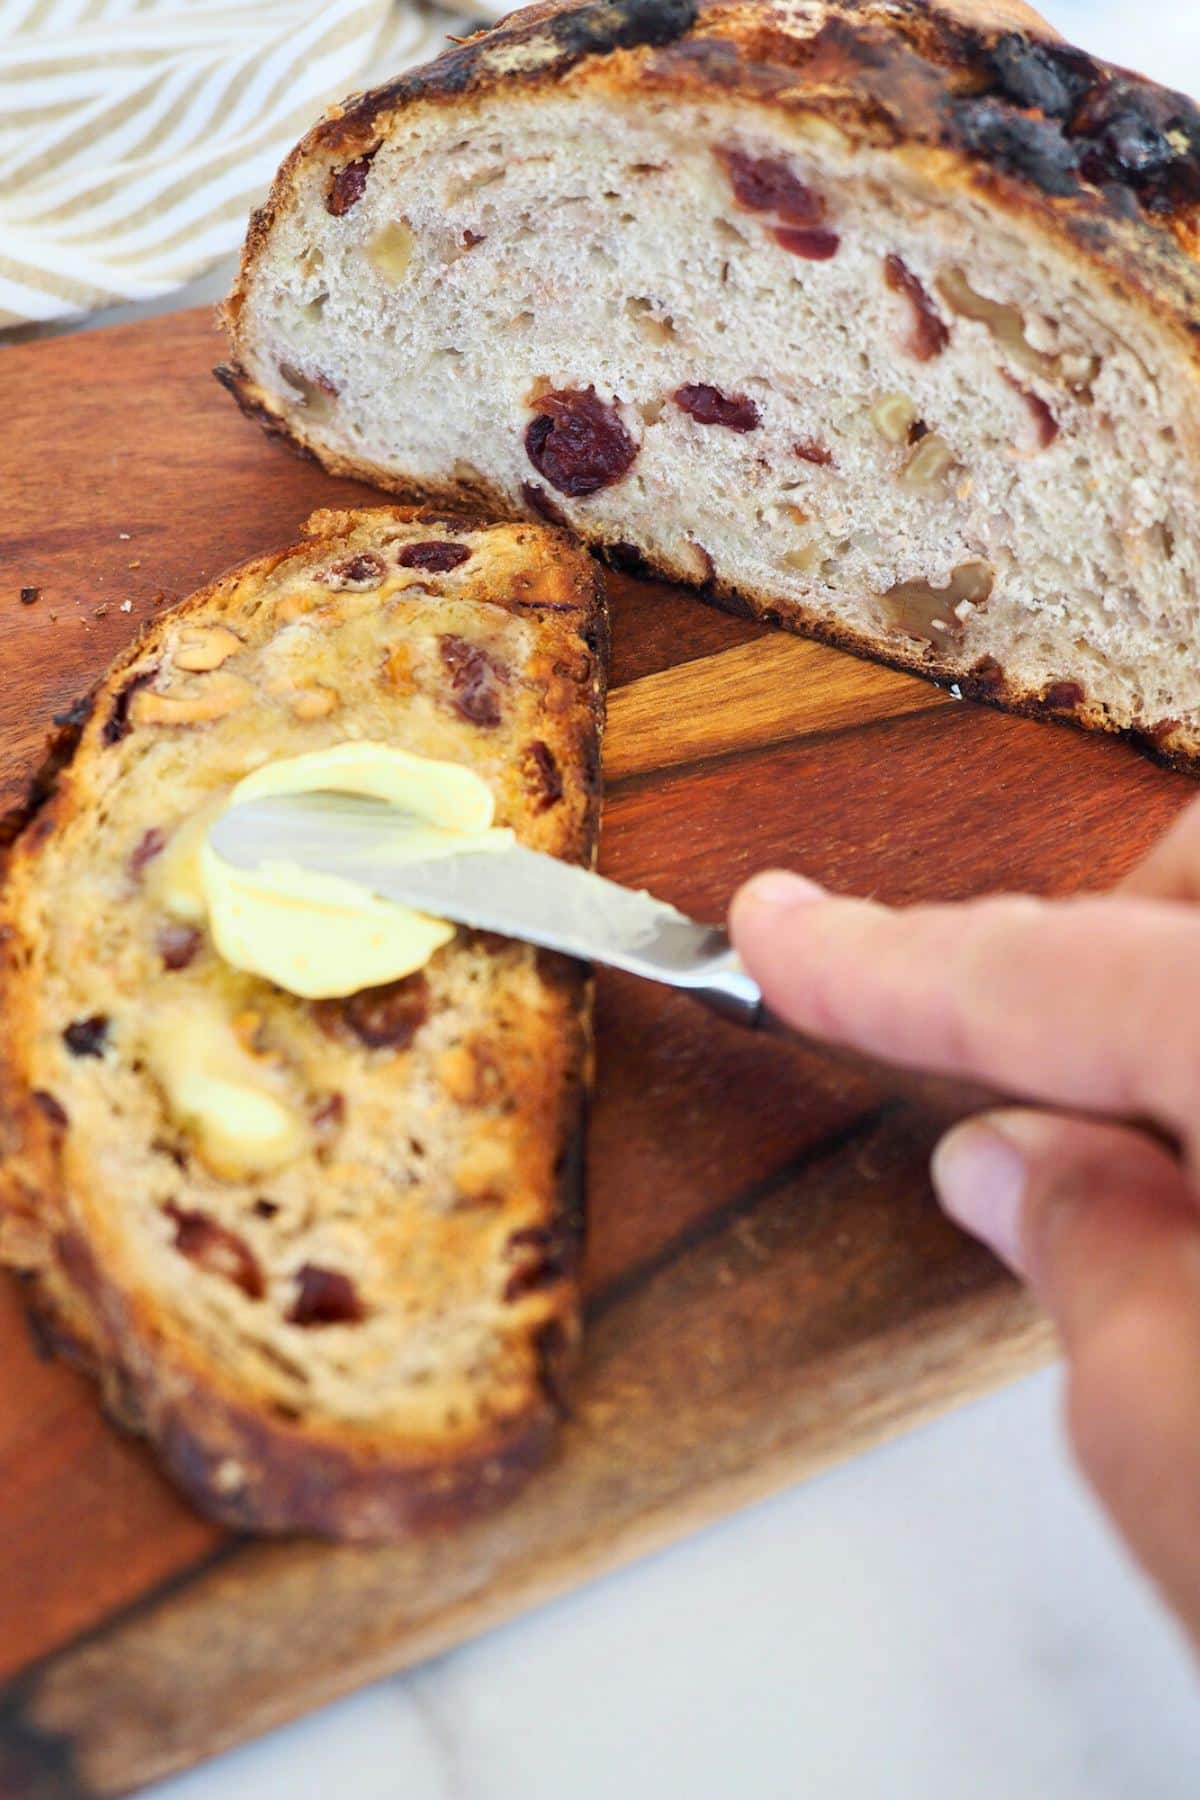
Our favorite way to enjoy this bread is to toast a slice until it’s nice and crispy, then slather it with rich, grass-fed European butter. Trust me, you’ll need a napkin—you’ll be drooling!
No-Knead Cranberry Walnut Bread makes a fabulous food gift! Print these fun Christmas Gift Tags or Gifts from the Kitchen gift tags.
If you love cranberries, try these other fresh cranberry recipes! Fresh Cranberry Relish, Cranberry Lemon Drop, dazzling sugared cranberries or Refreshing Cranberry Spritzer.
Frequently Asked Questions
To prevent the bottom from burning:
Lower the Heat: Reduce the oven temperature to 425°F when you place the bread in the oven.
Adjust Baking Time: Bake covered for 30-35 minutes, then remove the lid and bake uncovered for another 15 minutes.
Use a Thermometer: For best results, bake until the bread’s internal temperature reaches 200-210°F (93-99°C.) to ensure it’s done without over-baking.
If you notice your bread has doubled in size in a short amount of time, place it in the refrigerator overnight. This will slow down the rise time and help develop the rustic flavors in the bread. If your kitchen is too warm (above 85°F or 29°C), the yeast may become too active, causing the dough to rise too quickly and potentially leading to overproofing or an uneven texture.
Check Your Yeast: If you suspect the yeast, test it by dissolving a teaspoon of yeast in warm water (about 110°F) with a pinch of sugar. If it bubbles and froths within 5-10 minutes, it’s still good. If not, it’s time to get new yeast.
Check the Temperature: Bread rises best at 70-80°F. If your home is cooler, try using your oven’s proofing feature (if available) or find a warmer spot for your dough to rise overnight.
More from The Fresh Cooky
Like this recipe?
Don’t forget to give it a ⭐️⭐️⭐️⭐️⭐️ star rating and leave a comment below the recipe!
Video
Equipment
Ingredients
- 3 cups all-purpose flour + 3 tablespoons May also use bread flour for a chewier loaf
- ½ teaspoon instant yeast make sure your yeast is fresh, see notes
- 2 teaspoons kosher salt
- 1 cup walnuts chopped, or use pecans or your favorite
- 1 cup dried cranberries or replace with fresh, rough chopped
- 1 ½ cups water room temp or slightly warm
- ¼ cup honey
Special Equipment Needed
- 6 qt or larger Dutch Oven make sure your Dutch oven is safe up to 500° F. See notes if no Dutch oven.
Instructions
- Add flour, yeast and salt to large bowl (large enough for dough to double), stirring yeast into one portion of flour, salt the other, then stir together. Toss cranberries and walnuts and stir well to coat in the flour mixture.3 cups all-purpose flour + 3 tablespoons, ½ teaspoon instant yeast, 2 teaspoons kosher salt, 1 cup walnuts, 1 cup dried cranberries
- Pour honey into warm water and stir to combine. Pour honey water into flour mixture. Stirring to combine, it will be sticky, that’s okay!1 ½ cups water, ¼ cup honey
- Cover the bowl with plastic wrap, allow to rise until doubled for 12-18 hours (yes, hours), this is a slow rise, ferment, which gives the bread it's texture and flavor.
- NEXT DAY Once the dough has risen, and dust a piece of parchment paper with flour; with floured hands, gently scrape the dough away from the bowl and onto the parchment paper, the dough will be stringy and floopy.
- Gently shape the dough into a round or oval shape. It will feel different than other breads, kind of fluid, that's alright it lends to the rustic look. Cover the shaped dough with a piece of plastic wrap (sprinkle a little flour on top of your dough if it's really sticky) and then with a tea towel. Let rise for another 30-45 minutes while your oven preheats.
- Adjust your oven rack so that the Dutch oven sits several inches above the bottom, but still has plenty of clearance on the top. PLACE DUTCH OVEN with LID INSIDE THE OVEN TO HEAT WITH THE OVEN. Preheat oven to 450°F (230°C) You will reduce the temperature as you put it in the oven. See notes for dark Dutch ovens.6 qt or larger Dutch Oven
- Remove the plastic wrap, don’t worry if it doesn’t look like the dough has risen too much, it will puff up once it hits the heat of the oven.
- Reduce heat to 425°F CAREFULLY (it's really hot!) remove the pot from the oven, set the lid aside and using the excess parchment paper as a sling, transfer bread dough to the Dutch oven, cover with lid (it's hot too!) and place back in hot oven for 30 minutes — no peeking!! This is when the crispy crust develops.
- After 25 minutes, remove the lid (remember it's still hot!)After 30 minutes, carefully remove the lid (remember it's still hot) and bake for another 15 minutes or until the internal temperature reaches between 195-200°F (using an instant read thermometer). Brush with honey while warm if desired). How to test for doneness: Give the bread a light tap on the bottom—if it sounds hollow, it’s ready! For a more precise check, use an instant-read thermometer; the bread is done when the center reaches 195°F (90°C).
- Cool on wire rack. Resist cutting into the bread until it has mostly cooled, breads continue to bake while cooling and if you cut into it too soon it could make it gummy inside. I recommend at least 2 hours.
Notes
- Use Fresh Ingredients: Ensure your yeast is fresh. If in doubt, proof a small amount first.
- The dough should be sticky, not dry—resist the urge to add extra flour.
- Long Rise Time: Let the dough rise overnight (12-18 hours) for deep flavors and a chewy texture. Note: If your kitchen is very warm, check the dough a bit earlier to avoid overproofing, which can affect the bread’s texture. If it doubles in size, go ahead and bake it or store it in the fridge overnight and bake it in the morning.
- Shape with Care: After the long rise, gently fold the dough into a round shape to preserve air bubbles.
- Preheat: Preheat your Dutch oven or baking stone/steel before adding your dough for a crispy/chewy crust.
- Score the Dough: You may slash the top before baking to allow proper expansion and create a rustic look. I don’t typically do that with this loaf.
- Steam for Crust: If not using a Dutch oven, add a pan of boiling water in a cast-iron pan or sturdy metal pan (not glass) to the bottom rack to help create a crisp, golden crust.
- Cool Completely: Let the bread cool on a wire rack before slicing to ensure the interior sets properly.
- If the bread is too crisp on the bottom, try this: Place mostly cooled bread in a baggie without sealing it; this will soften the crust.
- When using a dark Dutch oven (inside), it tends to brown things faster, so reduce your temperature by 25°F.
- Many ovens heat differently, especially if you are using convection (you should reduce the temperature by 25° whenever using convection over conventional) or gas. Take a peek at the bread when you remove the lid, if browning quickly, plan on taking it out a little earlier.
- Invest in an oven thermometer to check whether your oven runs hot or cold. Many ovens run 25-35° different than your planned temperature.
Nutrition


Fern E. Tansini
It sounds wonderful,.I will try to make it as I am not to good with yeast
It is wonderful, Fern!! This is the easiest of yeast breads!!
Dori
Hi , I make dutch oven bread every other week, and was so excited to try a bread recipe with such perfect ingredients. My kitchen smells wonderful. The temperature was a little to high for me and the bottom is a little dark. I’m going to cook this again at 425 and take the lid off at 25 min. We are at 5,000 feet elevation and maybe that makes a difference.
Hi Dori, sounds like a great adjustment to make and I know you’ll find even with a darker bottom it’ll be amazing!
Marilyn Chandler
This sounds wonderful and I would love to make it. Could this be made in a bread machine since my oven no longer works.. If not do you have a bread machine recipe very similar to this. Love your recipes. Thank you!
Thank you Marilyn, I had to do a little research since I’ve never done this, technically to get a true “rustic” overnight loaf, you need to bake it in order to get the same chewy crust. But hey, if you don’t have an oven, it’s worth a try. I’d choose the longest cycle you have on your machine so that it has time to ferment as long as possible. This helps to develop the flavor. Let me know how it turns out!
Marilyn
Thank you so much for responding so quickly. I have seen this recipe numerous times on here and I have really wanted to make it.
I will try it in the next few weeks and see if I have success with it or not. I do have an oven in my microwave, but it is not large enough for this recipe.
But it’s certainly worth trying in my bread machine and I will let you know how it comes out when I make it!
Excited to hear how it turns out, Marilyn.
Linda
Looks great Will make it
Thanks Linda! I hope you love it!!