


Make this simple Magnolia Bakery Banana Pudding at home! A rich, creamy Southern banana pudding recipe made without Cool Whip, so easy and always a hit!
Why you should make Magnolia Bakery Banana Pudding
I kept hearing about this famous Magnolia Bakery Banana Pudding, the one from NYC, not the Gaines’ and how it was the best. So I grabbed their cookbook, made a batch, and wow…it really is that good. No Cool Whip (yay!), just simple ingredients and total banana-pudding comfort. I modified it slightly, adding vanilla bean paste because vanilla pudding IS the key ingredient; otherwise, this is the exact recipe.
I’ve tested plenty of banana puddings over the years, and while I’m all about from-scratch recipes, sometimes you just need something simpler, and this one is perfect: thick, creamy vanilla pudding, softened Nilla wafers, and fresh bananas. It’s easy enough for a weeknight and special enough for a gathering.
When I served this at book club, even the non-dessert eaters were scraping their bowls. Make it in a trifle, a wide glass bowl, a baking dish or in individual jars, it’s always a hit. This is one of those no-bake recipes you’ll come back to again and again. It’s a classic banana dessert, no question! Give this strawberry banana pudding and this strawberry banana cake a try, too!
Simple Banana Pudding Recipe Ingredients
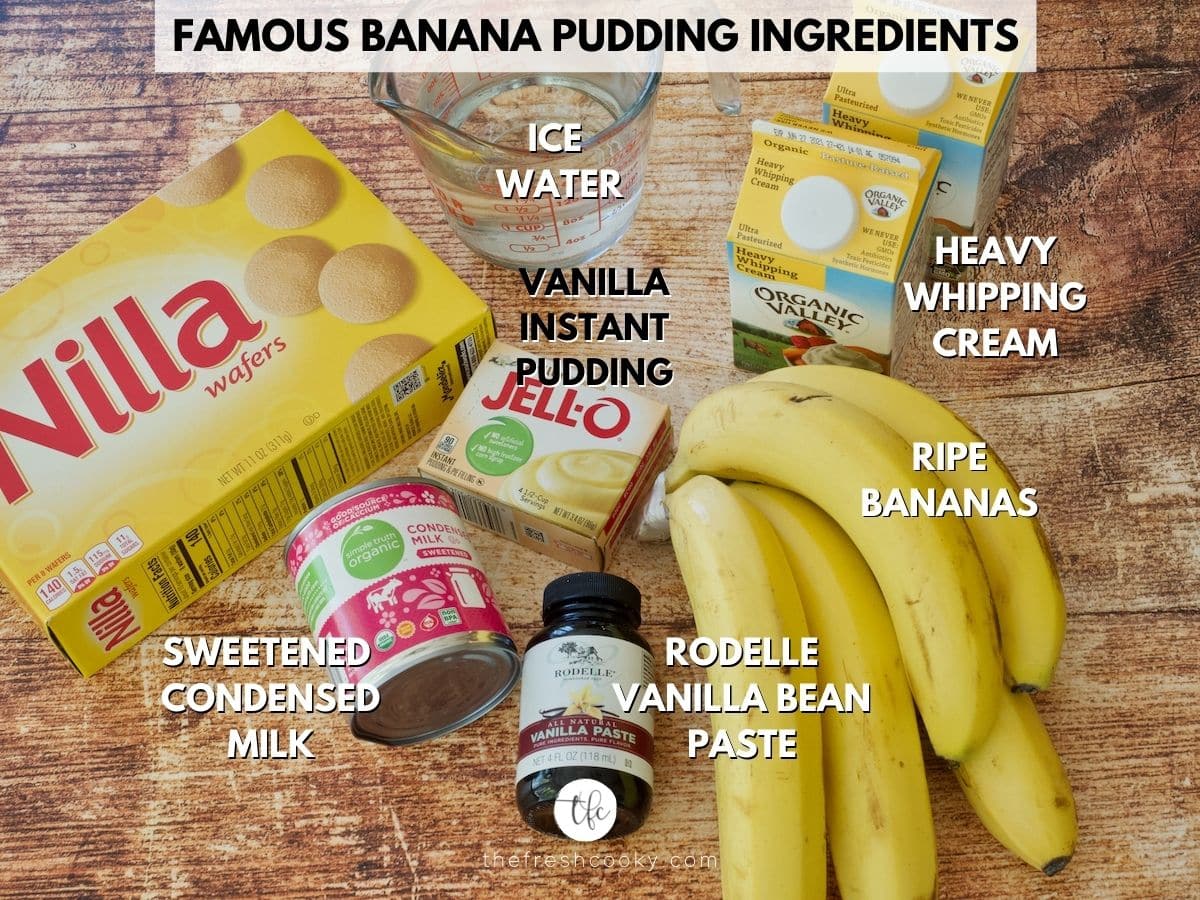
- Sweetened Condensed Milk: I used organic to keep things a little cleaner. Use the small can, this is not the same as evaporated milk. And it replaces cold whole milk you normally use.
- Ice Cold Water: Helps the pudding mix set properly when combined with the condensed milk. To get ice-cold water, fill a bowl or measuring cup with 1½ cups of water and ice, let it chill for a minute, then pour out 1½ cups, straining out the ice.
- Instant Vanilla Pudding Mix: I couldn’t find an organic instant pudding mix, so I used Jell-O brand, which is Magnolia Bakery’s preferred choice, according to their cookbook.
- Vanilla Bean Paste: My personal touch for extra vanilla flavor. I love Rodelle’s natural, often organic products. You can swap in regular vanilla extract if needed.
- Heavy Cream: The real stuff, whipping cream, not fat-free. It’s totally worth it and no Cool Whip whipped topping needed! Yippee!
- Nilla Wafers: The original recipe insists on these, but I’ll share some gluten-free options at the end of the post. I used a few extras, including some mini Nilla Wafers for fun.
- Ripe Bananas: Opt for perfectly ripe (neither green nor mushy). If you’re worried about browning, toss them in a little lemon or orange juice to slow it down without adding too much tang.
Get the full recipe in the recipe card below.
How to make a banana pudding
Below are the simple steps to making your own famous Nilla wafer banana pudding (a no-bake dessert)!
Step 1: Preferably, the night before
Instead of making our own custard, we’re cheating a smidge and using a pudding mix, that’s been amped up!
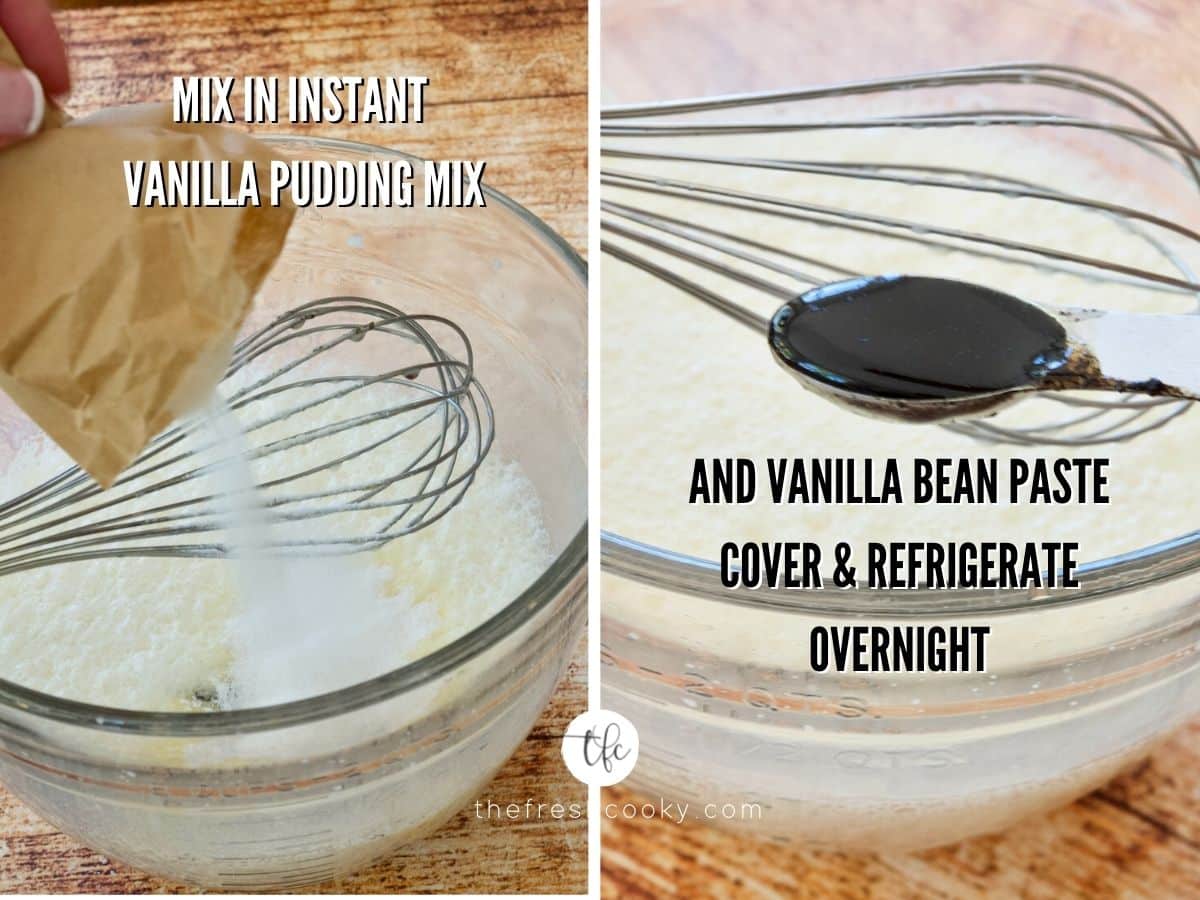
Pro Tip: Do this first step the day before to allow the pudding to set up properly.
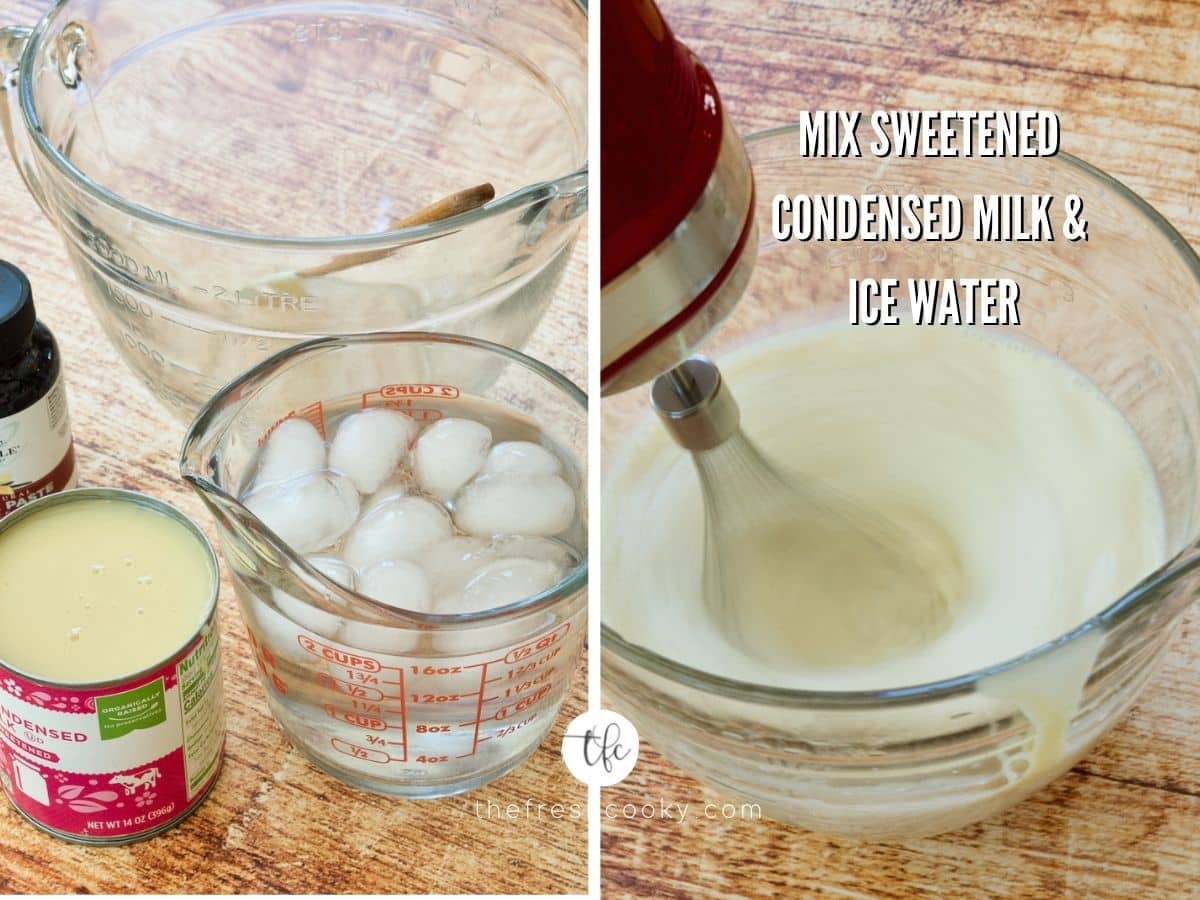
In a mixing bowl, beat together sweetened condensed milk and ice-cold water with an electric mixer on medium speed. About 1 minute.
Pour in the pudding mix and vanilla bean paste, beat well, about 2 minutes until thick and incorporated. Don’t worry, it won’t be very pudding-like yet; it will set as it sits in the refrigerator.
Cover and refrigerate at least 3-4 hours, preferably overnight.
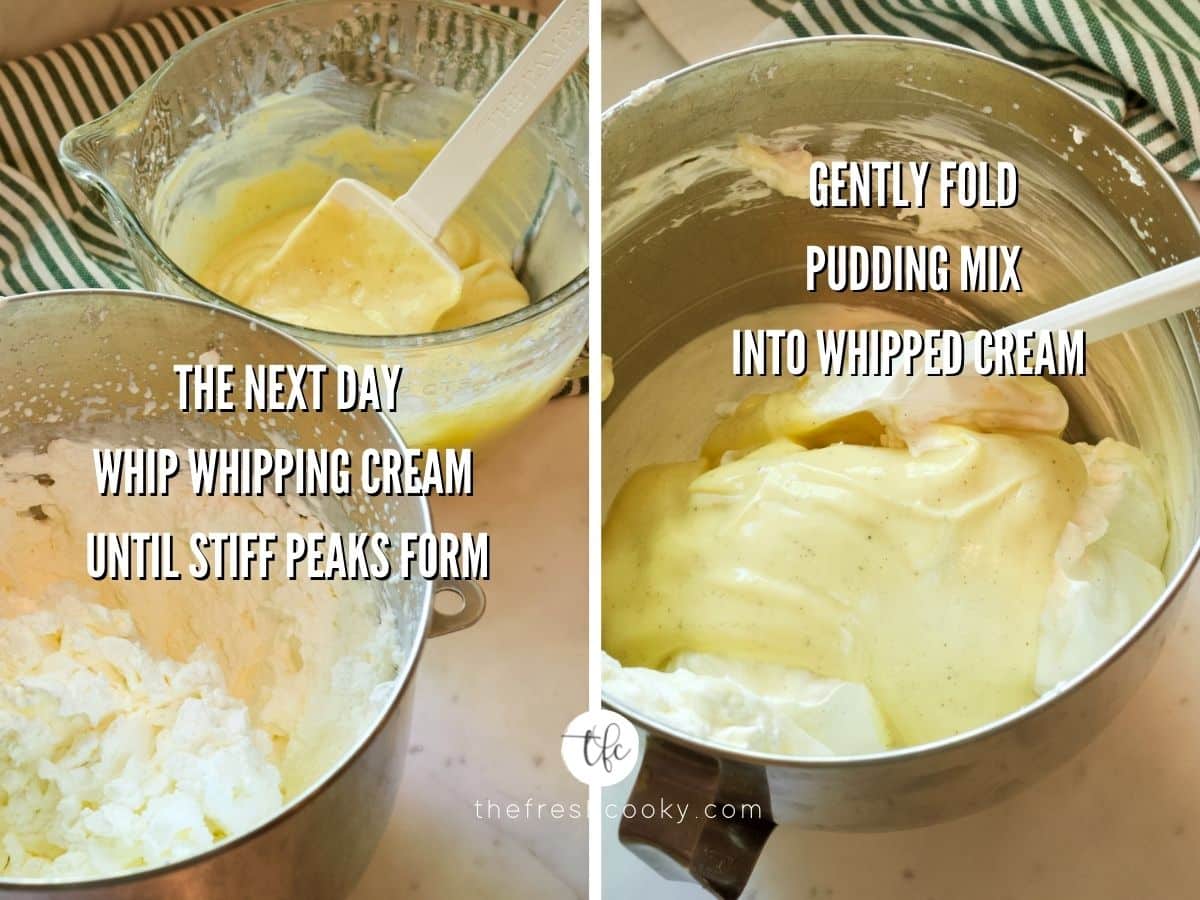
Step 2: Preferably, the next day
In a large bowl or in your stand mixer with whisk attachment, whip the heavy cream until stiff peaks form.
Then gently fold the pudding mixture into the whipped cream until combined using a rubber spatula. You might have a few lumps, but don’t worry about those; they add to the texture, but try and make sure there are no streaks of pudding remaining.
Step 3: Assemble Banana Pudding
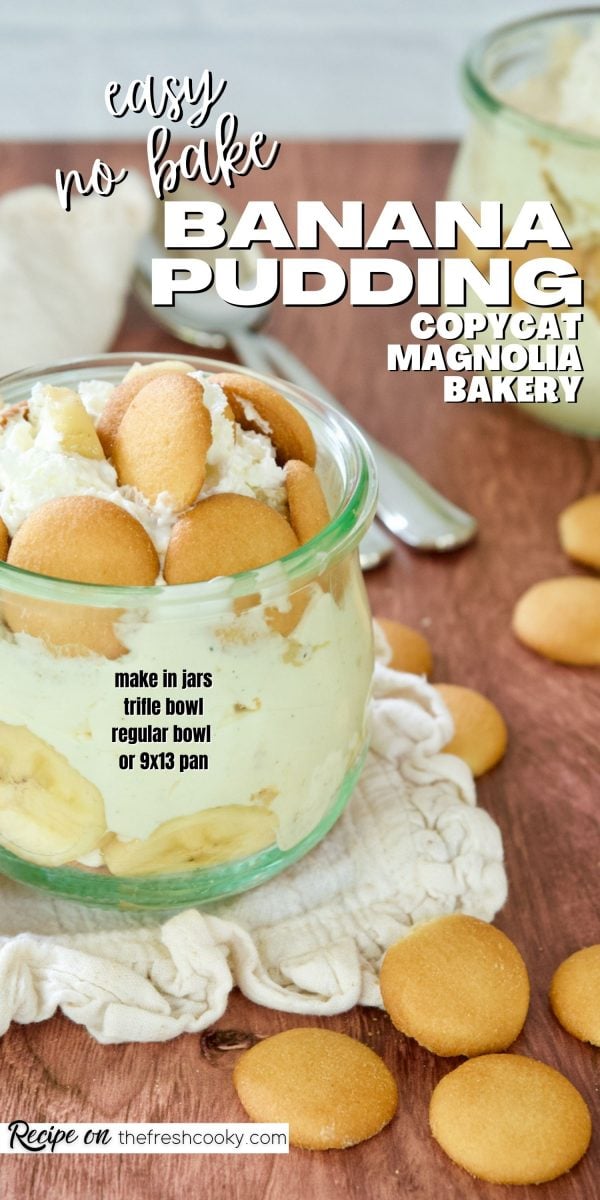
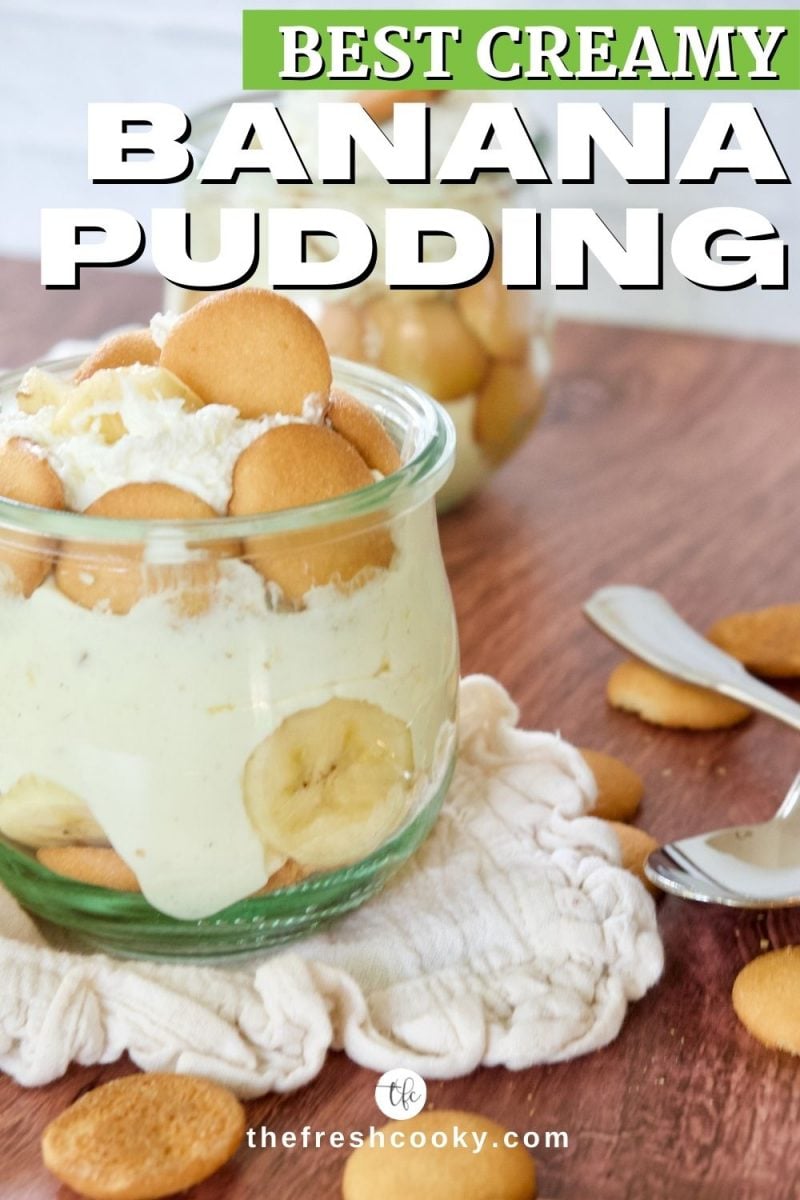
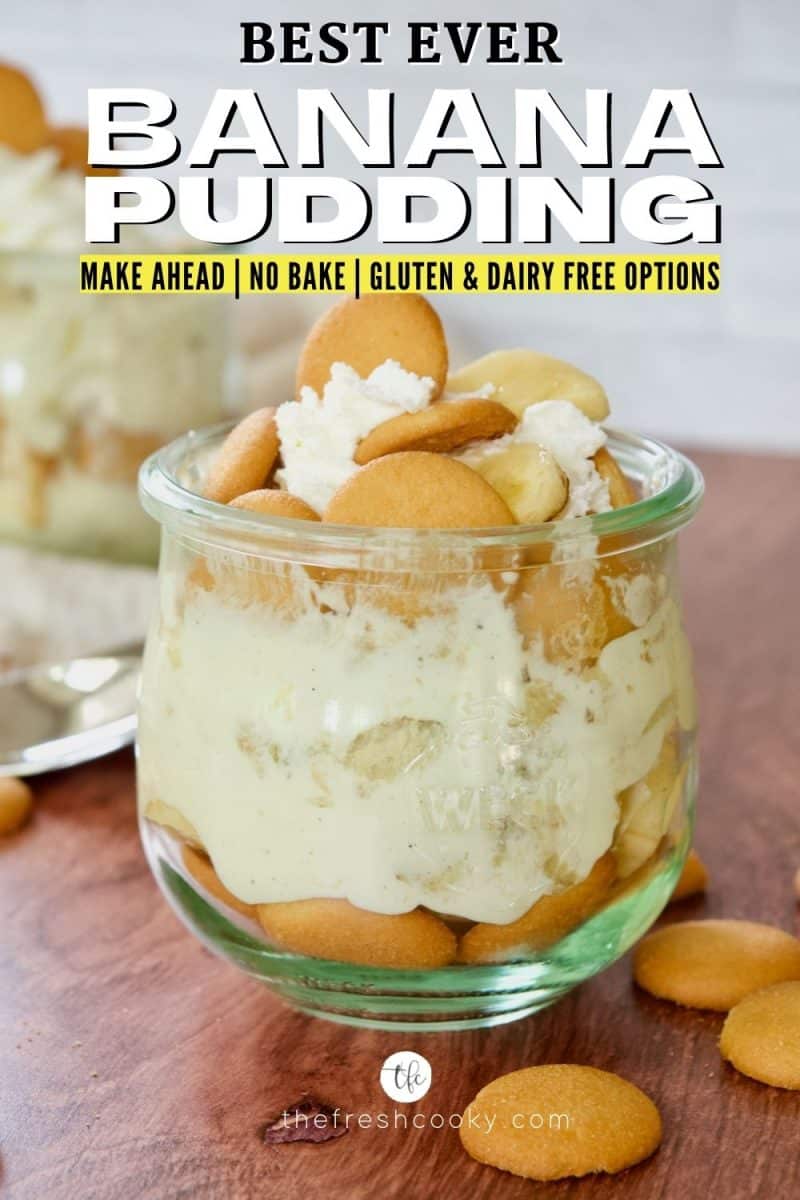
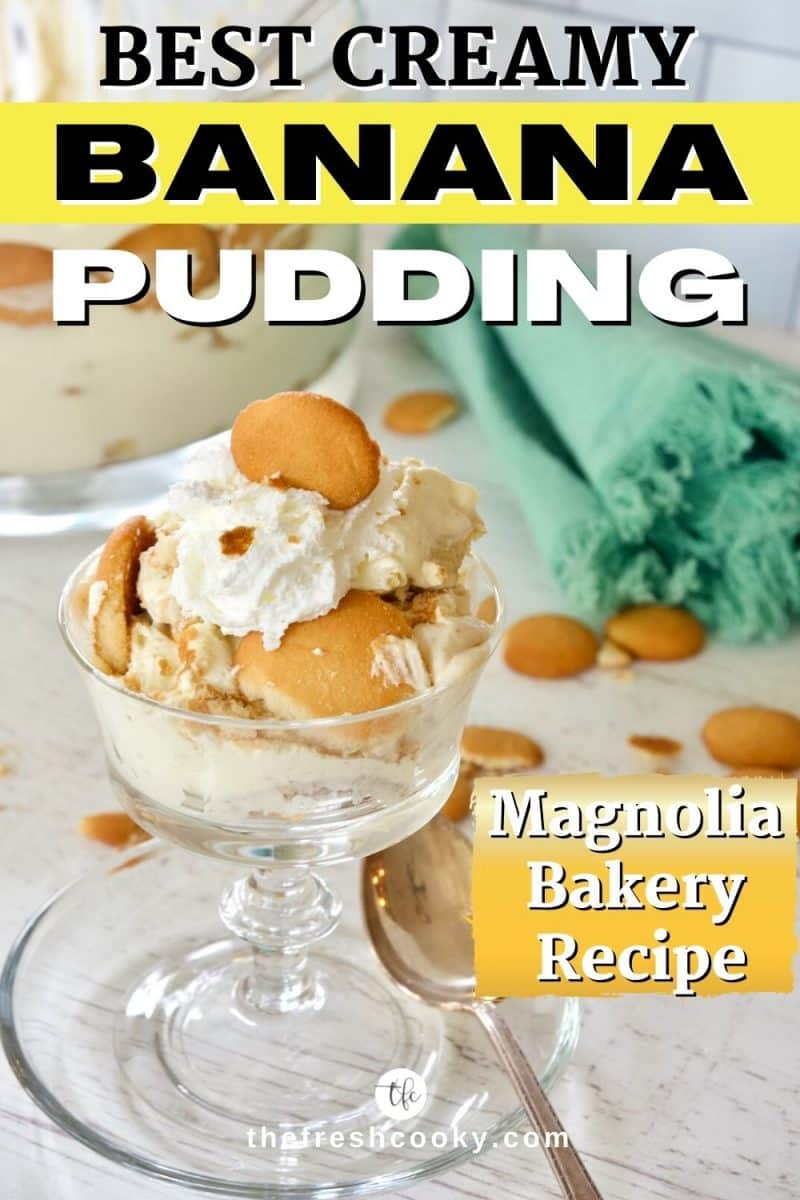
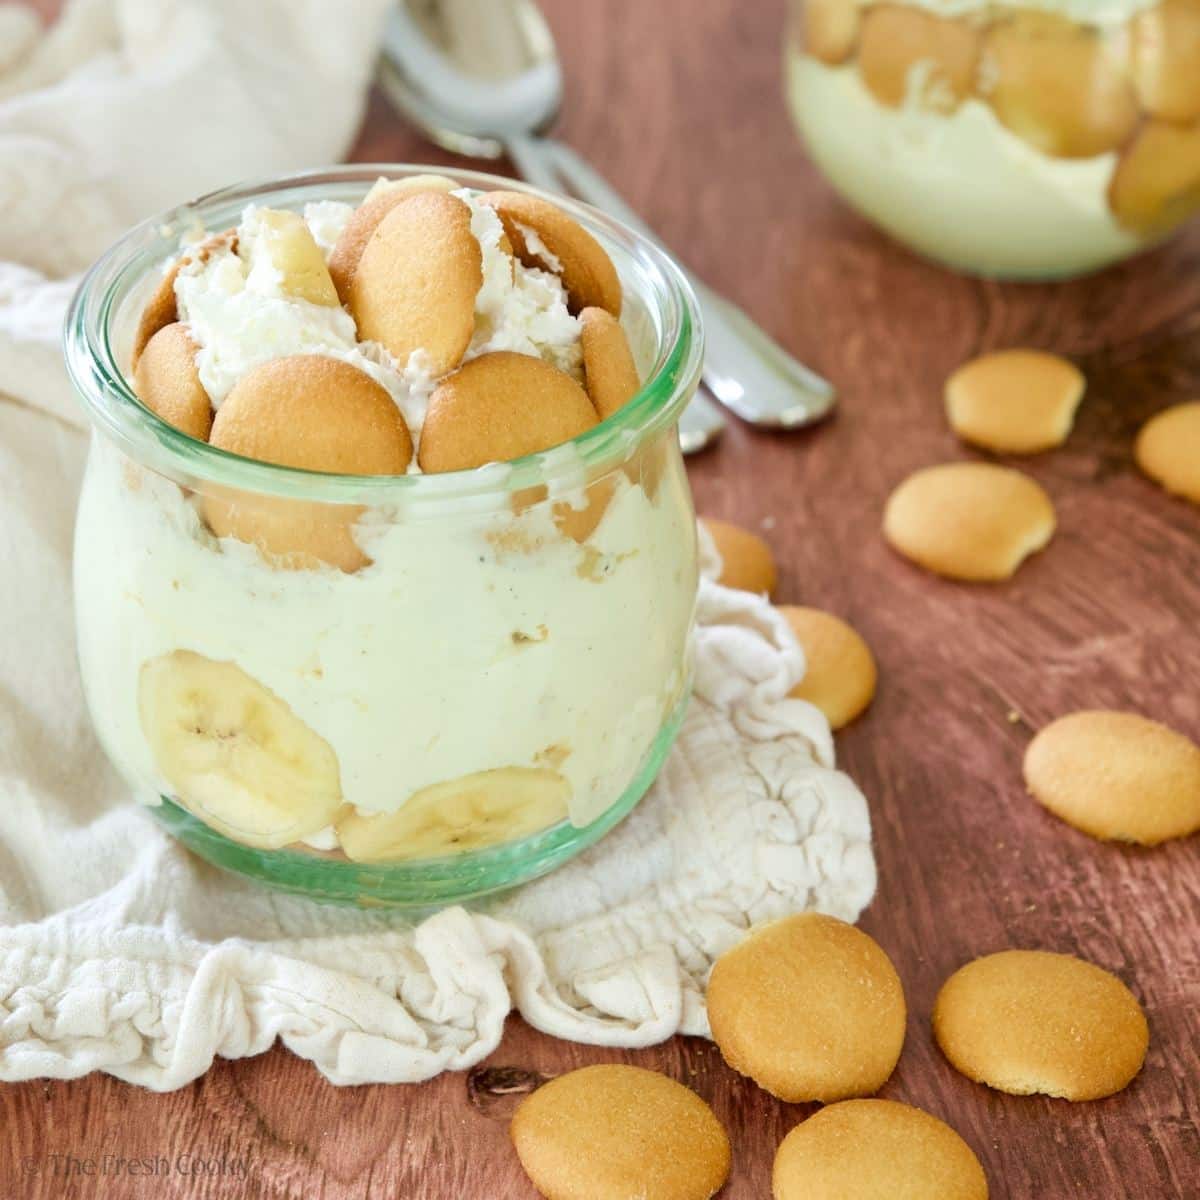
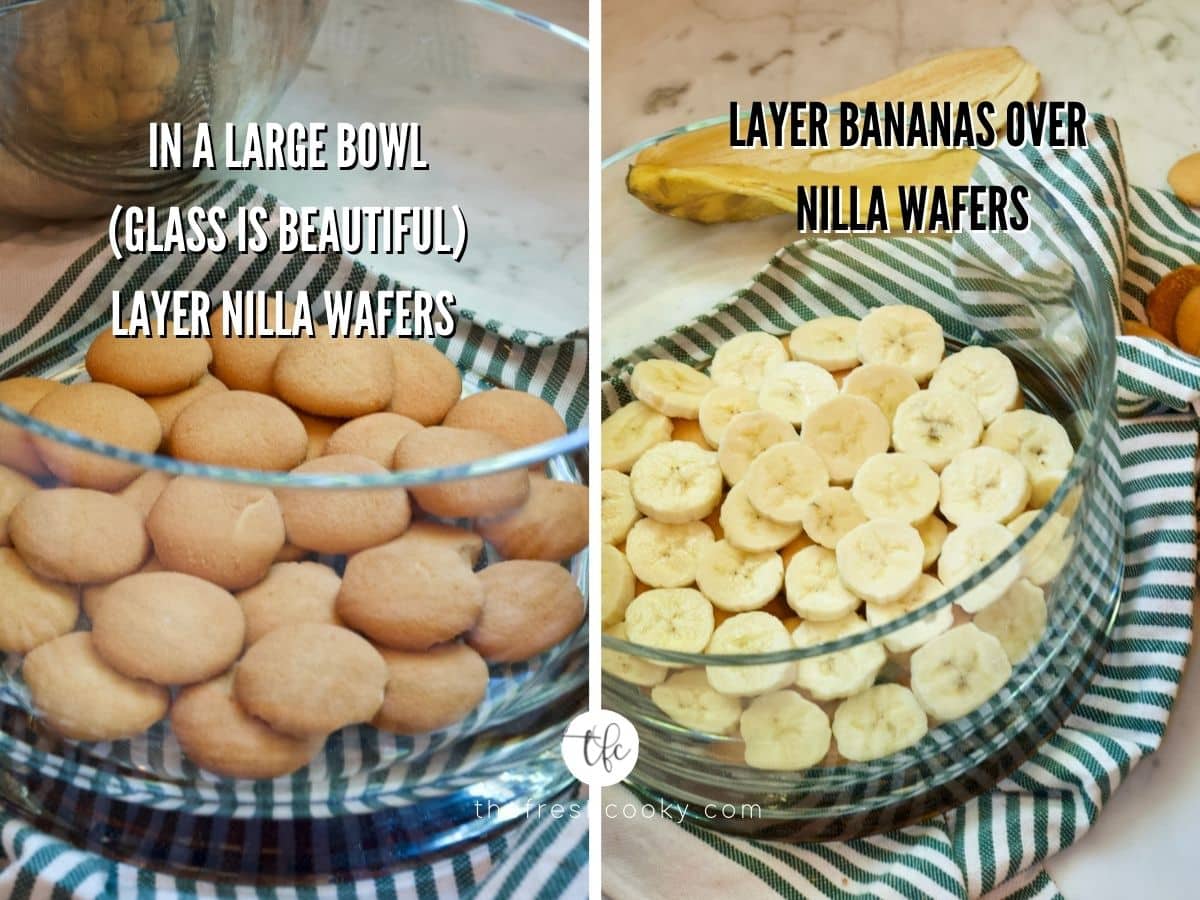
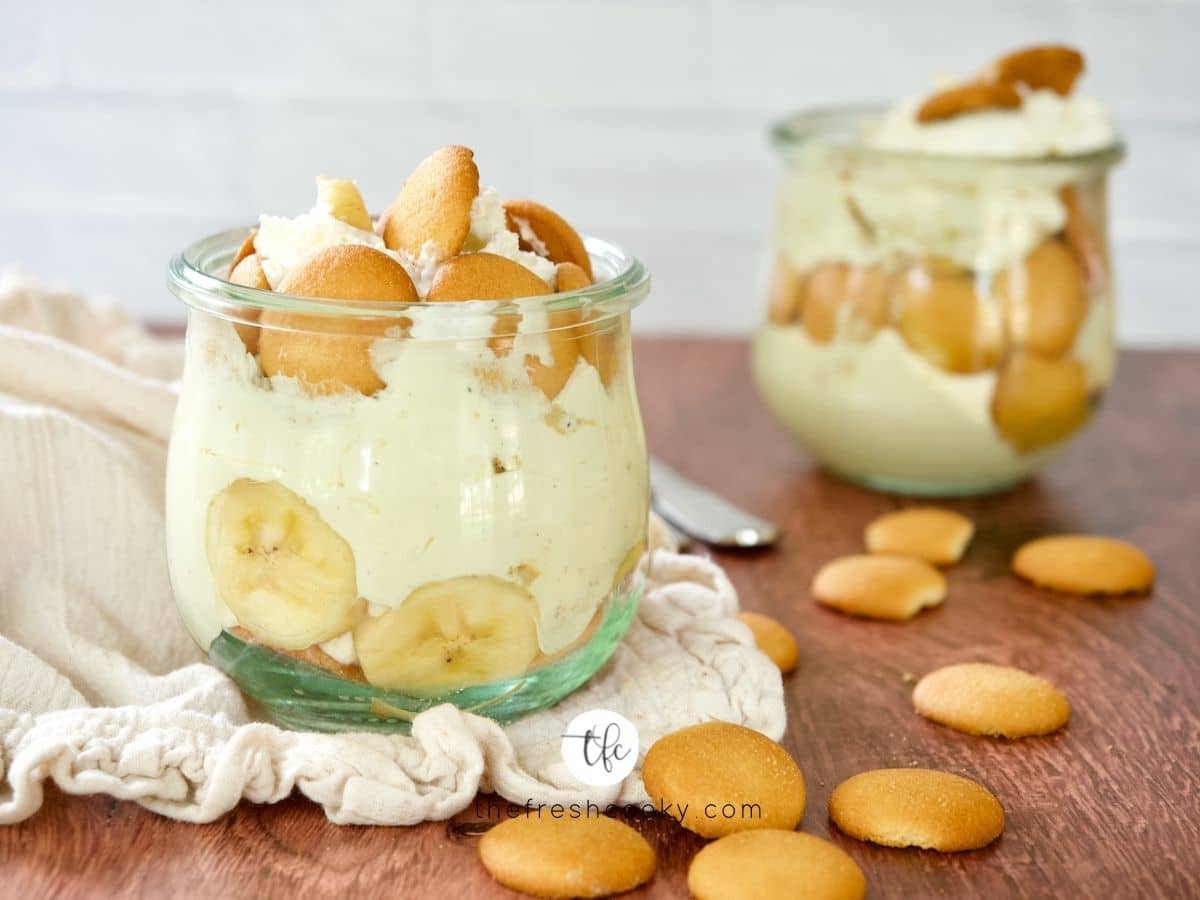
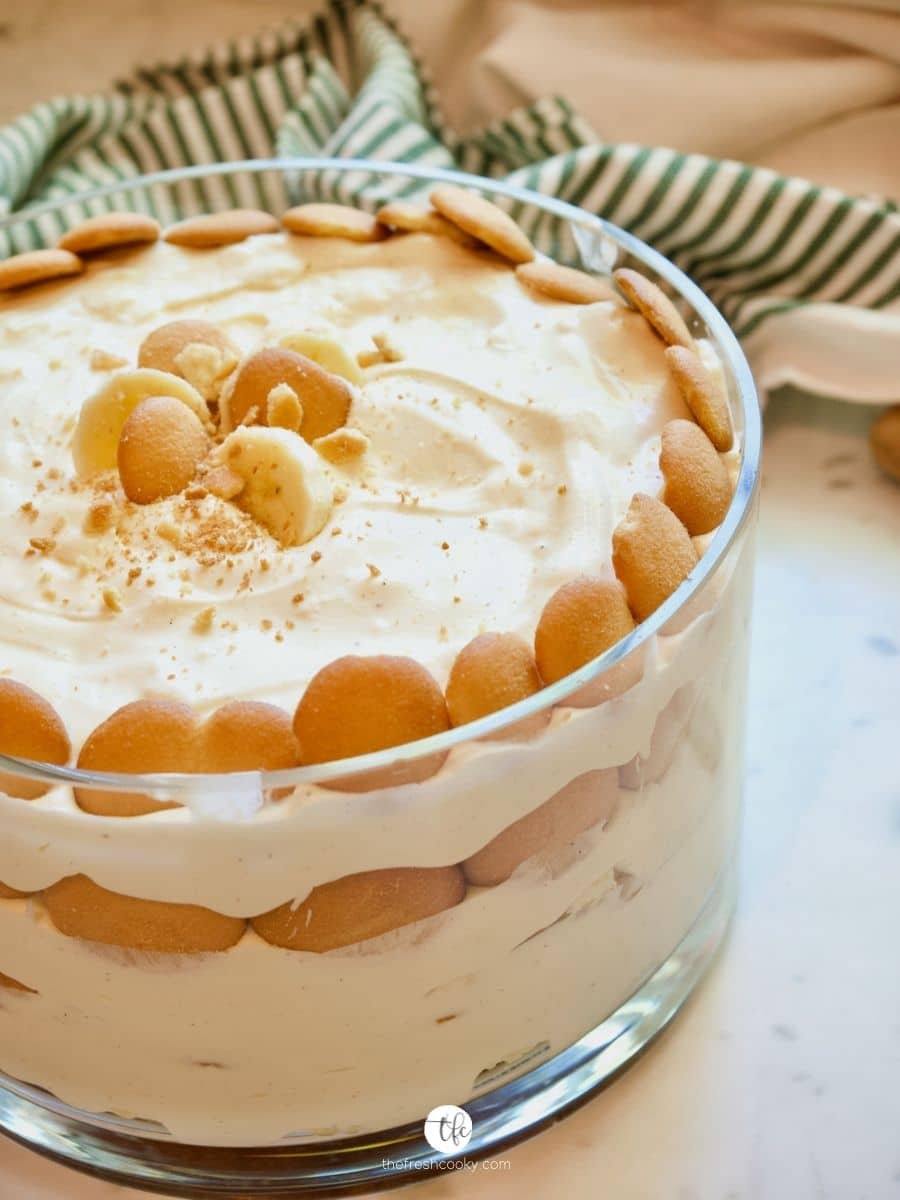
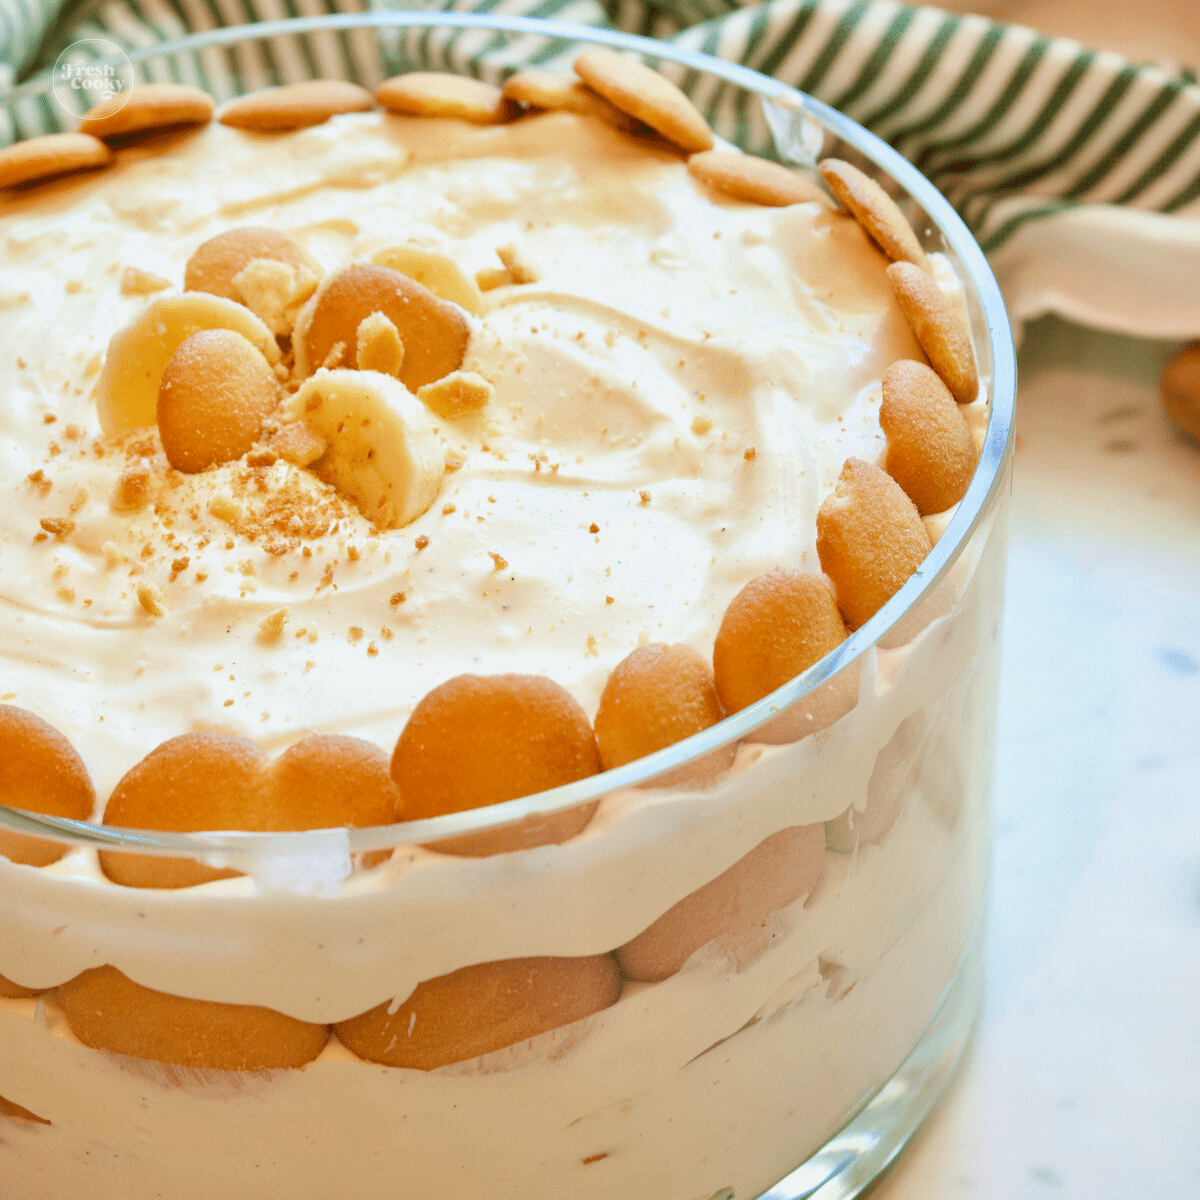
Choose a large, wide bowl (a glass trifle bowl or trifle dish is beautiful to see those layers of wafers) with a 4-5 quart capacity. You can use a trifle bowl, but it’s not necessary; any bowl will do.
Place Nilla Wafers on the bottom layer of the bowl, and then a layer of sliced bananas; you can press some against the side of the bowl if you wish. You might need to do some overlapping.
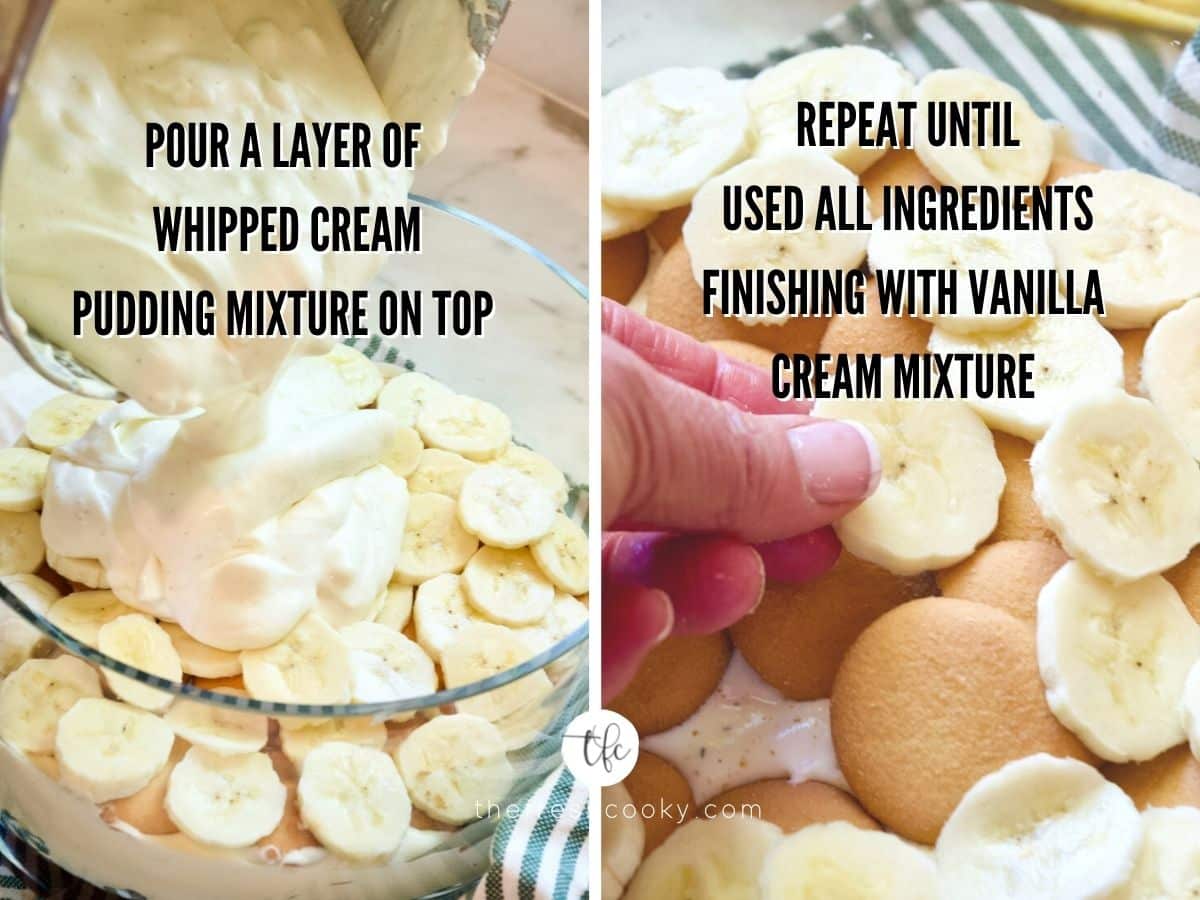
Layer one-third of the pudding on top of the bananas, repeating the layer of vanilla wafer cookies, bananas and pudding two more times.
Step 4: Final steps for this simple banana pudding recipe
I fancied mine up a bit by lining the top edge with mini Nilla Wafers, not necessary, but can you really have too many? I don’t think so. This is a truly simple Southern banana pudding recipe that anyone can make.
Cover with plastic wrap and refrigerate for at least 4 hours, or up to 8 hours.
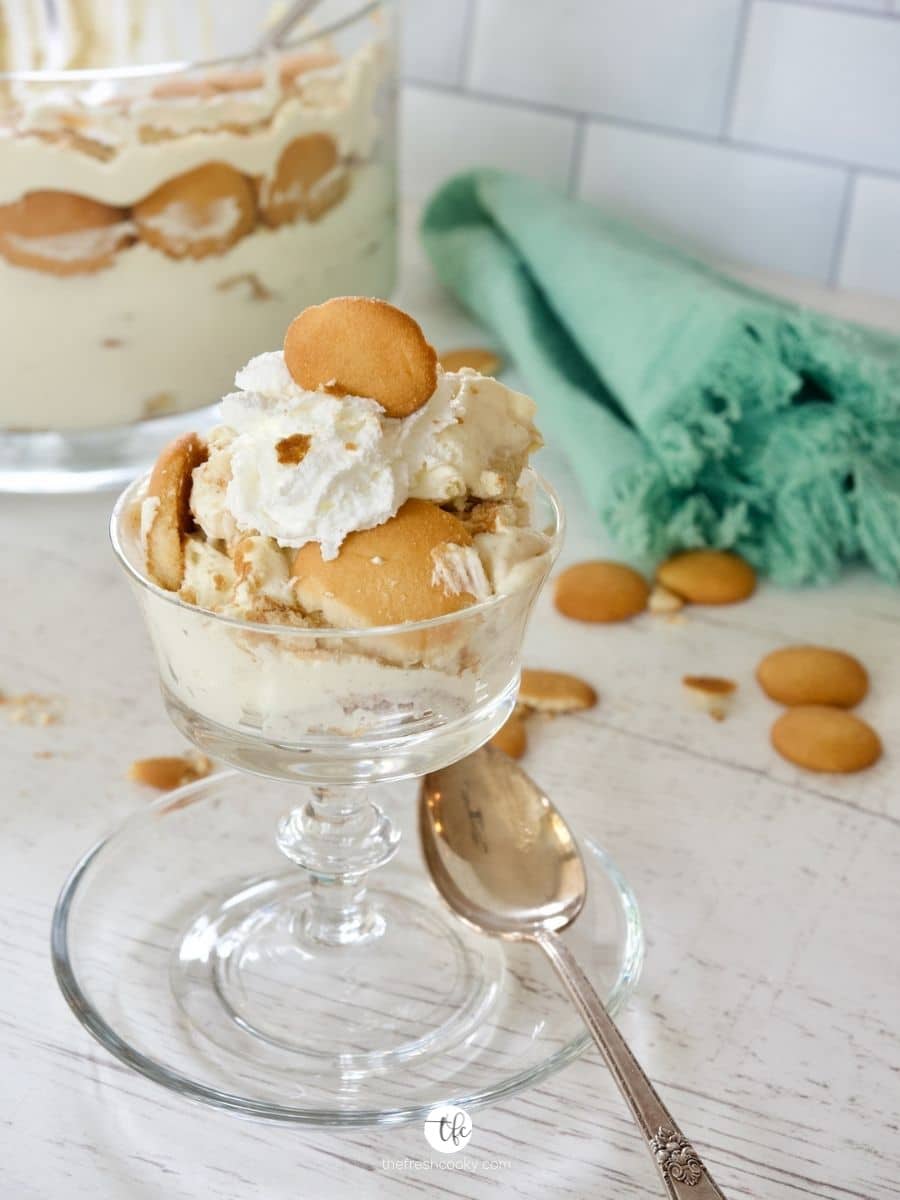
To serve this no-bake banana pudding, scoop it into bowls, dessert dishes, wine glasses, or mason jars. Add a dollop of whipped cream, a Nilla Wafer, and a banana slice if you’re feeling fancy!
Frequently Asked Questions
Nope! I used to think so too, but they’re actually different. This Magnolia Bakery Banana Pudding comes from the iconic New York City bakery, famous for its cupcakes and this banana pudding that’s always on their menu. It’s one of their all-time favorite desserts, and now you can make it at home, no trip to NYC required! Not to be confused with the Gaines’ Magnolia brand in Waco, Texas.
Banana pudding should always be stored in the fridge. While the cookbook says it’s best enjoyed 4–8 hours after making, it’s still good for about 48 hours. That said, I served this at book club and my family happily ate the leftovers all week! The bananas may brown a bit after a few days, but the pudding is still totally delicious for 4–6 days…if it lasts that long.
For a classic, creamy banana pudding like this, I don’t recommend freezing; it’s best fresh from the fridge. That said, if you have leftovers, the ingredients are similar to no-churn ice cream. Just don’t thaw, eat it straight from the freezer!
Variations for the best banana pudding recipe
- Use banana pudding mix instead of vanilla for even more banana flavor.
- Try mini Nilla Wafers for bite-sized layering or topping.
- Make it in jars or cups for easy, grab-and-go servings.
Gluten-Free Options: The only gluten in this recipe comes from the Nilla Wafers. Try one of these easy swaps:
- Skip the wafers entirely for a naturally gluten-free, lower-carb dessert.
- Use your favorite gluten-free butter cookie or wafer-style cookie; I like the Kinnikinnick brand.
Dairy-Free Options: Replace sweetened condensed milk with sweetened condensed coconut milk. Use whipped coconut cream instead of heavy cream (see below).
How to Make Coconut Whipped Cream:
- Chill 1–2 cans of full-fat coconut milk overnight.
- Scoop out the thickened cream, leaving the water behind.
- Whip until fluffy using a hand or stand mixer.
- Optional: Add 1–2 tablespoon powdered sugar and ½–1 teaspoon vanilla for extra flavor.
- Fold into the pudding mixture as directed.
Storage Tips
Store leftover layered banana pudding dessert in an airtight container and refrigerate up to 3-5 days. It will become soggier over time, but it honestly adds to the lusciousness of the banana pudding.
Mini or Mason Jar Banana Pudding
- I served my Banana Pudding in these beautiful Weck jars, or use an 8 oz Mason jars.
- Serve up in stemless wineglasses!
- For that matter, serve in martini glasses or stemmed wine glasses; get creative! I would love to see how you serve your banana pudding, be sure to tag me on Instagram, Pinterest or Facebook #thefreshcooky.
Well, that’s about it! I know you’re going to love this Southern Banana Pudding—it’s a classic dessert that’s perfect for potlucks, parties, or just a sweet treat at home.
More easy Southern recipes you’ll love
Like this recipe?
Don’t forget to give it a ⭐️⭐️⭐️⭐️⭐️ star rating and leave a comment below the recipe!
Video
Equipment
Ingredients
- 14 ounce sweetened condensed milk I used Organic
- 1 ½ cups ice cold water
- 1 3.4 oz instant vanilla pudding mix if you can find it, use organic, if not, Jell-O works great
- 1 teaspoon Vanilla Bean Paste or replace with equal amount of regular vanilla extract.
- 3 cups heavy cream I used organic heavy whipping cream
- 12 ounce Nilla Wafers regular or mini or buy both and mix!
- 4 cups bananas ripe, sliced about 4-5 medium bananas
Instructions
Step 1 | The Night Before
- In a medium bowl, combine the sweetened condensed milk and cold water. Use a hand mixer on medium speed and mix for about 1 minute, until fully blended and smooth.Tip for Cold Water: To get it extra cold, fill a measuring cup with 1½ cups water and a handful of ice. Let it sit for a minute, then pour off the cold water (leaving the ice behind) and measure from that.14 ounce sweetened condensed milk, 1 ½ cups ice cold water
- Add the pudding mix and vanilla bean paste to the bowl. Beat on medium speed for about 2 minutes, until the mixture thickens slightly and everything is well combined.Note: It won’t look like pudding yet, that’s okay! It will thicken more as it chills.1 3.4 oz instant vanilla pudding mix, 1 teaspoon Vanilla Bean Paste
- Cover the bowl and refrigerate for at least 3–4 hours, or overnight if possible. This chilling time allows the pudding mixture to fully set and thicken.
Next Day: Assemble Banana Pudding
- In a large mixing bowl or in your stand mixer with whisk attachment, whip the heavy cream until stiff peaks form.3 cups heavy cream
- Gently fold the chilled pudding mixture into the whipped cream until fully combined. You want it well mixed with no streaks of pudding, but don’t overmix, it’s fine if there are a few soft lumps. Keeping it light and fluffy is the goal!
- Choose a large, wide bowl with a 4–5 quart capacity, glass is great for showing off the layers. A trifle bowl works beautifully if you have one, but it’s not a must. You can also layer this banana pudding in mason jars for individual servings or in a 9×13-inch baking dish for easy scooping.
- Place a layer of Nilla Wafers on the bottom of the bowl and the a layer of sliced bananas, you can press some against the side of the bowl if you wish. You might need to do some overlapping.12 ounce Nilla Wafers , 4 cups bananas
- Layer one third of the pudding mixture on top of the bananas, repeating two more times.
- I fancied mine up a bit, by adding a few mini Nilla Wafers around the top edge of the bowl, not necessary at all, but can you really have too many Nilla wafers? I think not!
- Cover with plastic wrap and refrigerate for 4 hours and up to 8 hours!
- Serve by scooping into bowls, dessert dishes, wine glasses, mason jars. If desired, add a little spritz of whipped cream, top with Nilla wafer and a slice of banana.
Notes
Nutrition


Mirlene
I love making this dessert specially when theres no baking involved! The banana pudding satifies our sweet tooth right after dinner!
It really does, it’s so delicious!
Beth
I live in a place that is starting to get hot so this no bake dessert if perfect for keeping my house cool while still serving a crowd a tasty dessert! Delish!
Absolutely perfect!
Andrea
You had me at old-fashioned banana pudding! Love that you don’t skimp on the bananas or nilla wafers. One amazing dessert!
Absolutely, it’s all about the texture that the bananas and nilla wafers bring!
Anita
We love this banana pudding, and I love it since it’s super easy to prepare, no cook, and no baking. Pretty much I can make this anytime of the year.
Absolutely, thank you so much!
Andrea
I love the vanilla pudding and vanilla wafers used in this recipe. It really was that easy to make!
Glad you found it so easy!
ColleenB. ~ Tx.
As I was looking over the recipe; hubby walked in and asked; ‘does she deliver?’
Assuming not, So I guess I will have to break down and make this for him, but I assure you, with him it probably won’t last for 1 day; ( a day & a half……maybe) and it would be gone.
? 4 U; No vanilla paste so would it be ok to use the pure vanilla extract instead of?
Thank You
Enjoy your day.
Stay cool & stay safe
Haha! No, sadly I do not deliver! And yes, of course regular vanilla is fine, I should have put that in there and will do so now Colleen! I hope you (and your hubby) enjoy it! Stay cool yourself! Kathleen
Tasia ~ two sugar bugs
This no bake banana pudding will be perfect when our summer finally arrives! It would look so pretty in a trifle bowl, but I’m also loving the adorable look in the individual glass jars.
It’s been over 100 the past two days here, I would say summer has arrived! And yes, it’s so gorgeous in a trifle bowl! Thanks Tasia!