
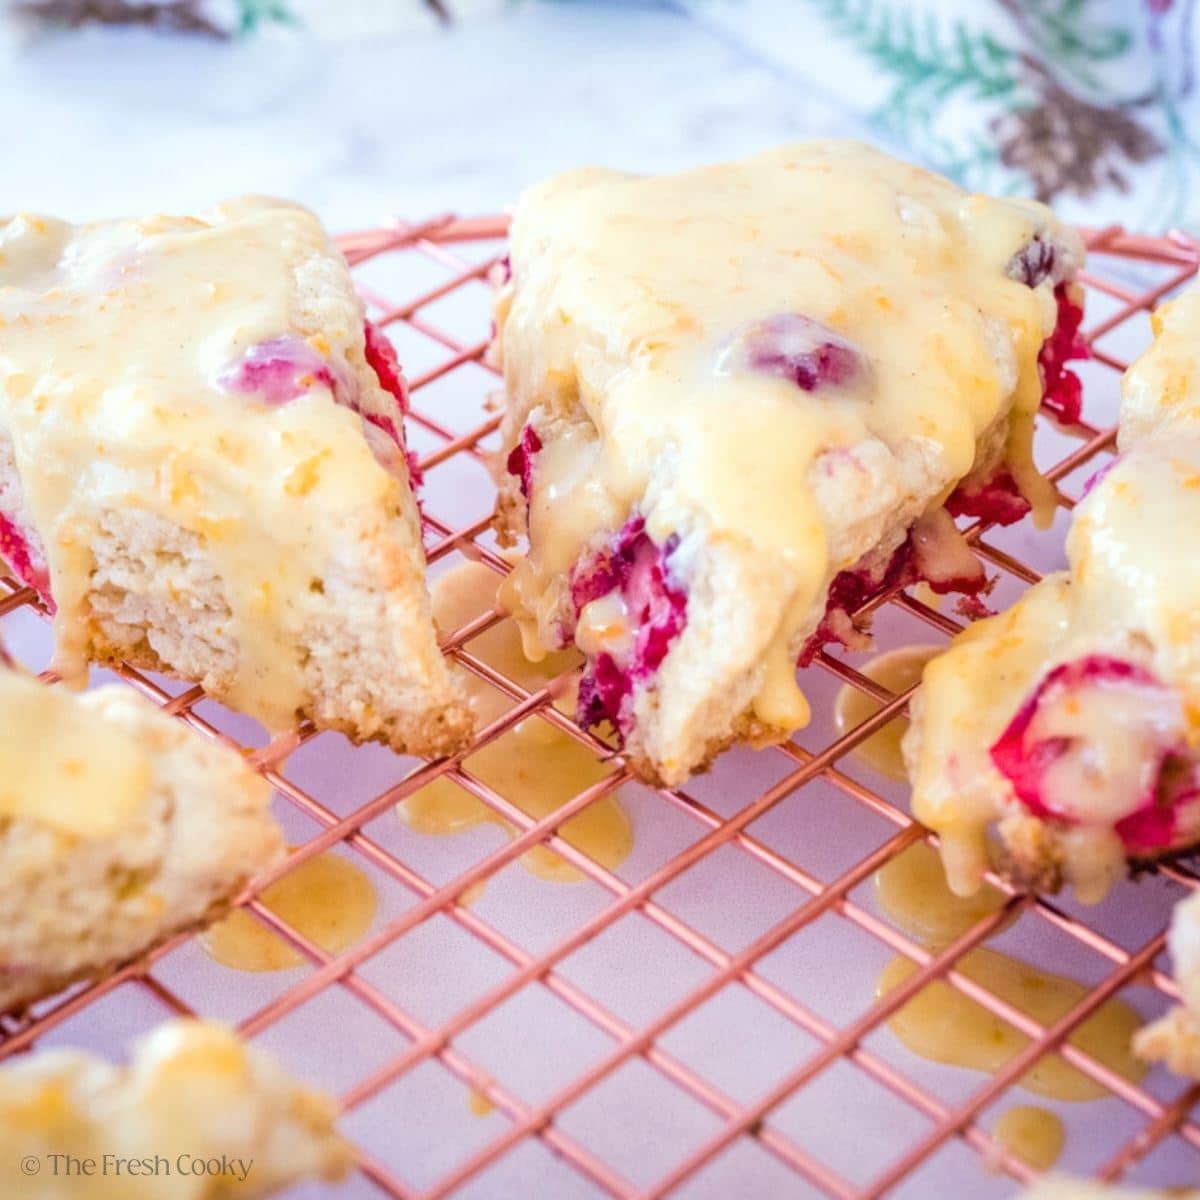
These homemade Cranberry Orange Scones are melt-in-your-mouth tender with a golden, crispy exterior and bright pops of cranberries. Finished with a silky orange vanilla glaze, they’re the perfect balance of sweet, tart, and buttery flavor!
You Will Love this Cranberry Orange Scone Recipe!
I love flexible recipes, and these Cranberry Orange Scones fit the bill! Whether you have dried cranberries (Craisins) in your pantry or a stash of fresh or frozen cranberries on hand you are good to go. I love using frozen cranberries; they add a festive pop of tart flavor and keep the dough nice and cold – a key to tender, flaky scones.
Based on my ever-popular orange scone recipe, this cranberry version has everything you love: a buttery, melt-in-your-mouth crumb and a bright, citrusy kick. Each bite is full of tangy cranberries and topped with a sweet, zesty orange vanilla glaze. It’s just the right balance of sweet and tart, so they are a must have for your holiday brunch or Christmas morning breakfast.
If you are new to scone baking, don’t worry – this recipe is as simple as it gets! The dough is easy to mix and shape, and you can even prep it ahead to freeze it unbaked. That means you’ll always have warm, fresh from the oven scones to impress guests or just treat yourself. Friends and family request this recipe often!

Cranberry Orange Scone Recipe Ingredients
- Flour: All-purpose flour works great here! I like to use organic, unbleached, all-purpose flour.
- Sugar: To sweeten things up and help the scones get some color in the oven!
- Baking Powder: Baking powder gives the scones their lift.
- Kosher Salt: To balance out the flavors!
- Butter: Make sure you use very cold butter. Cold butter = flaky scones. I love grating mine and popping it in the freezer until it is ready to use.
- Cranberries: You can use dried, fresh, or frozen!
- Heavy Cream: To add moisture and richness to the dough.
- Vanilla Extract: You can use vanilla bean paste or vanilla extract here.
- Egg: An egg helps add structure to these scones and keep them in shape!
- Orange Zest & Juice: You will need both orange zest and fresh orange juice to lend the perfect amount of citrus flavor to these scones.
- Orange Butter Glaze: Optional of course, but it finishes them beautifully; you’ll need powdered sugar, vanilla extract, a little butter, more orange zest and orange juice. If preferred, add a few drops of orange extract in place of the zest.
Get the full recipe in the recipe card below.

How to make Cranberry Orange Scones
Step 1 – Make the Dough
Line a baking sheet with parchment paper. In a large mixing bowl, whisk the flour, granulated sugar, baking powder, and salt together.


Toss frozen, grated butter into flour mixture and using a pastry cutter or your hands, quickly mix until it resembles coarse crumbs. Stir in cranberries (or dried cranberries)


In a small bowl or measuring cup, whisk together the heavy cream, vanilla bean paste or extract, egg, orange zest and orange juice.


Make a small well in the center of the dry ingredients and pour in the egg mixture. Gently mix together with a fork until the dough just comes together, forming a shaggy dough.


Step 2 – Shape the Scones
Turn out the dough onto a parchment-lined cookie sheet, using the parchment to help form the dough into disc (about 8 inches), about ½ – ¾-inch thick. If the dough is really dry, add a little splash of orange juice or heavy cream, but not too much, a little dry flour is okay. Do not overwork the dough.


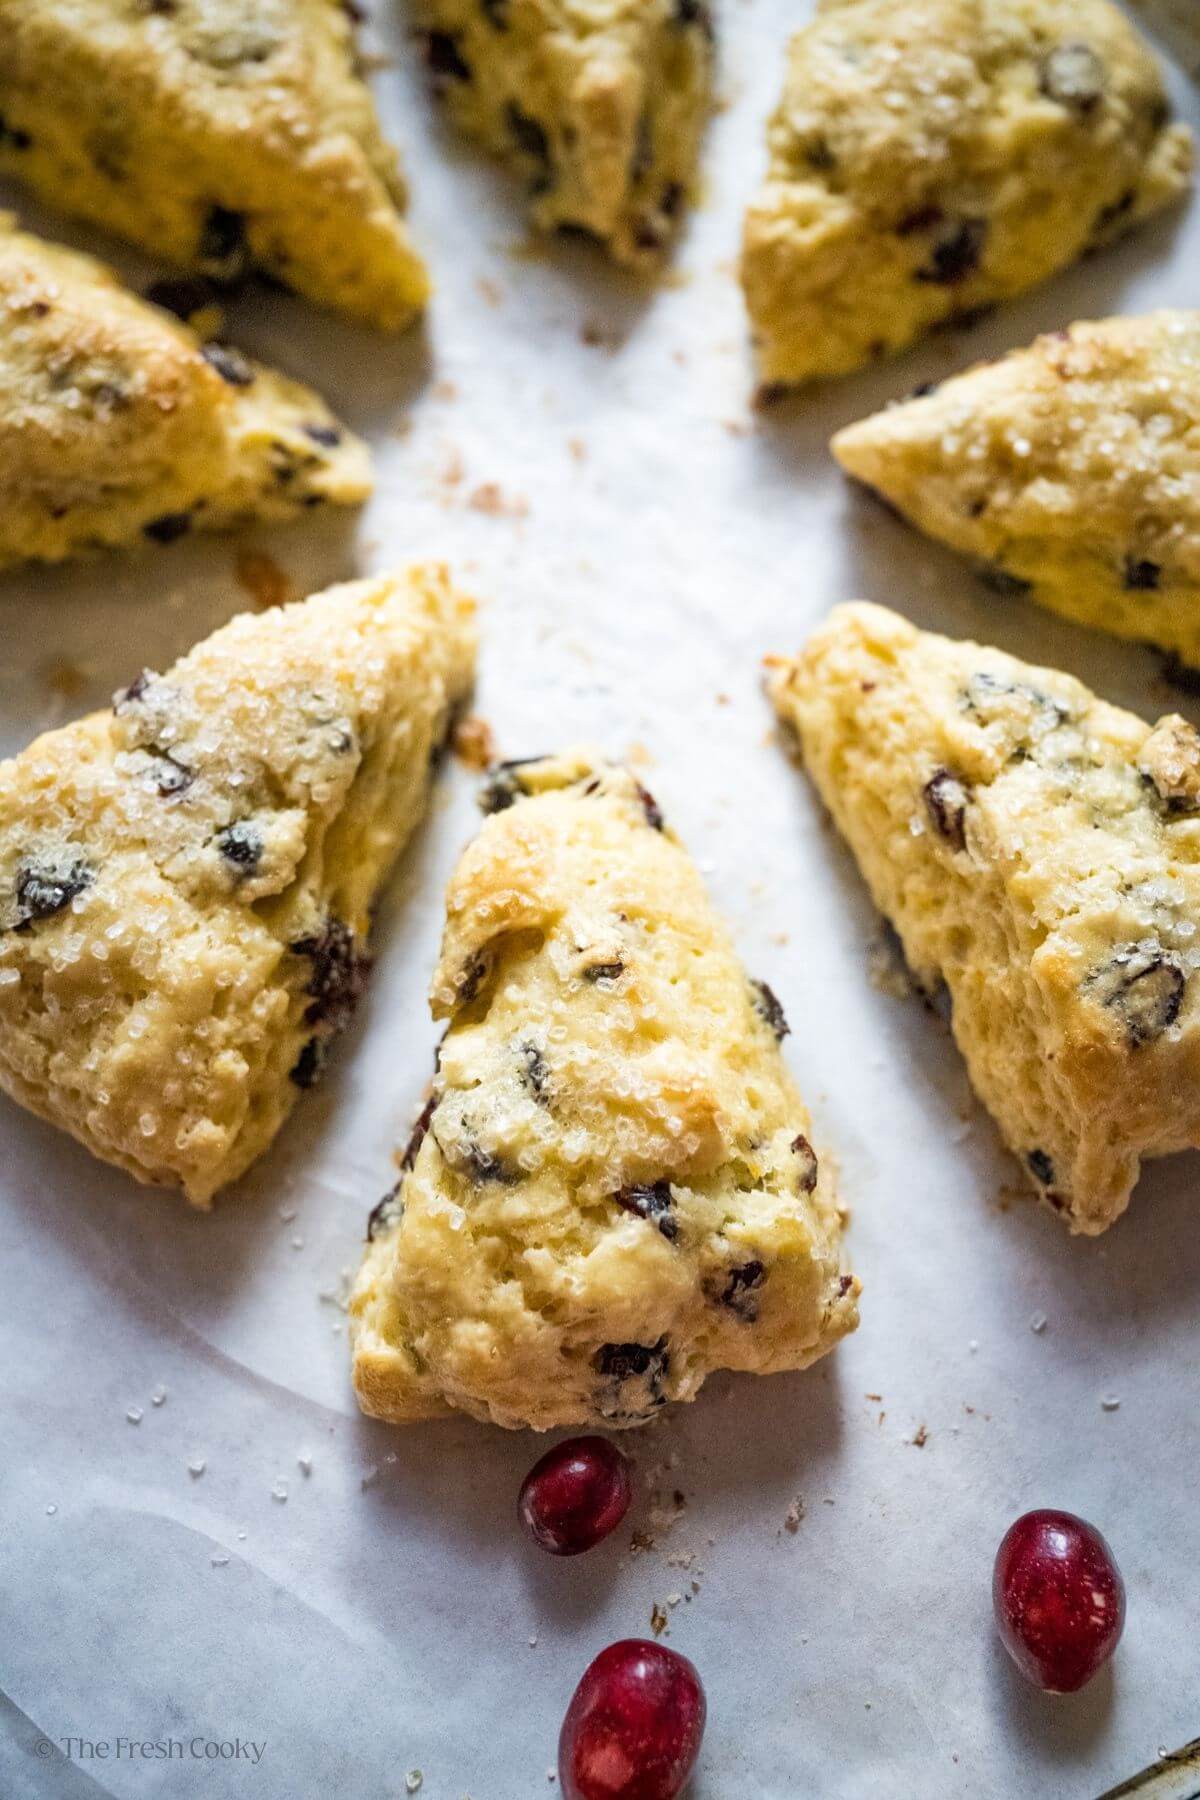
Using a bench scraper or large knife cut the disc in half, then quarters, then again cutting the quarters in half, making 8 large scones (see below for mini scones).
Freeze unbaked scones to firm the butter back up for about 30-60 minutes; now is a great time to preheat the oven to 400°F (204°C). Remember cold is key to light, flaky scones and not overworking the dough. You want the dough to stay together when pinched, but a few spots of flour are okay.


Step 3 – Bake
Bake scones until lightly golden brown on the bottom, about 15-18 minutes; 15 will be softer and 18 more firm. Remove to a rack to cool completely. Every oven bakes differently, so you might peek in at them for around 13-14 minutes and see how they are doing.

Step 4 – Make the Glaze & Serve
In a wide bowl (large enough in case you prefer to dunk the scone in the glaze) mix the powdered sugar, orange zest, melted butter, vanilla bean paste (or vanilla extract) and whisk in just enough orange juice to get a smooth, pourable consistency; whisk until smooth.
Once the scones are cool, drizzle a healthy spoonful of glaze over the top of the scones or one at a time, carefully pick up and dip the scone top into the orange glaze to coat, then return to the rack to set the glaze.

If you want more of a drizzle verses a glaze, make sure scones are completely cooled and keep the glaze thicker.


Success Tips for Cranberry Scones
- Cold Butter: I grate my butter using a standard box grater and place it in the freezer while assembling the rest of my ingredients. You can also cut the butter into small cubes and freeze it – the goal is to have it COLD!
- Real Butter: I cannot stress this enough: it doesn’t matter if you use salted or unsalted butter, but make sure it is real, pure cream butter, no blends! It is not real butter if it is soft coming out of the fridge. And the higher quality of the butter (e.g., European butter), the better the result. Cheaper butter contain water, and that will impact your scones!
- Cold Cream: Unlike other baking recipes (chocolate loaf cake) that, like room temperature ingredients, scones do not! Keep the cream in the fridge until ready to use.
- Do not overwork: Think of scones as the dainty, delicate cousin to yeast bread; whereas yeast bread thrives on kneading to activate the ingredients, scones will become tough and will not rise as well if the dough is overworked.
- Be fast: To cut in the butter, using a pastry cutter keeps warm hands out. The beauty of grating the butter and freezing it allows you to quickly mix it with your hands without warming the dough too much. And my hands are always cold anyway!
- Liquid: Only add enough liquid to bring the dough together, having some extra flour is okay, the dough will look shaggy (see above picture).
- Shaping: To quickly and easily shape your scone disc, use parchment paper (or wax paper works, too) and fold it up on the ingredients, using the paper to press together and smooth the dough into the disc. This contains the floury mess and helps your hands not warm the butter too much. If needed add a teaspoon of liquid at a time, just until large pockets of flour are combined.
- Chill: Place the pan in the freezer for 30-60 minutes once your scones are formed. This gives the scone time to firm the butter back up, chilling it so the magic happens when it hits the hot oven.
- Leavening: Make sure your baking powder is fresh, if it’s spent, your scones will not rise.

Cranberry Orange Scone Variations
- Gluten-Free Scones: Swap the all-purpose flour with a 1:1 gluten-free baking flour. Add an extra tablespoon of cream if the dough feels too dry. I also like replacing ¼ cup of GF flour with ¼ cup of oat flour or almond flour for both texture and moisture.
- Dried Cranberries: Replace fresh/frozen cranberries with ¾ cup dried cranberries.
- Glossy Scones: Brush the unbaked scones (before or after freezing) with heavy cream for a glossy finish.
- Crunch: Sprinkle the tops with coarse sugar before baking for a light, sweet crunch.
- Add a Nutty Twist: Fold in ½ cup of chopped pecans or walnuts for extra texture and flavor.
High Altitude Adjustments for Scones
- Decrease baking powder to 1 ½ teaspoons.
- If above 7,000 feet, add additional 1-2 tablespoons flour
- You may need to increase liquid, but do not overadd. The scones should barely hold together.
- Bake as directed, but begin checking them 2-3 minutes early.

How to Serve Orange Cranberry Scones
You can serve these scones slightly warm or at room temperature along with a cup of coffee or tea! They are also super delicious with a bit of butter or lemon curd.
I like to serve my scones for breakfast or brunch, along with brunch dishes like cinnamon rolls, mini breakfast sandwiches, and a pancake charcuterie board!
How to store a Cranberry Orange Scone
To store your orange and cranberry scones properly:
- Keep them at room temperature in an airtight container for up to 5 days.
- Freeze unglazed baked scones for up to 4 months, wrapped well.
- For make-ahead convenience, freeze unbaked shaped scones and bake directly from frozen!
- If freezing glazed scones, flash freeze for 30-60 minutes, then wrap well in plastic wrap individually and then place in an airtight container or freezer baggie.
How to Freshen Up Stale Scones
Quick Microwave Fix
Wrap the scone in a slightly damp paper towel and microwave for 10-15 seconds. The steam will soften them up—just don’t overdo it!
Warm Them in the Oven
Wrap the scones in foil and bake at 300°F (150° C) for 5-10 minutes. This gently revives their texture without drying them out. Don’t worry if they have glaze on them, it will melt into the scones making them even more moist.

Cranberry Orange Scones Recipe FAQs
Keep your ingredients, especially the butter, very cold to create flaky layers. Handle the dough as little as possible to avoid toughness, and chill it briefly before baking. Work quickly and use a light touch when mixing and shaping for tender, delicious scones every time!
The perfect scone should be neither dry nor overly moist! It should have a tender, slightly moist interior. The exterior should have a slight crispness. When broken open, it should be fluffy and light but still hold together well.
Your scones might not be light and fluffy if the butter isn’t cold, the dough is overworked, or too much flour is added. Make sure to use fresh leavening agents, handle the dough gently, and chill it before baking to keep the butter cold and create steam for that perfect rise.
To test if scones are perfectly baked, look for several key indicators. The tops should be light golden brown while the bottoms take on a slightly darker golden hue. A toothpick inserted into the center should come out clean, and when gently pressed, the top should feel firm yet slightly springy!
Our Scone Recipes

More Popular Recipes from The Fresh Cooky
Like this recipe?
Don’t forget to give it a ⭐️⭐️⭐️⭐️⭐️ star rating and leave a comment below the recipe!
Equipment
Ingredients
- 2 cups all-purpose flour I use organic, unbleached all-purpose flour
- ⅓ – ½ cup granulated sugar I use all-natural cane sugar, I typically use ⅓ cup to counter the tart
- 2 teaspoons baking powder reduce to 1 ½ teaspoons for high-altitude
- ¼ teaspoon kosher salt
- 4 tablespoons butter grate the butter and place in the freezer or cut into small cubes and freeze until ready (unsalted butter may be used, add additional ¼ teaspoon salt)
- 1 cup frozen cranberries heaping, use frozen or fresh, or ¾ cup dried cranberries
- ½ cup heavy cream you might need an extra tablespoon or two for high altitude
- 1 teaspoon vanilla bean paste or vanilla extract
- 1 large egg
- 1 tablespoon orange zest grated from one orange, I used large naval oranges
- 1-2 tablespoons orange juice freshly squeezed
For the Orange Vanilla Butter Glaze
- 1 cup powdered sugar
- ½ teaspoon vanilla bean paste or vanilla extract
- 1 tablespoons melted butter
- ½ – 1 tablespoon orange zested I like it orangey, so I use 1 tablespoon
- ½ – 1 tablespoons orange juice use as much or as little as you need to get a smooth consistency
Instructions
- Line a baking sheet with parchment paper. In a large mixing bowl, whisk the flour (2 cups), granulated sugar (⅓ – ½ cup), baking powder (2 tsp) and salt (¼ tsp) together. See note 1 for high altitude adjustments.

- Add frozen, grated butter (4 TBL) into flour mixture and using a pastry cutter or your hands, quickly mix until it resembles coarse crumbs. Stir in fresh or frozen cranberries (or dried cranberries)
- In a small bowl or measuring cup, whisk together the heavy cream (½ cup), vanilla bean paste or extract (1 tsp), egg (1), orange zest (1 TBL) and orange juice (1-2 TBL).
- Make a small well in the center of the dry ingredients and pour in the egg mixture. Gently mix together with a fork until the dough just comes together, forming a shaggy dough.
- Turn out the dough onto a parchment-lined cookie sheet, using the parchment to help form the dough into an 8 inch disc about ½ – ¾ inch thick. Turn the dough, lightly kneading to incorporate any larger dry flour, adding a teaspoon of liquid (cream or OJ) at a time. Do not overwork the dough.
- Using a bench scraper or large knife cut the disc in half, then quarters, then again cutting the quarters in half, making 8 large scones (see below for mini scones).
- Separate scones away from the other, on the parchment lined cookie sheet. Freeze or refrigerate scones to firm the butter back up for 30-60 minutes; now is a great time to preheat the oven to 400°F (204°C). At this point they may be frozen wrapped well in plastic wrap and placed in a baggie for up to 2 months. Bake straight from frozen, adding a few minutes if needed.
- Bake scones until lightly golden brown on the bottom, about 15-18 minutes, 15 will be softer, 18 more firm. Remove to a rack to cool completely.Remember all ovens heat differently, scones are ready when they are puffed, lightly golden on top and darker golden on the bottom, when lightly touched they should spring back.


For the Orange Butter Glaze
- In a wide bowl (large enough to dunk a scone) mix the powdered sugar (1 cup), orange zest (1 orange), melted butter (1 TBL), vanilla bean paste (½ tsp) and whisk in just enough orange juice to get a smooth, pourable consistency; whisk until smooth.
- Once the scones are cool, for glazed scones, spoon glaze over the tops, or carefully pick up and dip the scone top into the orange glaze to coat, then return to the rack to set the glaze. For drizzled scones, do not thin the glaze so much and drizzle over completely cooled scones.
- Store scones on the counter in airtight container up to 5 days, or wrap them individually and place in a pretty covered cake stand. Scones may also be frozen 3-4 months and wrapped well.

Notes
High Altitude Adjustments for Scones
- Decrease baking powder to 1 ½ teaspoons.
- If above 7,000 feet, add additional 1-2 tablespoons flour
- You may need to increase liquid, but do not overadd. The scones should barely hold together.
- Bake as directed, but begin checking them 2-3 minutes early.
- When forming the dough discs, split the dough into two even portions on their own parchment sheets.
- Proceed with shaping into a smaller disc and cutting the same way, yielding 8 smaller petite scones per disc.
- Bake about 12 minutes.
- Liquid: When adding fresh squeezed orange juice, whisk in a few tablespoons until the consistency is thick yet pourable.
- Wire Rack: This makes clean-up and setting so much simpler. Using your same baking pan, and parchment, set a wire rack over the top then use it to place scones on to set the glaze.
- Glaze falls off: If it falls off or soaks in, it’s one of two things. Your scones need to be cooled, and/or you thinned out the glaze too much. Add a bit more powdered sugar a tablespoon at a time until the glaze is the right consistency.
- Leftover glaze: Add a little extra drizzle to each scone with a spoon or spatula!
Nutrition


Veronica
Can these be baked in a scone pan
Absolutely Veronica! Just keep an eye on them. They might bake a little quicker.
Diane
These were tasty! Thank you! I put the shaped dough in the freezer 45 minutes before baking and they held their shape beautifully. I froze some after baking & frosting. Reheating them on the defrost setting worked really well, just until warm but before the frosting melted. So good!
Perfect!! Love your tips, Diane! Thank you so much!