


Make creamy, homemade Greek yogurt with just 2 ingredients and minimal effort! This easy recipe is less tangy than store-bought and full of fresh, delicious flavor.

Originally published in 2018. The recipe remains the same, but I’ve updated the photos and added more helpful methods and tips to improve your experience and make the process even easier!
This recipe is from my long-time dear friend, neighbor, and blog encourager, Eliza. Check out her blog at Happy Simple Living and her cookbooks.
Why You’ll Love This Homemade Greek Yogurt Recipe
Homemade yogurt is surprisingly simple; you only need two ingredients, and most of the time, it’s completely hands-off. It’s smoother and milder than store-bought, with a soft, fresh taste that’s not nearly as tangy.
Once you try it, you’ll be amazed at how easy it is to make your own. No fancy tools or experience are needed, just a little patience, and you’ll be scooping creamy yogurt in no time.
I’ve made this recipe again and again because it’s reliable, affordable, and just tastes better than anything from a container. It’s also super versatile; perfect for breakfast bowls, smoothies, baking, or just a spoonful with a drizzle of honey. I’ll share how to make it in the Instant Pot and the Slow Cooker, keep reading! And also try this Sous Vide Yogurt!
What is Greek Yogurt?
Greek yogurt is simply yogurt that has been strained to remove most of the liquid whey. By taking out that extra liquid, you’re left with a yogurt that’s thicker, creamier, and higher in protein than regular yogurt. It has a rich texture you can stand a spoon in, and a flavor that ranges from mild and fresh to tangy, depending on how long it’s incubated.
Because of its versatility, Greek yogurt shows up everywhere: in breakfast bowls, smoothies, baking, savory sauces, and even classic dips like tzatziki. It’s one of those staple ingredients that feels fancy but is really just regular yogurt with a little makeover.

Pair this with this easy Eggs in Puff Pastry or this easy Quiche Florentine for a delightful breakfast or brunch.
Greek Yogurt Recipe Ingredients
- Plain yogurt: You will use just a few tablespoons for your starter culture. Use a quality plain store-bought yogurt if you don’t already have some.
- Milk: I like using organic, whole cow’s milk, or raw milk. It would be awesome if you could find it, but others have found success using 2%, skim milk, and other percentages of milk, too! You’ll need a half-gallon to a gallon of milk (make sure you have a large bowl for straining).
- Cheesecloth is handy when you are straining the yogurt.
- Having an instant-read thermometer makes life easier too!
Get the full recipe in the recipe card below.

Full Fat vs. Low Fat Milk for Yogurt
You’ll see it spelled both yogurt and yoghurt; they’re the same thing, just different spellings (U.S. vs. British).
When it comes to milk, I personally lean toward whole milk. It has the natural fats and enzymes our bodies need to break it down properly and support brain health. We don’t go overboard on dairy in our house, but when we do, I prefer it in its most natural form, just my 2¢.
You can use low-fat or 1% milk for yogurt (Eliza did!), but full-fat will give you the richest, creamiest results. If you’re curious, this article from TIME gives a good look at the full-fat vs. low-fat milk debate.
How to Make Homemade Greek Yogurt
Step 1: Prep Ingredients and Heat Milk
To start, pour 2 tablespoons of milk into a small bowl and set aside.
Kathleen’s Tip: The higher the fat content, the creamier your yogurt will be, which is a personal choice.
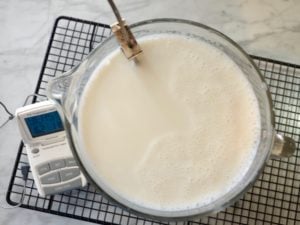
In a heavy-bottomed pan (I wonder if people describe me that way? Hmmm? Tee-hee!) or in a double boiler, set a candy thermometer or an instant-read thermometer, pour in the half gallon of milk, and warm milk over medium heat. Stir constantly and watch it very closely so you don’t burn the milk.
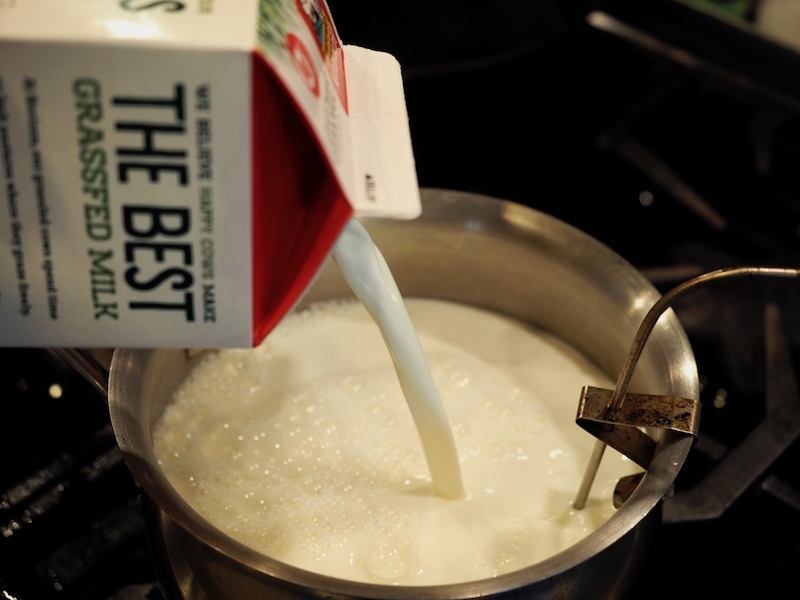
Heat the milk to 180º F, stirring constantly, watching it closely!
Immediately remove the pot from the stove and carefully pour the hot milk into a glass or ceramic (not metal) bowl; even a deep casserole dish works. I placed my bowl in the sink and then poured in my hot milk since I’m the QUEEN of Spills!
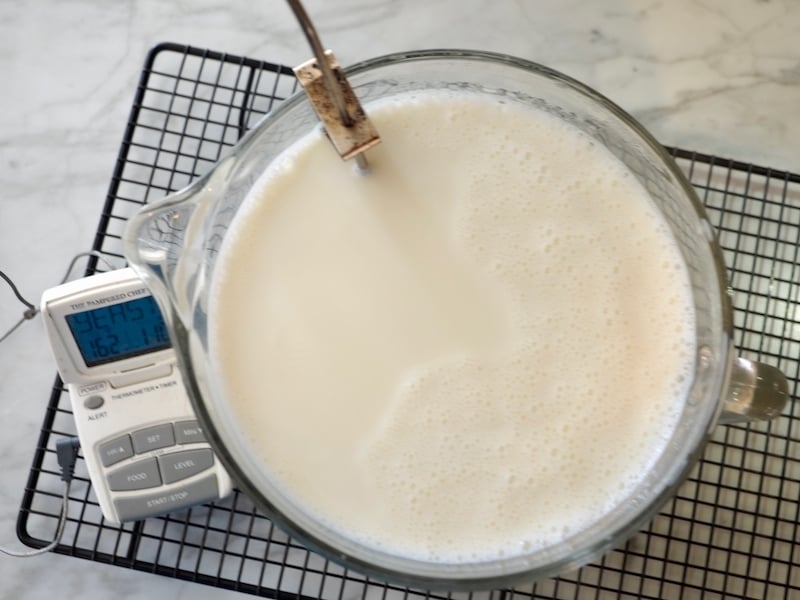
Step 2: Cool the Milk
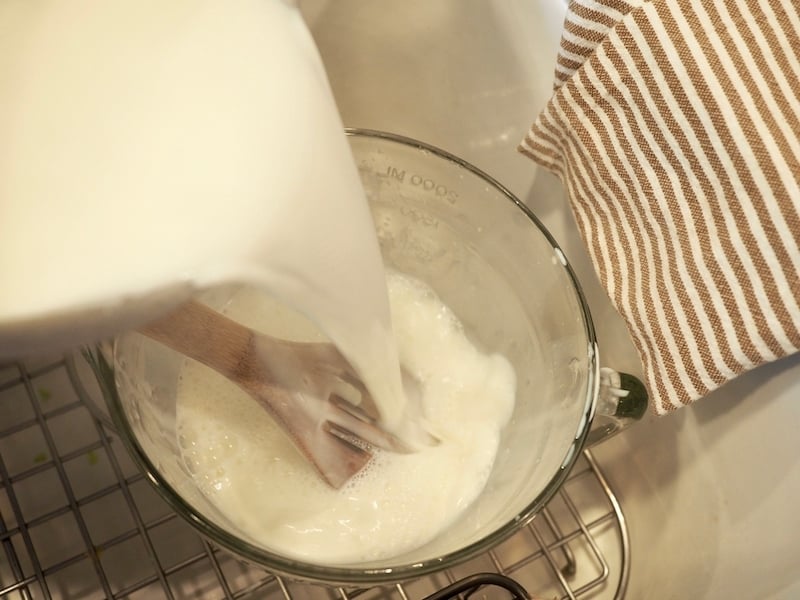
Place the dish on a cooling rack, UNCOVERED, and allow the milk to cool to 105° and 110°. In the middle of summer, this took about 45 minutes. You can hurry it along by placing the entire bowl in a larger bowl of an ice bath, stirring and checking the temperature often, because it cools quickly.
Pro Tip: Make sure to leave the dish/bowl uncovered, this allows the good bacteria to start doing their thang!
Step 3: Mix in Starter Culture & Incubate (Fermentation)
Once it’s cooled to between 110°F and 105°F, turn your oven to the “warm” or “proof” setting, if available, or heat it to 100°F. I don’t recommend using your oven light, as most lights nowadays are too hot! You can also place it in a cooler with a large pot of hot water.
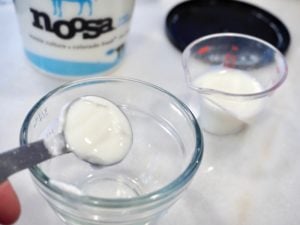
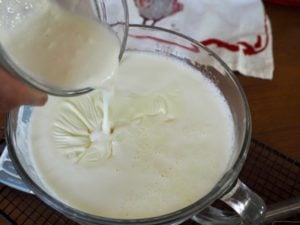
Combine your reserved milk and 2-3 level tablespoons of plain yogurt and stir to combine. As Eliza suggested, I used 2 ½ tablespoons, and it worked beautifully. Make sure your yogurt is plain and has live cultures! I used Noosa plain yogurt.

Pro Tip: Resist the urge to add more than 3 tablespoons of yogurt. According to the Joy of Cooking, “you may wonder why so little starter is used and think that a little more will give a better result, it won’t. The bacillus, if crowded, gives a sour, watery product.”
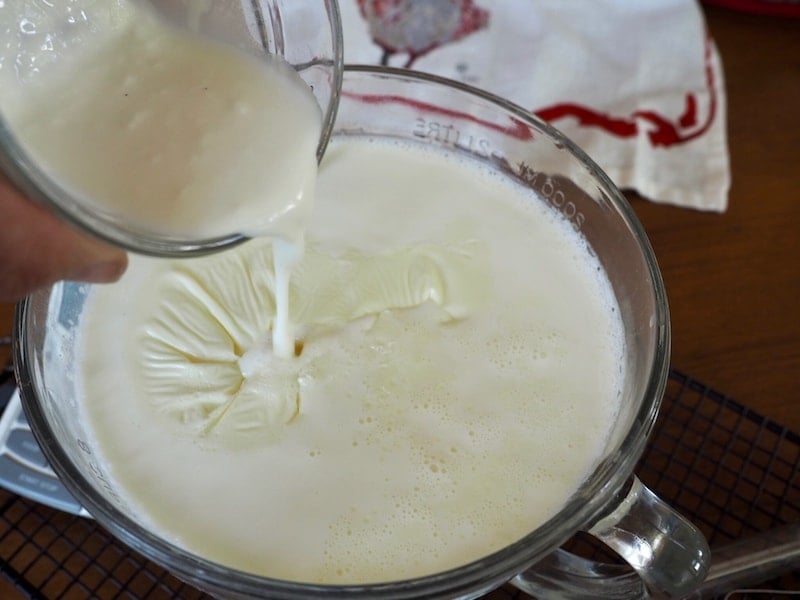
As soon as your milk has cooled to somewhere between 110-105º, using a non-metal spatula or wooden spoon, pour your milk/yogurt starter mixture into the milk. Stir well until combined. Note: a film might have developed during the cooling process. No worries, just stir it in.
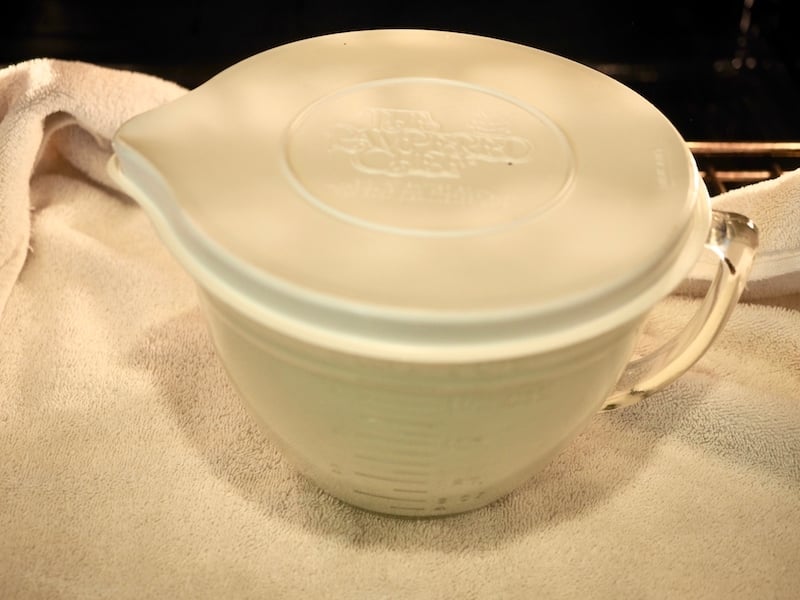
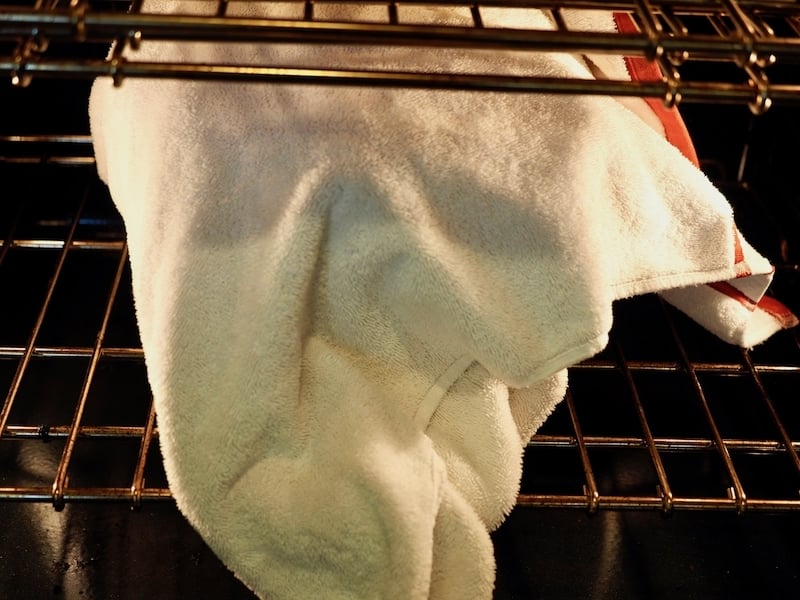
Place the lid on your bowl (or cover it with plastic wrap), carefully wrap the covered bowl of yogurt mixture in a heavy tea towel or an old bath towel, and place the towel-wrapped, covered dish in the oven.
IMPORTANT STEP… turn OFF your oven! The heat reserved from when you warmed the oven should be sufficient. Leave the yogurt alone for 7-8 hours or overnight. I left mine overnight, from about 4 pm – 6 am.
Pro Tip: Eliza suggests “you place the towel-wrapped yogurt on a heating pad set to “low” or put it in a cooler with a tight-fitting lid and several jars of hot water to maintain the heat.” Try not to disturb the yogurt during its bacterial phase!
Step 4 – Check Yogurt (next morning)
In the morning, carefully remove your dish from the oven, unwrap the towel, and check under the lid. The yogurt should look thick and creamy, especially if you used whole milk.
If it’s still runny, pop it back into the warm oven and check again in an hour.
Note: The first time I made this, I accidentally left the halogen lights on; those things get hot! I thought I’d cooked it too much and ruined the batch, but surprisingly, it turned out thick and super creamy. On the flip side, Eliza once had a batch stay too cool; it was still milk after 8 hours. She added a little bit of yogurt (about a tablespoon) and let it sit for another hour. Boom! Yogurt success!

If you want plain yogurt, the runnier, thinner style, you can stop at this stage, just stir and refrigerate, it may develop a bit of watery liquid (called whey), pour off before serving, but if you are going for creamy, dreamy, thick yogurt…read on.
Step 5 – Chill Yogurt
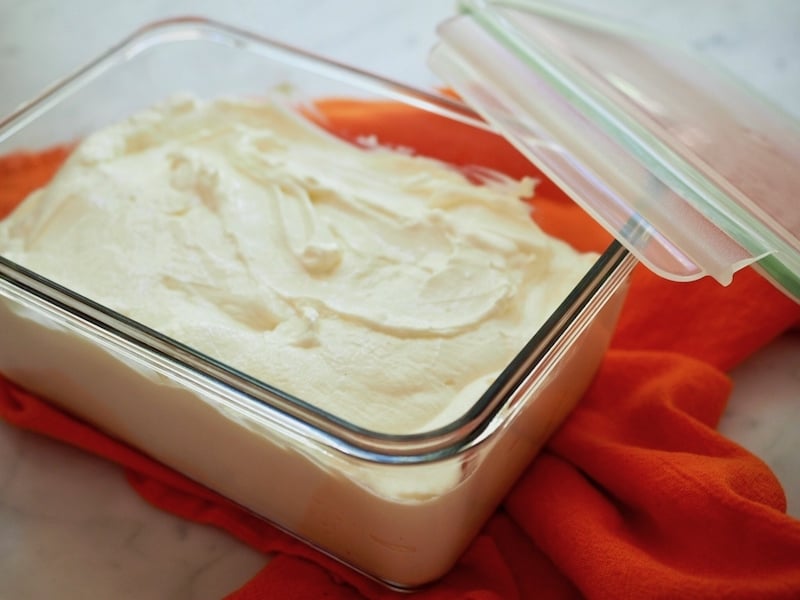
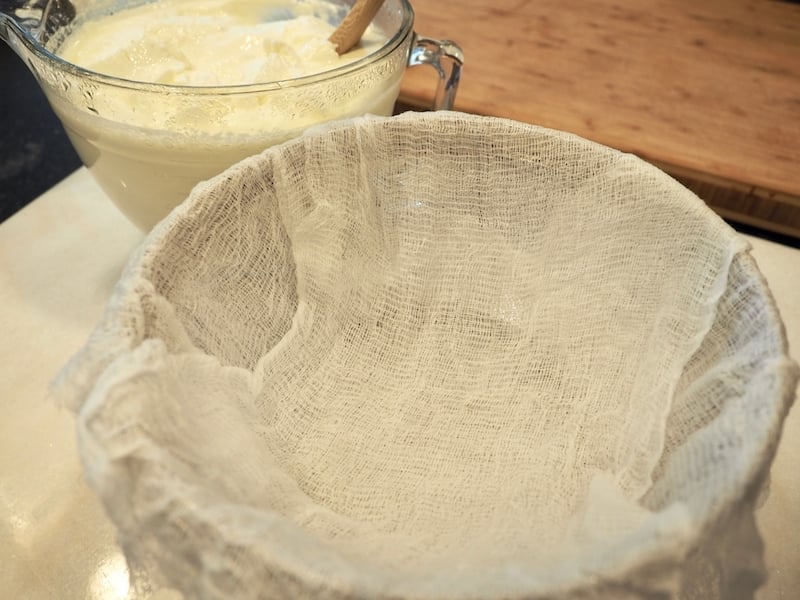
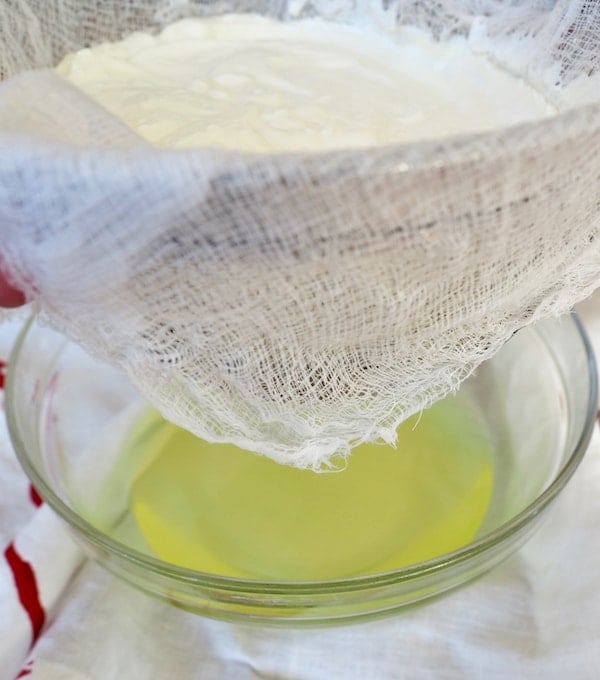
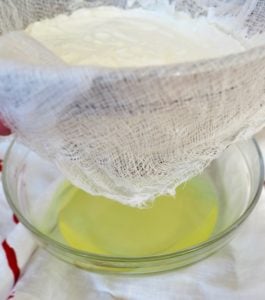
Refrigerate the yogurt (without stirring) for at least 3 or more hours until completely cooled and thickened. Then, I lined a large mesh strainer or colander with four layers of dampened cheesecloth; I wet mine, squeezed it out with my hands, and laid it in a cross pattern.
Place your lined fine mesh strainer over a large bowlmake sure it’s deep enough so the strainer doesn’t touch the bottom. Refrigerate for 1-2 hours, then pour off the liquid (whey) that collects in the bowl.

Return the strainer and bowl to the fridge for another hour if you want it thicker. Strain again, and your creamy, homemade Greek yogurt is ready!
Spoon or pour your yogurt into a container (makes about 32 oz; recycle a clean yogurt container or a large mixing bowl).
Kathleen’s Pro Tip: If you think you might make additional batches of your own Greek yogurt, reserve 2-3 tablespoons of your yogurt as a starter for your next batch. Keep tightly covered in the fridge until ready to use.
What Is Whey?
The liquid you strain off your yogurt is called whey, and it’s rich in protein and nutrients. Don’t toss it! You can use whey in smoothies, soups, bread dough, or even as a boost in pancake or muffin batter. It’s a great way to cut waste and add nutrition.

How to Store Homemade Greek Yogurt
Store yogurt in an airtight storage container and refrigerate for up to 10 days. I like using a glass jar or a container. Eliza says 6, but I ate mine up to day 12, and it was fine, but I am a risk-taker that way!
I love giving this yogurt as gifts during the holidays; package it up and gift it with my soft granola and some lemon curd.

Greek Yogurt Recipe FAQ’s
It depends on the type of yogurt you usually buy. I buy organic, small-batch yogurt, and yes, it’s usually cheaper for me to make my own than to buy it, and it tastes so much better, too!
The key to amazing homemade yogurt is all about temperature and time. Heat the milk gently, cool it just right, and give it enough time to culture undisturbed. Use a good-quality starter (with live, active cultures), and if you’re aiming for that thick, Greek-style texture, don’t skip the straining. The longer you let the yogurt strain, the thicker it will be. And honestly? Patience and a little practice go a long way. Every batch gets easier (and tastier)!
Authentic Greek yogurt starts out just like regular yogurt, by heating milk, adding a starter culture, and letting it sit to ferment.
The difference? Once it sets, it’s strained to remove extra liquid (called whey). This extra step makes the yogurt thicker, creamier, and higher in protein. That’s also why it takes more milk to make and costs a bit more at the store!
Greek yogurt takes a little time, but most of it is hands-off. You’ll spend about 10 minutes heating the milk, 45 minutes cooling, then let it rest for 8–12 hours to turn into yogurt. After that, chill for 3 hours and strain for another 1–2 hours to get that thick, creamy texture.
There’s a reason it costs more at the store; it takes that extra straining step! I usually start around 3 p.m. and let it sit in the oven overnight. Totally worth it when you taste the difference.
And once it’s ready? Use it in a cozy Lemon Yogurt Cake, this soft and crumbly Lemon Crumb Cake, or my favorite Dill Sauce that goes with almost everything. Homemade yogurt never goes to waste around here! Use it anywhere you use sour cream.
You can use different types of milk to make yogurt, but if you can find raw milk, that’s truly the best; it’s rich in nutrients and natural enzymes, and makes incredible yogurt. If raw milk isn’t available, Eliza notes it’s best to avoid ultra-pasteurized milk, especially if it’s not organic. Pasteurized milk works great, and make sure it’s antibiotic-free, since antibiotics can interfere with the yogurt cultures.
Eliza used 1% milk, and I used Horizon’s Grassfed Whole Organic Milk (which is ultra-pasteurized). I wasn’t sure how it would turn out. Spoiler alert: it turned out GREAT! And I’ve used organic whole milk ever since, in the hundreds of times since I first made this yogurt!
Yes, since it’s made from cow’s milk, it is a dairy product. The good news is, there is typically less lactose than in regular yogurt, making it easier for the lactose-sensitive to tolerate. Want to make it dairy-free? Check the recipe card for more details.
Absolutely! It’s packed with protein, calcium, and probiotics (those good-for-your-gut bacteria). It’s lower in sugar and carbs than regular yogurt and keeps you full longer, making it a great choice for breakfast, snacks, and a healthy swap in recipes.
Greek Yogurt Recipe Variations
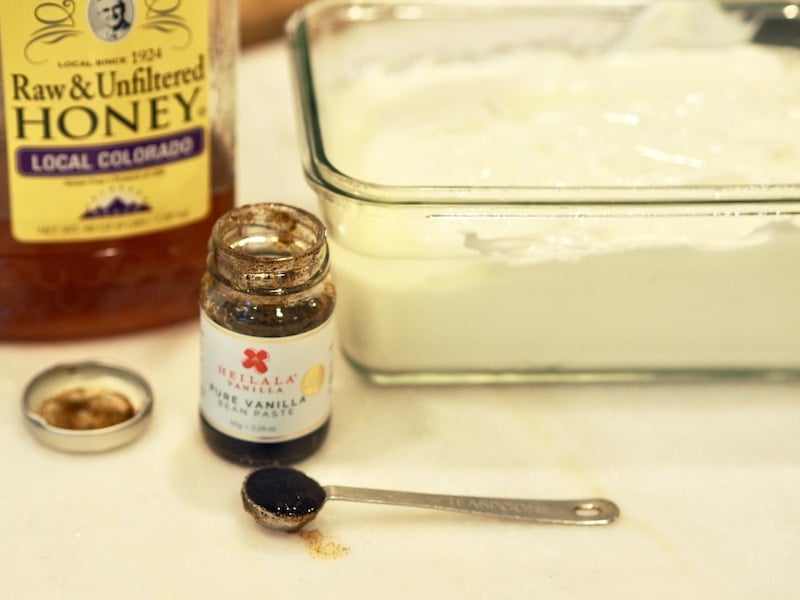
- If you prefer your yogurt a bit sweeter, stir in a scant ⅛ – ¼ cup of raw, local honey, try and buy local honey as it has amazing health & allergy benefits for you. But be sure to taste it first, you’ll be surprised how much milder it is than store-bought yogurts.
- Want to make Copycat Noosa Vanilla Bean Yogurt? Stir in 1 teaspoon of vanilla bean paste along with the honey until smooth and combined. Return to the refrigerator.

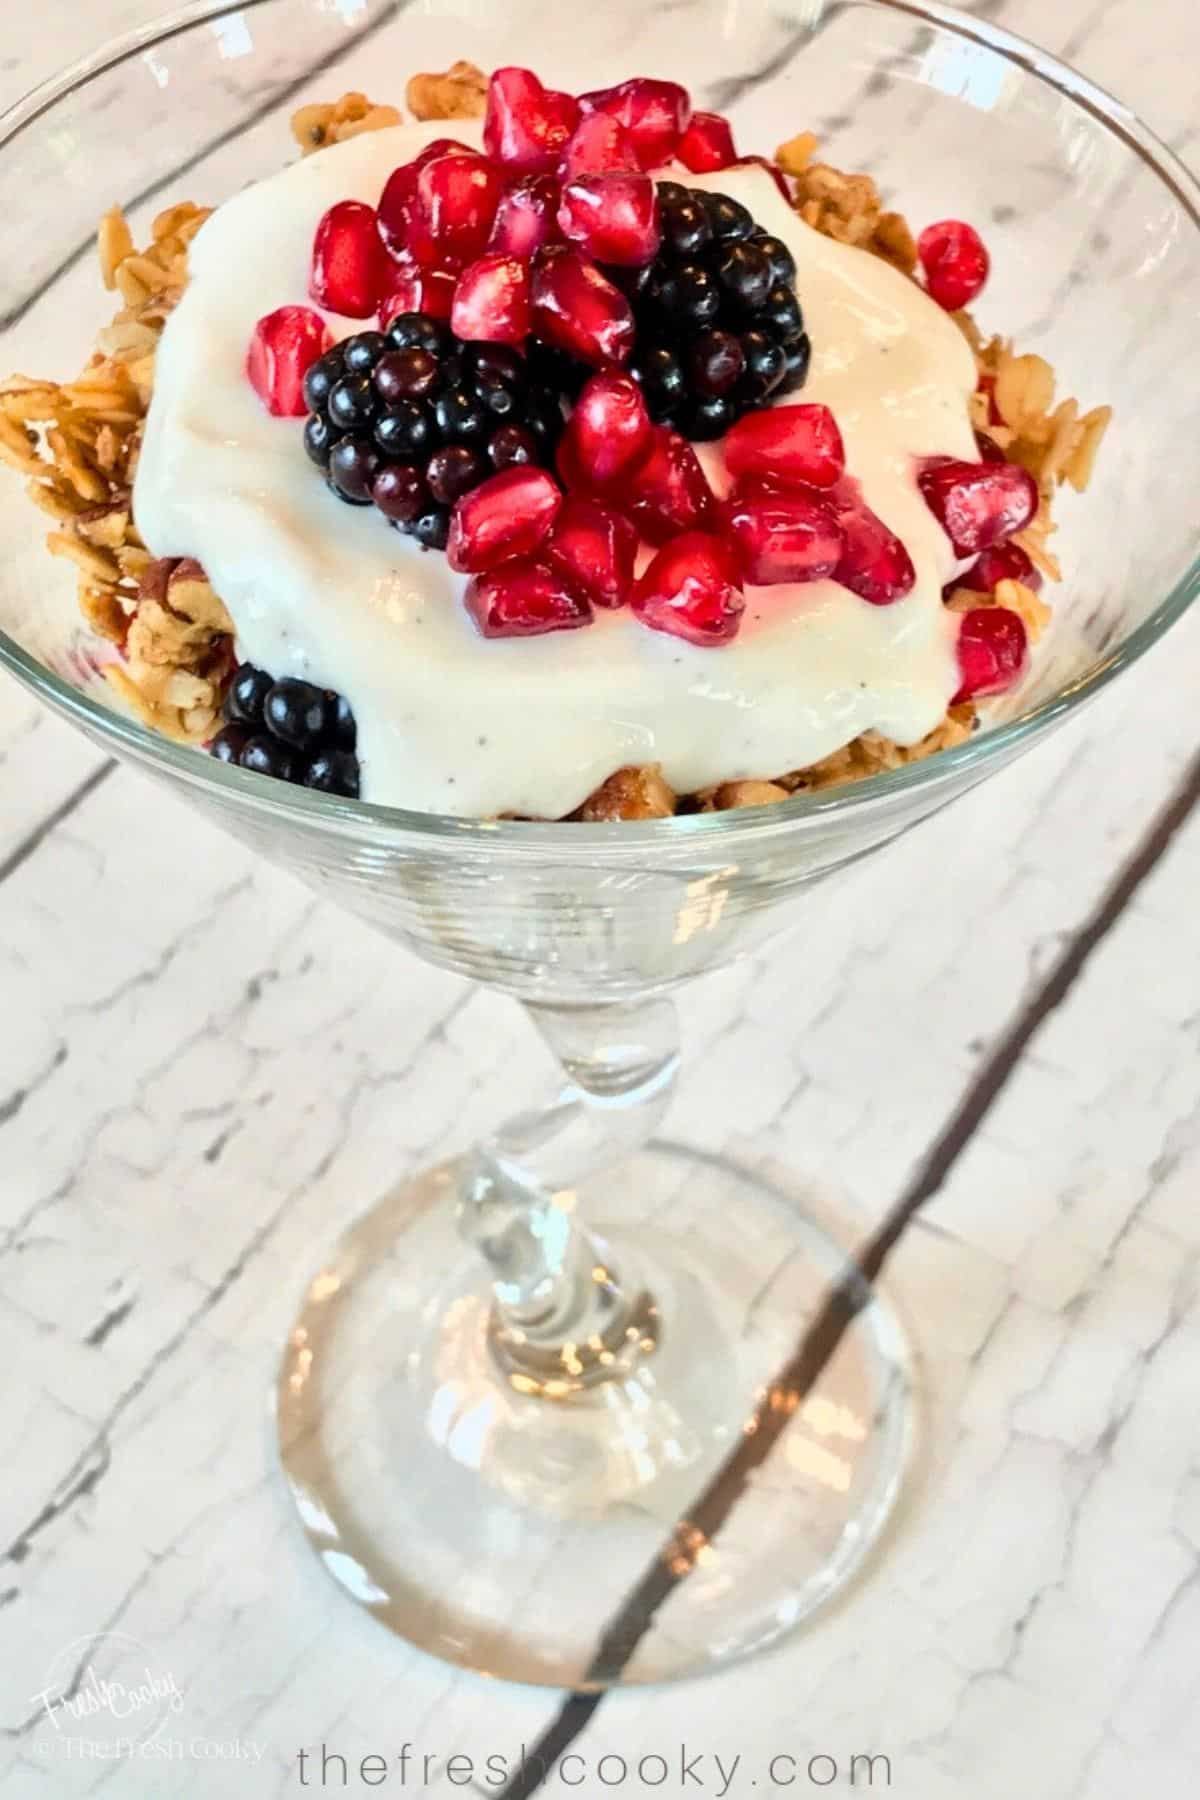
Eat all by itself or make a yogurt parfait layering some of my soft-baked homemade granola, your favorite in-season fruit, and some lemon curd! STOP! It’s so good, ever tried it?
How to Make Dairy-Free Yogurt
- Milk: Use 2 cans (about 3 ½ – 4 cups) of full-fat canned coconut milk or soy milk. (You don’t want to use coconut milk in a carton as it’s too thin.) *You can use other plant-based milks such as almond or oat milk, but you need to add a thickener like agar agar or tapioca starch to make it thicken.)
- Starter: When adding starter, use 2 tablespoons of dairy-free yogurt (plain) with live cultures or a vegan yogurt starter packet.
- Process: The process is the same as regular yogurt.
Instant Pot Yogurt: Use the “Yogurt” function to heat the milk to 180ºF, then cool to 110ºF. Whisk in your yogurt starter, seal the lid, and incubate using the “Yogurt” setting for 8–12 hours. Chill, then strain if making Greek-style yogurt.
Slow Cooker Yogurt: Heat milk in the slow cooker on low for 2–3 hours until it reaches 180ºF. Turn off, let cool to 110ºF, then stir in the starter. Wrap in towels and let sit (with the slow cooker off) for 8–12 hours. Chill, then strain if desired.
Yogurt Maker Yogurt: Heat milk on the stove to 180ºF, cool to 110ºF, then stir in the starter. Pour the mixture into yogurt maker containers and incubate according to the manufacturer’s instructions (typically 8–12 hours). Chill and strain if making Greek yogurt.

Ways to use Homemade Greek Yogurt!
- The obvious would be in a yogurt parfait.
- Make this delicious garlic yogurt sauce for Chicken Shawarma
- Swiss Bircher Muesli, the original overnight oats
- Homemade Naan!
- Pumpkin Pie Yogurt Parfait (so good!)
- Eggnog Coffee Cake
Like this recipe?
Don’t forget to give it a ⭐️⭐️⭐️⭐️⭐️ star rating and leave a comment below the recipe!
More Popular Recipes from The Fresh Cooky
Homemade Greek Yogurt Recipe
Equipment
Ingredients
- ½ gallon organic milk I used organic Grassfed whole milk*, reserve 2 tablespoons
- 2 – 3 tablespoons plain store-bought yogurt with live active cultures (I used Noosa Plain yogurt)
OPTIONAL ADD INS
- ⅛ – ¼ cup raw honey
- 1 teaspoon Vanilla Bean Paste Pure vanilla extract may be substituted
- Fresh Fruit
- Granola
Instructions
- Pour 2 tablespoons of milk into a small dish and set aside. In a heavy bottomed pan or a double boiler set a candy thermometer or instant read thermometer, pour in the balance of the milk and heat over medium heat. Stir constantly; watching it closely so you don't burn the milk.½ gallon organic milk

- Heat the milk to 180º F, stirring constantly, don't allow it to boil. Once reached 180º F, immediately remove the pot from the stove and carefully pour the hot milk into a glass mixing bowl or ceramic (not metal) bowl, even a deep casserole dish would work.
- Place the dish on a cooling rack, UNCOVERED and allow the milk to cool to between 105° and 110°. In the middle of summer, this took about 45 minutes. Make sure leave the dish/bowl uncovered, allowing for the good bacteria to expand. May use an ice bath to speed things up, stirring often.
- Once it's close to the 110-105° turn your oven to it's warm or "proof" setting if you have it, or heat to 125°F.
- Combine 2 tablespoons of reserved milk and 2-3 level tablespoons of plain yogurt and stir to combine. I used 2 ½ tablespoons of yogurt. Make sure yogurt is plain and has live and active cultures in it! I used Noosa plain yogurt. Resist the urge to add more than 3 tablespoons of yogurt, see notes in blog post.2 – 3 tablespoons plain store-bought yogurt
- As soon as your milk has cooled to 110-105º, using a non-metal spatula or wooden spoon, stir in your milk/yogurt starter mixture into the milk. Stir well until combined. Note: a film might develop while your milk cools, just stir it in.
- Place the lid on your bowl (or cover with plastic wrap), carefully wrap the covered bowl of yogurt mixture in a heavy tea towel or I used an old clean bath towel and place the towel wrapped, covered dish in the oven.
- IMPORTANT STEP…turn your oven off, it should stay warm with risidual heat. Careful if you use yoru lights, if LED it shoudl be fine, if hallogen they may get too hot. Theve the yogurt undisturbed for 7-8 hours or overnight.
- In the morning, carefully take your dish out of the oven, unwrap the towel and remove the lid, check to see whether the milk has turned into yogurt, it should be thick and creamy. If your batch hasn't quite thickened, return to the oven and check in an hour. If still runny, stir in a tablespoon of plain yogurt, return to warm place for 1 hour.
- If just want regular thinner yogurt, you can stop at this stage, just stir and refrigerate, it may develop a little watery liquid, that can just be poured off before serving, but if you are going for creamy, dreamy, thicker Greek yogurt, move on to the next step.
- Refrigerate the yogurt (without stirring) for at least 3 or more hours until completely cooled and further thickened.
- Then line a large mesh strainer with 4 layers of dampened cheesecloth (I wet mine, then squeezed it out with my hands and laid it in a cross pattern), setting the lined strainer in a bowl large enough to allow the strainer to drain and not sit on the bottom of the bowl.

- Refrigerate for one hour, then pour the liquid (whey) that has puddled in the bottom out, (save or discard, it's great for smoothies, soups, breads and more). Return the strainer, yogurt and bowl to the refrigerator for one more hour (if desired), and your yogurt will be done! Spoon or pour your yogurt into a container (makes about 32 oz; reuse a clean yogurt container or a glass container fitted with a lid).The longer you strain it the thicker it will be.


HONEY VANILLA BEAN YOGURT
- If you prefer your yogurt a bit sweeter, stir in a scant ⅛ – ¼ cup of honey; raw, local honey is best! Stir in 1 teaspoon of Vanilla Bean Paste along with the honey, until combined.⅛ – ¼ cup raw honey, 1 teaspoon Vanilla Bean Paste
- Refrigerate until ready to eat. Try making a yogurt parfait by layering fruit, granola and yogurt.Fresh Fruit, Granola

Notes
- Pour milk into the Instant Pot (at least half a gallon).
- Press the “Yogurt” button until it reads “Boil” this will heat the milk to around 180ºF.
- When it beeps, remove the lid and let the milk cool to 110ºF.
- In a small bowl, mix 2–3 tablespoons of yogurt starter with a bit of warm milk, then whisk back into the pot.
- Press the “Yogurt” button again, set the timer for 8–12 hours (the longer it sits, the tangier it will be).
- Once done, refrigerate for 2–3 hours, then strain if making Greek-style yogurt.
- Pour milk into your slow cooker and heat on low for about 2½–3 hours, or until it reaches 180ºF.
- Turn the slow cooker off, unplug, and let milk cool to 110ºF (this takes 1–2 hours).
- Whisk 2–3 tablespoons of starter yogurt into a small bowl of warm milk, then stir into the full batch.
- Wrap the slow cooker in towels and let it sit with the lid on (but turned off) for 8–12 hours.
- Once set, refrigerate for a few hours, then strain if a thicker yogurt is desired.
- Heat milk on the stovetop to 180ºF, stirring occasionally to prevent scorching.
- Let the milk cool to 110ºF, then stir in 2–3 tablespoons of starter yogurt.
- Pour the mixture into yogurt maker jars or a container.
- Set the machine according to the manufacturer’s instructions, usually 8–12 hours to incubate.
- Once the yogurt is set, refrigerate for a few hours. Strain if making Greek-style.
The liquid you strain from your yogurt is called whey, and it’s rich in protein and nutrients. Don’t toss it! You can use whey in smoothies, soups, bread dough, or even as a boost in pancake or muffin batter. It’s a great way to cut waste and add nutrition. Dairy-Free Yogurt Tips
- Milk: Use 2 cans (about 3 ½–4 cups) of full-fat canned coconut milk or soy milk. (Skip carton coconut milk, it’s too thin. You need thickeners if using other plant-based milks.)
- Starter: Add 2 tablespoons plain dairy-free yogurt with live cultures, or use a vegan yogurt starter packet.
- Process: Follow the same steps as regular yogurt; strain if you’d like it thicker.
Nutrition


Rate & Comment