


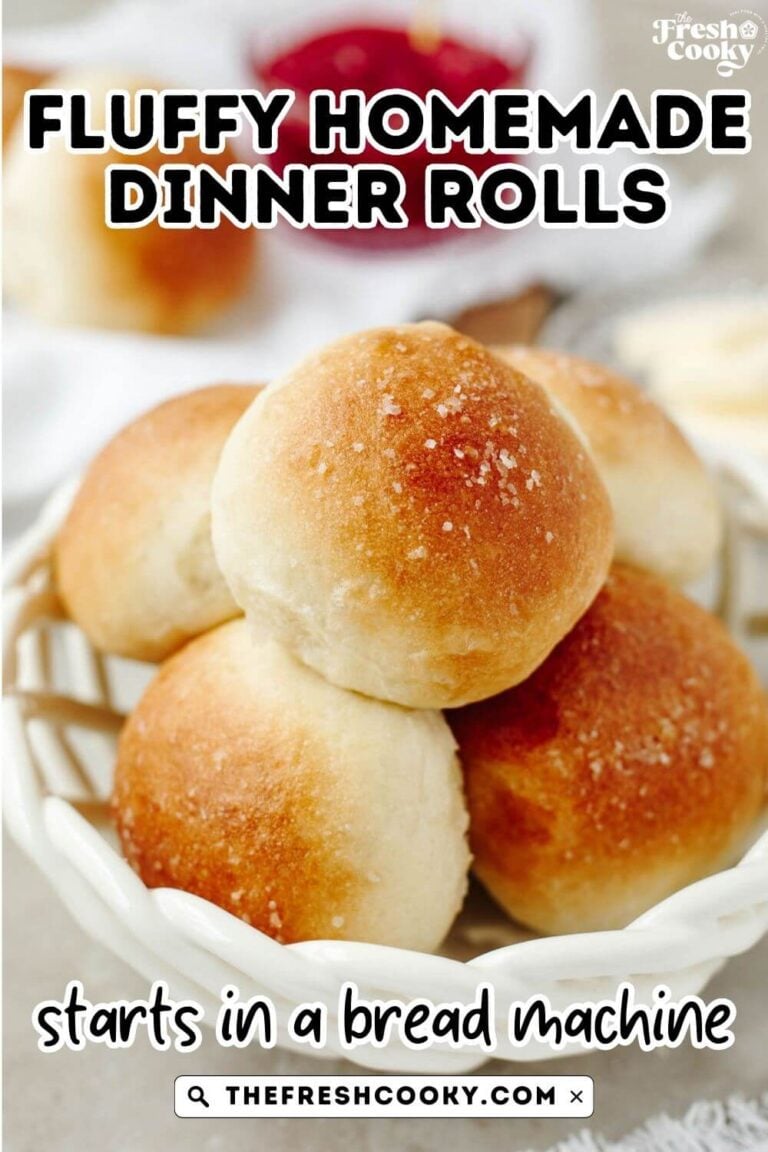

Soft, fluffy, easy homemade yeast rolls started in your bread machine and finished in the oven! A family favorite saved over 10,000 times, this beginner-friendly recipe includes make-ahead tips for perfect, hot rolls every time. No bread machine? I’ve got you covered! You will thank me when you taste them!!
This recipe was originally published in 2017 and has been retested, updated, and improved in 2023, 2025, and 2026 with new photos, clearer instructions, and additional tips for perfect Easy Yeast Rolls every time.
⭐️ ⭐️ ⭐️ ⭐️ ⭐️ Reader Michelle Raved: “I tried this recipe one time and was sold! Now I’ve used the dough for whole loaf bread, monkey bread, and cinnamon rolls, the dough is so versatile and easy and never fails!”
Soft, golden yeast rolls that melt in your mouth? Yes, please! This Easy Yeast Roll recipe is a family tradition that’s been on our holiday tables for years—and it’s been saved over 10,000 times by readers who love it just as much. Whether you’re a first-time baker or a seasoned bread enthusiast, I’ll walk you through it step by step, from the bread machine to a perfect bake in the oven. Don’t have a bread machine? No problem, I’ll show you how to make this dinner roll recipe by hand or with a stand mixer.
I know yeast baking can be scary, but I promise you, you got this! With years of recipe testing and countless batches of rolls under my belt, I’ve perfected these homemade rolls to be as foolproof as they are delicious. I’ll even give you tips on making these rolls ahead of time so they’re soft, fluffy, and fresh when you’re ready to serve. Whether it’s a holiday feast or a weeknight dinner, these rolls will be the star of the show.
Why You’ll Love this Recipe
- Easy yeast rolls for beginners. If baking bread intimidates you, have no fear! I’m ready to solve that with this recipe that I’ve made dozens of times.
- Multiple foolproof methods. If you have a bread maker, great! This is how we will mix and proof them quickly. If not, don’t even worry, I’ve got methods for making the dough by hand or in a stand mixer too. It’ll become your favorite recipe too!
- Perfect to prep in advance. Yes, even though bread baking can seem daunting, you can easily assemble these ahead of time to make entertaining simpler! Save for special occasions, or just because.
Reader Tracy Said: “Thank you so so so so much!! They turned out BEAUTIFULLY!! I’m beyond ecstatic!! Thank you so much for such an easy recipe and sooooo good!! I’m making these for Thanksgiving AND Christmas this year! Probably never use another recipe for them! Again, THANK YOU so much, I appreciate it more than you will ever know!!” ⭐️ ⭐️ ⭐️ ⭐️ ⭐️
Ingredients for Bread Machine Rolls
- Bread Flour | While you can substitute with AP flour, the results will not be the same as the light, fluffy rolls you get with bread flour. Bread flour has a higher protein content, which gives a better texture.
- Egg | Bring your egg to room temperature for the best incorporation. If you forget, submerge the egg in a bowl of warm (not hot) water for 5-7 minutes.
- Yeast | I use yeast made for bread machines (Rapid Rise Yeast) or Instant Yeast for this recipe. Dry active yeast may not work as well; it will just take longer for the first rise. Make sure it’s fresh, check the expiration date on the packet or your buns won’t rise, and that would be sad!
- Butter | Use real butter at room temperature, I used salted butter, you may use unsalted butter.
- Salt & Sugar | Just a touch of sugar and kosher salt to add depth and flavor to your buns!
- Warm Water | Your water temperature should be between 90-110°F.
Get the full recipe in the recipe card below.

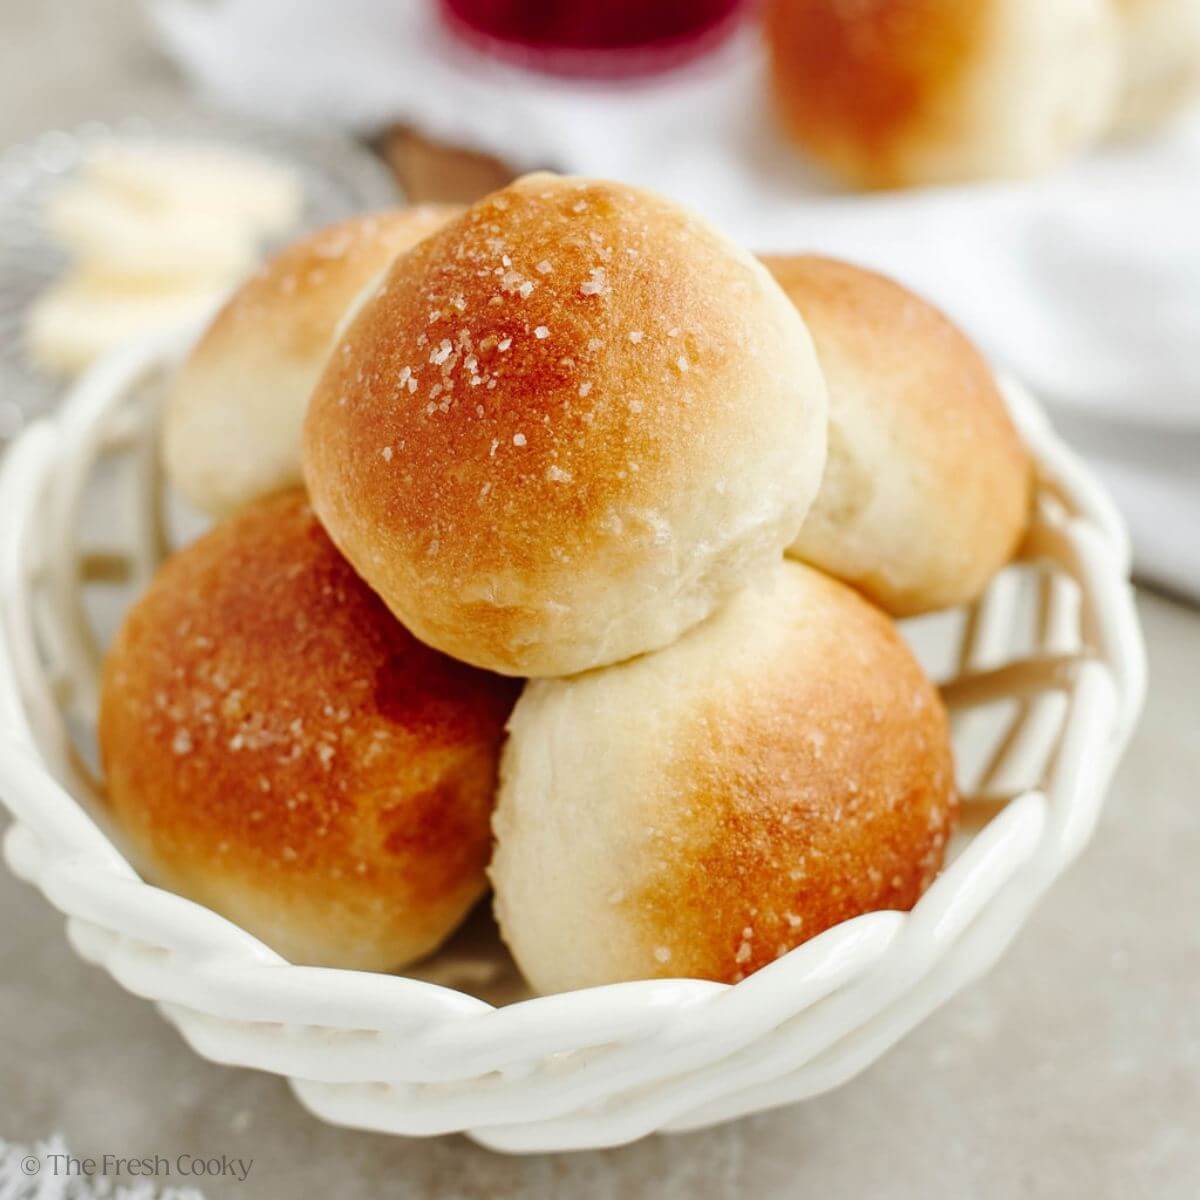
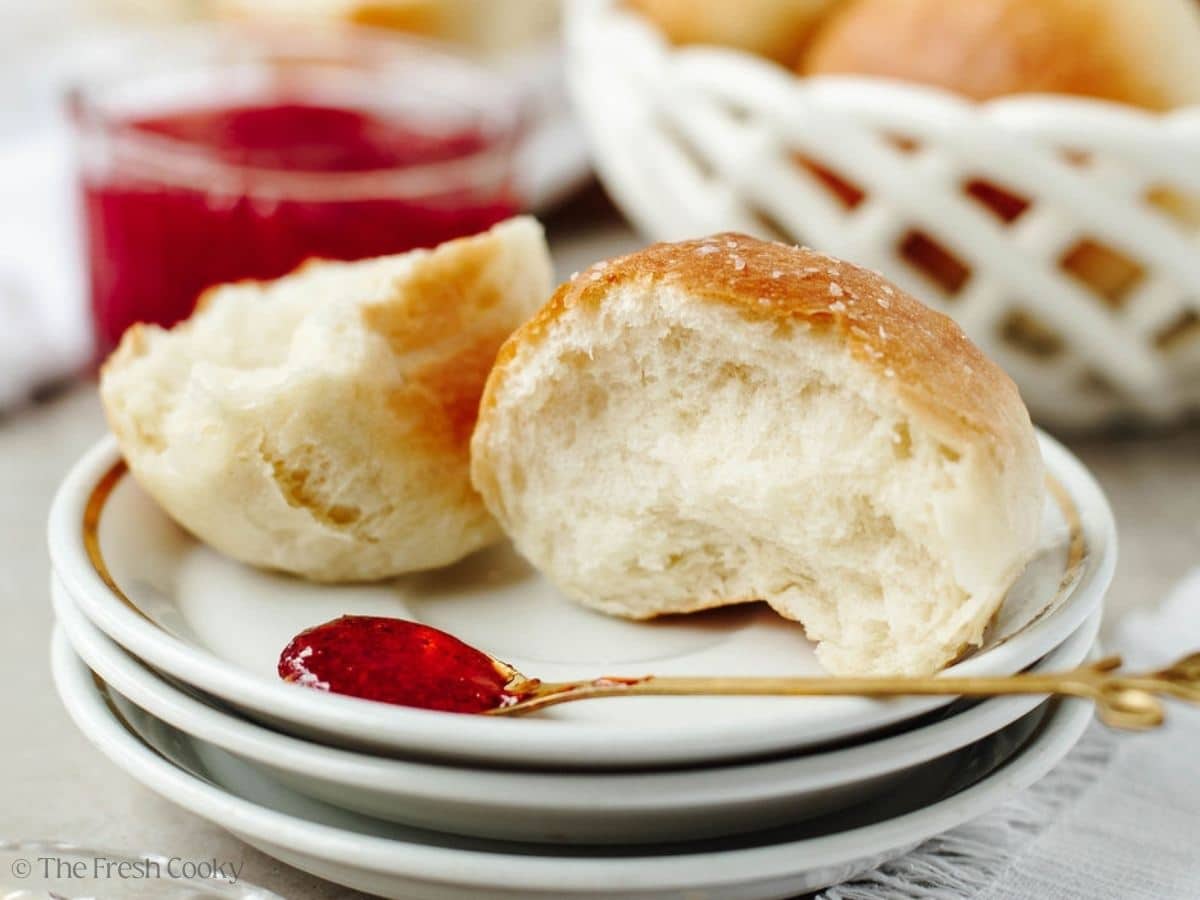
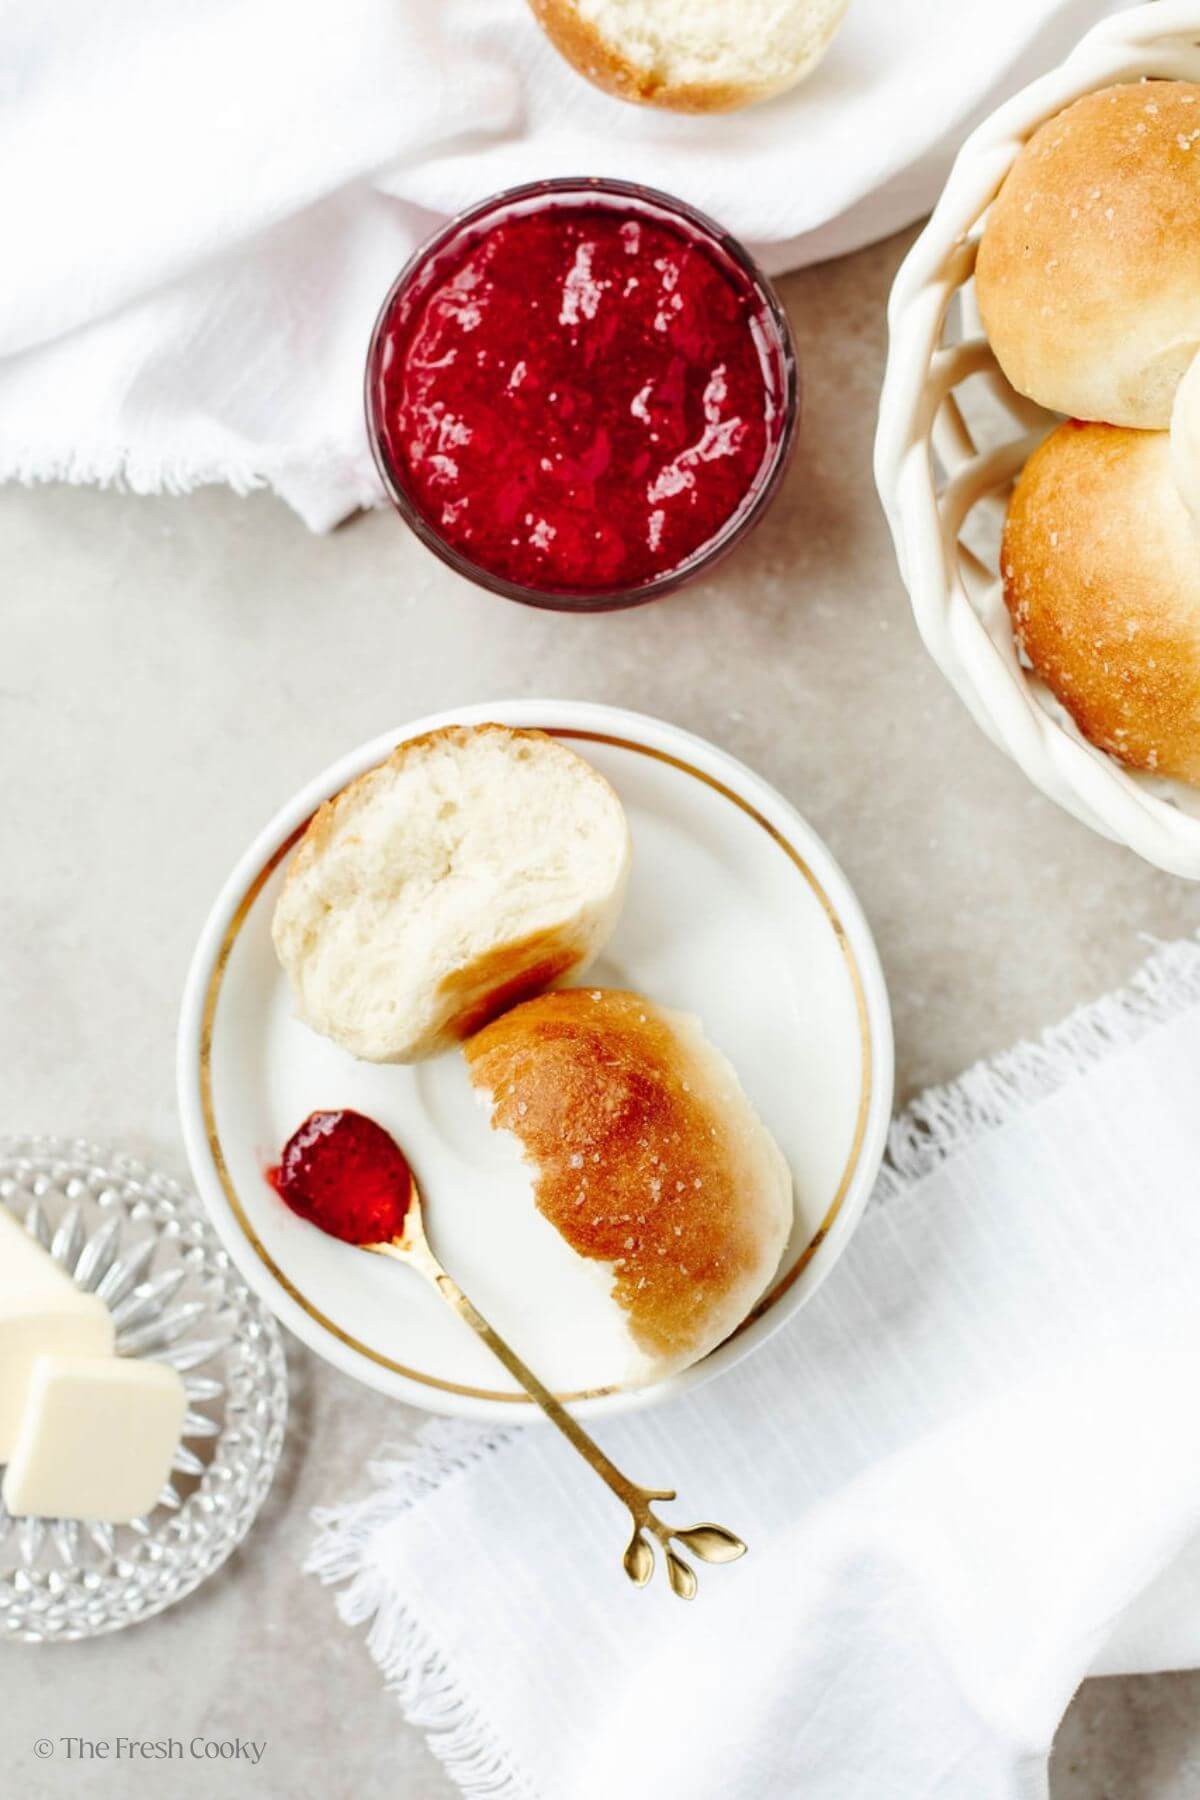
Kathleen’s Tip: Don’t miss brushing the tops with melted butter and sprinkling with flaky or regular sea salt; it adds a fabulous softness and dimension to these easy yeast rolls.
Recommended Tools
- Bread Machine | I have had my bread machine for over 20 years, and it’s still kicking, but if I were to buy one today, this Breville Bread Maker is the one I would purchase.
- Half Sheet Pan | This recipe makes quite a few rolls, you want a large pan, my favorite USA made pans!
- Pastry Brush | Certainly easier to brush melted butter on with a brush!
- Flaky Sea Salt | This stuff is the best, I sprinkle it on most of my cookies!
High Altitude Adjustments: The only adjustment needed for high altitude is to reduce your yeast to 2 ¼ – ½ teaspoons, make and bake as directed!
How to Make Bread Machine Dinner Rolls
Step 1 | Combine the Ingredients
To make Bread Machine Dinner Rolls, add the ingredients to your bread machine pan in the proper order so the dough behaves itself. Start with warm water, then add the softened butter and a room-temperature egg.
Next, go in the dry ingredients: bread flour (all-purpose works in a pinch), cane sugar, and kosher sea salt. Finish with the yeast right on top. Quick-rise yeast works best in a bread machine, but if you’re using active dry yeast, you’ll want to activate it first, or plan for the dough to take a little extra time to catch up.
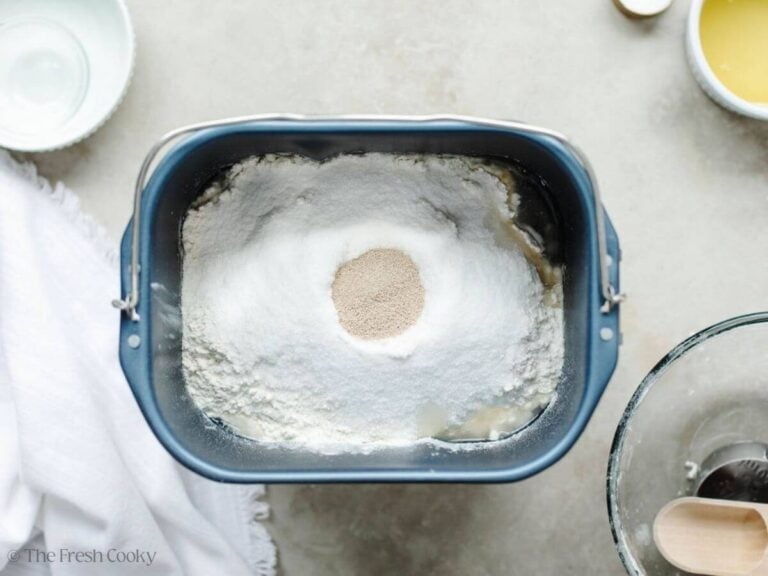
Recipe Tip: Yeast is temperamental; when placing it in the mixture, put it next to the sugar, not the salt. Yeast feeds on sugar, and salt tends to kill it.
Step 2 | Make the Dough
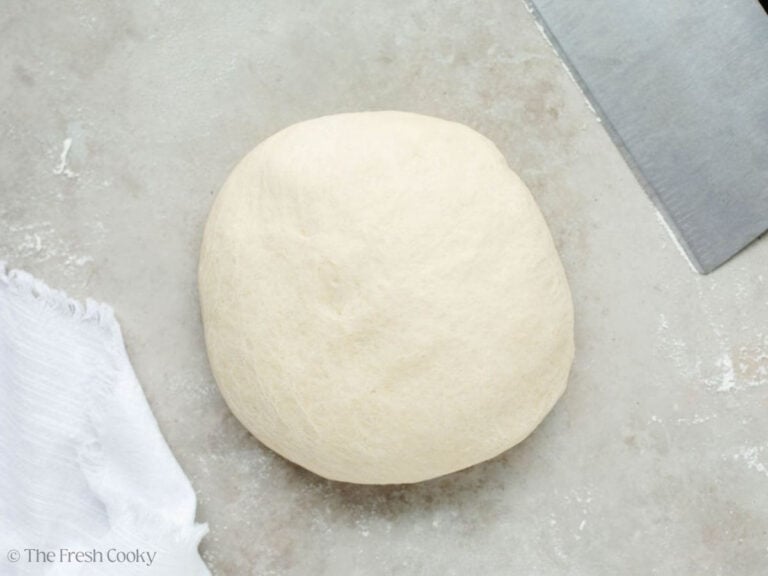
Place ingredients in your bread maker and choose the –>white, –>large, –>dough cycle; not the full bread cycle —just the dough cycle. Press start! They will do their second rise after you shape them into dough balls.
After the dough cycle is finished, remove the dough ball and then begin the roll making process.
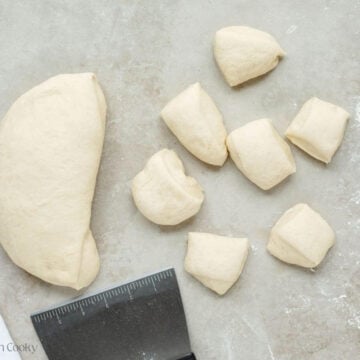
Step 3 | Shape the Yeast Rolls
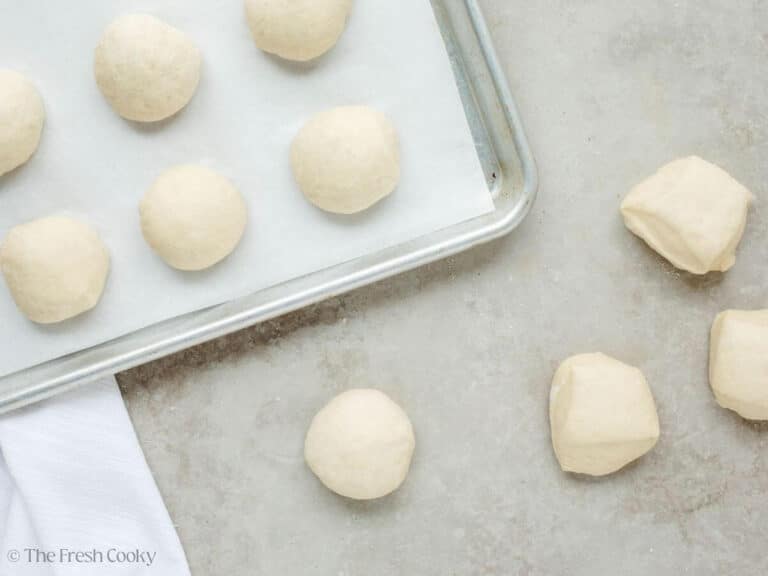
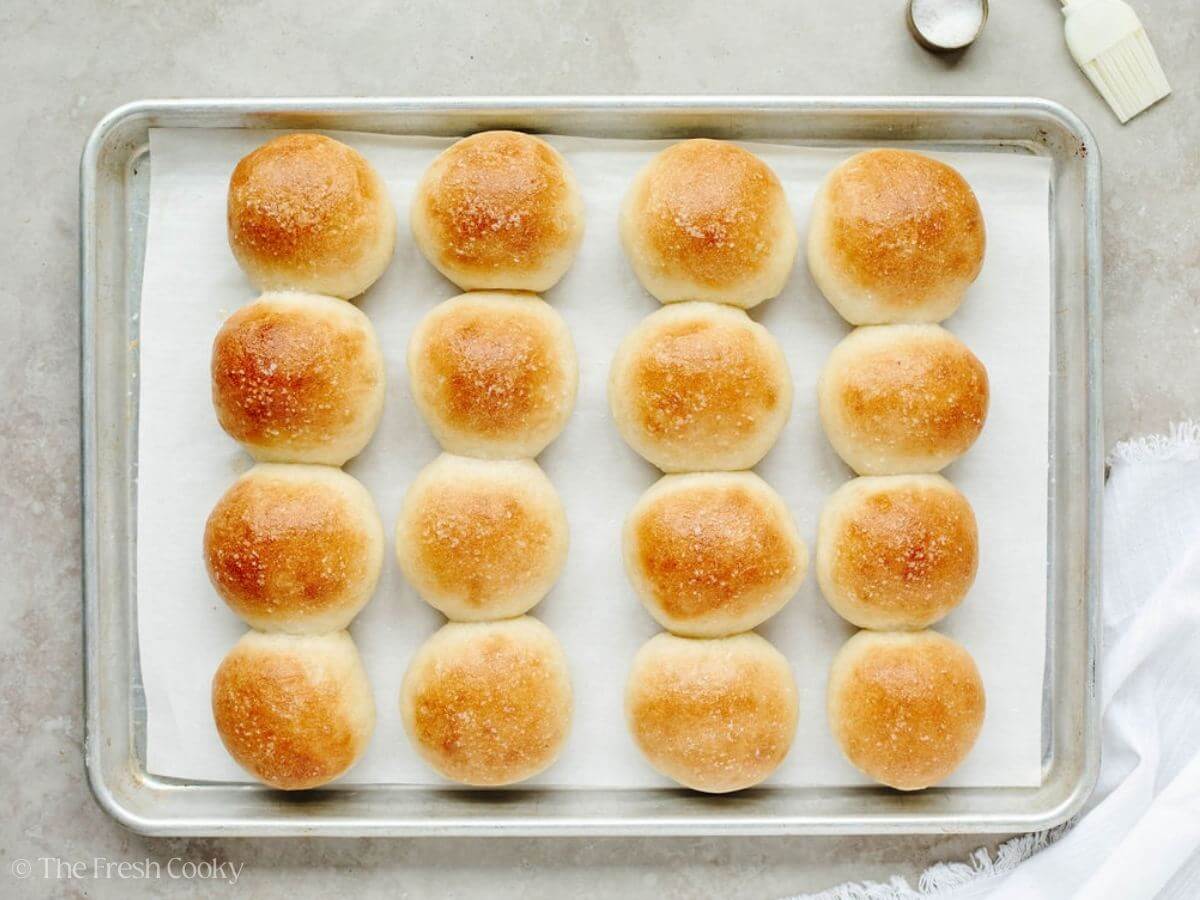
Punch down and plop onto a floured surface or a cutting board and divide into 16-24 equally shaped pieces. I love using my bench scraper to divide them, it’s quick and easy.
Next pinch into round little dumplings
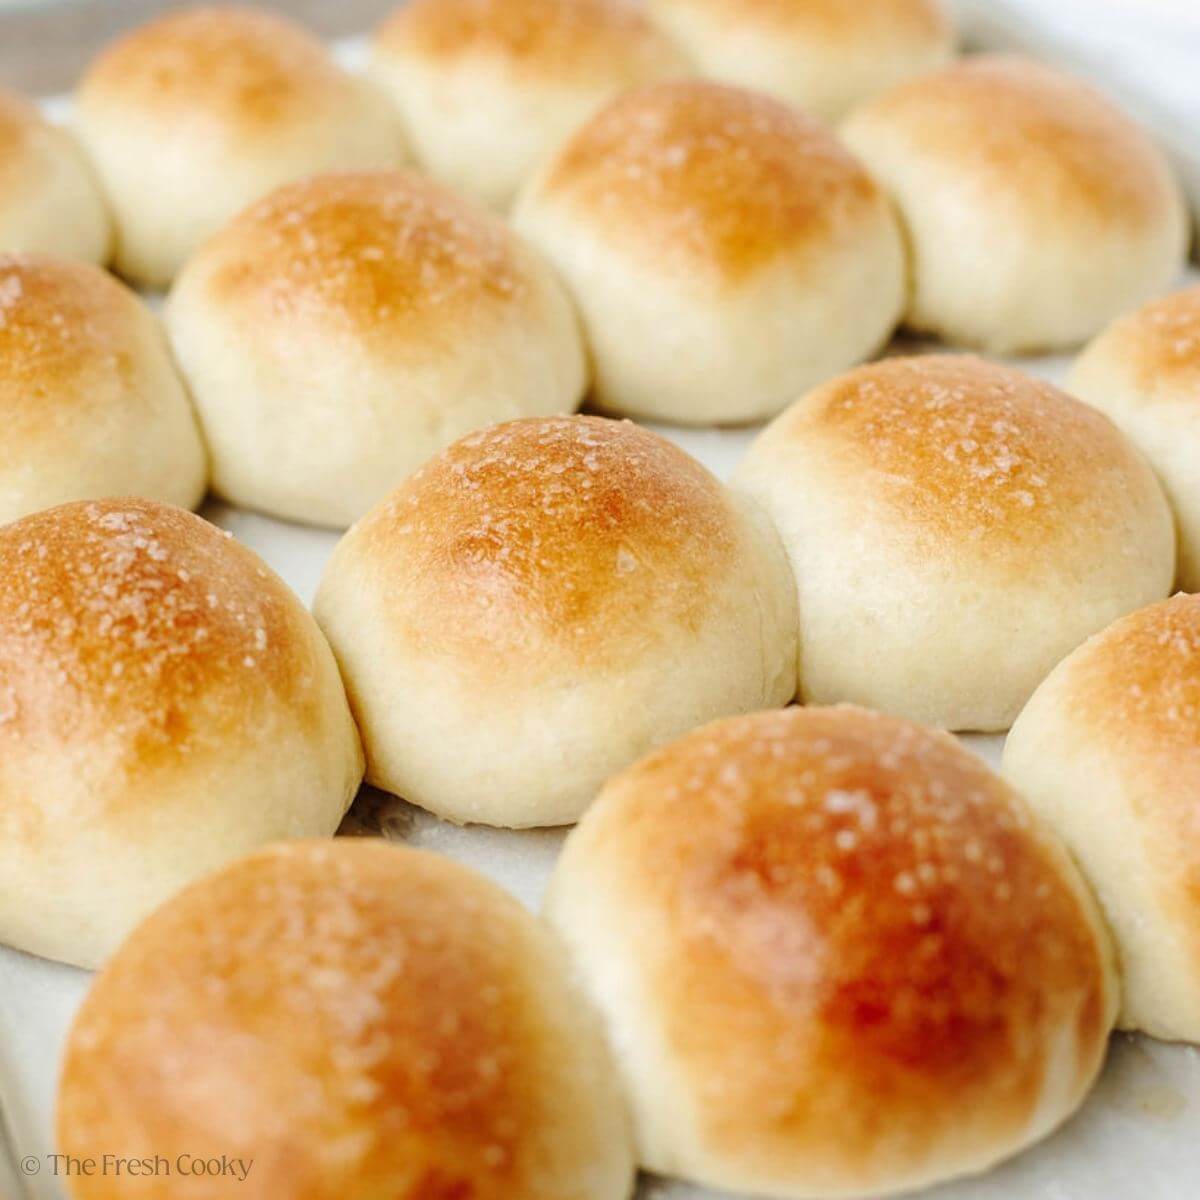
Place the pinched side down on a parchment-lined or greased sheet pan.

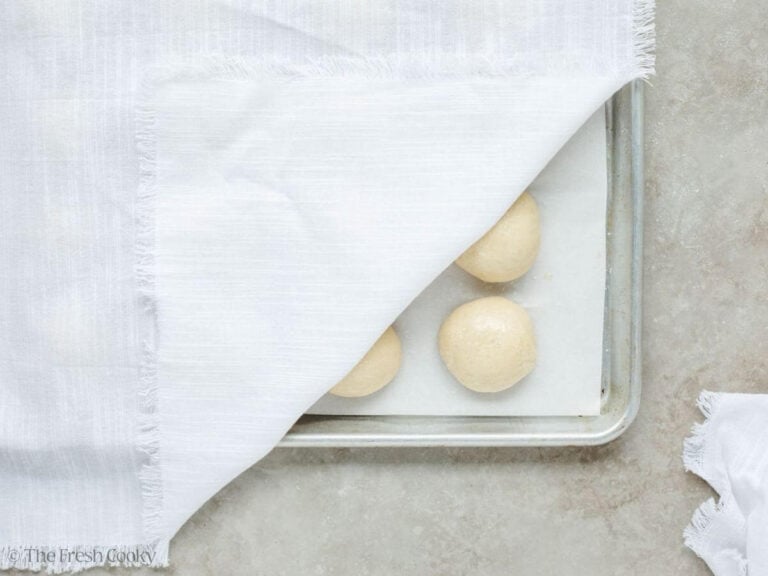
Brush top of the dough with melted butter…
Sprinkle the tops with a pinch of kosher salt or fleur de sel, cover with a clean, damp tea towel, and allow to rise in a warm place* until doubled. The temperature of your kitchen can impact rise times, so when it’s cooler, it will take longer. Be patient or use a proof setting on your oven.

Recipe Tip: I like to set my oven to 100º, turn it off, and then place the rolls in to rise. Or if your oven has a “proof” setting, use that. You want to set it to about 70°-75° F.
Step 4 | Bake
Once doubled in size, about 30-40 minutes, remove from oven and preheat oven to 375º F (190° C).
Bake until golden brown, if desired brush again with melted butter just before serving and sprinkle with a little flaky sea salt. AMAZING!
How to make homemade yeast rolls without a bread machine
It’s so easy, you can use either a stand mixer or a large mixing bowl with a wooden spoon and your hands. And from my experience too, kids love to help shape the rolls, it’s a whole family activity!
- Add all ingredients to a stand mixer or large mixing bowl. Mix on low with a paddle attachment or use a wooden spoon until the dough comes together. It should feel tacky, not overly sticky. If it’s too wet, add a teaspoon or two of flour at a time. If it feels dry, add a splash of water. If you’re working with active dry yeast, activate it by stirring it into 1⁄4 cup warm water with a teaspoon of sugar, then let it proof for 5 to 10 minutes until bubbly. Stir the yeast mixture into the bowl.
- Then, scrape the sides and bottom of the bowl, and continue kneading using the dough hook on low-medium for 6-8 minutes, until the dough is slightly sticky but stretchy and holds together.
- Place dough in a medium bowl coated with a little oil, turning to cover both sides of dough. Cover with a damp tea towel or plastic wrap.
- Place in a warm spot (an oven with the lights on works, too, but not halogen, they get too hot!) for about 30 minutes, until doubled.
- Once doubled in size, remove the dough, pinch it into balls, and continue with the above recipe.
Expert Tips
- If your dough isn’t rising, check the date on your yeast, it may be expired!
- Make sure you allow your rolls to rise correctly. Once they are shaped, place the rolls in a warmer, draft-free area of the kitchen to easily rise. If the room is cold, this could take longer; I often like to use my oven on the “proof” setting or preheat to 100ºF, turn it off, and then add the rolls.
- Place a damp towel over the rolls before they rise. This helps the dough to not dry out or form a skin before baking.
- If you are making the rolls in a stand mixer or by hand, avoid over-mixing or over-kneading. This can make the texture tough or gummy rather than soft and fluffy. Mix just until combined and knead for 6 to 8 minutes, until the dough is sticky but also stretchy.
- Make your rolls the same size. This is so important for even baking! You can eyeball the size, or use a culinary scale if you want to be precise.
Variations
- Herbed Dinner Rolls: Add chopped rosemary, parsley, or thyme to the dough, then sprinkle a little extra on top before baking for a pretty, fragrant finish.
- Honey Butter Rolls: Brush warm rolls with melted butter mixed with honey, and add a pinch of flaky salt if you like the sweet-meets-salty moment.
- Slider Rolls: Shape the dough into small rounds for easy little sandwich buns.
- Garlic Butter Rolls: Brush warm rolls with melted butter mixed with minced garlic, or with 1 teaspoon garlic powder, then sprinkle a bit of Parmesan if you’re feeling fancy.
- Cheese Rolls: Fold shredded cheddar cheese, Monterey Jack, or Parmesan into the dough, or sprinkle cheese on top near the end of baking.
- Everything Seasoned Rolls: Brush with butter and dust the tops with everything bagel seasoning before baking.
- Whole Wheat Dinner Rolls: Swap in part whole-wheat flour for a heartier roll and add a drizzle of honey to keep things soft.
- Shape a little larger and make into hamburger buns!
Storage
- Once the rolls are completely cooled, transfer them to an airtight container or resealable plastic bag and store on the counter 1-2 days.
- If you’ll use them within 48 hours, you can leave them at room temperature. Or refrigerate 2-3 days (though this isn’t my favorite way).
- For the best texture, bring to room temperature or warm slightly before serving.
- Preheat your oven to 300 °F (150 °C). Place rolls on a baking sheet and warm for 5-10 minutes, until heated through and slightly crisp on the outside.
- Alternatively, microwave a single roll for about 15-20 seconds (depending on your microwave), then pat the top with a bit of butter for that fresh-out-of-the-oven feeling.
- Brush melted butter on top after warming, if you like that extra shine and flavor (just like in the original bake).
Freezing
If you want to freeze the rolls, once fully cooled, wrap each roll (or the full batch) in plastic wrap, then place in a freezer-safe bag or container, removing as much air as possible. Freeze up to 2 months.
- When ready to use, you have two options:
- Overnight thaw: Remove from freezer and place in the fridge the evening before, then warm in the oven the next day.
- Quick thaw & warm: Preheat your oven to 325 °F (165 °C). Remove from wrapping, place on a baking sheet, cover loosely with foil, and warm for about 10-15 minutes or until heated through. For the last 2-3 minutes, remove foil to let the tops re-crisp.
- After thawing and warming, consume within 1 day for the best texture.
Make Ahead Instructions (Overnight Yeast Rolls)
- Refrigerate overnight: Make through the first rise, then shape the rolls, place them in a lightly greased baking dish or sheet pan, cover the shaped rolls with lightly oiled plastic wrap, and chill in the refrigerator for up to 24 hours. Before baking, let them warm up and rise until puffy, about 45–90 minutes.
- Par-bake: Bake 10–12 minutes until set but pale. Cool, then cover and finish baking for 8–10 minutes at 350°F.
- Freeze unbaked: Freeze shaped raw dough balls on a tray for one hour, then bag. When ready, place in the pan, cover, and let thaw and rise 3–5 hours before baking. Like homemade Rhodes rolls!
What to Serve with Yeast Dinner Rolls
In our house, homemade dinner rolls pair with any meal, but here are some signature recipes we love to serve them with:
More Delicious Bread Recipes
FAQs
Tough rolls usually mean too much flour, over-kneading, or liquid that was too hot or too cold for the yeast. Measure flour lightly, knead just until smooth, and use warm water so the dough rises properly and stays soft.
Usually, the yeast wasn’t active, the liquid was too hot or too cold, or the dough didn’t get enough warm time to proof.
This recipe was originally published in 2017 and has been updated several times (2023, 2025, and 2026) to improve the photos, baking tips, and instructions for the best possible homemade Easy Yeast Rolls.
Like this recipe?
Don’t forget to give it a ⭐️⭐️⭐️⭐️⭐️ star rating and leave a comment below the recipe!

Video
Equipment
Ingredients
- 1 cup warm water between 90-110°F but not too hot.
- 2 tablespoons butter softened, I use salted butter, if using unsalted, add ¼ teaspoon additional salt
- 1 large egg Room temperature (if you forget, submerge the egg in warm (not hot) water for 5-7 minutes)
- 3 ¼ cups bread flour may substitute all-purpose flour end result will be less fluffy, but they will still be good!
- ¼ cup sugar
- 1 teaspoon salt
- 3 teaspoons bread machine yeast make sure your yeast is fresh; use instant or bread machine yeast. (For high altitude use 2 ½ teaspoons yeast)
- 2-3 Tablespoons melted butter for brushing
- kosher salt or flaky sea salt
Instructions
- Place first 7 ingredients in bread machine in order listed (see notes for how to make without bread machine).1 cup warm water, 2 tablespoons butter, 1 large egg, 3 ¼ cups bread flour, ¼ cup sugar, 1 teaspoon salt, 3 teaspoons bread machine yeast
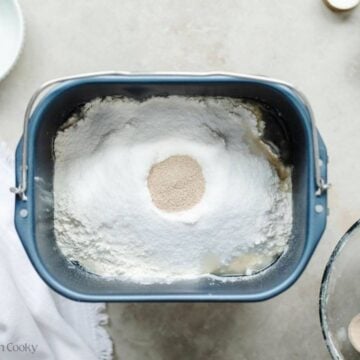
- When adding ingredients, place the yeast near the sugar, not the salt.
- Start bread machine on >>white, >>dough, >>large cycle (not the full bread cycle). You will do the second rise after you form them into dough balls.
- Once cycle is finished, line a cookie sheet with parchment paper, or spray with non-stick spray.
- Remove yeast dough from the bread pan and punch down; separate pieces into 16-24 equal dough balls.
- Pinch together bottoms of dough to form little dumpling sized dough balls and place upside down on cookie sheet.

- Brush with melted butter and sprinkle with kosher or flaky sea salt.2-3 Tablespoons melted butter , kosher salt

- Cover with clean, damp tea towel and let rise in warm location* for 30-40 minutes until doubled.

- Once doubled, preheat oven to 375° F (190° C) and bake 12-15 minutes until golden brown.

- Remove from oven and brush tops again with melted butter, if desired and sprinkle with a little flaky sea salt.

Notes
High Altitude Instructions: Reduce the yeast to 2 ½ teaspoons, and proceed with the recipe. Everything else stays the same!
For more information, and how to make without a bread machine, expert tips and variations, see the post.Nutrition


Janet R Doolittle
They were delicious, but the dough was so sticky, I had a hard time getting it out of the pan onto my floured board. Followed the directions exactly. What happened?
Could have been the amount of flour, you may have needed a bit more. Humidity can play into yeast breads too. Hopefully it didn’t affect your final results. Just use a little extra (not a lot) of flour when making into roll balls.
Tammy Mitchell
Very happy with the results of this recipe! I will make these yeast rolls over and over!
Thank you so much, Tammy! So happy to hear!
Linda
So forgot to rate can’t find original comment so I’ll do again lol, love the rolls. Just purchased bread machine, grandson loves loves rolls. You recipe is wonderful. Made batch last nite husband loved, so light, he said did I really 2 lol. Making batch now grandson, sons family. Also shared with sister who is a baker. Plans on making rolls and sandwich buns from your recipe
You are the best!!
Julie
When was the first rise?
Julie
Hi Julie, the first rise happens in the bread machine, it’s a bulk rise, then after you shape the rolls, you will rise them the second time. That’s why you only make them through the dough cycle on the bread machine.
Linda
Just purchased bread machine. Was looking for roll recipe found yours. My grandson loves rolls. Made last nite. My husband agrees with me they are great. He said they were so light did i really eat 2 lol now making batch for sons family(grandson)thank you. Have shared with sister who is a baker too
Thank you so much Linda, this warms my heart so very much!
Christina Bowles
Absolutely wonderful! Exactly the recipe I was looking for! My husband can’t get enough of these and I’m now making my third batch in a week! Thank you for sharing this delicious recipe!
Makes me so happy to hear that Christina! So glad you love them!
celia bichun
On the bread machine do you put on making dough cycle only and remove ? Wasn’t sure
Yes Celia, f not you’ll just end up with a loaf of bread. Once the dough is done, remove form into roll balls and let rise again before baking! Enjoy!
Dawn
These rolls are as good (maybe even better?) than my husband’s grandmother’s recipe. I’ve been making Mamaw’s rolls for special dinners for over 45 years. But this Thanksgiving I served these. Everyone thought they were delicious. And they took 1/2 the time!
I love that they tasted great and didn’t take as long to make, hopefully Mamaw would even approve! Thanks Dawn!
Shelley Snyder
These were my first yeast rolls… for Thanksgiving no less! Perfect!
Oh Shelley, this made my month! Thank you!
Susan Kotterman
I can’t wait to try this recipe! I have inherited a bread machine and am excited to use it. How do I store the rolls, and can you make them ahead?
Thanks for the prod Susan, I updated the recipe to include storage, make ahead instructions and more. The short answer is yes, you can make them ahead. See the post/recipe card for details, but you can make the rolls, cover them and keep them in the fridge overnight, baking them the next day or freeze completely cooked rolls (after cooling) I’ve got a few other methods in there for you too! Can’t wait to hear how you love them!
Susan Kottermsn
We just made these rolls and they are delicious! I am not a baker, and was not really expecting them to be very good-LOL, but they were so easy with the bread machine. We made them ahead and will freeze them for Thanksgiving! Thanks so much for adding the storage tips Kathleen!
Well I would say you could now say, “I am a baker!” So happy to hear, thank you so much for your sweet comment, Susan!
Diana
I made then recently with a roast chicken to practice the rolls for Thanksgiving. I was so pleased I made them perfect the first time! These were so easy and the bread machine made it so easy.
Thank you so much Diana!! So excited for you too!
Donna Brown
Came out perfect the first time. Delicious! Easy! I mixed all wet together and all dry together, adding yeast last.
Fabulous, Donna! Thank you for your tips!
SD
Great recipe! I’ve lost count how many times I have made this for the family now. A family member recently went through oral surgery and these were a blessing as they don’t take much time to make and are truly melt in your mouth delicious!
Thank you for your sweet words, SD! Made my day!
Glendean
Good dinner roll recipe, we really enjoyed
So happy to hear that Glendean! Thank you!
Cat
Kathleen,
If I wanted to just make this as a loaf of bread in the bread machine, what pound setting should I put it on? Never thought to weigh it after it went through the dough cycle for the rolls. Thanks!
Good question, between a 1 ½ – 2 pound loaf. 🍞 let me know how you like it!
Cat
Thanks…I’ll wing it. By the way, these rolls were amazing! I didn’t make them all the same size, some were large for sandwiches later and some were small for dinner. Absolutely the very best rolls I’ve ever made and so simple! I can’t get over how soft they were without being weak, if that makes any sense. Anyway, thank you for saving the day in the rolls department this holiday!
I’m excited to hear how it turns out! I totally understand what you mean, they are so surprisingly easy, light and soft and yet mmmm!!!! 🙂
Cat
In the oven as we speak on this Easter Sunday! Amazingly simple recipe. Bread machine dough setting does all the work, divide into rolls, rise, bake. Easy peasy. The rising of the rolls was very quick and I love that there’s more yeast in there than usual recipes. Can’t wait to sink my teeth into one of them! Thanks, Kathleen!
Yay, Cat!! They are a favorite of ours too! Bet the house smells heavenly! Happy Easter!
Cat
It does! We are not eating till later, but you know I’m going to have to dig into one of these warm rolls when they come out! Happy Easter!
Of course you will, one has to taste test to make sure they are “safe” for everyone!! 🤣
Barbara
Delicious and easy to make!
Thank you so much, Barbara!!
Barbara
I have made these dinner rolls at least 8 times with my bread machine and they turn out fluffy and delicious every time. They are very easy to make using the recipe and my bread machine.
Thank you, Barbara!! Such a sweet comment!