
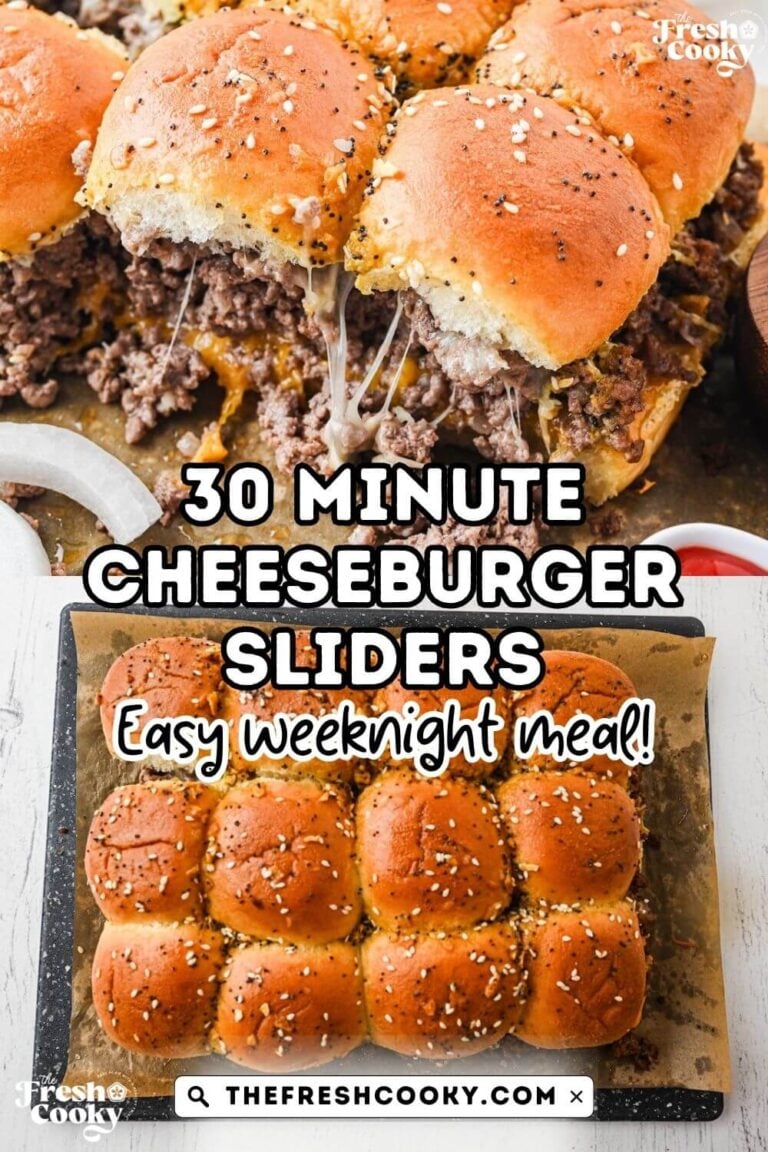
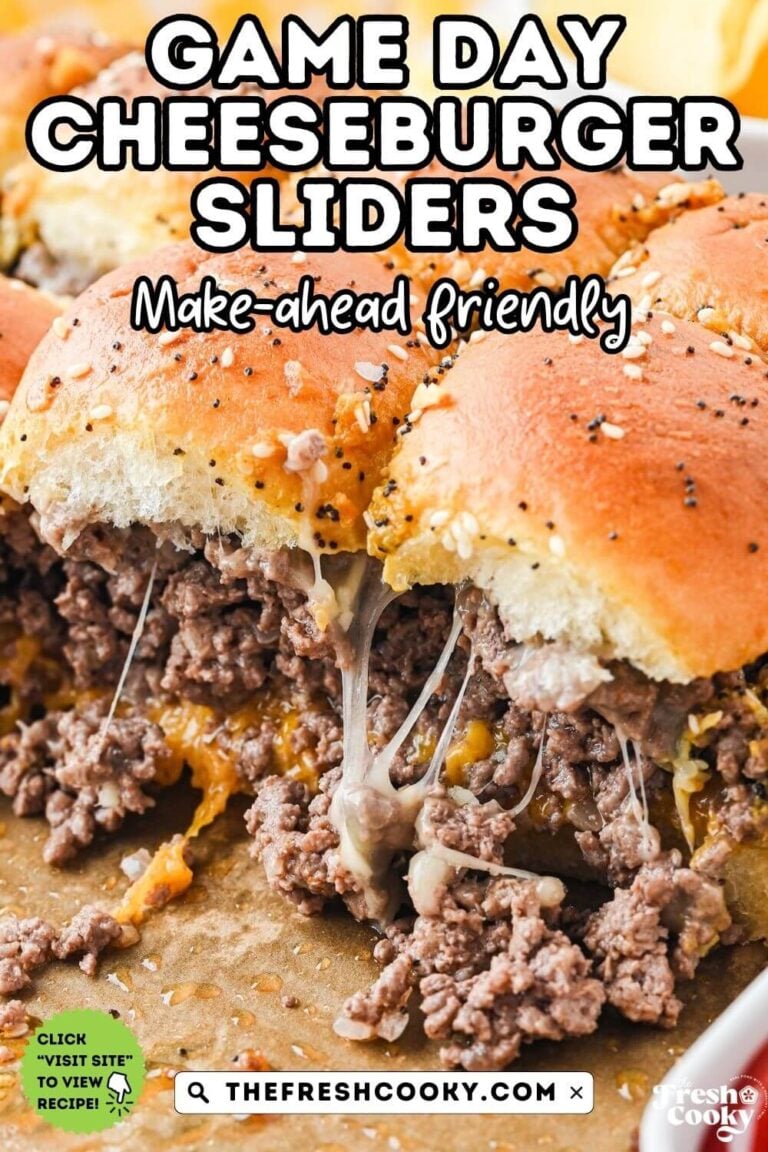
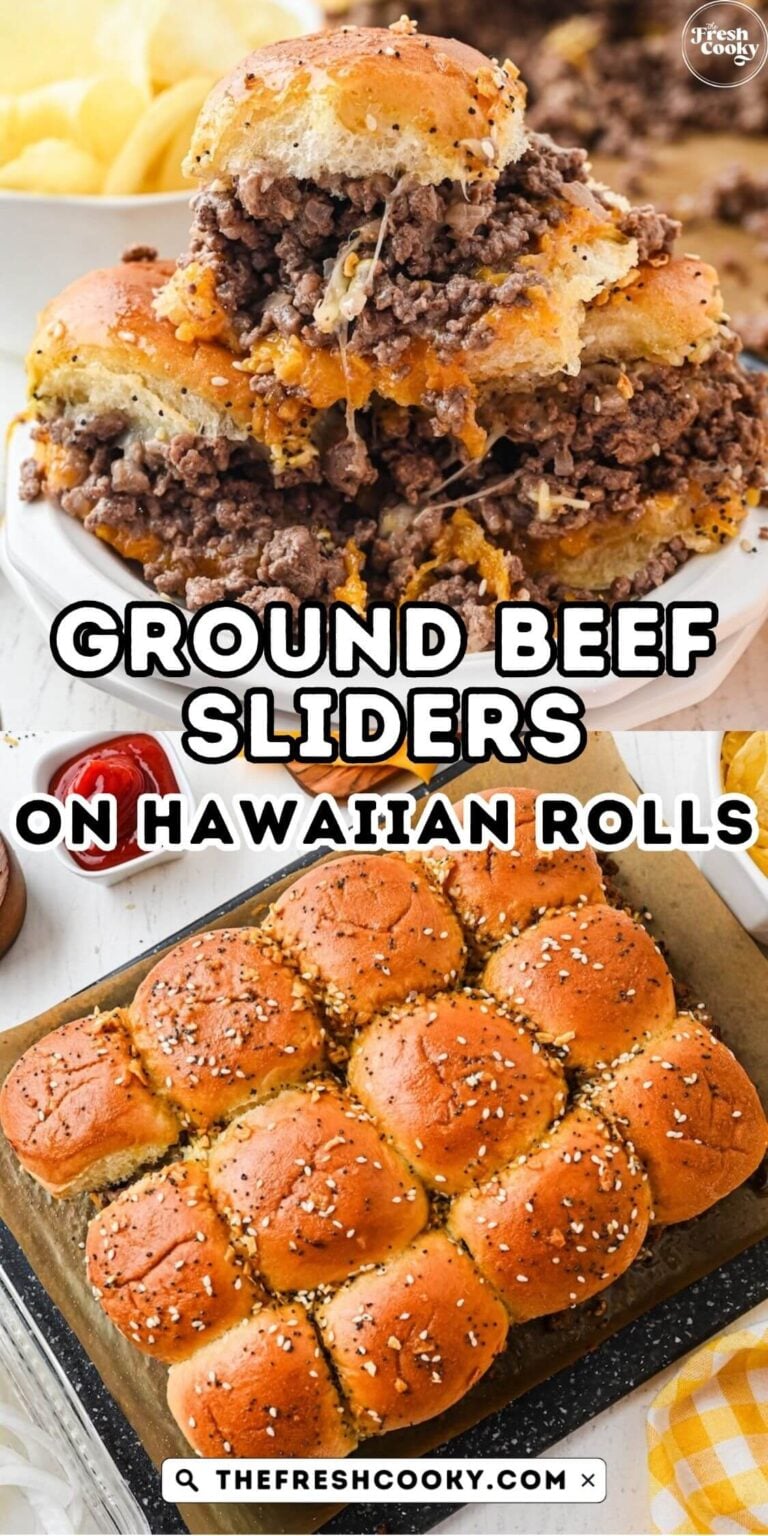
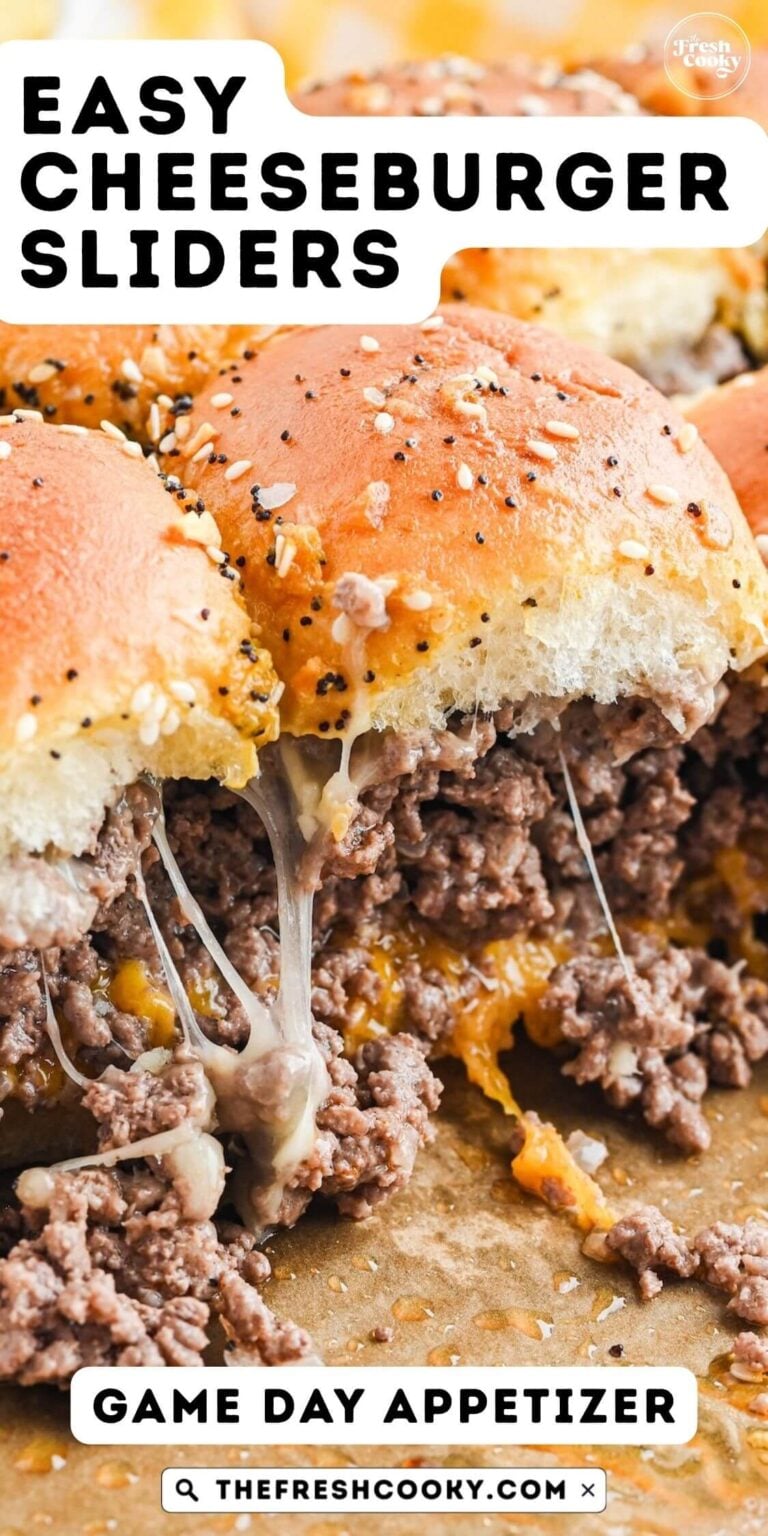

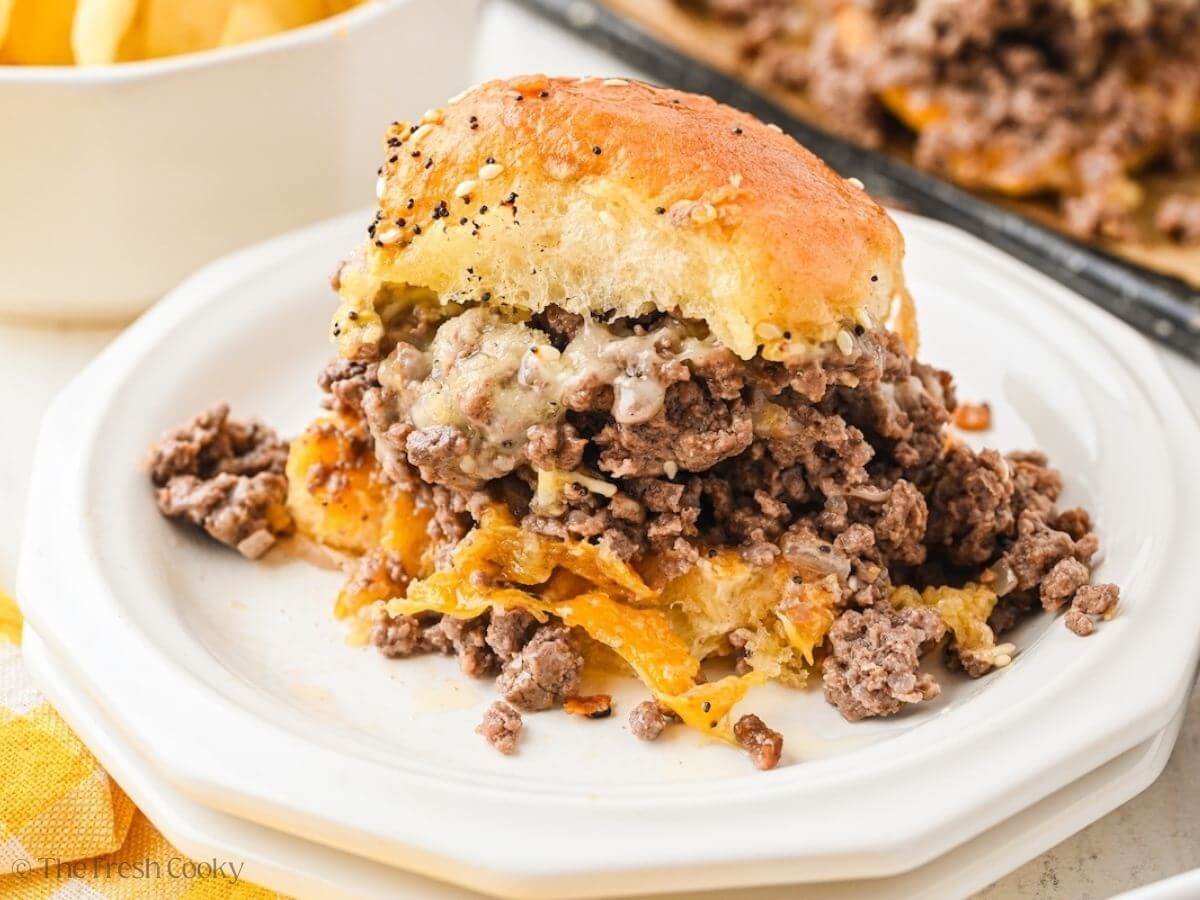
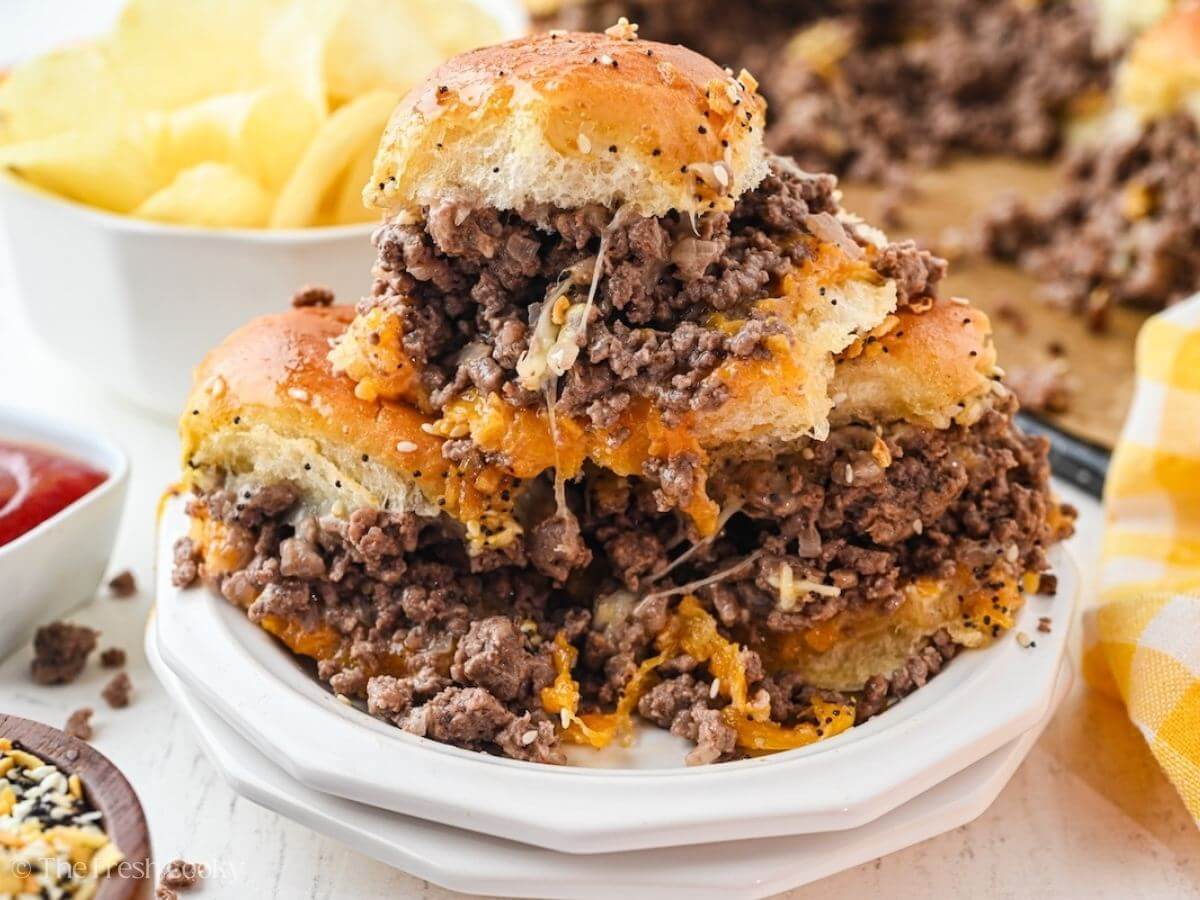
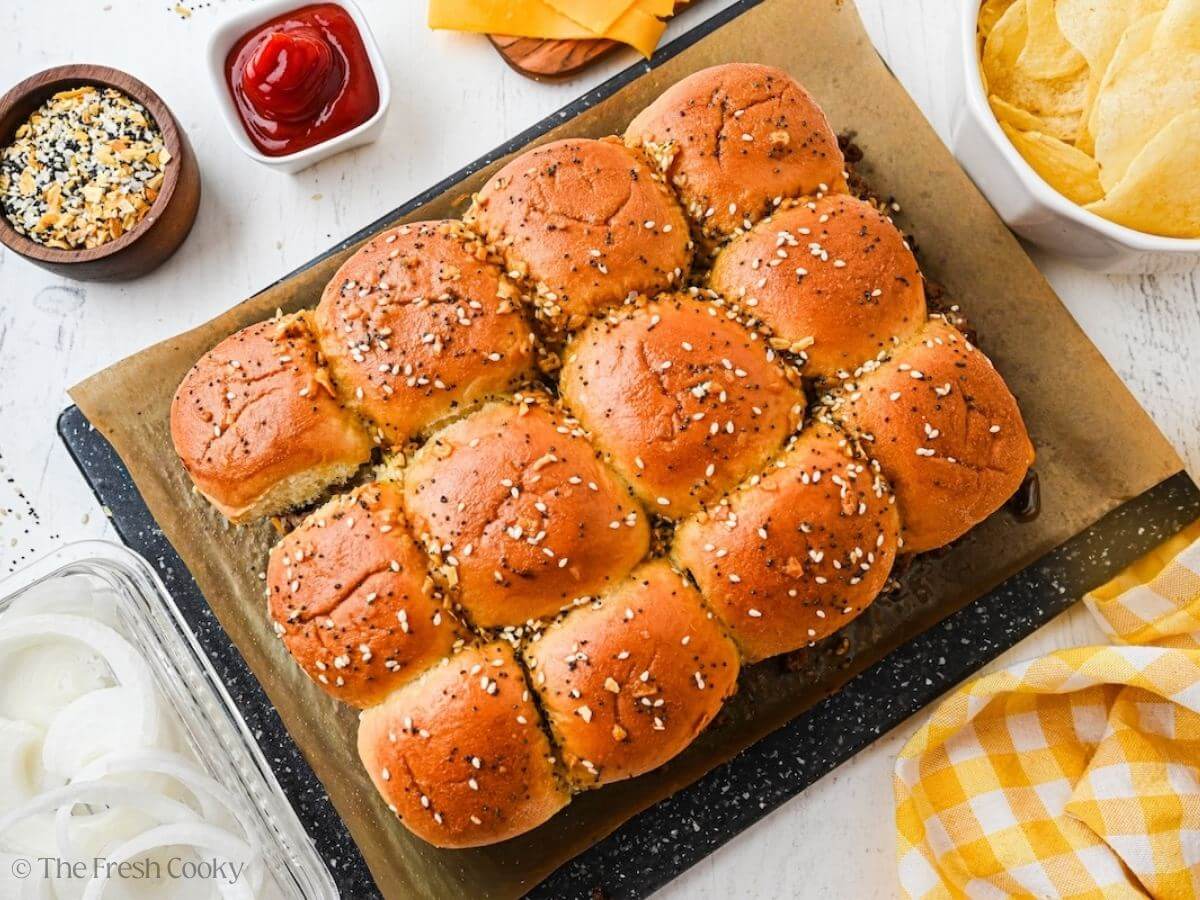
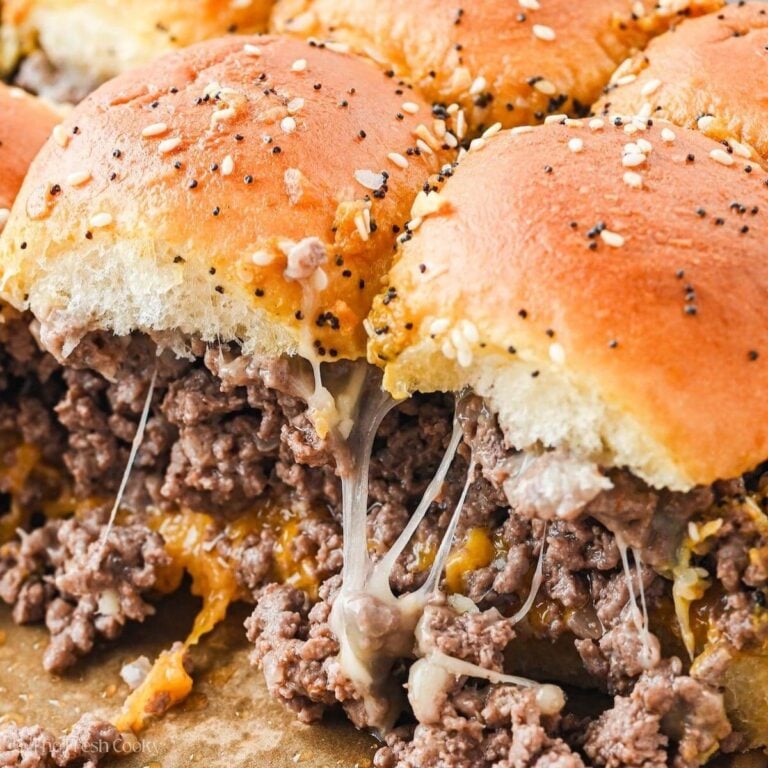
Forget the drive-through. These baked Cheeseburger Sliders on Hawaiian rolls deliver real burger flavor in 30 minutes, no patty-forming, no flipping, no assembling one by one. Just one pan, 1 ½ pounds of ground beef, and a butter sauce that makes the tops absolutely golden.
⭐️⭐️⭐️⭐️⭐️ Robin said, “These were DELICIOUS. So easy to make!! Had extras, and they were super easy to reheat for dinner or a lunch snack. Make sure you have a napkin! They are super ooooey goooey!!”
Some recipes get overhauled. This one just grew up a little. Originally published in 2023, updated in 2026. I’ve increased the ground beef and sauce since then to keep up with bigger appetites at our table, added my Smash Burger Sauce for dipping, and updated the post with new photos, smarter tips, and make-ahead instructions. Same great recipe, just heartier and better documented.
I’ve Made More Sliders Than I Can Count, and This Is the One You Need
Sixteen slider recipes on this blog. Dozens of batches made for swim teams, soccer families, holiday parties, and hungry teenagers who needed food fast. I’ve tested every variation, every method, and every roll, and these Hawaiian Roll Cheeseburger Sliders have earned a permanent spot in my regular rotation, maybe my new favorite!

Our boys grew up playing sports, which meant our evenings were a constant race between practice schedules and dinnertime. Sliders became our secret weapon. Easy to make in one pan, easy to wrap and take, easy to keep warm in the slow cooker while everyone scattered to the field. These fed my family through a decade of sports seasons, and I know they’ll do the same for yours.
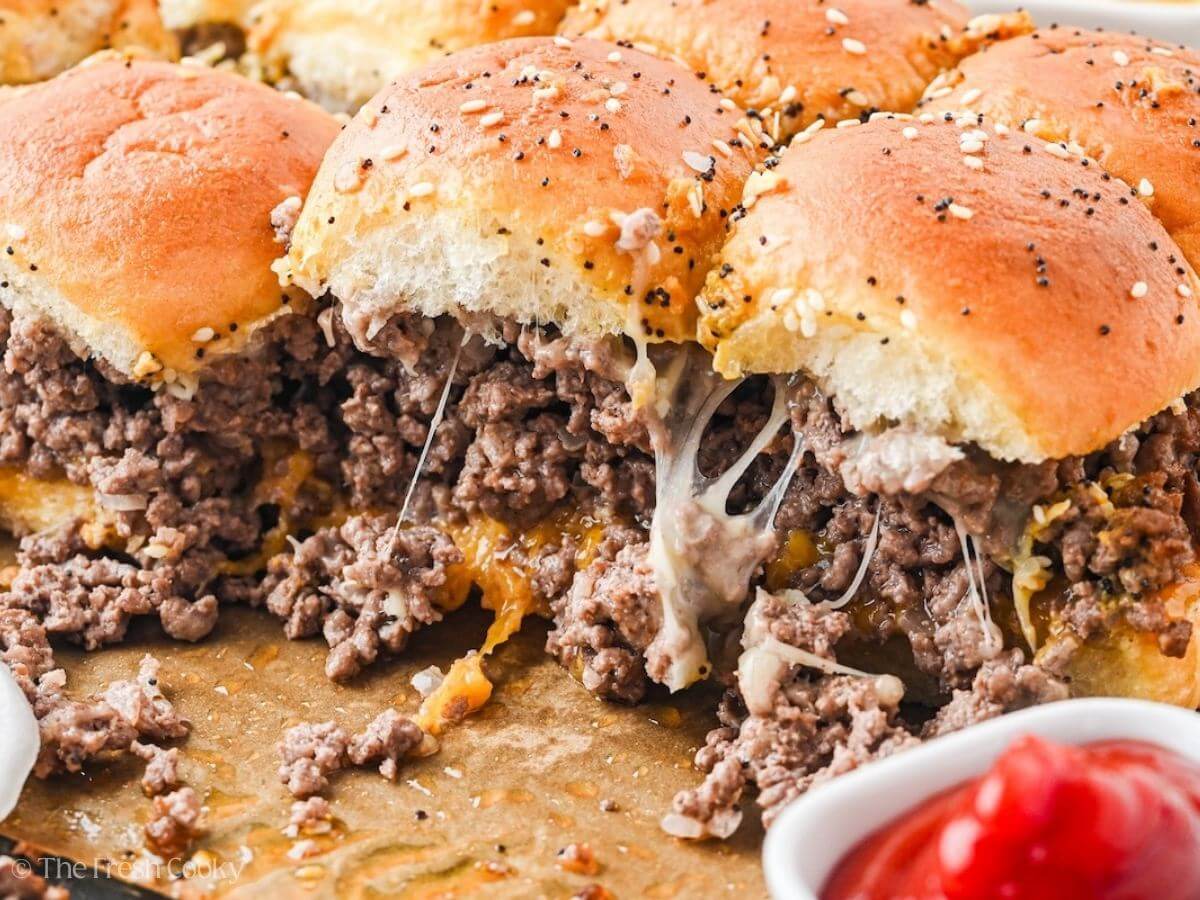
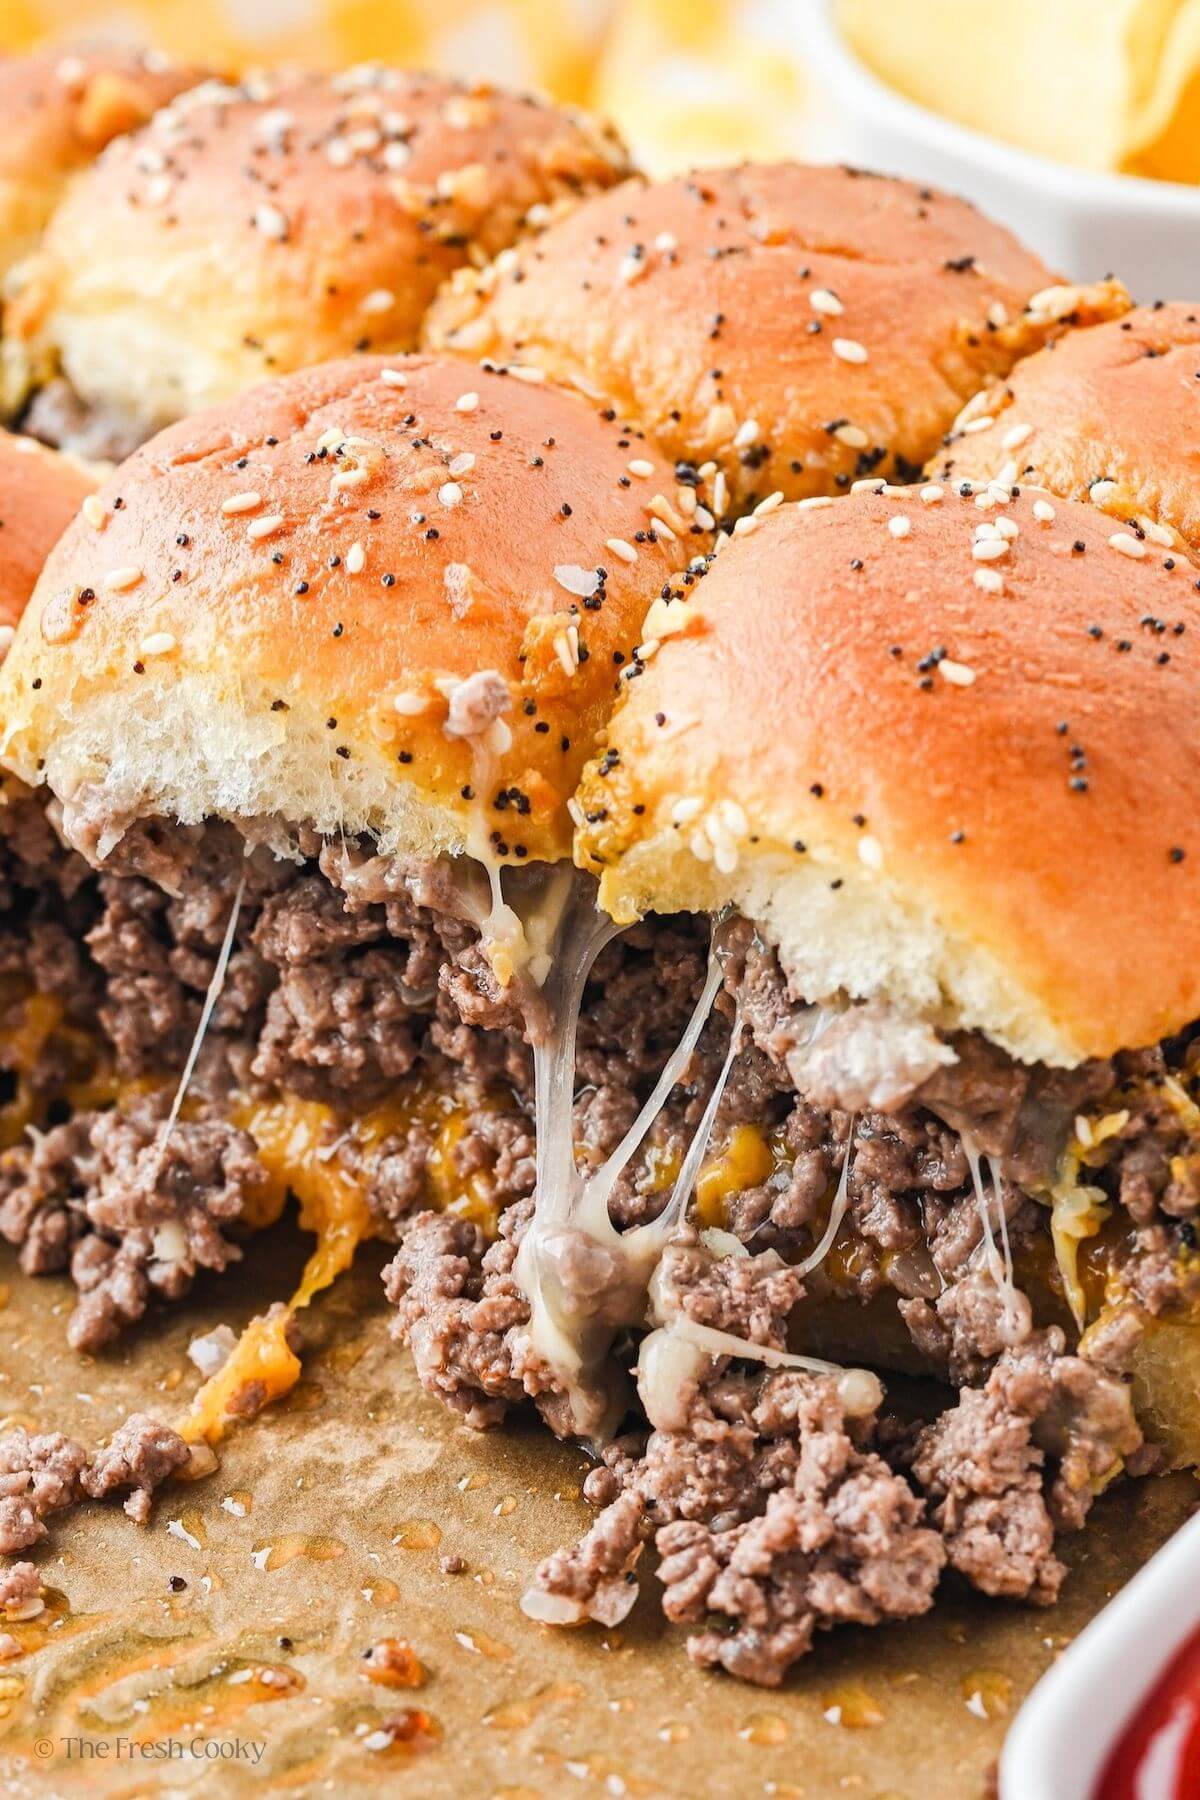
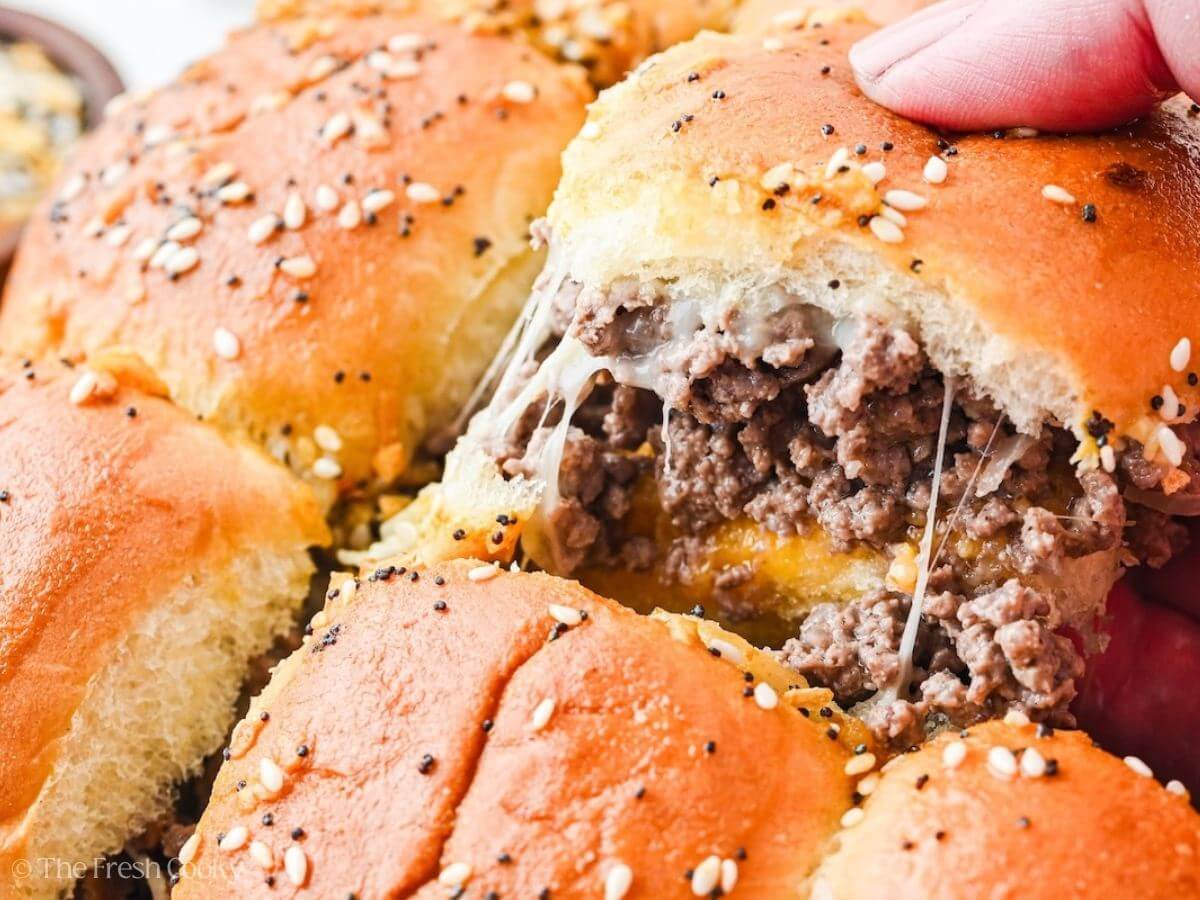
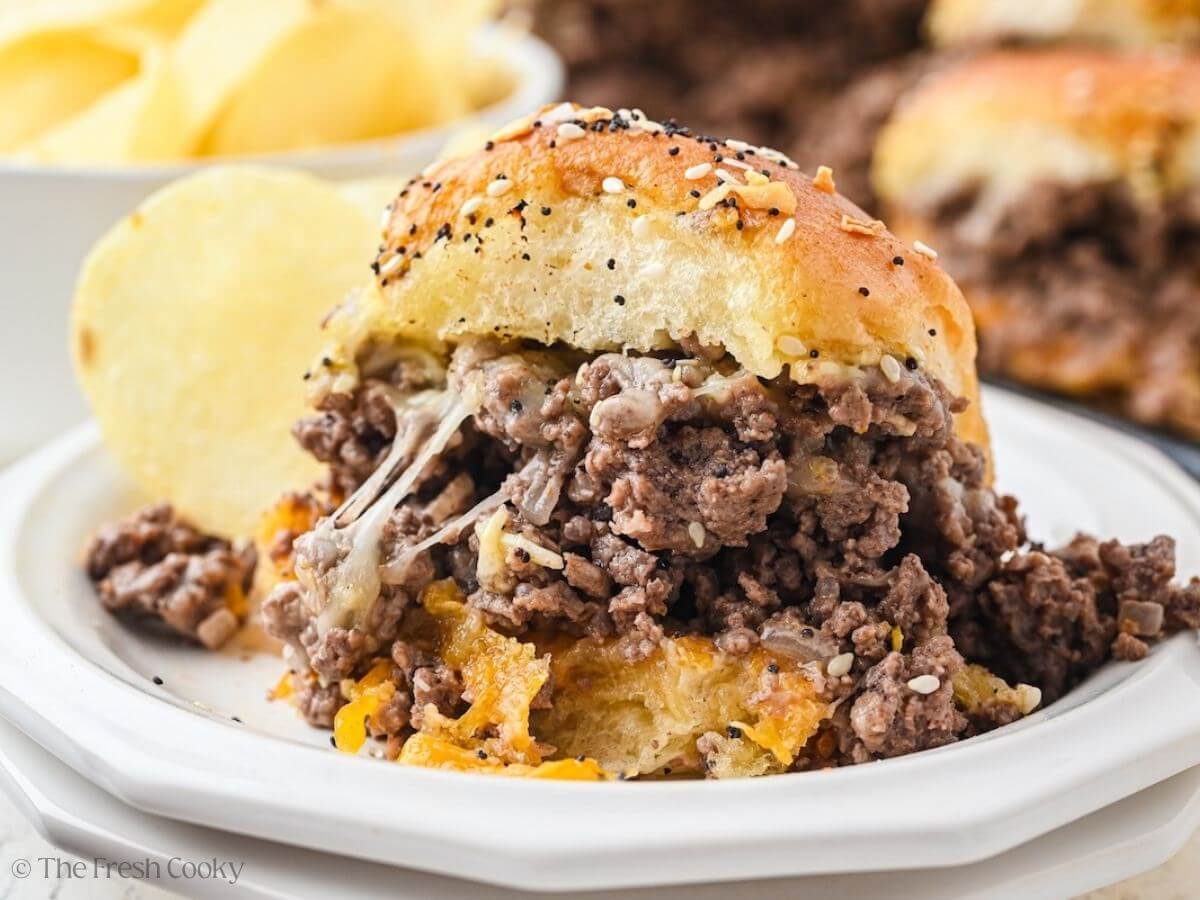
The flavor here is pure nostalgia, think White Castle, but better. Juicier beef, real melty cheese, those pillowy sweet rolls, all baked together in one pan so you’re not standing at the stove flipping anything. And with 1 ½ pounds of ground chuck spread across 12 rolls, these are genuinely hearty. Not a dainty appetizer, a real meal.
Already a slider fan? Don’t miss my Philly Cheesesteak Sliders, the always-requested Hammy Sammies, or these incredible Meatball Sliders on Hawaiian Rolls.
Why You’ll Love This Recipe
- One and a half pounds of beef across 12 rolls, satisfying, hearty portions
- Double cheese layers seal in the juiciness and deliver serious melt
- 30 minutes, one pan, zero patty-flipping required
- Freezer-friendly before or after baking, meal prep gold
- Tailgate-tested, keeping warm in a slow cooker, details below
- Dietary tips, variations, make-ahead, something for everyone.

Ingredients for Cheeseburgers Sliders
- Ground beef: I like to use ground chuck (80/20 or 85/15) for these sliders; it gives you the best flavor and the juiciest results. Ground sirloin works too, and if you’re feeling adventurous, bison or elk would be absolutely delicious. Or try a combination! After browning, tilt the pan and spoon off the excess fat, or use tongs and a wad of paper towels to blot up what’s left before assembling. If your beef is lean, use a little olive oil in the pan.
- Onion: Use sweet onions, yellow or white onions.
- Ketchup & Mayo : Classic flavors to season the ground beef.
- Salt and pepper: I always use kosher salt and freshly ground black pepper.
- Rolls: This recipe is best with soft rolls. I used King’s Hawaiian Rolls, brioche slider rolls or any small slider roll.
- Cheese: I prefer cheddar cheese or whole milk American cheese slices for burgers. Try blue cheese, Pepper Jack, Swiss, sharp cheddar or Muenster, use your favorite!
- Butter: I typically have salted butter handy, so that’s what I’ve used here. If using unsalted butter, add a pinch of salt.
- Worcestershire sauce: adds signature slider flavor and punch to the sauce.
- Mustard: I love Dijon, but try yellow mustard too, or your favorite here.
- Everything Bagel Seasoning: Add a burst of flavor with a sprinkle of everything bagel seasoning.
Want a dipping sauce that takes these completely over the top? My Smash Burger Sauce was made for exactly this moment. Make a batch while the sliders bake.
Get the full recipe in the recipe card below.

How to Make Cheeseburger Sliders
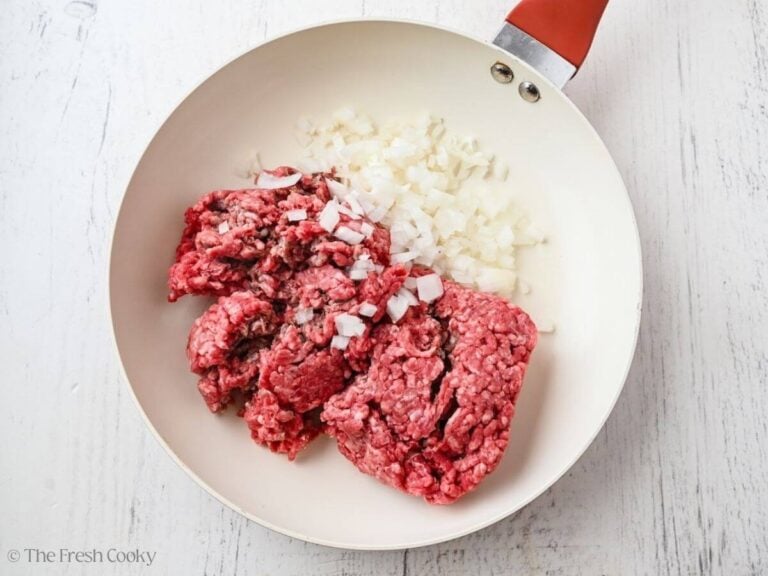
Step 1 – Brown Ground Beef
Preheat the oven to 350°F (175°C). Spray a 9×13-inch baking dish with oil or line a sheet pan with parchment paper. Go ahead and chop up the onions, too. I love this alligator chopper!
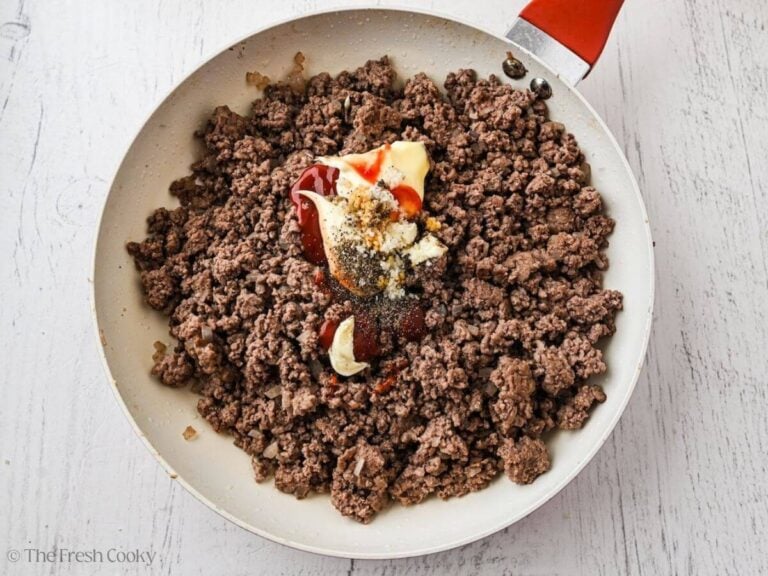
In a large skillet over medium-high heat, brown the ground beef and chopped onion, draining any excess grease. Next, stir in the ketchup, mayo, salt, and pepper, and set the meat aside.
Make-Ahead Shortcut: Prefer to skip the stovetop? Press the raw seasoned ground beef into the bottom of your 9×13 baking dish in an even layer, about ¾ inch thick. Bake at 350°F for 18 to 20 minutes, then carefully drain off the liquid and fat. Let it cool slightly before layering your cheese and rolls on top. This method works especially well when you want to get the beef done ahead of time; just cover and refrigerate until you’re ready to assemble and bake.
Step 2 – Prepare Hawaiian Rolls
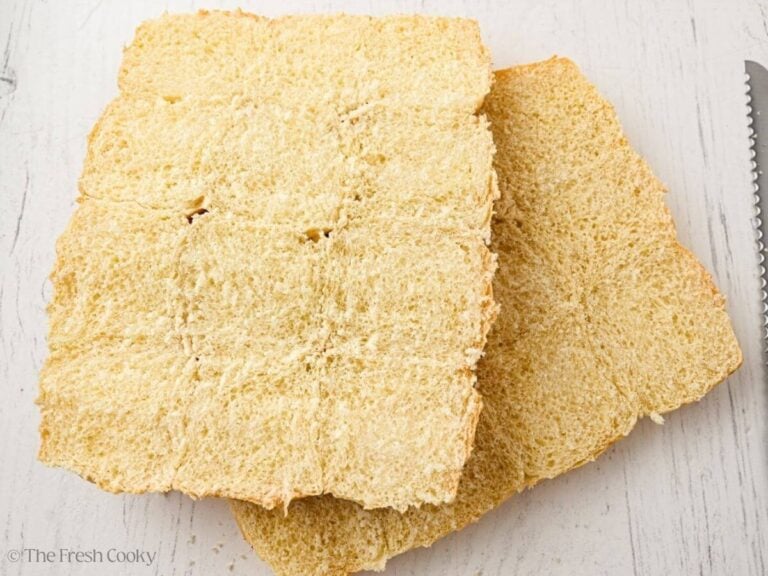
Using a serrated knife, slice the entire pack of rolls in half lengthwise, keeping them intact. I leave the bottom half slightly thicker to help prevent sogginess.
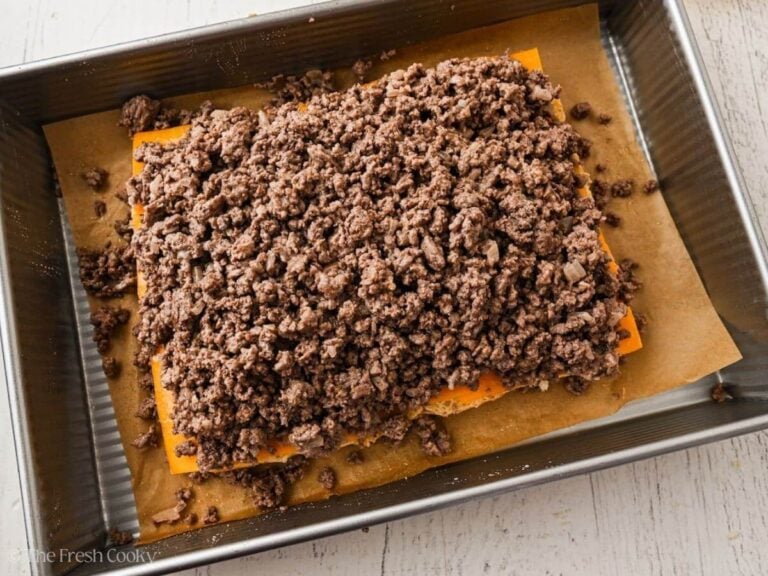
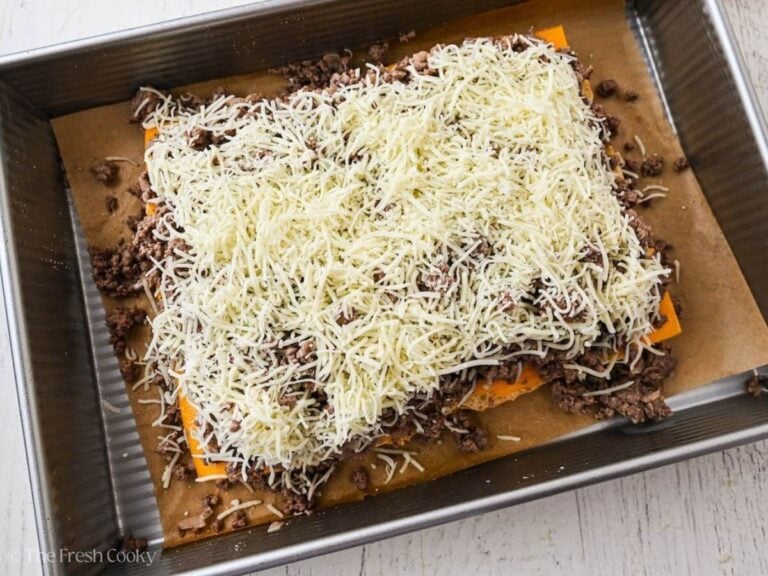
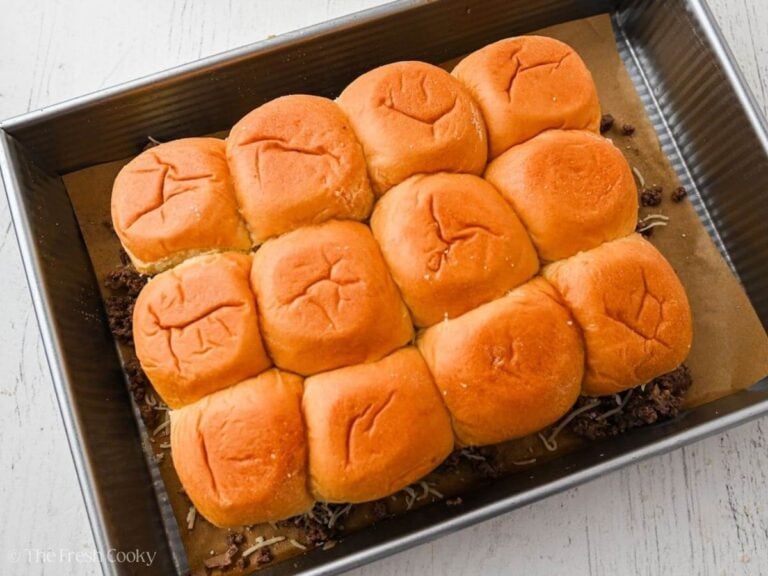
Place the bottom half of buns in a baking dish or on a sheet pan. If you used the oven slab method, lift the beef out, give the pan a quick wipe, then lay the buns in the same pan before assembling. Layer with cheese slices, then spread the cooked ground beef over the cheese. Add another layer of cheese, then place the top half of the rolls over everything.

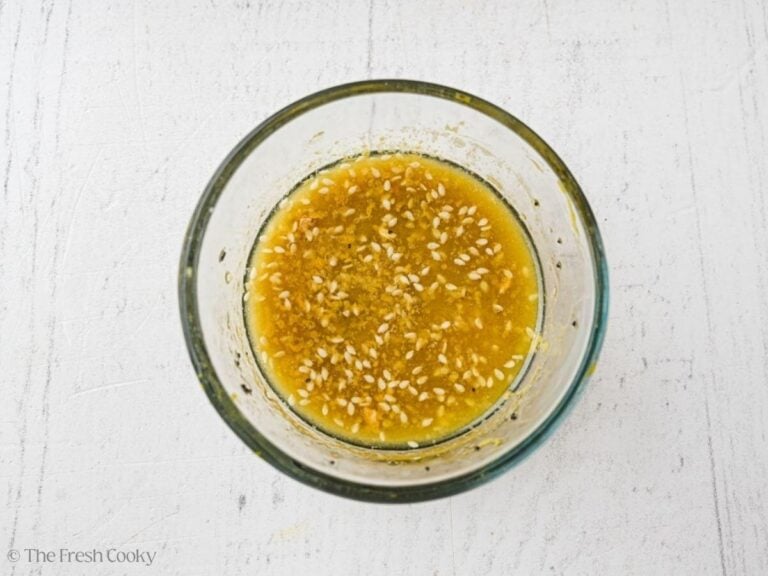
Step 3 – Make Burger Sauce
In a small bowl, mix the melted butter, mustard, Worcestershire sauce, and bagel seasoning. Brush the tops and sides of the rolls with the sauce.
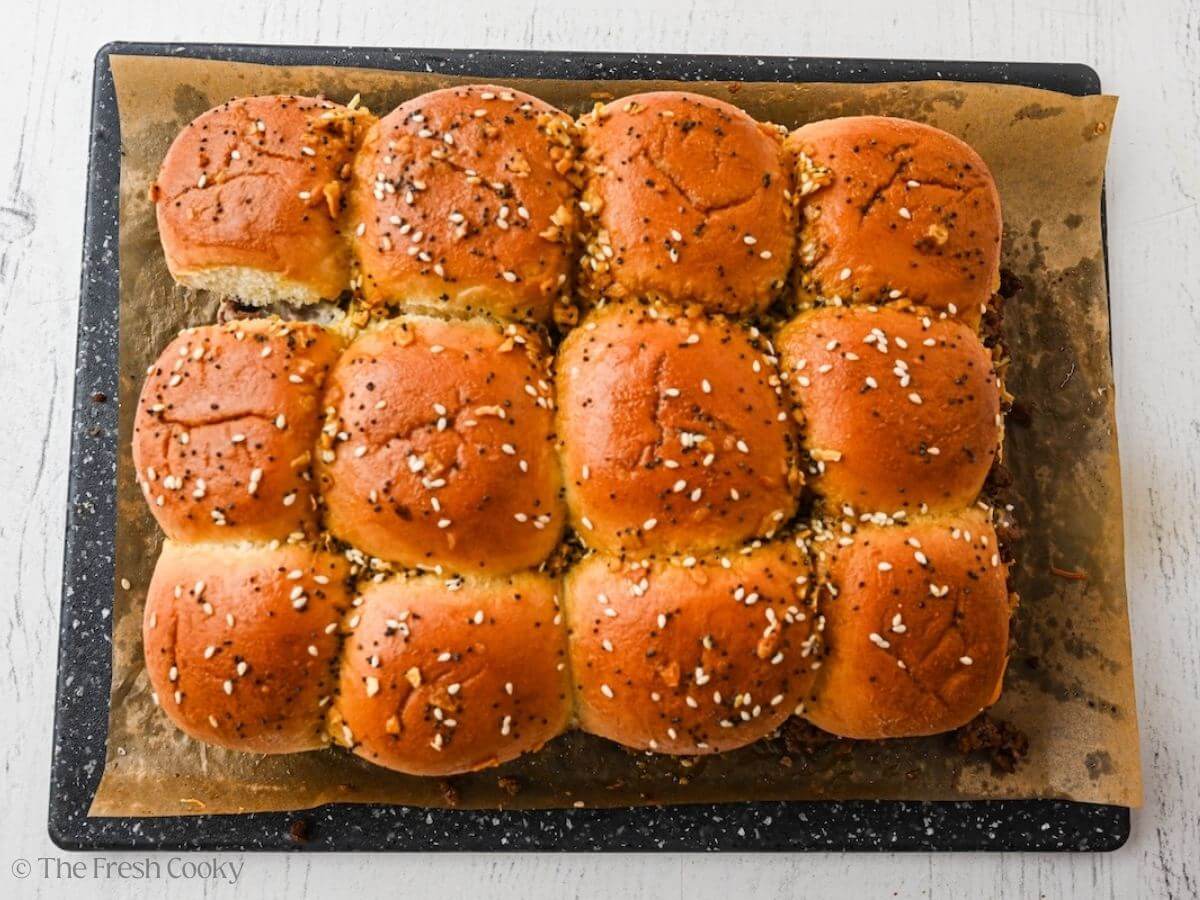
Cover with foil and bake for 10 minutes. Then uncover and bake another 7–10 minutes, until the cheese is melted and the tops are golden brown.
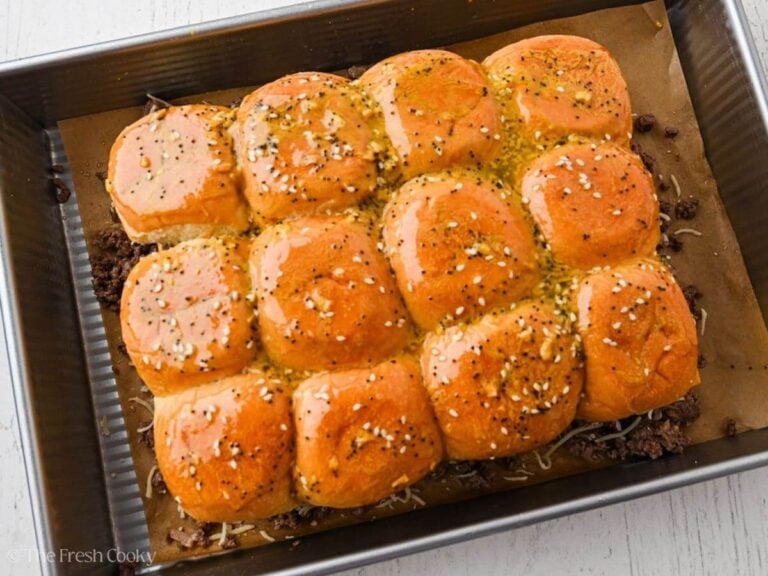
Pro Tip: After testing, I prefer the cheeseburger sliders baked in a baking dish vs. baking sheet for a softer, juicier burger slider. If you want a little more crunchy on the sides, bake them on a baking sheet.
Party Tip: Bake these at home, wrap each slider individually in foil, and pile them into a slow cooker set to Warm. They’ll hold for 2 to 3 hours, making them perfect for tailgating, potlucks, or cheering from the soccer sidelines. Tuck a clean tea towel between the lid and the crock to absorb moisture and avoid soggy buns. Don’t push much past 3 hours or they’ll start to soften more than you’d like.
Burger Sliders Recipe Variations
- Toppings: Add lettuce, sliced dill pickles, tomatoes, onions, whatever you like! Serve with yum yum sauce or my favorite Smash sauce.
- Meat Swap: Use ground turkey or chicken for a lighter option. Or try bison, elk or venison too! You can use lean ground beef, but they won’t be quite as flavorful.
- Cheese Options: Try cheddar, Swiss, provolone, Muenster, or your favorite.
- Extra Flavor: Mix ⅛–¼ cup mayo with the ketchup or add garlic powder to the butter topping.
- Lighter Version: Skip the sauce (if you must), brush buns with butter or oil, and sprinkle with sesame or everything bagel seasoning.
How to Make Keto Burger Sliders
I’ve made these low-carb for some friends with just a few tweaks. Cut the onion down to ¼ cup, skip the Worcestershire sauce, and use sugar-free ketchup to keep things on track. Don’t worry, they still taste amazing! Swap in grated or home-sliced cheese, and pick up some keto slider buns (Aldi has some great ones). Just like that, you’ve got a low-carb version of a favorite!
Gluten-Free Option: Swap Hawaiian rolls for gluten-free slider buns. Use deli-sliced or freshly grated cheese, as pre-sliced varieties may contain gluten. Double-check that seasonings and sauce are gluten-free.
How to Make Bacon Cheeseburger Sliders
It’s easy to turn these into bacon cheeseburger sliders! Cook up crispy bacon first, then either stir chopped bacon into the ground beef mixture or place a halved slice on top of the cheese for each slider (you’ll need 12 slices). Add the bun tops, brush with sauce, and bake as directed.
What do you eat with Cheeseburger Sliders on Hawaiian Rolls
These sliders are happy alongside just about anything you’d bring to a backyard cookout or game day spread. A few of our favorites:
- Steak fries or sweet potato fries (the air fryer makes these a breeze)
- Classic potato salad or pasta salad
- Baked beans
- Coleslaw, great alongside or stuffed right inside the slider
- Potato chips or BBQ chips when you want zero-effort sides
For a full list of sides that pair perfectly with sliders, check out my post on what to serve with ham and cheese sliders, and if you’re looking for more slider inspiration, my slider roundup has something for every crowd.
Making Sliders Recipe Ahead of Time
To avoid soggy rolls, layer your cheese on the bottom, add the cooled ground beef mixture on top, and then add another layer of cheese. Finally, add the tops of the rolls, brush with sauce, cover, and refrigerate until ready to bake. Bake as directed, adding 2-3 minutes. Using the oven slab method above? This is where it really shines for make-ahead prep.
Storing Burger Sliders
Store leftover sliders in an airtight container in the fridge for up to 3 days.
How to Reheat Burger Sliders
Place sliders on a baking dish, cover with foil, and reheat in a 350°F (175°C) oven for 5–10 minutes. Remove foil during the last few minutes to crisp the tops.
Can you Freeze Cheeseburger Sliders?
Yes! Here’s how to do it both ways.
Freezing Unbaked Sliders (Best for Meal Prep) Brown the beef, drain the fat well, and let the meat cool completely before assembling on the rolls. Add your cheese layers and top buns, but hold off on the butter sauce; that goes on fresh right before baking. Wrap the whole slab tightly in plastic wrap, then in foil, and freeze for up to 2 months. When ready to bake, thaw overnight in the refrigerator, make your butter sauce, brush it on, and bake as directed, adding 3 to 5 extra minutes since you’re starting from cold.
Freezing Baked Sliders Let sliders cool completely first. For grab-and-go lunches, after-school snacks, or tossing in a bag for the soccer field, wrap individually in plastic wrap then foil. For a full meal another night, wrap the entire slab first in plastic wrap, then in foil, or double wrap in foil if skipping the plastic. Freeze up to 3 months.
To Reheat
Microwave (thawed only): Wrap in a paper towel and microwave for 30 seconds, rotate, then heat 20 more seconds. Let rest 1 minute. Note: this method can make the buns a bit soft.
Oven: Wrap in foil and bake at 350°F for 15 to 18 minutes from frozen, or 5 to 10 minutes from thawed.
Air fryer: Wrap individually in foil and place in a preheated 350°F air fryer for 7 to 9 minutes. Don’t overcrowd the basket.
Frequently Asked Questions
I prefer using King’s Hawaiian Butter rolls for these sliders, but the original sweet dinner rolls are another excellent choice if you desire sweetness. Honestly, any soft dinner roll will do.
Yes! Wrap each slider individually in foil and place them in a crockpot on warm for a grab-and-go party or game-day fun! Place a tea towel between the lid and the crockpot and it will absorb the moisture helping them not to get too soggy.
Yes, use the slider on the recipe to increase the quantities; make on one single half-sheet pan or bake in two baking dishes. Great for a crowd!
More Easy Ground Beef Recipes
- Zucchini Casserole with Ground Beef
- Instant Pot Ground Beef Stroganoff
- Skillet Shepherd’s Pie
- Smash Burger Recipe
- Bison Burger Recipe
More Slider Recipes to Try


Like this recipe?
Don’t forget to give it a ⭐️⭐️⭐️⭐️⭐️ star rating and leave a comment below the recipe!
Video
Equipment
- Hamburger Chopper
Ingredients
- 1 – 1 ½ pounds ground beef I like using 85/15 ground chuck, but leaner % work too, adjust your seasonings accordingly, also try ground bison, elk, turkey or chicken
- 1 small-medium onion minced small
- 2 – 3 tablespoons ketchup Use 3 if using 1 ½ pounds
- 2 – 3 tablespoons mayonnaise Use 3 if using 1 ½ pounds
- 1 teaspoon kosher salt
- ½ teaspoon garlic
- ½ teaspoon black pepper
- 1 package Hawaiian Rolls (package of 12) or use other slider rolls, brioche rolls, keto or gluten-free
- 6 – 8 slices Cheddar or white American cheese, or use your favorite cheese try Swiss, provolone, blue cheese, sharp cheddar, goat cheese, Muenster or Mozzarella
- 1 cup white cheddar cheese shredded off the block, use sharp or mild your preference
- 3 tablespoons butter melted
- 1 tablespoon Dijon mustard or may use yellow mustard if preferred
- 1 tablespoon Worcestershire sauce
- 1 tablespoon Everything Bagel seasoning or sesame seeds
Optional
Instructions
- Preheat oven to 350°F (175 °C) and line a rimmed baking sheet pan with parchment paper or spray a 9×13 inch baking dish with oil.
- Break up and brown the ground beef and onions in a large skillet over medium-high heat. Drain any excess grease or blot using paper towels and tongs. Stir in the ketchup, mayonnaise, garlic powder, salt and pepper, and set the meat to the side.1 – 1 ½ pounds ground beef, 1 small-medium onion, 2 – 3 tablespoons ketchup, 2 – 3 tablespoons mayonnaise, 1 teaspoon kosher salt, ½ teaspoon black pepper, ½ teaspoon garlic
- Using a serrated knife, slice the rolls in half lengthwise, keeping the bottom a little thicker to help avoid sogginess.1 package Hawaiian Rolls
- Place the roll's bottom half onto the sheet pan or baking dish and top them with slices of cheese, next, add the ground beef mixture and finish with a layer of cheese then replace the top of the rolls on.6 – 8 slices Cheddar, 1 cup white cheddar cheese
- Mix the melted butter, mustard, Worcestershire sauce, and Everything bagel seasoning in a small mixing bowl. Brush the mixture on the top and sides of the rolls.3 tablespoons butter, 1 tablespoon Dijon mustard, 1 tablespoon Worcestershire sauce, 1 tablespoon Everything Bagel seasoning
- Cover with foil and place the sliders in the oven, baking for 10 minutes; remove foil and bake an additional 7-10 minutes until cheese is melted and sliders are golden. Serve immediately.
- If desired, serve with a side of Smash Sauce to take these over the top! Or slather some on just before baking.
Notes
- Keep leftover sliders in an airtight container in the fridge for up to 3 days.
- Reheat (Oven): Place sliders in a baking dish, cover with foil, and bake at 350°F (175°C) for 5–10 minutes. Uncover for the last few minutes to crisp the tops.
- Reheat (Frozen): From frozen, cover sliders with foil and bake at 350°F for 15–20 minutes. Remove foil and bake 2–3 more minutes until heated through.
- Reheat (Microwave): Not ideal, but works in a pinch. Wrap a thawed slider in a paper towel and microwave for 30 seconds, rotate, then heat for 20 seconds more. Let sit for 1 minute.
From frozen: Microwave 30 seconds per side, wrapped in a paper towel. Rest 1 minute. - Freezing Tips: Let baked sliders cool completely. Wrap tightly in plastic wrap or foil and place in a freezer-safe container or bag. Freeze for up to 3–6 months.
- To Reheat (Thawed): Thaw overnight in the fridge, then reheat in the oven as above.
Nutrition


Lori Midgley
This recipe is SOOO YUMMY! I used ground bison and brioche buns. We will definitely been putting this one on repeat.
Looovvveee bison!!!
Robin
These were DELICIOUS. So easy to make!! Had extras, and they were super easy to reheat for dinner or a lunch snack. Make sure you have a napkin! They are super ooooey goooey!!
Thanks so much Robin!! So glad you loved them!!
Tayler
I made these sliders for dinner last night and they were so delicious! Loved by both the hubby and kids!
YAY! Thank you!
Beth
These are so good! I made them last night and they were a huge hit. Next time, I’m adding bacon for bacon burger sliders.
Everything is better with bacon!
justin
Kids loved these with several slices of cheese on top!
A kid win is always a win!! So glad you liked it!
Kate
These sliders were so easy! Perfect for our neighborhood party!
Yay!! Glad they were a win!
Suja md
This looks and sounds fabulous! Love this recipe.
Thank you!
Laura Ashley Johnson
These are perfect for game day!!
They really are!!
Tasia
These cheeseburger sliders are going to be perfect for the busy fall season ahead. I’ve added the Hawaiian rolls to my shopping list so I can make a batch and freeze for when I need dinner in a hurry.
Perfect!! So glad they will make it to your table!