
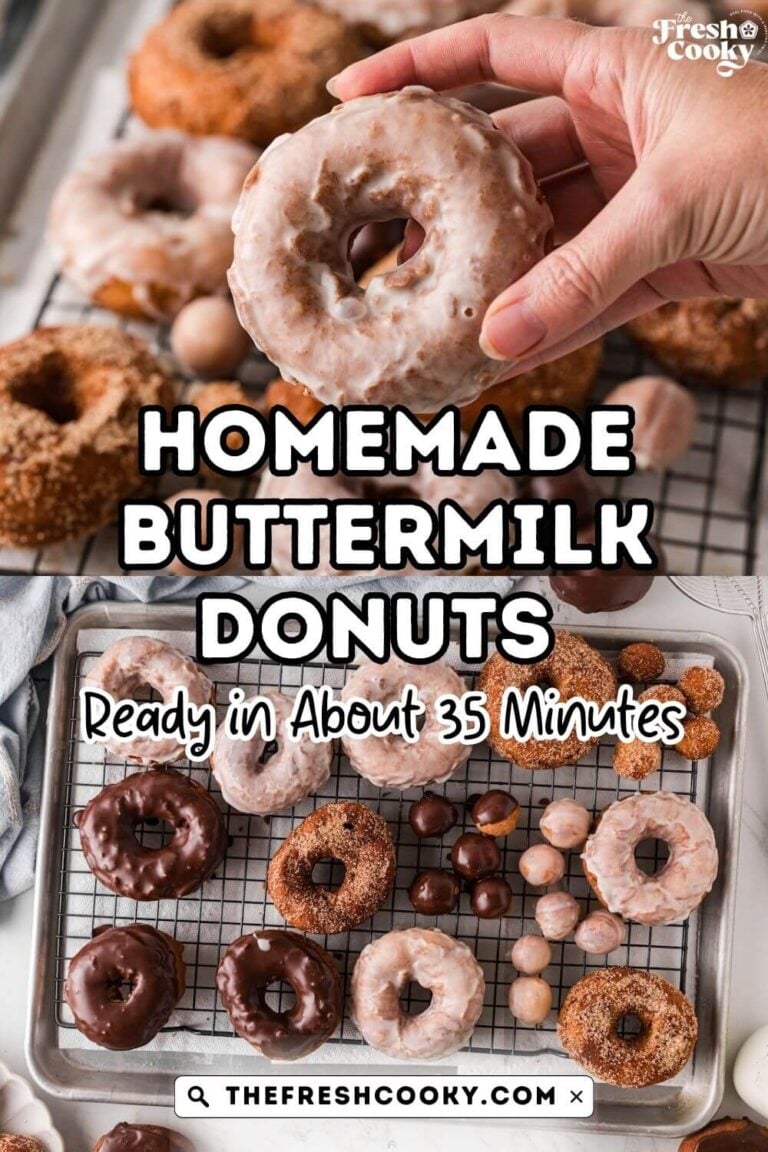
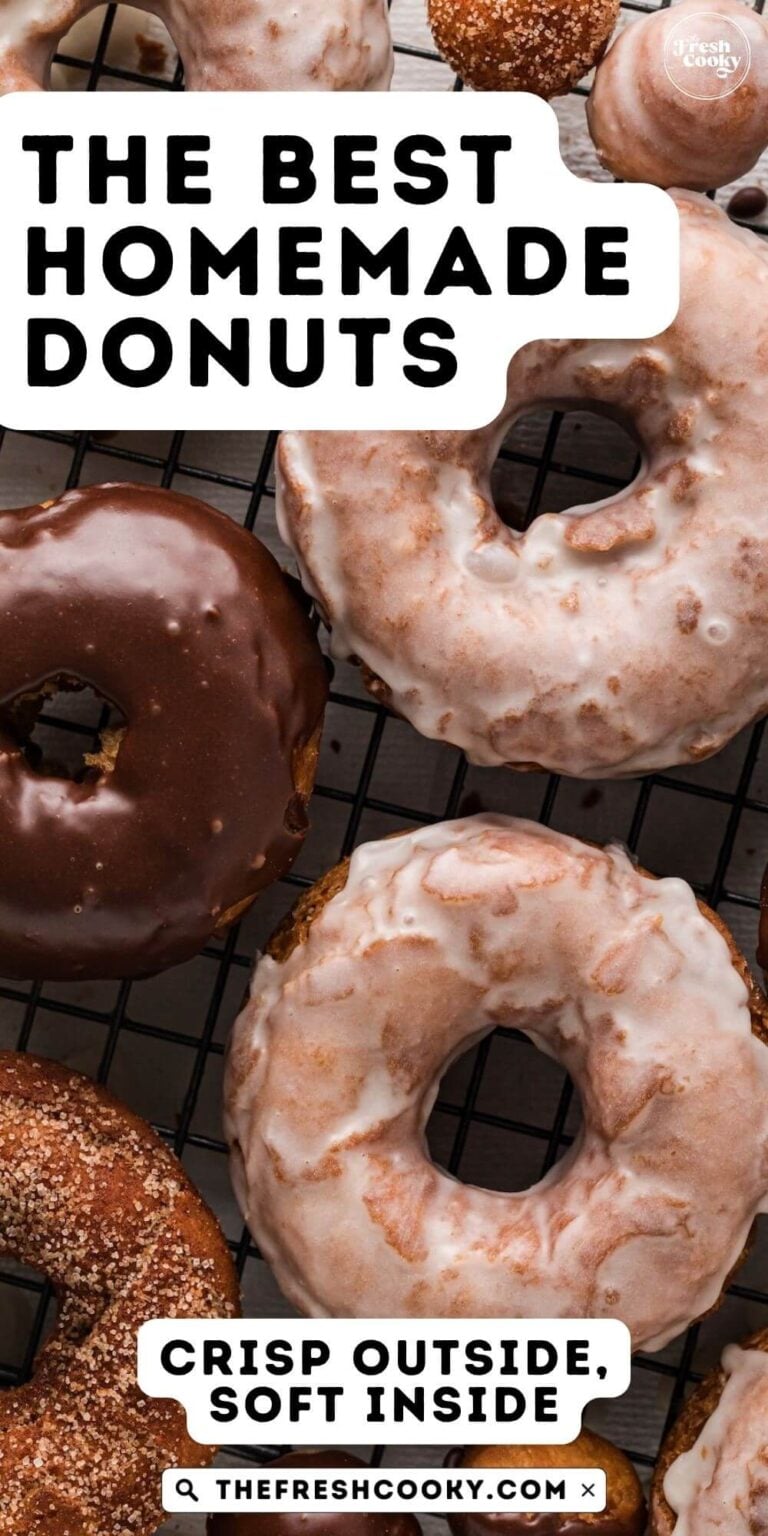
This homemade donut recipe is the one you’ll come back to every time. No yeast, no long rise time, just a simple buttermilk dough that fries up crispy on the outside and tender and cakey on the inside. I tested a variety of oils to find the best results, and these old-fashioned homemade donuts have been tested at every altitude across the country. They turn out right every single time, beginner-friendly!
The Donut Recipe I Couldn’t Stop Tinkering With
I spent a long time developing this homemade donut recipe. I pored over old-fashioned donut recipes, buttermilk donuts, cake donuts, and even yeast donuts like my Paczki from every corner of the internet and a stack of cookbooks. Once I looked at my mom’s 1960s Betty Crocker Cookbook, something clicked. This recipe is a love letter to that era of home baking, with a few smart modern tweaks.

One of those tweaks? Sour cream. I’ve had a harder and harder time finding full-fat organic buttermilk lately, so I started using low-fat buttermilk and adding sour cream to make up for the fat. It adds flavor and helps give the donut that soft, pillowy crumb you’d expect from a really great cake donut. Keep the sour cream in, even if you’re lucky enough to find full-fat buttermilk. Trust me on this one.
My volunteer recipe testers had a few things to say, and they said it best: “My son had never had a cake donut like this before and he loved them, especially the donut holes with all the glaze.” And: “A super easy recipe to follow and make!” The donut holes, friends. Don’t you dare throw them away! Dawn said, “They were easier to make than I thought. I made a half batch, and they were delicious”
Obsessed with donuts and pastries like I am? Browse all my pastry recipes for more from-scratch favorites.

What makes an Old-Fashioned Donut different?
An old-fashioned donut is a cake-style donut with a distinct craggy, crackly exterior and a soft, tender inside. That signature rough surface isn’t an accident; it happens because the dough is fried at a slightly lower temperature, which lets the outside split and crack as it cooks, creating those rugged ridges that catch every last drop of glaze.
Unlike a yeast donut (think Krispy Kreme-style, light and airy with a smooth exterior), an old-fashioned donut gets its lift from baking powder and baking soda, not yeast. No waiting for dough to rise, no proofing, no fuss. Just mix, rest, cut, and fry. The result is denser than a yeast donut, but in the best possible way: more substantial, more flavor, and that crunch when you bite through the outside? That’s the whole point.
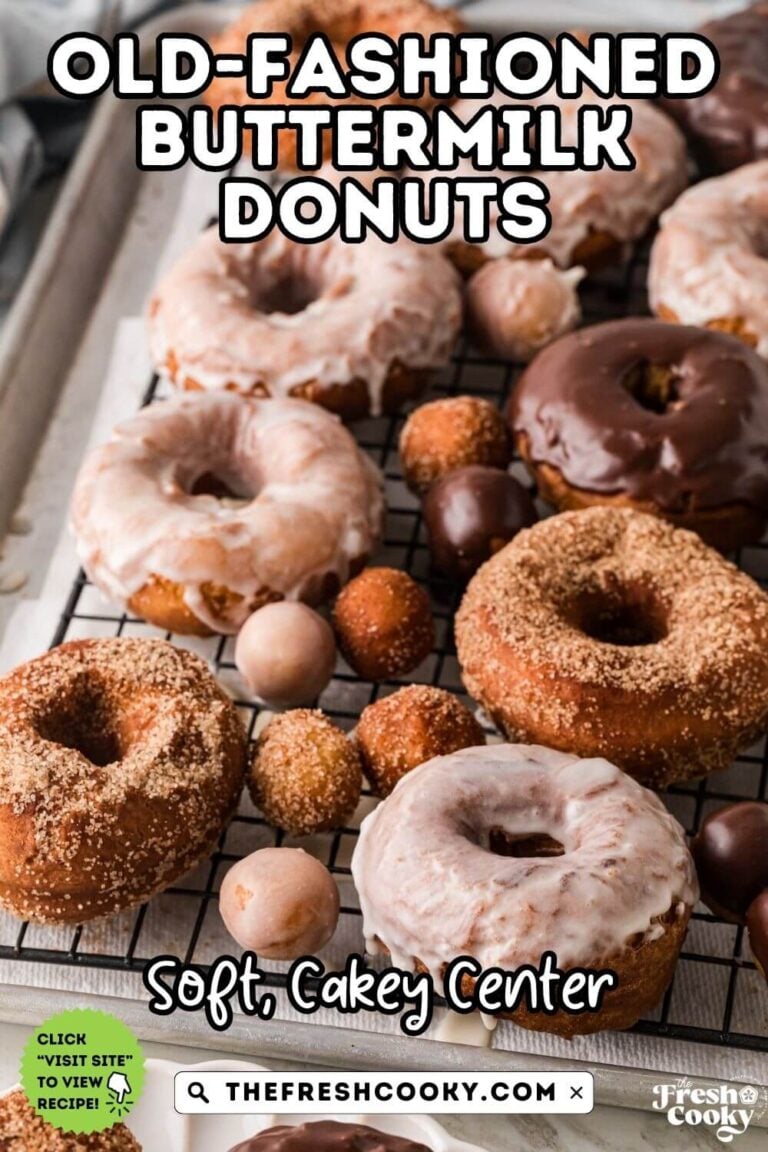
Buttermilk is what gives this version its slight tang and tender crumb. Add sour cream to the mix (my secret moisture weapon here), and you’ve got a donut that’s every bit as good as what your local bakery charges way too much for.
You’ll notice I use “donut” and “doughnut” interchangeably throughout this post. Same thing, different era. The traditional spelling is doughnut, but donut has been winning the spelling war since Dunkin’ dropped the “ugh” back in the 1950s. Either way, make the recipe.
Cake Donuts vs. Yeast Donuts
There are two camps in the donut world, and people feel strongly about which side they’re on.
Yeast donuts are made with, you guessed it, yeast. The dough needs time to rise, sometimes twice, which gives it that light, pillowy, almost bread-like texture. Think Krispy Kreme glazed, or any filled donut with a smooth, golden exterior. They’re incredible, no argument here.
Cake donuts skip the yeast entirely. Instead, baking powder and baking soda do the heavy lifting. The dough comes together fast, rests for just a few minutes, and goes straight into the oil. The texture is denser and more substantial, with a crispy exterior and a tight, cakey crumb inside. Old-fashioned donuts, sour cream donuts, and buttermilk donuts all fall into this category.
So which is better? Honestly, it depends on the day. But if you want a donut you can make from scratch on a Saturday morning without planning ahead, cake donuts win every time. No yeast, no rise time, no waiting around. Plus tips for making the dough the night before!
You Will Love This Doughnut Recipe
- They taste like the real thing. That crispy, golden exterior with a soft, cakey interior is exactly what you want in a homemade donut. And these don’t require yeast or a long rise!
- They taste like your favorite bakery, only better. That crispy, golden exterior with a soft, cakey interior is exactly what you want in a homemade donut, and these don’t require yeast or a long rise!
- The sour cream makes them extra tender. It’s a small addition with a big impact on crumb and flavor, giving these a leg up on your average cake donut.
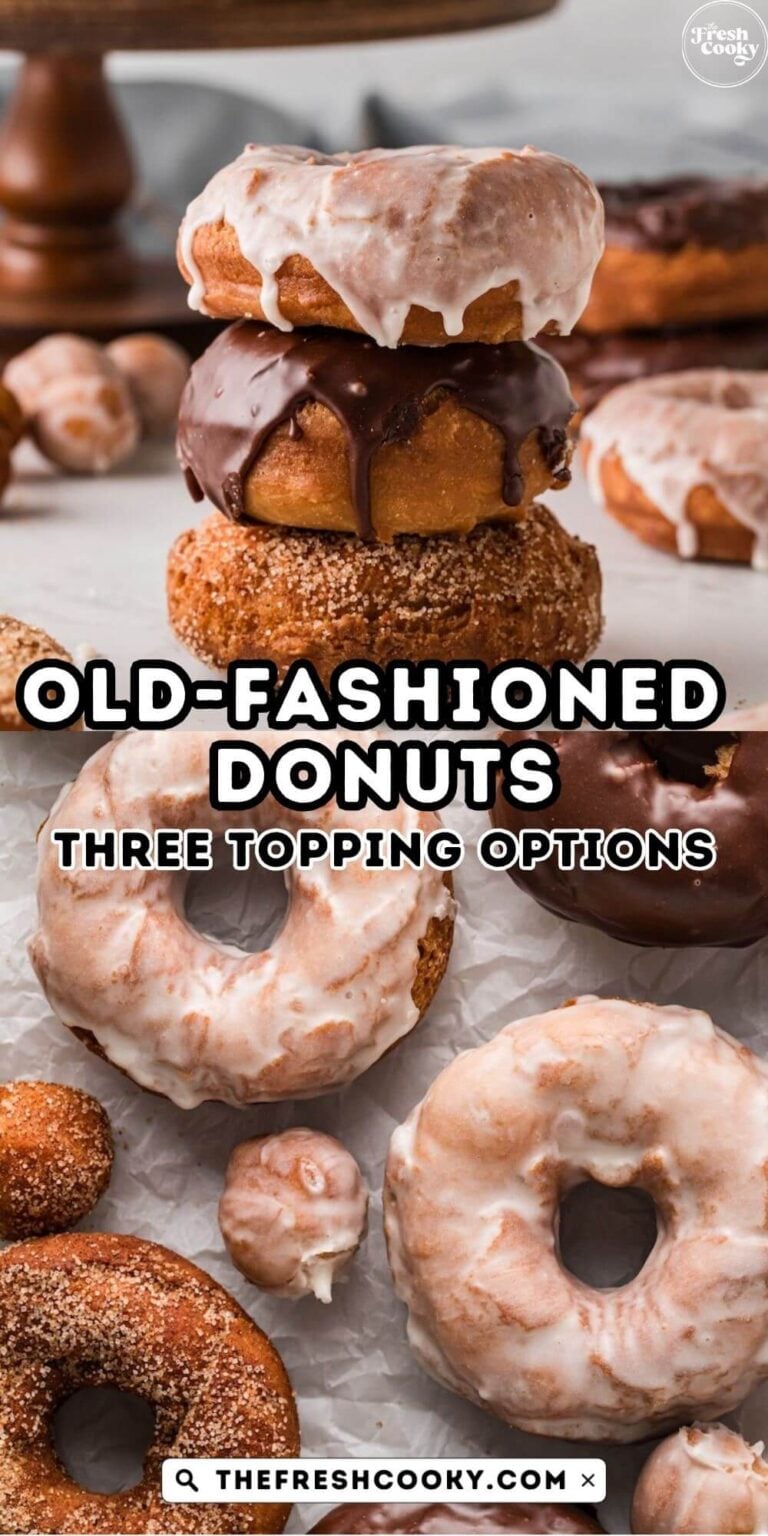
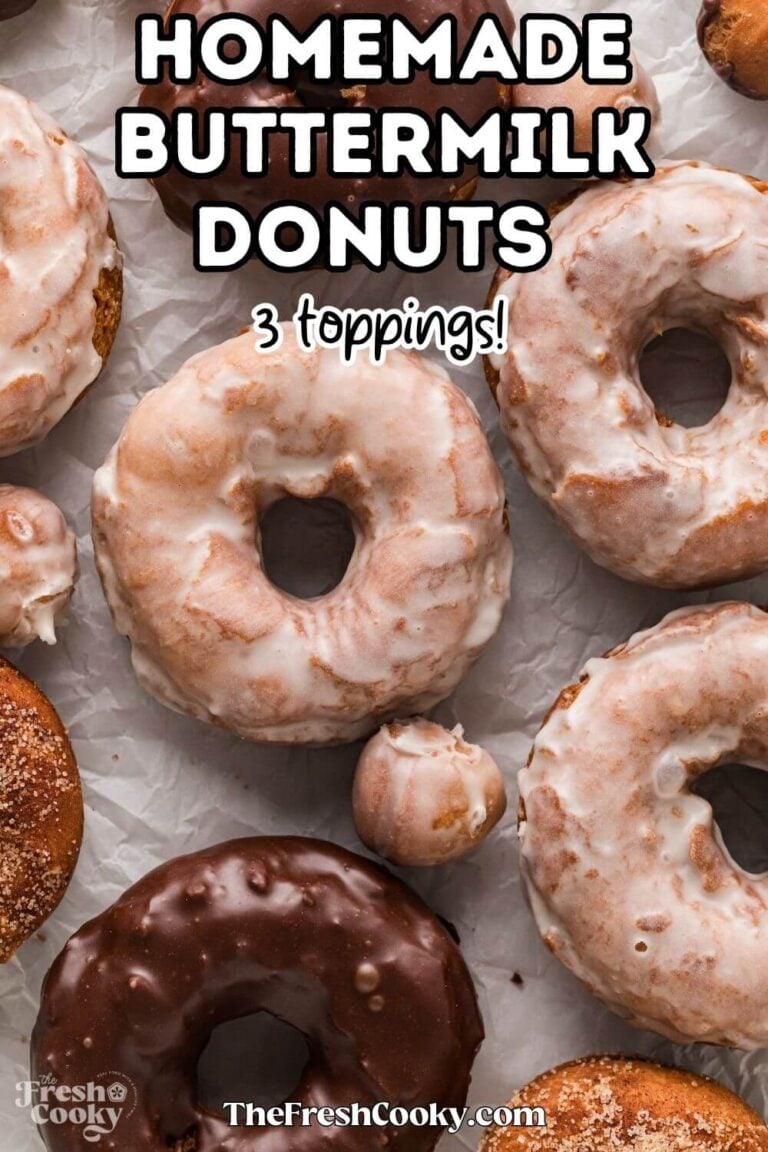
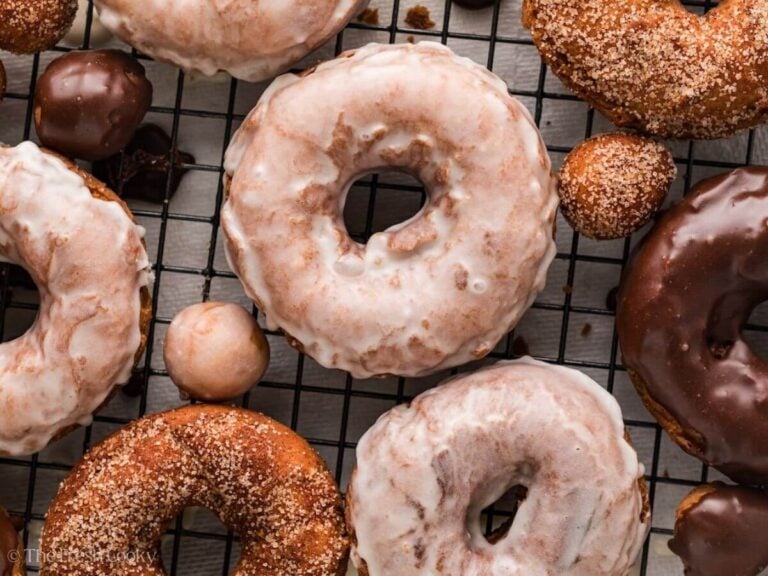
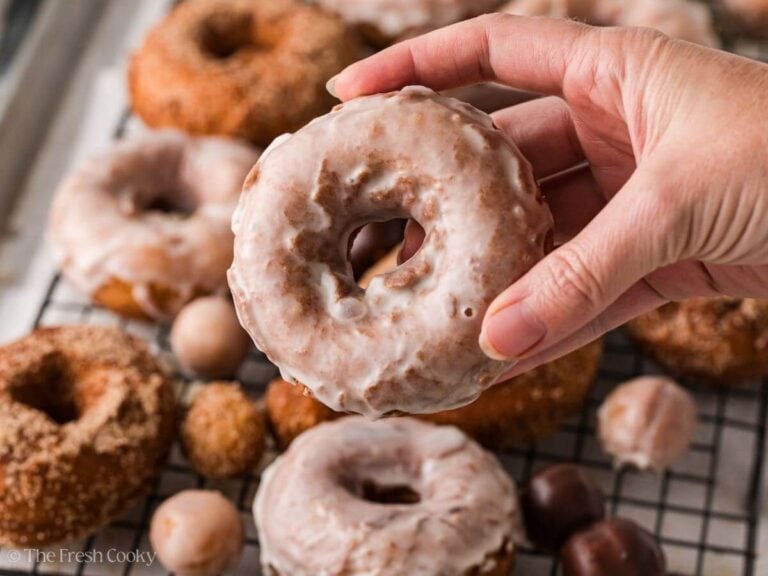
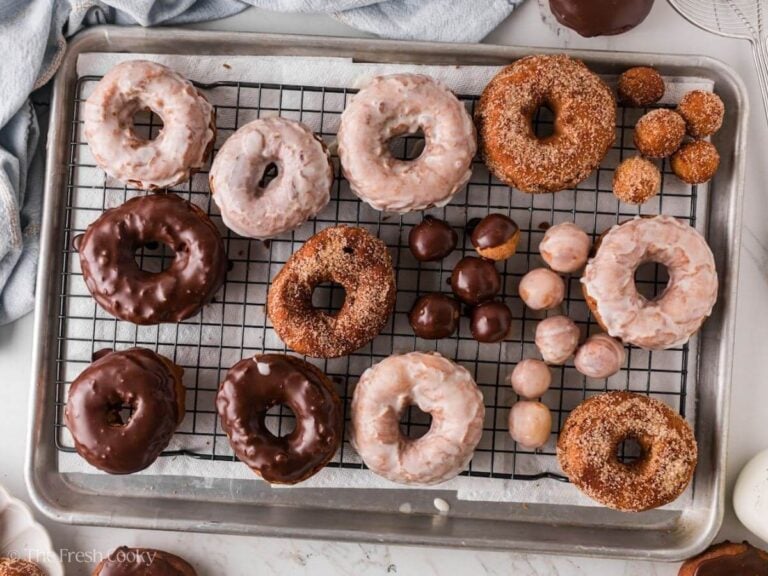
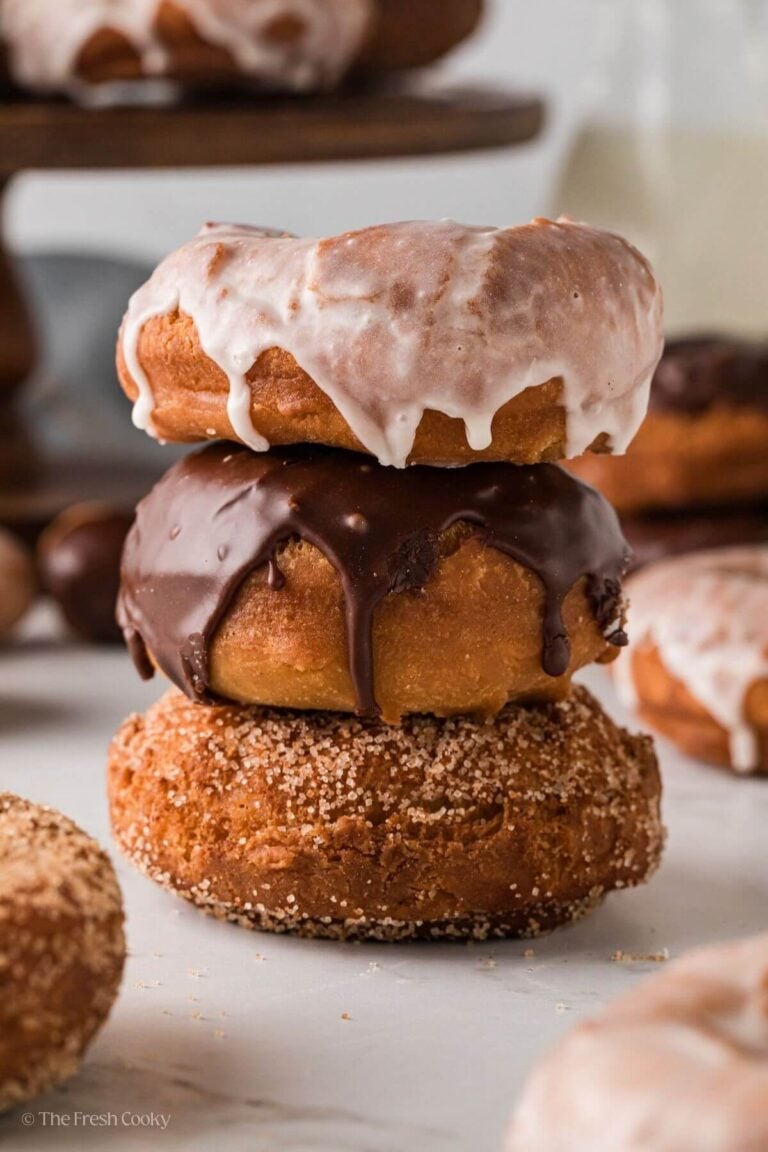
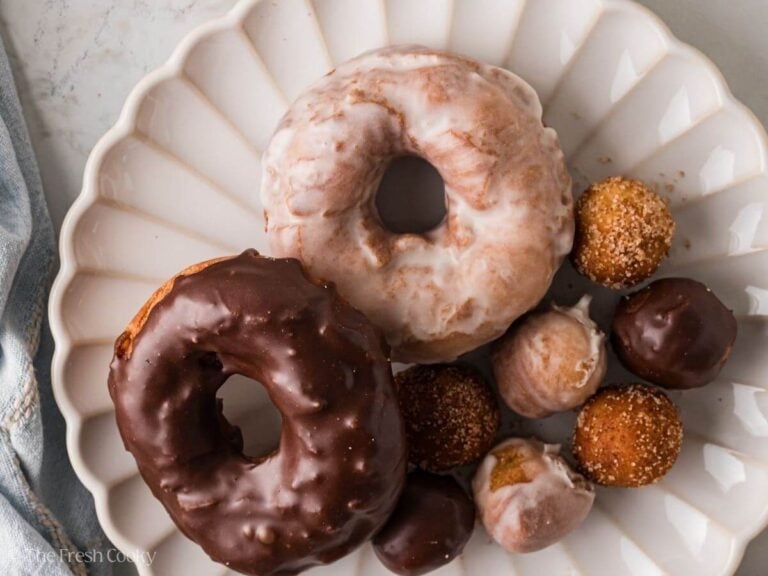
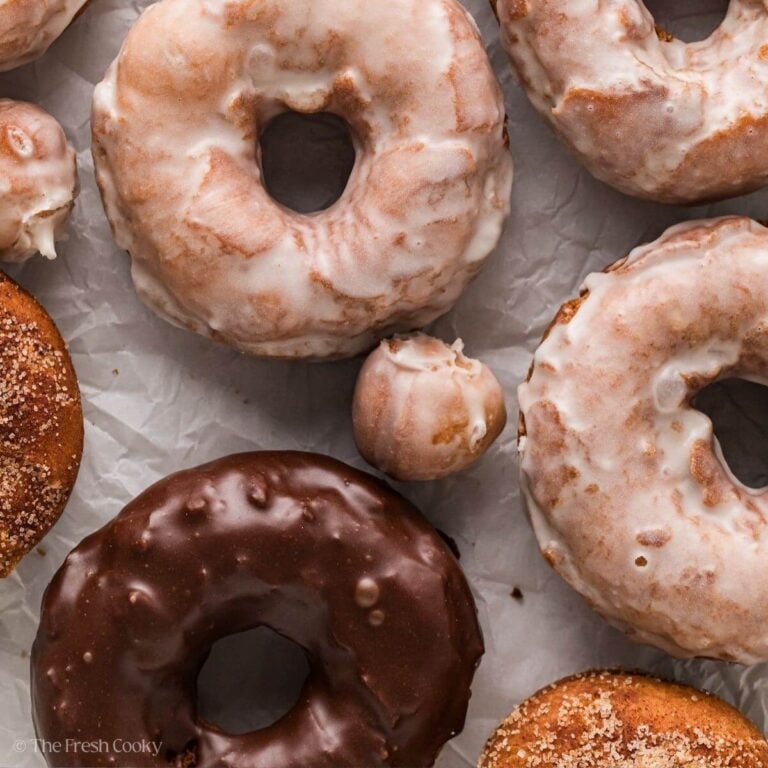
- Three toppings mean everyone’s happy. Classic vanilla glaze, chocolate glaze, or cinnamon sugar! Make one, make all three, we’re not here to judge.
- Donut holes are a bonus. Every batch comes with a pile of little golden donut holes, from taking the middle out of the donuts! They fry up fast and taste incredible rolled in your favorite toppings.
- High-altitude friendly. I bake and fry at 5,280 feet, so I’ve included all the adjustments you need. But these were thoroughly tested by volunteer recipe testers across the country!
- They’re freezer-friendly. Make a batch of homemade donuts, freeze the extras (before glazing), and you’re set for up to three months!
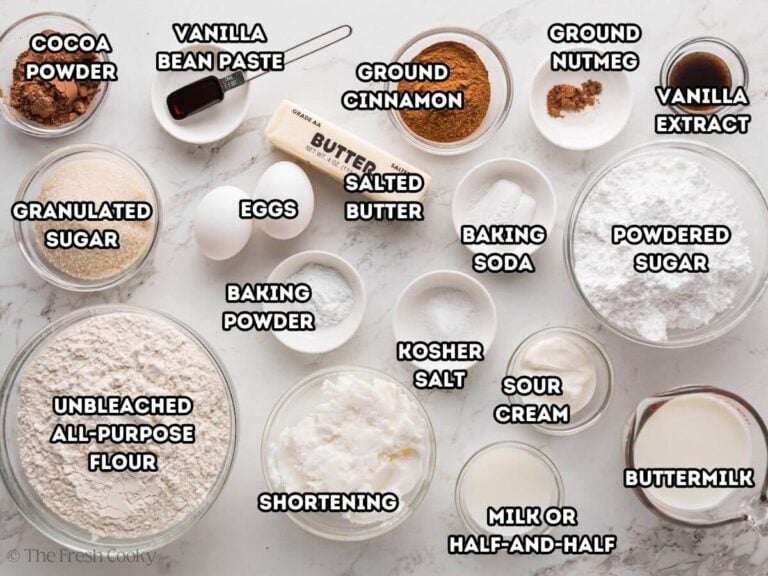
Donut Recipe Ingredients
- Salted Butter: Room temp is key so it creams properly. Using unsalted? Add an extra ¼ teaspoon of salt.
- Granulated Sugar: I love using all-natural cane sugar here. Just be sure to beat it a little longer for that light, fluffy texture. White granulated sugar may of course also be used.
- Eggs: Two large eggs for structure and richness. If you forget to pull them out to come to room temp, set them in warm water for 5 minutes.
- Buttermilk: Gives these donuts their classic tang and tender crumb. If you can’t find buttermilk, make your own! Add 1½ tablespoons of lemon juice or white vinegar to a measuring cup, then fill to the ¾-cup line with milk.
- Vanilla Bean Paste or Vanilla Extract: Vanilla bean paste adds beautiful flecks and a deeper flavor, but extract works perfectly too.
- Sour Cream: My secret ingredient! It adds fat, lift, and flavor while keeping the crumb soft and tender. Plain Greek yogurt works in a pinch.
- All-Purpose Flour: Unbleached all-purpose is my go-to here, and honestly, it’s all you need. I tested it against cake flour and the results were just as tender with less fuss. Measure by spooning into the cup and leveling off, or use the gram measurement for accuracy.
- Baking Powder + Baking Soda: Both are needed for lift and browning. Check that they’re fresh!
- Ground Nutmeg: This is the ingredient that makes these taste distinctly old-fashioned. Don’t skip it and if possible use fresh nutmeg!
- Kosher Salt: Balances the sweetness and enhances all the other flavors.
- High-heat frying oil: Avocado oil is my top pick and I tested them all. You can also use canola or vegetable oil. Crisco or lard also work beautifully. Avoid lower smoke-point oils like olive oil.
For the Glazes + Cinnamon Sugar:
- Powdered Sugar: The base for both glazes. Sift it for a smooth, lump-free finish.
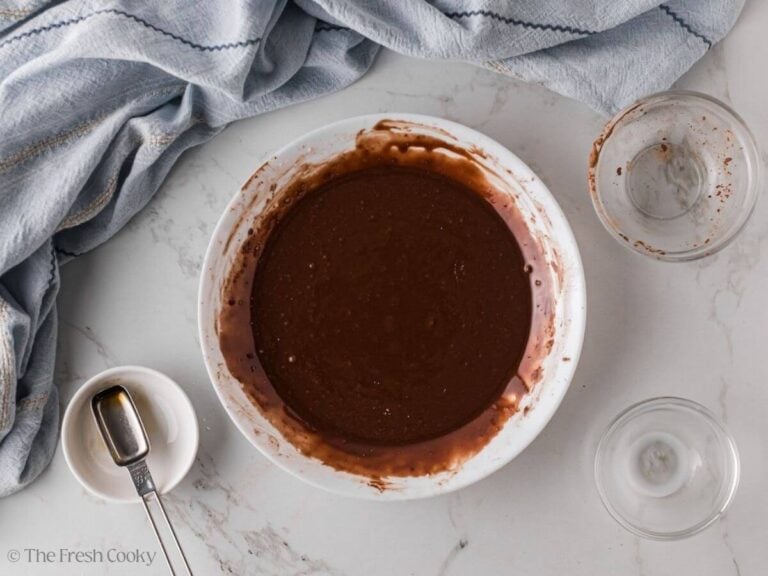
- Unsweetened Cocoa Powder: For the chocolate glaze. Sift this too!
- Milk, Half-and-Half, or Water: To thin the glaze to your preferred consistency.
- Vanilla Extract or Vanilla Bean Paste: Goes into both glazes for flavor depth.
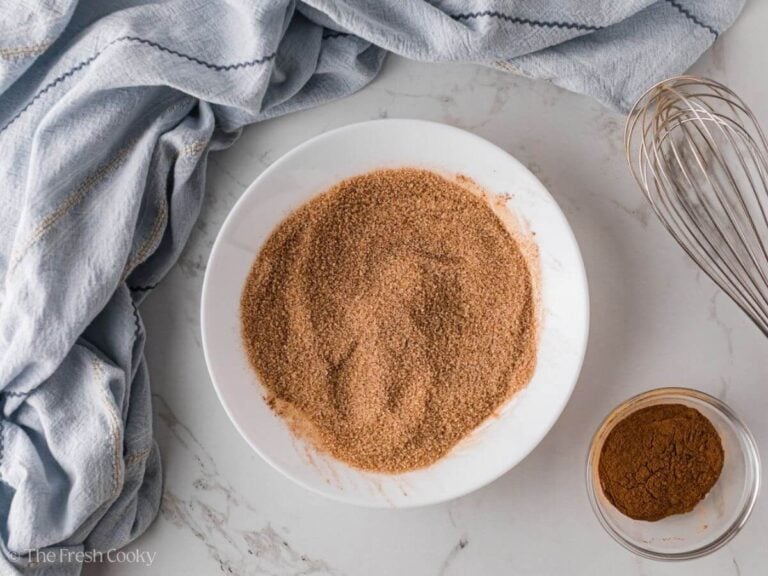
- Granulated Sugar + Cinnamon: Toss these together in a wide, shallow bowl, and you have the most irresistible cinnamon sugar coating.
Get the full recipe in the recipe card below.
Watch How to Make This Donut Recipe
See the full process from dough to glaze in the video below, including my fold-and-pat technique and tips for keeping your oil at the right temperature.
How to Make Homemade Donuts
Step 1 | Start the Dough
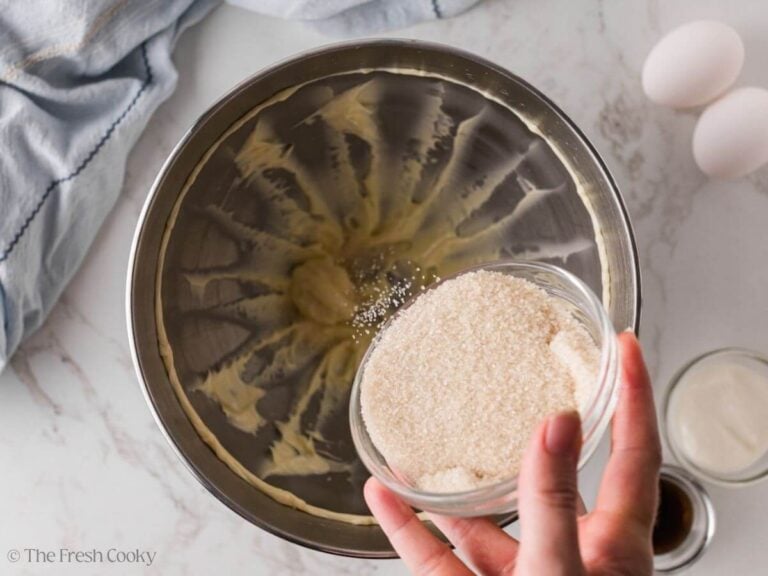
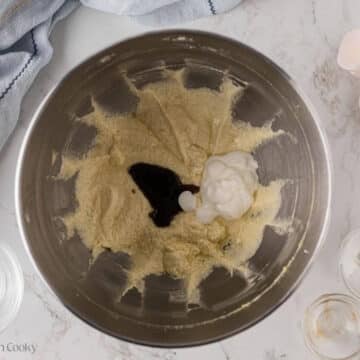
In the bowl of a stand mixer fitted with the paddle attachment, beat the softened butter on medium-high for 2 minutes. Add the sugar and beat until light and fluffy, 2–4 minutes. If you’re using a coarser cane sugar, beat toward the longer end.
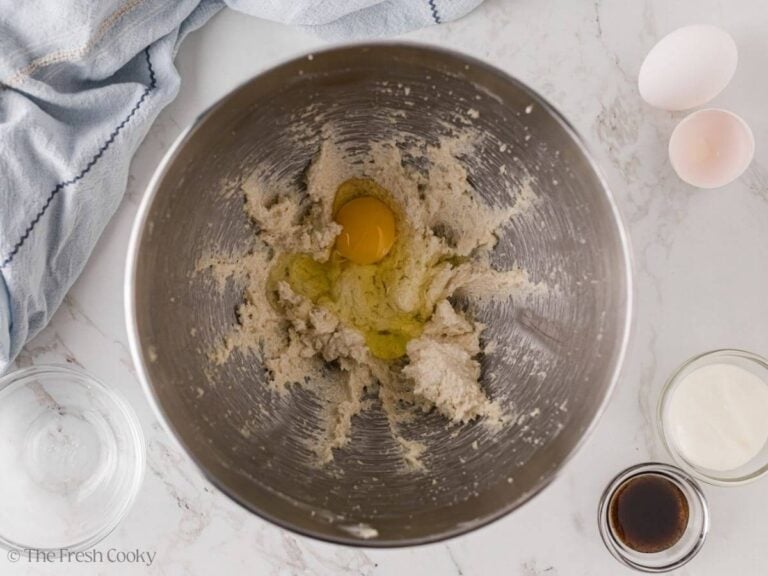
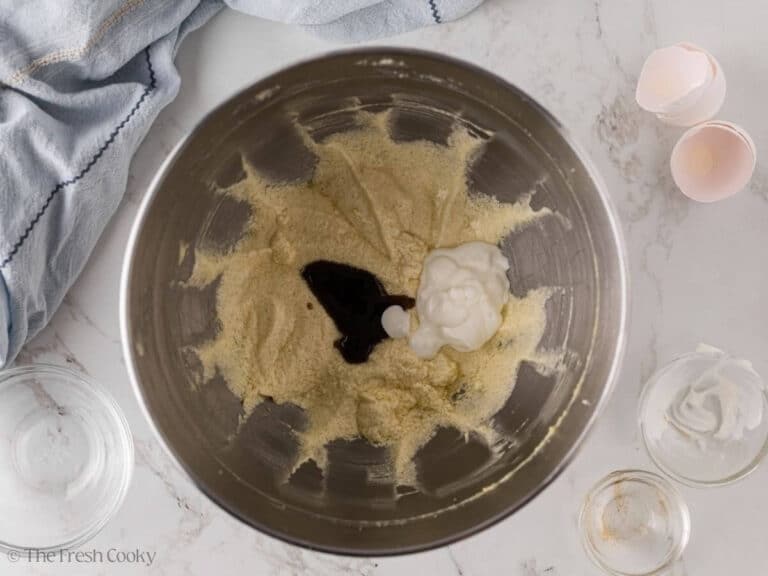
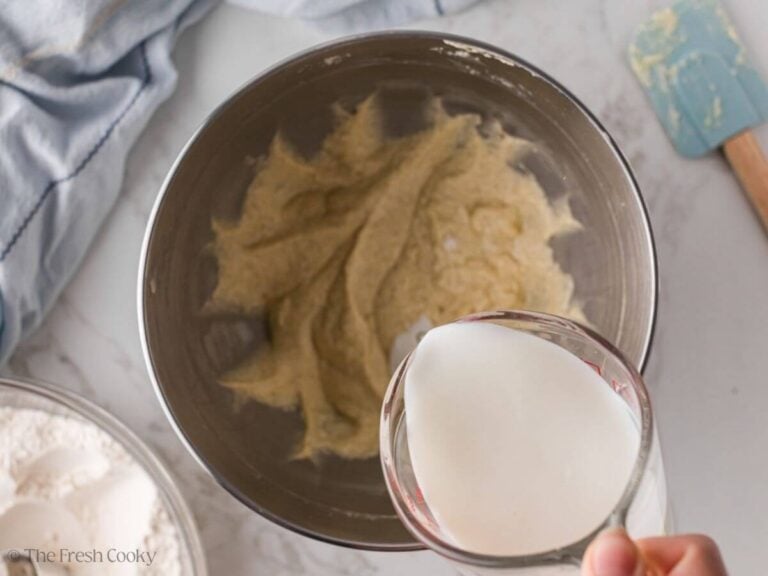
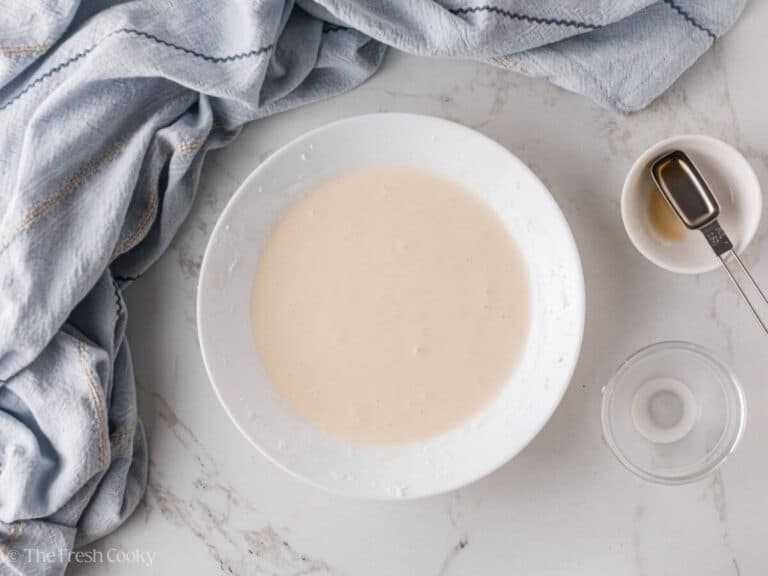
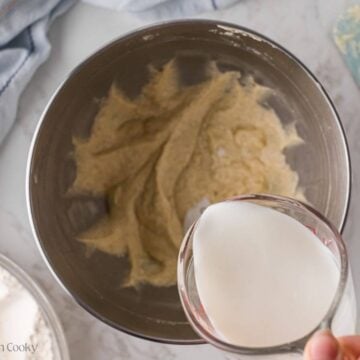
Reduce speed to medium. Add the eggs one at a time, beating 30–60 seconds per egg. Scrape down the sides as needed. Add the vanilla bean paste and sour cream and mix until just combined.
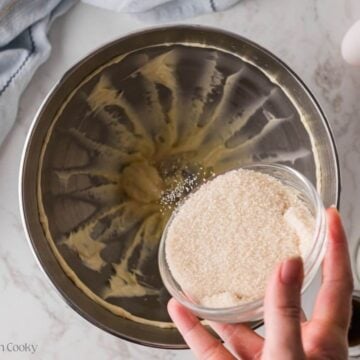
Step 2 | Add Dry Ingredients
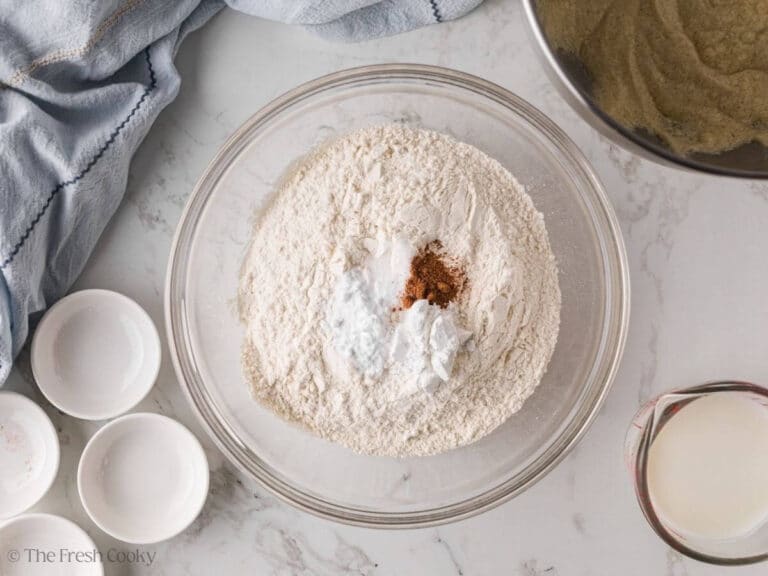
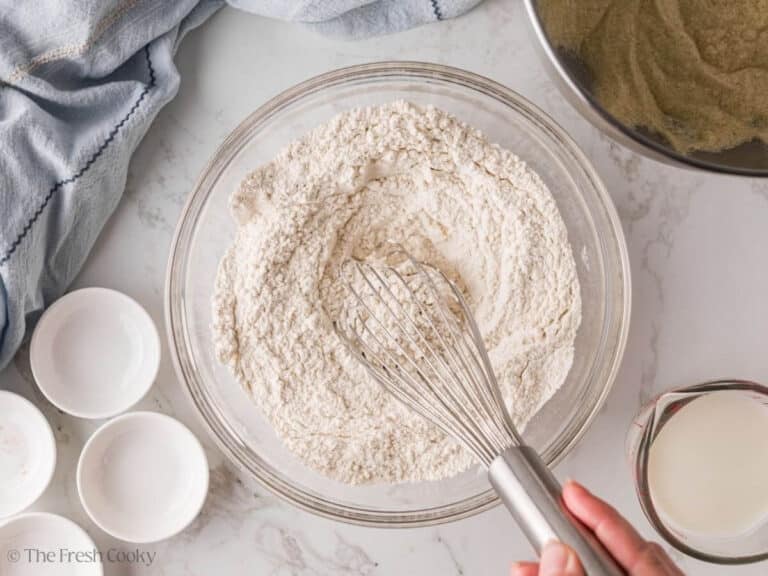
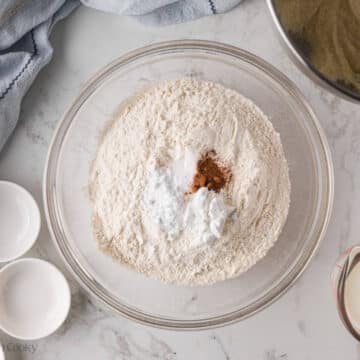
In a separate bowl, whisk together the flour, baking powder, baking soda, salt, and nutmeg.
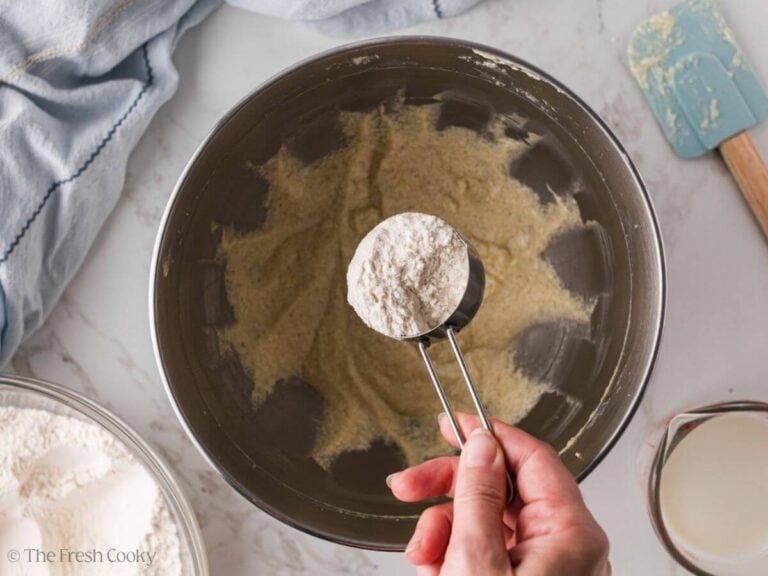
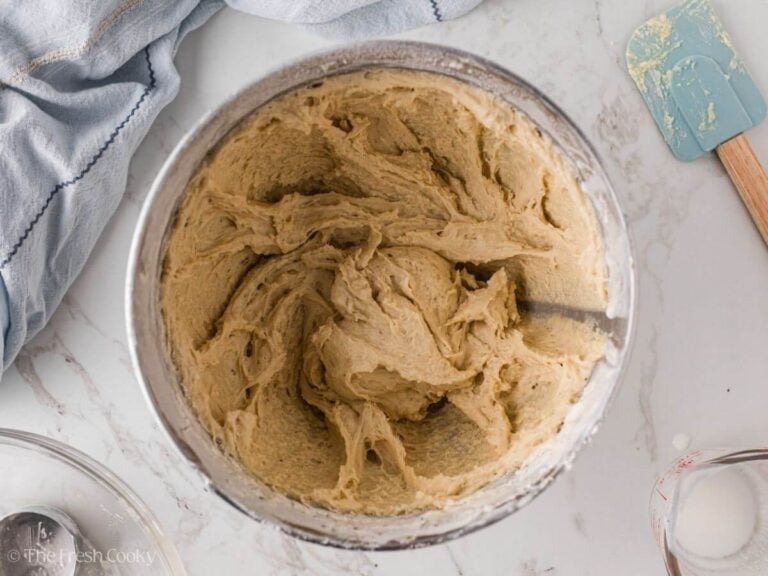
With the mixer on low speed, add the flour mixture about ¼ cup at a time, alternating with the buttermilk, and finishing with flour. Mix only until the dough is shaggy. It will be sticky and not fully uniform. Use a spatula to work in any remaining flour streaks.
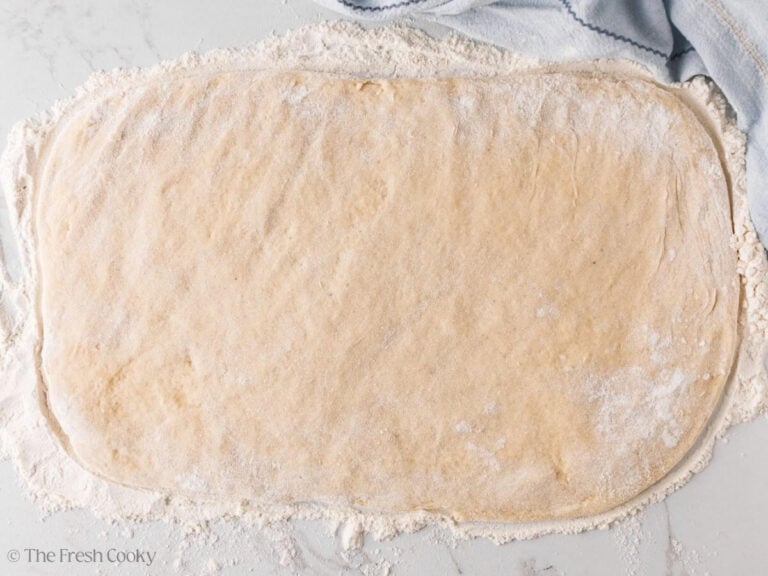
Step 3 | Shape & Rest the Dough
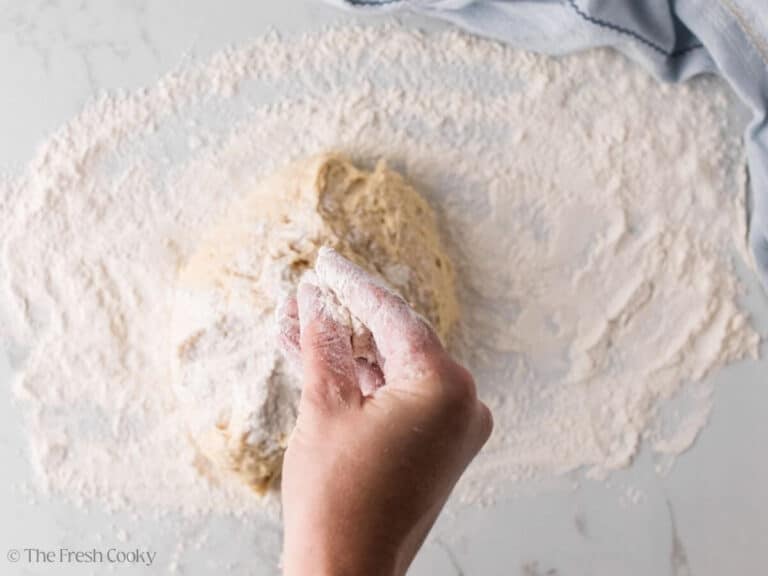
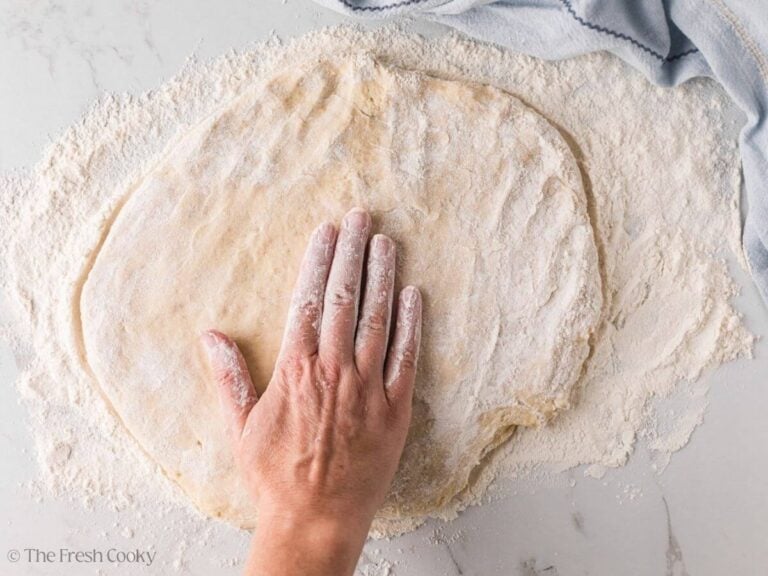
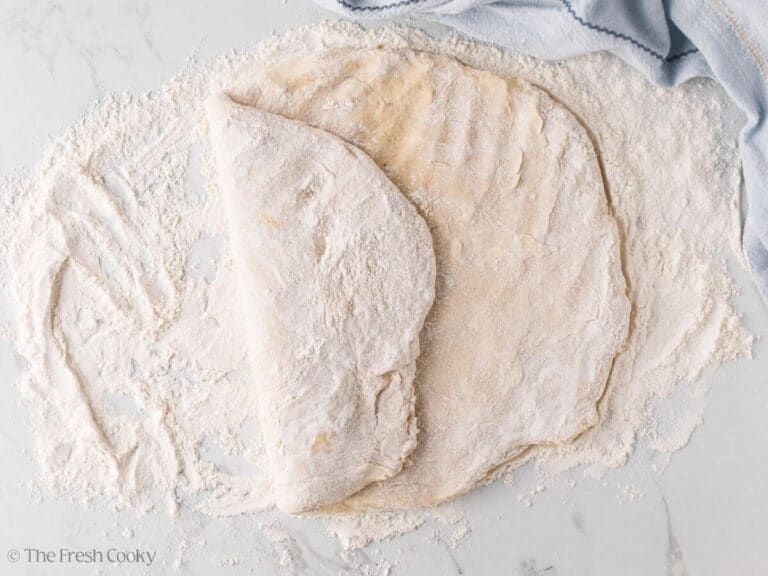
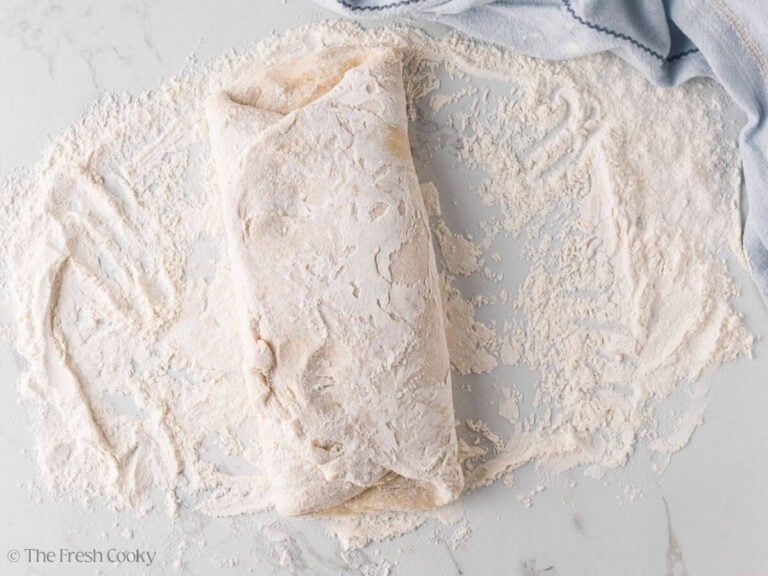
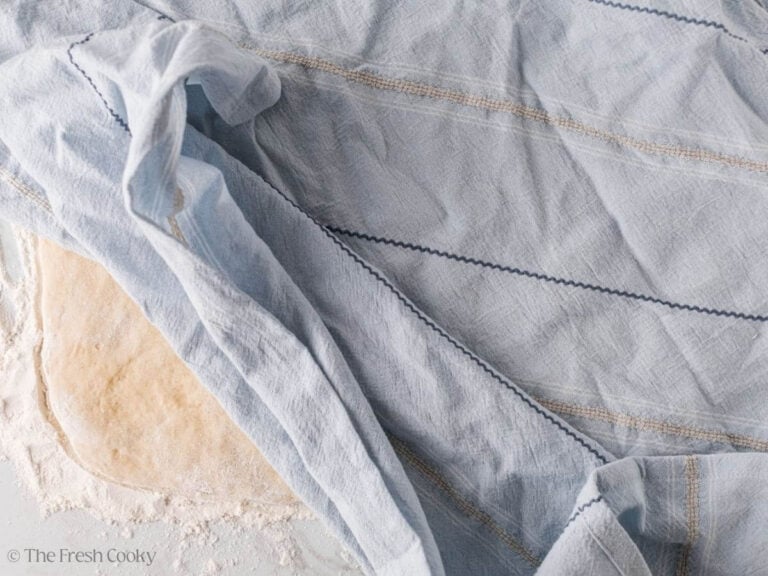
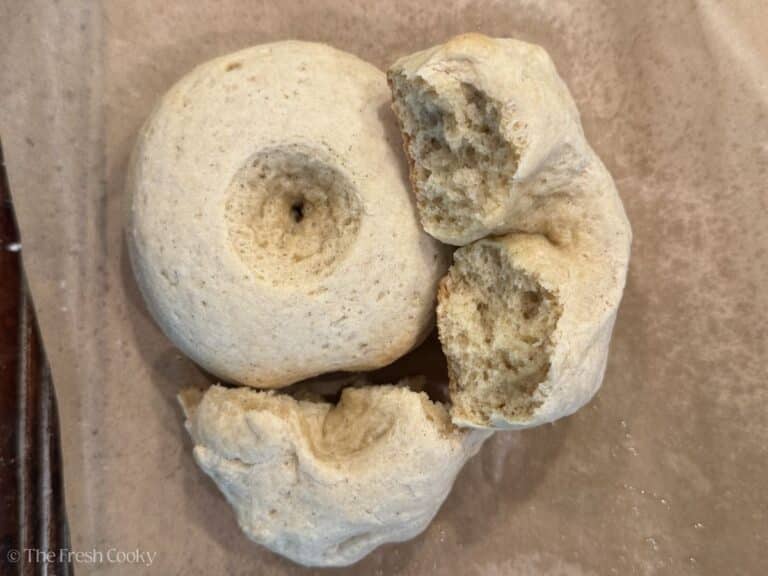
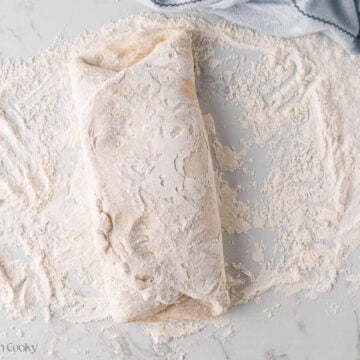
Turn the dough out onto a well-floured surface. With floured hands, gently fold and turn the dough, adding just enough flour so it doesn’t stick. Press into a 1-inch rectangle, fold it over itself like an envelope (into thirds), and pat out again. Repeat once more, then pat to just under ½-inch thick. Cover with a tea towel and let rest 5–10 minutes while you heat the oil.
Step 4 | Heat Oil & Prep Toppings
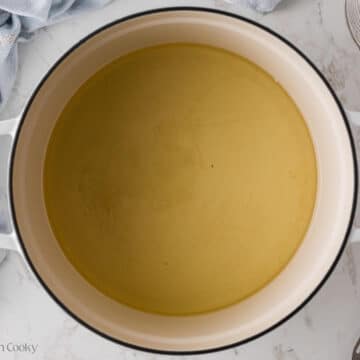
Pour 2–3 inches of oil into a deep, heavy pot (a Dutch oven is ideal). Clip a deep fry thermometer to the side. Heat the oven to 350–375°F. High altitude tip: Reduce your target temperature by about 3°F per 1,000 feet of elevation.
Mix your glaze(s) and/or cinnamon sugar now so you’re ready to coat the donuts while they’re warm. Using a shallow, small bowl.
Pro Tip: Especially for the cinnamon sugar topping, if you wait too long, the cinnamon sugar won’t stick to the donut, so make sure they cool just 30-60 seconds max before rolling in the cinnamon sugar.


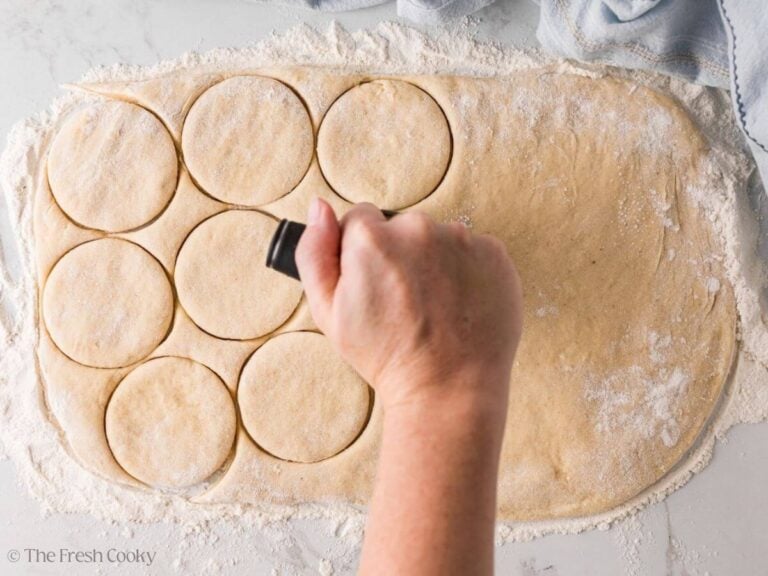
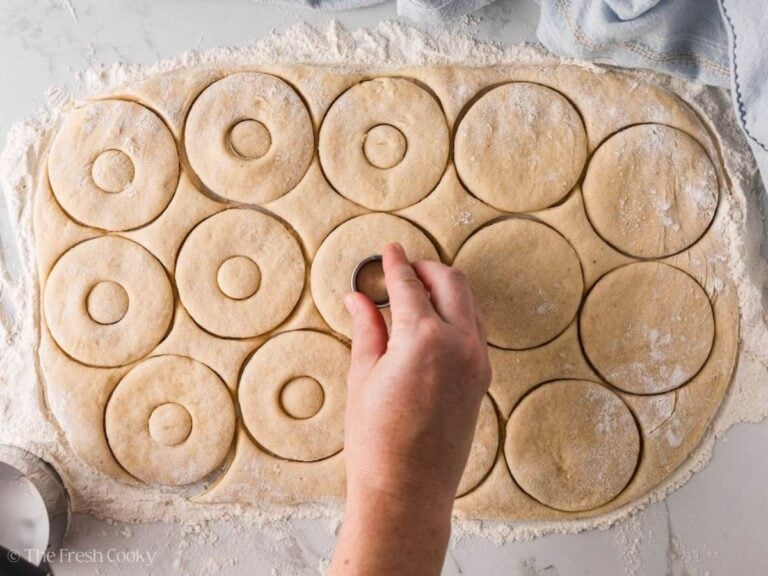
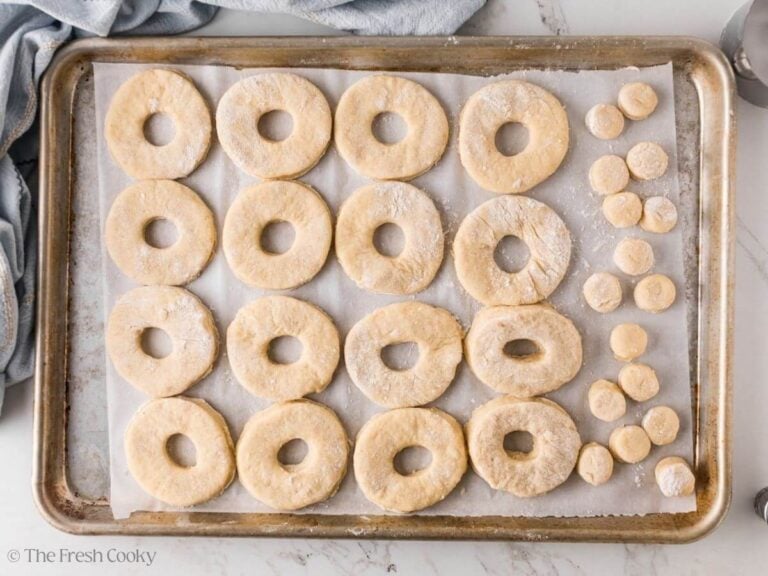
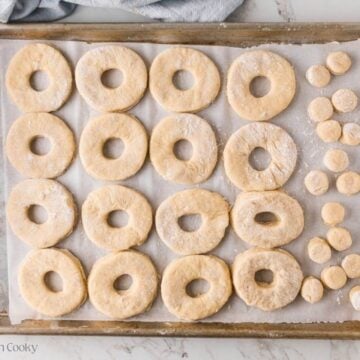
Step 5 | Cut the Donuts
Using a 3–3¼-inch donut cutter, press straight down and gently shake side to side to release — don’t twist! Twisting seals the edges and your donuts won’t rise as well. Transfer cut donuts and holes to a parchment-lined tray with a spatula.
Pro Tip: No doughnut cutter? A large round cookie cutter works perfectly for the outside, and a smaller one handles the holes. Or try freehand, using a sharp knife or even a pizza cutter.
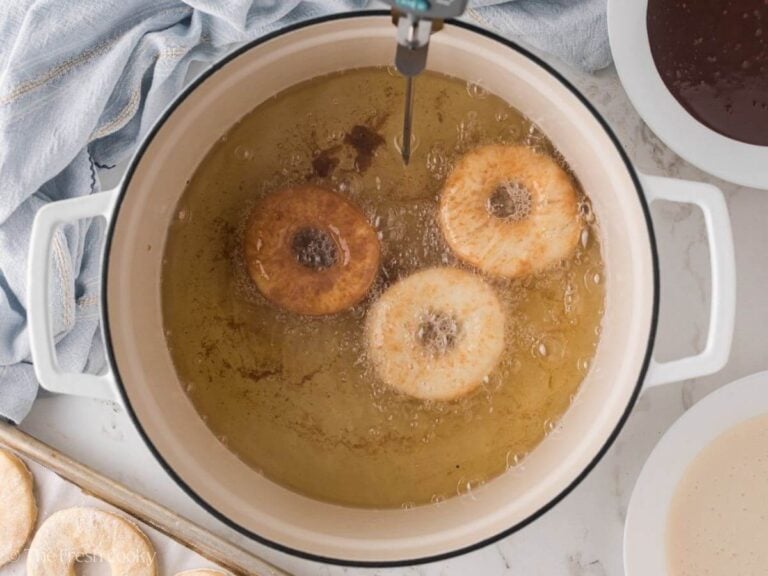
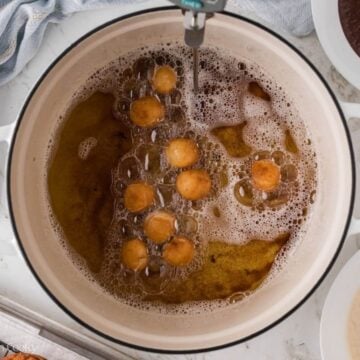
Step 6 | Fry
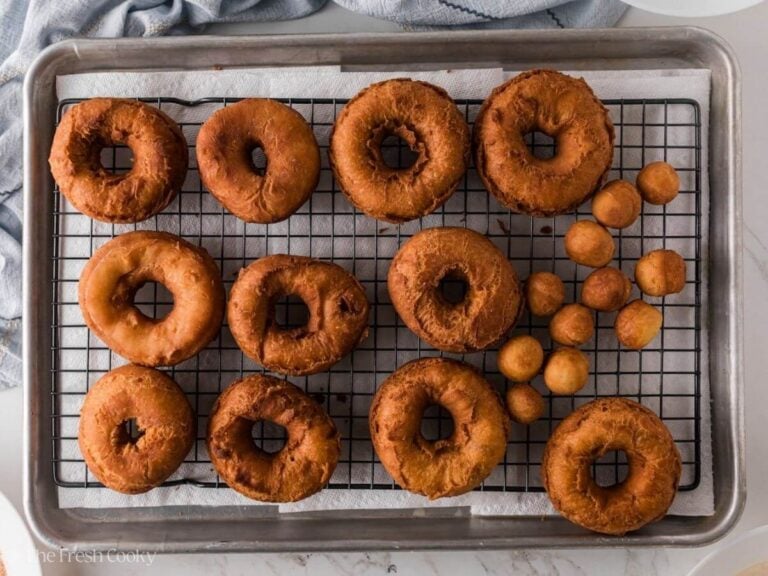
Slide 2–4 donuts into the hot oil, smooth-side down, using a fish spatula. Fry for 90 seconds to 2 minutes, flip, and fry another minute. Remove using a spider to a cooling rack set over a paper towel-lined baking sheet. An instant-read thermometer inserted into the center should read about 200°F.
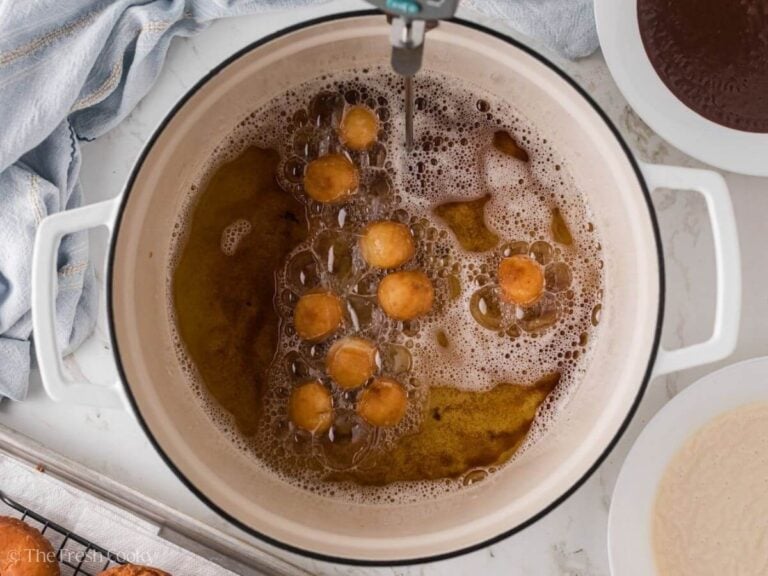
Donut holes: These go quickly! Fry for 60–90 seconds, stirring and turning continuously, until golden brown.
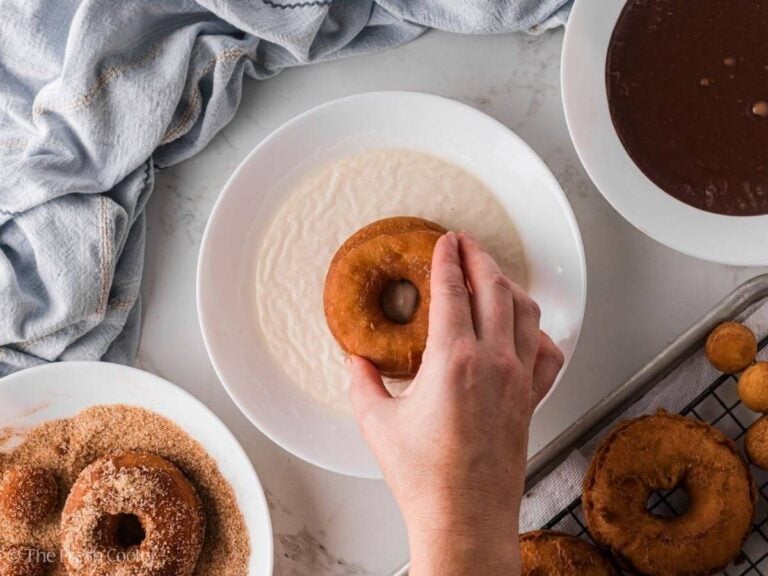
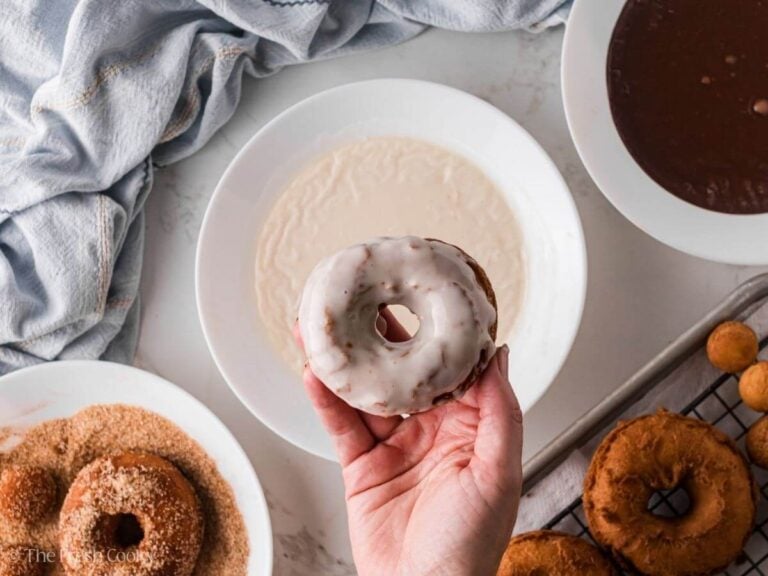
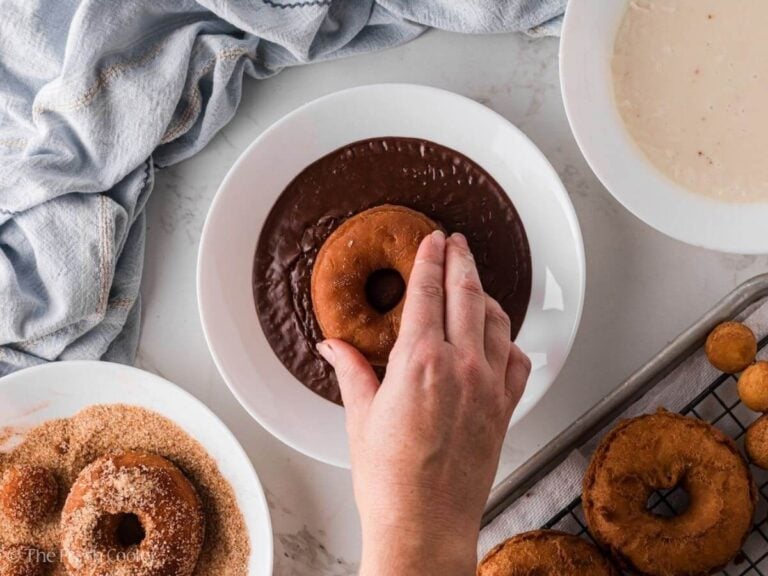
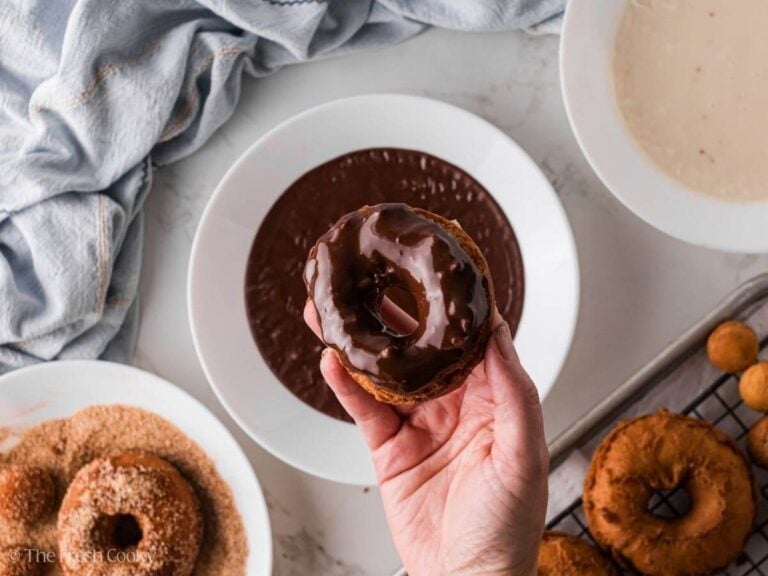
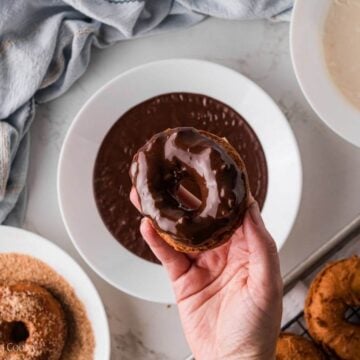
Step 7 | Glaze & Enjoy
Let donuts cool just a minute before dipping in vanilla glaze or rolling in cinnamon sugar. Wait about 10 minutes for the chocolate glaze; you want them still warm, so it sets with that signature soft-crackly finish.
Can You Make the Dough Ahead of Time?
Yes, and it works really well. After you mix the dough, instead of the 5-10 minute counter rest, cover the bowl tightly with plastic wrap and place it in the refrigerator for up to 24 hours. Cold dough is actually easier to work with; it firms up, rolls out more cleanly, and holds its shape better when you cut it. Similar to how I handle the dough for my Danish Kringle. You can also pat it out into a rectangle, so it’s easier in the morning to start shaping.
So if you want fresh donuts on a Saturday morning, mix the dough Friday night. In the morning, pull it out while you heat the oil, let it sit on the counter for about 10 minutes to take the chill off, then roll, cut, and fry. Faster than you’d think, and the flavor is just as good, maybe even a little better after that overnight rest.
One thing to keep in mind: cold dough drops your oil temperature faster than room-temperature dough. Stick to 2 donuts at a time instead of 3-4, and give the oil a little longer to recover between batches. One of my recipe testers tried this method and it worked great!
Homemade Donut Recipe Variations
- Oil choices: A high-heat oil is key. My preference is always avocado oil. Crisco came in second, lard in third. All three work. Strain the completely cooled oil and store it in the fridge for another use.
- Double-dipped donuts: Go ahead and dip in chocolate glaze, let set, then drizzle with vanilla glaze. They’re so good!
- Spiced donuts: Add a pinch of cinnamon or cardamom to the dough, along with the nutmeg, for an extra warm flavor.
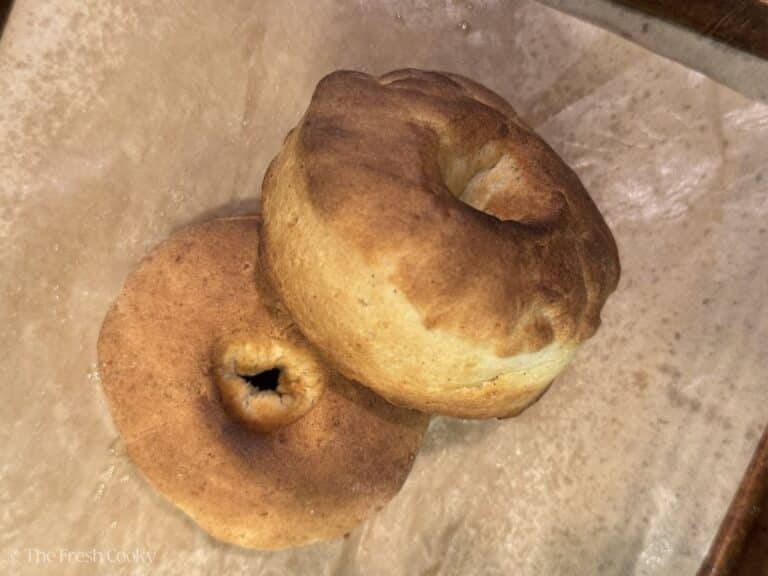
- Baked version: You can bake these at 350°F for 9–10 minutes in a donut pan or on a sheet pan. Spritz with avocado oil for a closer-to-fried result. They won’t have that crispy shell, and look a little anemic, but tasted okay! If you love a baked donut, my Red Velvet Cake Donuts are a great place to start. Pictures below.
- Air fryer version: Preheat your air fryer to 385°F, spritz the donuts with avocado oil, and air fry for 8–10 minutes. Not too bad, just not quite the same as oil-fried. (Check out my tips on Air Fryer Biscuit Donuts too!)
How to Store Homemade Donuts
- At room temperature: Fried donuts are best the day they’re made (though let’s be honest, hot and fresh out of the oil is always going to win). Store leftovers loosely covered (not airtight, or they’ll go soft). A clean kitchen towel draped over the plate works great.
- Reheating: Place on a rack in a 275°F oven for 8 to 10 minutes to revive them, or microwave in 10- to 20-second bursts until just warm. The glaze may drip slightly in the oven, but won’t slide off completely.
- Freezer: Wrap donuts individually and store in a zip-lock freezer bag for up to 3 months. Freeze them unglazed if possible, then glaze after thawing for the freshest result.
High Altitude Adjustments
| Ingredient | Standard | High Altitude |
| Flour | 3⅓ cups (438g) | Add 2 tablespoons (455g) |
| Baking powder | 2 teaspoons | 1¾ teaspoons |
| Baking soda | 1 teaspoon | ¾ teaspoon |
| Oil temp | 350-375°F | Reduce ~3°F per 1,000 feet |
Above 7,000 feet: Add another 2 tablespoons of flour and 2 teaspoons of additional liquid (buttermilk or water).
What to Serve with Homemade Donuts
These are a weekend morning kind of thing at our house, and honestly, they don’t need much alongside them. But here are a few ideas if you’re putting together a spread:
For breakfast or brunch: A strong cup of coffee is the classic pairing, and for good reason. The slight bitterness cuts right through the sweetness of the glaze. Hot chocolate works just as well, especially for the kids. If you’re doing a full brunch, these alongside an egg dish or a fruit salad make for a pretty great spread without a lot of extra effort.
For a donut bar: Set out all three toppings: vanilla glaze, chocolate glaze, and cinnamon sugar, and let everyone finish their own. Add a bowl of sprinkles, some crushed nuts, or a drizzle of caramel, and you’ve got a fun setup for a birthday morning, holiday breakfast, or anytime you want to make people unreasonably happy.
For dessert: Don’t count these out after dinner. A warm donut hole with a scoop of vanilla ice cream is a completely legitimate dessert, and I will not apologize for that.
Common Questions
Almost always an oil temperature issue. If the oil is too cool, the donuts absorb it instead of frying properly. Make sure your thermometer is reading accurately and let the oil fully recover between batches before adding the next round. Using a quality high-heat oil helps too: avocado oil, lard, tallow, Crisco, or palm oil. Canola oil works in a pinch.
A few possible culprits: old baking powder or baking soda (check the dates!), overworked dough, or oil that was too hot and set the outside before the inside had a chance to puff. The fold-and-pat technique in this recipe helps with rise, so don’t skip it. Also, be careful when cutting the donuts; if you twist too much, it seals the edges, prohibiting rise.
Absolutely. A large round biscuit cutter works for the outside, and a smaller round cutter, a bottle cap, or even a round piping tip works for the hole. Just press straight down and shake gently to release; don’t twist.
All old fashioned donuts are cake donuts, but not all cake donuts are old-fashioned. The old-fashioned style is specifically known for its craggy, cracking exterior, which comes from frying at a slightly lower temperature so the outside splits as it cooks.
Yes, and it actually makes temperature control easier since it holds a steady heat. Follow the same temperature guidelines in the recipe.
The buttermilk is what gives these their classic tang and tender crumb, so I wouldn’t skip it. But if you’re in a pinch, make your own: add 1½ tablespoons of lemon juice or white vinegar to a measuring cup and fill to the ¾-cup line with whole milk. Let it sit for 5 minutes before using.
Yes! Wrap them individually and freeze for up to 3 months. For the best results, freeze before glazing and glaze fresh after thawing. That said, if they’re already glazed, they still freeze fine, the glaze just softens a bit.
Yes, with a caveat. Sweet fried doughs like these can leach a bit more into the oil than savory fried foods, so the oil may have a slightly sweeter smell after use. That said, if it smells clean and wasn’t overheated, it’s worth saving. Let it cool completely, strain it well through a fine mesh strainer or cheesecloth to remove any bits, then pour it back into the original container or a clean glass jar and refrigerate. Use it within a month or so, and give it a sniff before using again; if it smells off or rancid, toss it.
To dispose of oil: pour completely cooled oil into a sealed container, freeze if needed to solidify, then toss in the trash. Never, ever pour it down the drain.
More Sweet Recipes to Try
Like this recipe?
Don’t forget to give it a ⭐️⭐️⭐️⭐️⭐️ star rating and leave a comment below the recipe!
Video
Ingredients
Donut Dough
- 5 tablespoons salted butter room temperature (70g) If using unsalted, add ⅛ teaspoon additional salt
- ½ cup granulated sugar I use all-natural cane sugar
- 2 large eggs room temperature
- ¾ cup buttermilk room temperature (or make your own, see notes)
- 1 tablespoon vanilla bean paste or vanilla extract
- 2 tablespoons sour cream full-fat, room temperature (or plain Greek yogurt)
- 3⅓ cups unbleached all-purpose flour 438g
- 2 teaspoons baking powder
- 1 teaspoon baking soda
- ¼ to ½ teaspoon ground nutmeg
- ½ teaspoon kosher salt increase to ¾ teaspoon if using unsalted butter
- 4 cups high-heat oil for frying approximately, see notes
Classic Glaze (multiply x2 – 3 to glaze all donuts and donut holes)
- 1½ cups powdered sugar 172g
- 2 to 3 tablespoons milk half-and-half, or water
- 1 teaspoon vanilla extract or vanilla bean paste
Chocolate Glaze (multiply x2 to x3 to glaze all donuts and donut holes)
- 1½ cups powdered sugar 172g
- 4 tablespoons unsweetened cocoa powder
- 3 tablespoons milk
- 1 teaspoon vanilla extract or vanilla bean paste
Cinnamon Sugar (multiply x2 to x3 to coat all donuts)
- ½ to ¾ cup granulated sugar
- 1 to 2 tablespoons cinnamon
Instructions
Make the Dough
- In the bowl of a stand mixer fitted with the paddle attachment, cream the softened butter on medium-high for 2 minutes. Add the sugar and beat on medium-high until light and fluffy, 2 to 4 minutes. (If you use a coarser cane sugar like I do, beat toward the longer end.)5 tablespoons salted butter, ½ cup granulated sugar

- Reduce speed to medium. Add the eggs one at a time, beating 30 to 60 seconds per egg and scraping down the sides as needed.2 large eggs
- Add the vanilla bean paste and sour cream. Mix until just combined.1 tablespoon vanilla bean paste , 2 tablespoons sour cream
- In a medium bowl, whisk together the flour, baking powder, baking soda, salt, and nutmeg.3⅓ cups unbleached all-purpose flour, 2 teaspoons baking powder, 1 teaspoon baking soda, ¼ to ½ teaspoon ground nutmeg, ½ teaspoon kosher salt
- With the mixer on low, add the flour mixture about ¼ cup at a time, alternating with the buttermilk, finishing with flour. Mix only until the dough is shaggy. It will be sticky and not fully uniform. Use a spatula to work in any remaining flour streaks.¾ cup buttermilk

Shape and Rest
- Turn the sticky dough out onto a well-floured surface. With floured hands, gently fold and turn the dough, adding just enough flour so it doesn’t stick.
- Press the dough into a 1-inch thick rectangle, then fold it over itself like an envelope (into thirds). Pat out again and repeat once more.
- Pat the dough out one final time to just under ½ inch thick (about ⅜ inch). Cover with a tea towel and let it rest 5 to 10 minutes while you heat the oil.


Heat the Oil
- Pour 2 to 3 inches of oil into a deep, heavy-bottomed pot (a Dutch oven works great). Clip a candy/fry thermometer to the side so it’s submerged but not touching the bottom. Heat over medium heat to 350°F to 375°F. High altitude note: Reduce your target temperature by 3°F per 1,000 feet of elevation. At 5,280 feet, I fry at about 350°F.4 cups high-heat oil for frying
- Set a cooling rack over a paper towel-lined baking sheet. This is where your donuts will drain, keeping the bottoms crisp instead of soggy.
Prepare Your Toppings
- Mix your glaze(s) or cinnamon sugar before you start frying so you’re ready to coat the donuts while they’re still warm.1½ cups powdered sugar, 2 to 3 tablespoons milk, 1 teaspoon vanilla extract
- Classic or Chocolate Glaze: Sift powdered sugar into a wide, shallow bowl. Add remaining ingredients and whisk until smooth. For chocolate glaze, sift the cocoa powder too.1½ cups powdered sugar, 4 tablespoons unsweetened cocoa powder, 3 tablespoons milk, 1 teaspoon vanilla extract or vanilla bean paste
- Cinnamon Sugar: Whisk together in a wide, shallow bowl.½ to ¾ cup granulated sugar, 1 to 2 tablespoons cinnamon


Cut the Donuts
- Using a 3- to 3¼-inch donut cutter (or a round biscuit cutter plus a smaller cutter for the holes), press straight down and gently shake side to side to release. Do not twist; twisting seals the edges and your donuts won’t rise as well. I prefer a larger donut hole than the one that came with my 3-inch cutter, about 1.6 inches / 4.2cm. If your center cutter is small, gently stretch the dough opening a bit after cutting, otherwise it may close up during frying.
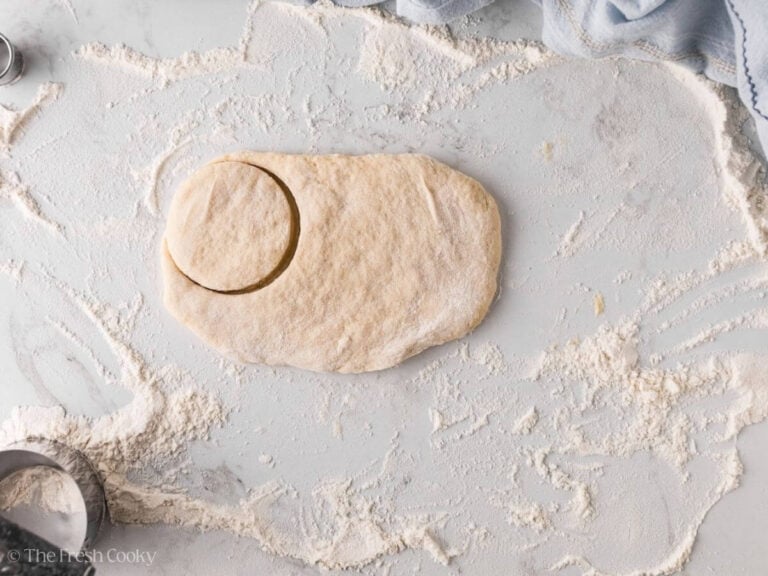
- Transfer cut donuts and holes to a parchment-lined tray using a spatula. Cut as close to the edges and to each other as possible on the first pass. You should get about 9 donuts from the first roll. Rerolling makes the dough tougher, but it’s still totally edible! I use the scraps as test pieces to check my oil temperature.

Fry
- Slide 2 to 4 donuts into the oil using a spatula (a fish spatula works well), placing them smooth side down first. This gives you that classic craggy, crispy top as the bottoms split during frying.
- Fry for 90 seconds to 2 minutes. Flip with a spider or slotted spoon and fry for another minute. Remove to the cooling rack. To check doneness, insert an instant-read thermometer into the center; it should read about 200°F. Fry only 2 to 4 donuts at a time to avoid large temperature drops. Keep an eye on the thermometer; oil temperature can swing quickly. Don’t be afraid to turn the heat off briefly, then back to low when it drops.
- For donut holes: Fry for 60 to 90 seconds, stirring and turning them continuously, until golden brown. Remove with a spider to the draining rack.

Glaze and Serve
- Let donuts cool just a minute before glazing with vanilla glaze and/or cinnamon sugar, it will stick better. Wait about 10 minutes before glazing with chocolate. You want them still warm so the glaze sets with that soft-but-crackly finish. For cinnamon sugar, roll them while still warm, just cool enough to handle.
Notes
- Can you bake these instead of frying? You can, but they won’t have that classic crispy shell, they are a little blah. To bake: use a donut pan or a sheet pan at 350°F for 9 to 10 minutes. For a closer-to-fried result, spritz with avocado oil.
- Air fryer only: Preheat to 385°F. Spritz donuts with avocado oil and air fry for 8 to 10 minutes. They’re decent, just not the same as oil-fried. See image.
- Oil choices: A high-heat oil is key. My preference: avocado oil (alone or blended with palm oil). Crisco came in second, lard in third. All three work. Strain the completely cooled oil and store it in the fridge for another use.
- Why are my donuts greasy? Either the oil temperature was too low or the oil wasn’t a quality high-heat oil. Stick with avocado oil, lard, Crisco, or palm oil. Canola oil works in a pinch, but seed oils are not my favorite.
- Thermometer: Essential. Oil temperature shifts fast. An inexpensive candy/fry thermometer from the grocery store will do the job.
- Draining: Always drain on a rack set over paper towels, not directly on paper towels. Direct contact can make the bottoms soggy.
- Make your own buttermilk: For ¾ cup, use 1½ tablespoons of lemon juice or white vinegar, then fill with milk to the ¾-cup line.
Nutrition


Rate & Comment