
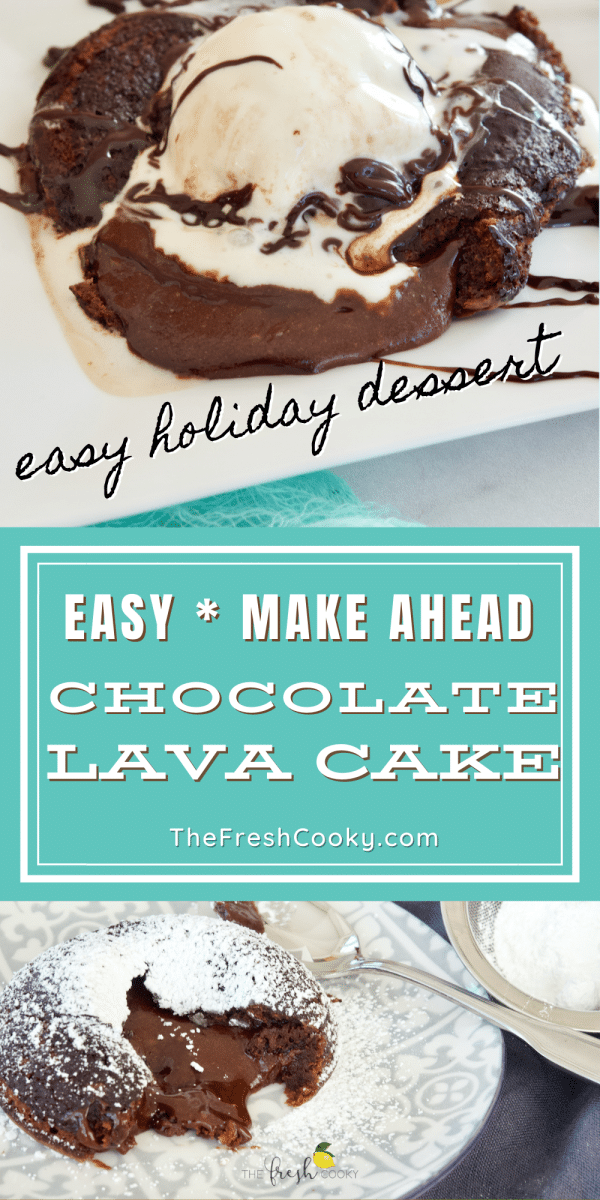
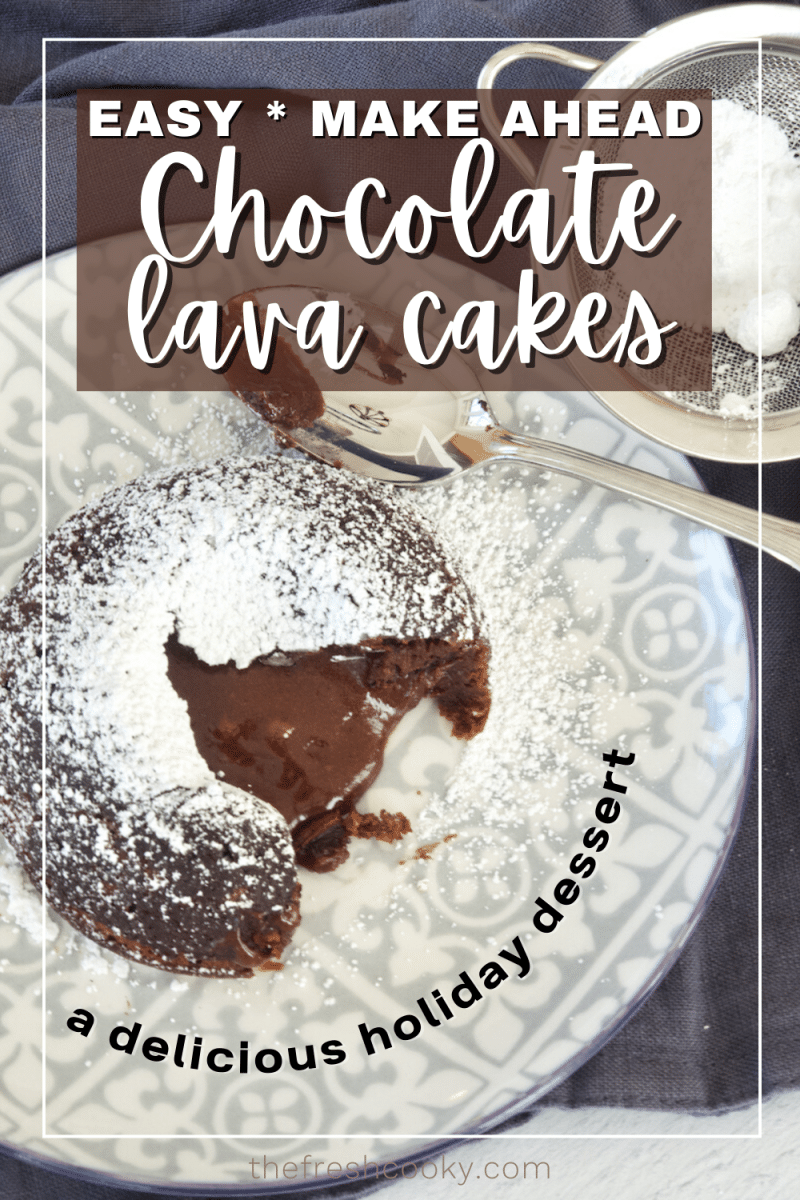
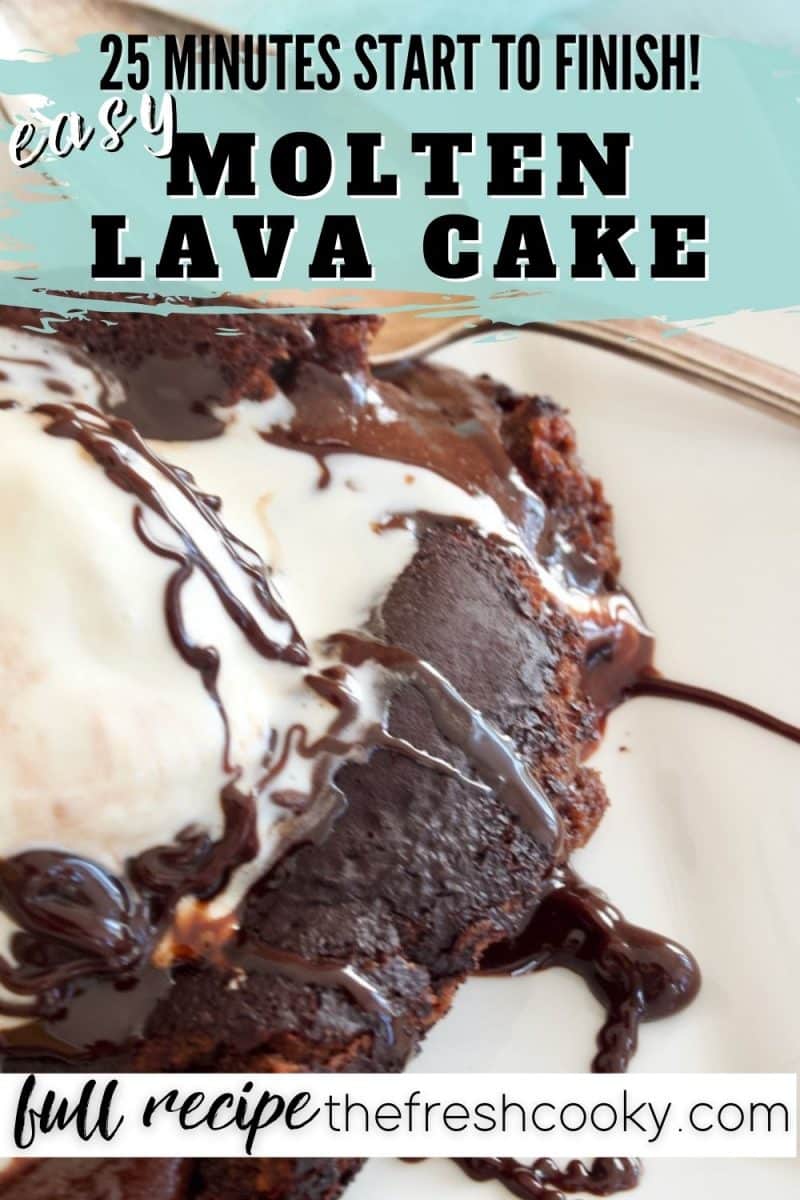
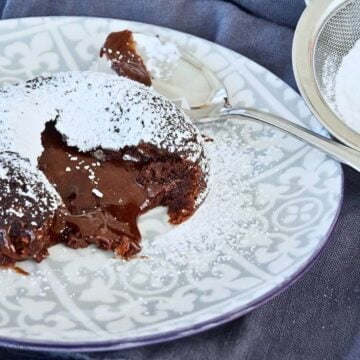
Make this Easy Chocolate Lava Cake Recipe just like a restaurant, but right at home! In less than 25 minutes, you will have warm and gooey molten lava cakes on the table. Better yet, you can even prepare the batter ahead of time, making dessert even simpler!
Reader Review: ⭐️⭐️⭐️⭐️⭐️ “These were SO easy and super yummy. I will definitely be making these again! I HIGHLY recommend.” -Nicole
There’s no need to be intimidated by these Easy Chocolate Lava Cakes. With my recipe that has just 6 ingredients, it’s foolproof and hassle-free, yet impressive for any occasion. Whether you are making them for Valentine’s Day or any special occasion, this molten chocolate cake recipe is for you!
I made these first a while back for my chocolate-loving son’s birthday, and they were a total hit. To say he liked them would be an understatement! I’m pretty sure he licked his plate clean. I loved that I could prepare the cake batter before the party and that no special equipment was needed to mix the ingredients (what a dream!).
If you’re a chocolate fan, you’re in luck. Check out these other favorite reader recipes: Chocolate Loaf Cake, Chocolate Chocolate Chip Bundt Cake, Mini Chocolate French Silk Pies.
Why You’ll Love this Recipe
- Restaurant-quality dessert prepped in 10 minutes. These lava cakes may look fancy, but they are too easy to make! A couple of bowls and a whisk are all you need.
- Only 6 pantry-staple ingredients. You may already have everything on hand to make these cakes even on a busy weeknight.
- Fun for the whole family. I’ve made these dozens of times for parties, holidays, and celebrations, and everyone always asks for the recipe.
Ingredients
This easy lava cake recipe uses 6 all-natural ingredients, pure and simple. Collect the following ingredients:
- Cocoa Powder: Unsweetened, for dusting the ramekins, just a few teaspoons
- Semi-sweet Chocolate*: A high-quality chopped chocolate bar is the best for the gooiest center. Or high-quality chocolate chips also work fine, but won’t yield quite as gooey a center! But I use them all the time!
- Unsalted Butter: Normally, I do not worry about this, but in this recipe, simple is better; keep it unsalted and season with salt in the recipe.
- All Purpose Flour: Structure for the molten lava cake recipe. I use organic, unbleached all-purpose flour.
- Powdered Sugar: Also known as confectioners’ sugar or icing powder
- Salt: Regular fine, table salt works best here
- Eggs: Provide the lift for the gooey goodness; you will need both egg yolks and whole eggs. I always use large eggs in baking. See notes below regarding how to make eggless.
- *Use a good quality chocolate (I used Ghirardelli baking bars or Guittard chocolate chips); lesser quality will still work, but the “lava” won’t be quite as gooey and smooth.
Get the full recipe in the recipe card below.

How to Make Easy Chocolate Lava Cakes
With just 10 minutes of prep, you will have this decadent molten lava cake recipe ready to bake for a show-stopping treat.
Step 1 – Prepare the Ramekins
Preheat oven to 425°F (220 ° C) and prep four 6-oz ramekins*. Using spray oil, spray ramekins well and then dust using unsweetened cocoa powder. I used oven-safe, 8-oz ramekins.
*If not using ramekins, spray a 6 cup muffin tin or 6 out of 12 count muffin tin and dust with cocoa powder.

Pro Tip: Place on parchment-lined quarter sheet pan for easy baking, removal, and clean-up.
Step 2 – Melt the Butter and Chocolate
- Coarsely chop the chocolate or measure out the chocolate chips and cold butter. Place butter first in a microwave-safe bowl, then heat for 30 seconds in the microwave, stir well.
- Microwave for 30 seconds again, stirring well, if further melting still needed, continue.
- Microwave in 20-second increments, stirring well between. Mine only took 3 times. NOTE: Chocolate and Butter continue melting without heating, so stir well between heatings.
- Set aside to cool slightly for 5-10 minutes.


Step 3 – Combine the Other Ingredients
- Whisk together in a small bowl flour and powdered sugar.
- In another small bowl, whisk the egg yolks and eggs together well.
- Pour the flour and sugar mixture into the chocolate mixture, then add the whisked eggs.
- Using a rubber spatula or wooden spoon, gently combine ingredients until incorporated.


Step 4 – Scoop the Batter into the Ramekins
- If batter is slightly lumpy, gently whisk out lumps, do not overmix (this is important!).
- Scoop or spoon batter into prepared ramekins evenly


Step 5 – Bake
- Place filled ramekins on quarter sheet pan.
- Bake for 12-14 minutes* until sides are solid (dull-looking) and centers are soft and glossy.
*If baking in a muffin tin, bake only 8-10 minutes.

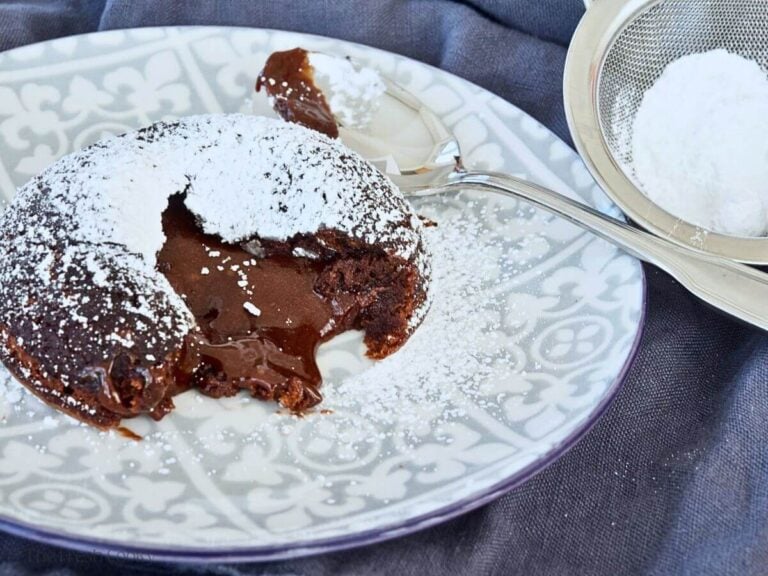
Step 6 – Cool, Invert, and Serve
- Let cool for 1 minute (using a hot pad), then invert the ramekin onto the plate, jiggling and tapping to get it to release.
- Serve immediately. If desired, serve with a scoop of your favorite vanilla or chocolate ice cream and a squeeze of chocolate.

Expert Tips
- When microwaving chocolate and butter together, be sure to stir frequently. This will help them melt evenly and combine smoothly in a rich chocolate base.
- Use high-quality chocolate bars rather than chocolate chips. I’ve made it both ways, and the chocolate bars yield a more molten lava center than the chips.
- Don’t over-mix the cake batter. This will prevent the molten lava cakes from baking correctly and could yield a gummy cake (and we don’t want that!).
- If you are using a muffin tin, be sure to lightly grease the muffin cups with spray oil and dust with powdered sugar so you are able to invert the cakes easily after baking.
- Timing is everything before the flip! Be prepared and have your oven mitts ready. You’ll want to set a timer for 1 minute for the cakes to rest out of the oven then flip and enjoy!
- Serve the chocolate lava cakes with some ice cream of course!
Storage
You can easily freeze baked lava cakes (pretty cool, right?). Here’s how I do it:
- Bake the lava cakes, cool completely, wrap in plastic wrap, and freeze for up to 3 months.
- When ready to serve, allow to thaw at room temp for 20-30 minutes, then reheat in microwave for 20-30 seconds until warmed through.
To make the lava cakes in advance, which makes for easy entertaining, follow these steps:
- Make up the batter ahead of time, store in fridge and when ready, pour or spoon the batter into prepared ramekins* and bake.
- In just 12 short minutes you will have warm, ooey-gooey, dark, rich and chocolatey lava cakes. Simple enough for a weeknight, elegant enough for a fancy dessert.
If you prep these chocolate lava cakes in advance, be careful if you pour into ramekins and refrigerate and then go straight into the oven, many glass products will shatter with big temperature changes. Remove and allow to come to room temperature for 15-20 minutes before baking.

Substitutions
Gluten & Dairy-Free Options
I recently held a cooking class (virtually), making these delicious lava cakes and several were dairy and gluten-free. Here’s what to do:
- Dairy-Free: Substitute butter with equal amounts of coconut oil and make sure your chocolate is dairy-free.
- Gluten-Free: Replace the small amount of all-purpose flour with equal amounts of gluten free all-purpose flour <– my favorite brand.
Vegan or Egg-Free Lava Cake
I have not tried this personally, but when I have had to make other baked goods egg-free, I have used a banana to replace the egg. Here are the options:
- Oil: 1 ½ tablespoons vegetable oil + 1 teaspoon baking powder + 1 ½ tablespoons water = 1 egg
- Applesauce: ¼ cup applesauce = 1 egg
- Banana: ¼ cup mashed banana = 1 egg
- Aquafaba: 3 tablespoons aquafaba = 1 egg
- Avocado: ¼ cup mashed avocado is equal to one egg
- Vinegar and Baking Soda: 1 tablespoon distilled white vinegar or apple cider vinegar + 1 teaspoon baking soda = 1 egg
- Flax egg: 3 tablespoons warm water + 1 tablespoon finely ground flax seeds + 10 minutes standing time = 1 egg
FAQs
I did not have to adjust any ingredients for high altitude on this recipe, but do watch the baking time; high altitude will require less time. I baked for about 12-13 minutes tops!
Yes! You can mix the batter in advance and hold in the fridge. When ready to serve, just pour into ramekins, bake, and enjoy!
You probably over-mixed or over-baked the batter! Be sure to keep an eye on the cakes and also use a timer for accurate results.
More Delicious Chocolate Recipes
Like this recipe?
Don’t forget to give it a ⭐️⭐️⭐️⭐️⭐️ star rating and leave a comment below the recipe!
Video
Equipment
- 8 cup Batter Bowl
Ingredients
- unsweetened cocoa powder for dusting
- 6 ounce semi-sweet chocolate I used Ghirardelli 4 oz bittersweet 60% and 2 oz semi-sweet, rough chopped, high quality chocolate; or a high-quality chocolate chip, like Ghirardelli or Guittard
- ½ cup unsalted butter cold, cut into chunks
- ¼ cup all-purpose flour I used organic unbleached all purpose flour
- ½ cup powdered sugar
- ⅛ teaspoon sea salt fine
- 2 large eggs room temp if possible
- 2 large egg yolks room temp if possible
Instructions
- Using spray oil, spray four ramekins (6 or 8 oz size) well with baking spray.Dust ramekins with cocoa powder, turning until entire ramekin is dusted in cocoa powder. Or spray and dust 6 cups in a 12 cup muffin tin.unsweetened cocoa powder

- Preheat oven to 425°F (220 °C). Coarsely chop chocolate and cold butter. Place butter first in medium microwave-safe bowl, then place chopped chocolate on top. Heat in 30 seconds, stir well, then another 30 seconds, stirring really well.6 ounce semi-sweet chocolate, ½ cup unsalted butter
- If another heating is needed, heat for 20 seconds and stir until melted until completely smooth. Set aside and allow to cool for 5-10 minutes while prepping rest of ingredients.
- In a small bowl, whisk flour, powdered sugar and salt together. Set aside.
- In another small bowl, crack 2 whole eggs and 2 egg yolks, whisk until thick and combined.2 large eggs, 2 large egg yolks
- Pour flour/sugar mixture along with eggs into the bowl of chocolate and stir gently until smooth. If needed, use whisk and gently whisk until smooth. The batter will be thick!
- Pour or spoon batter into prepared ramekins or muffin* tins evenly. Place ramekins onto a baking sheet and bake for 12-14 minutes until sides are solid (dull) and centers are soft (glossy). If baking in muffin tins, only bake 8-10 minutes.
- Remove from oven and allow to cool for 1 minute. Cover ramekin with serving plate and invert (using a hot pad, ramekins will be hot) upside down onto plate. Shake or jiggle gently if not easily coming out. If you used a muffin pan, use a spoon to gently release the cake from tin and invert onto serving plate.
- Add a sprinkle of powdered sugar, a scoop of your favorite ice cream, berries or chocolate syrup. Serve the gooey-chocolatey deliciousness immediately.


Notes
Make up the batter ahead of time, store in fridge and when ready, pour or spoon the batter into prepared ramekins* and bake according to directions. Freeze: Bake the lava cakes, cool completely, wrapping in plastic wrap and freeze for up to 3 months.
When ready to serve, allow to thaw at room temp for 20-30 minutes, then reheat in microwave for 20-30 seconds until warmed through. *If stored in the fridge, allow ramekins to come to room temperature 15-20 minutes before baking. Gluten-Free: I have successfully made these gluten-free as have friends. Simply replace the regular flour with a quality, cup-for-cup gluten-free flour. Dairy-Free: Replace the butter with coconut oil and make sure your chocolate is dairy-free. I had a friend who made hers both gluten-free and dairy-free and it turned out great. This recipe was adapted from Sally’s Baking Addiction.
Nutrition


Radha
This is addictive! Love this lava cake!
It truly is Radha, thanks so much!!
Inger@Art of Natural Living
My daughter was eating one of these from TJ the other day which made me really want to do one homemade. Yours is beautiful–I’d lick my plate too!
They are so simple to make, hope you and your daughter try them!
Ellen
Lava cakes are so yummy! These are so perfect for any special occasion!
Thanks so much Ellen!
Nicole Murray
I just did a virtual event and we all baked these together! They were SO easy and super yummy. I will definitely be making these again! I HIGHLY recommend. 🙂
Thank you so much Nicole! I had so much fun cooking with you all!
Deb Clark
Wow, is this a showstopper. I got all the appropriate ooh’s and ahhh’s – chocolatey heaven!
MICHAELA KENKEL
5 Stars for sure!! I ‘d give these delicious cakes a higher rating if you had one!
Nikki
These are my families all time favs! Gooey delish!
Debi
These were easy to make for our early Mother’s Day celebration (quarantine style!). Thanks for the delicious recipe
YES! quarantine style, glad you enjoyed them Debi!
Linda Krenz
OK Kathleen, I’m addicted! So yummy!
LOL! This is not a bad addiction to have!
bob
Hummers…HAPPY EASTER!!!!!!
I know, I know, you don’t like cake, or chocolate, or…have no fear another 30 minute meal coming up this week!