


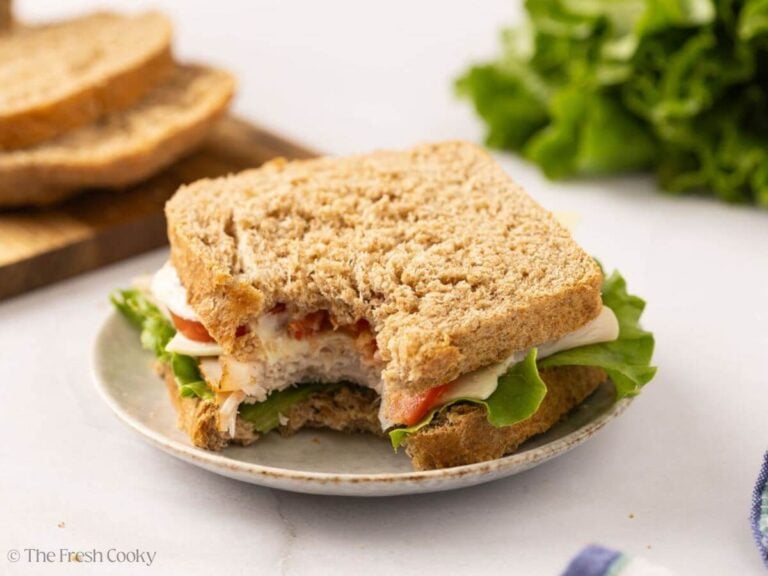
I grew up thinking Whole Wheat Bread had to be dense and heavy, but I longed for a loaf that was still 100% whole wheat while soft, tender, and sandwich-friendly. After plenty of experiments (and more than a few flops), I finally learned the balance that works every single time: a little honey, a splash of milk, and one simple step that changes everything. Now I can serve my family wholesome bread that’s as comforting as it is nourishing, and I’m so excited to share it with you, too.
⭐️⭐️⭐️⭐️⭐️ Adrienne raved: “I made the Honey Whole Wheat Loaf today and it was delicious! I love this loaf! It is nice and soft with a tender crumb, yet sturdy enough to hold up as a well-filled sandwich. The flavor is great, and I love the touch of sweetness from the honey. It is not at all difficult to make, and I think everyone will enjoy it!” ~ Recipe tester
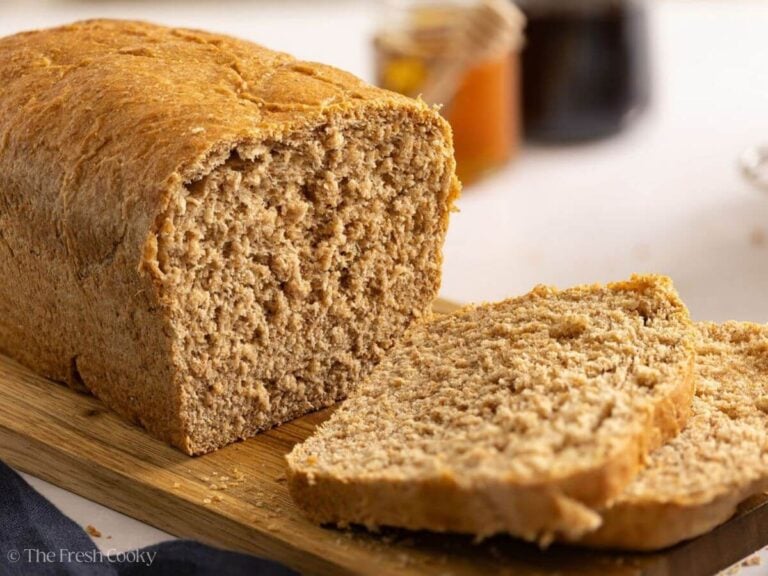
This is the Best Whole Wheat Bread
I grew up thinking whole wheat bread had to be dense and heavy, because that’s how I made it when I was a kid (yup, mom had us in the kitchen early). It was great for toast, but not exactly sandwich-friendly. Turns out, I was wrong.
After plenty of trial and error (and a few loaves better suited for doorstops), I finally found the secrets to soft, tender, 100% whole wheat bread. A quick rest to soften the bran in the stone-ground whole wheat flour, a splash of milk with lemon juice, and just the right balance of honey and butter make this loaf hearty yet fluffy, wholesome yet totally delicious. And friend, if I can figure this out, so can you. I’ll be cheering you on every step of the way!
Recipe Testing: Since I bake and develop my recipes at high altitude (5,280 ft), I also rely on recipe testers across the country to try them at sea level and mid-range elevations. This way, you can be confident that your whole wheat bread will rise, bake, and slice beautifully no matter where you live.

Whole Wheat Sandwich Bread Recipe Ingredients
- Whole Wheat Flour: I use stone-ground whole wheat for a rich, nutty flavor. The amount you use depends on humidity and altitude. Add gradually until the dough is tacky but not sticky. I like Bob’s Red Mill organic.
- Warm Water: Water hydrates the flour and helps activate the yeast.
- Whole Milk: Adds richness and softness to the crumb while also helping the crust brown beautifully. You will warm it.
- Instant Yeast: Gives the bread its rise. You can also use active dry yeast; just proof it first in the warm water with honey.
- Honey: Natural sweetness that balances the nuttiness of whole wheat while feeding the yeast. I like using raw honey here, you may also use maple syrup or agave even.
- Salted Butter: Provides richness, tenderness, and a soft crumb. Oil (avocado or light olive oil) works too if you prefer a dairy-free option. Unsalted butter may be used!
- Salt: Essential for flavor and helps strengthen the dough structure.
- Lemon Juice: Helps soften the bran in whole wheat flour, resulting in a more tender loaf. Apple cider vinegar works too.
Get the full recipe in the recipe card below.

Watch the video on how to make this honey whole wheat bread
How to Make Homemade Whole Wheat Bread
Step 1 – Make the Sponge (Autolyse Stage)
In a large mixing bowl, or the bowl of a stand mixer; combine warm water, warm milk, yeast, honey, and 2 cups of flour. Mix until smooth, cover with a towel, and let rest 15–20 minutes until bubbly. This is crucial for a lighter texture. May also be mixed using a wooden spoon and by hand!


Step 2 – Mix the Dough
Add butter, lemon juice, salt, and 2 more cups of flour. Mix, then switch to a dough hook or knead by hand. Add flour gradually until the dough is soft, smooth, and tacky but not sticky.


Step 3 – First Rise
Place dough in a lightly greased bowl, cover, and let rise until puffy, 45–90 minutes depending on your kitchen temperature.

Step 4 – Shape the Loaves & Second Rise
Punch down, divide the dough into two equal pieces, and shape each piece into a loaf. Place seam side down into greased bread pans.
Cover and let rise until the tops are ½–1 inch above the pan rim, about 45–60 minutes.


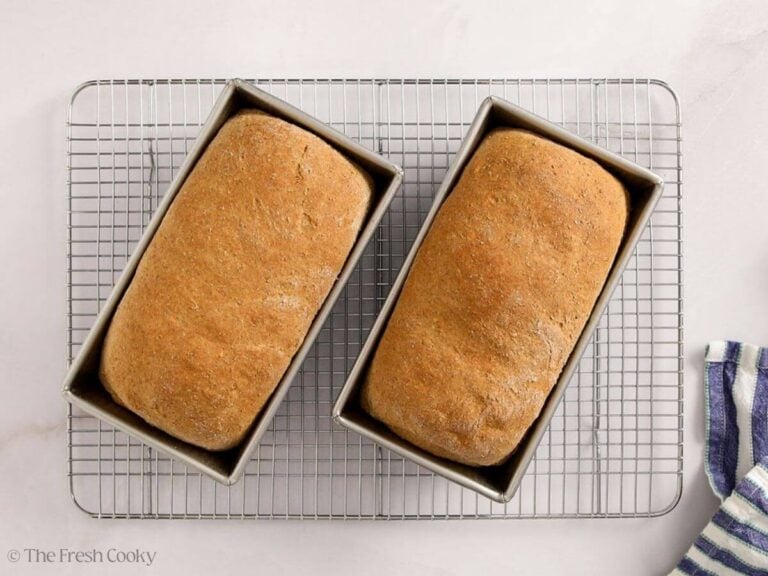
Step 5 – Bake & Cool
Preheat oven to 350°F (177°C). Bake in the center of the oven for 35–45 minutes, until crispy golden brown and the internal temperature reaches 190–200°F.
Remove from pans and cool completely on a cooling rack before slicing.
Tips For Making This Simple Whole Wheat Bread Recipe
- Keep an eye on overproofing. In a warm kitchen (above 75°F), dough rise can happen much more quickly, sometimes in half the expected time. Check it early and often; I like to set a timer every 15 minutes as a reminder. The dough is ready when it slowly springs back after a gentle press with your fingertip. It’s always better to bake a little underproofed than overproofed, since an overproofed loaf may collapse in the oven.
- Use a thermometer. Bread can look done on the outside but still be underbaked inside. The most reliable way to know it’s ready is to check that the internal temperature reaches between 190–200°F.
- Don’t rush the rise. It might be tempting to move to the next step quickly, but a good rise helps develop both flavor and structure. Check the dough regularly; if it springs back slowly when pressed with your fingertip, it’s ready.
- Cool completely. Bread continues to cook as it cools, and slicing too early can leave you with a gummy, underdone texture. Waiting at least an hour ensures clean slices and a loaf that holds together beautifully.
Whole Wheat Sandwich Bread Recipe Variations
- Honey molasses bread: Swap half the honey for molasses for a darker, deeper, richer flavor.
- Seeded loaf: Add ½ cup sunflower, pumpkin, or flax seeds to the dough.
- Cinnamon swirl bread: Roll out the dough before shaping, sprinkle with cinnamon sugar, and roll into a loaf.
- Replace up to 1 cup of whole wheat flour with oatmeal flour, rye flour, spelt or your favorite flour grain for a delicious multigrain bread.
- Dairy-free: Replace milk with water and butter with oil for a dairy-free version.
How to Store Homemade Whole Wheat Bread
I like to store my bread in a bread box! It keeps it fresh for about 3 days at room temperature without drying out. Refrigeration isn’t ideal, since it makes bread stale faster. If you need longer storage, freezing is your best option.
Freezing Whole Wheat Sandwich Bread
Slice your loaves in half before freezing so you can pull out just what you need. Wrap tightly in plastic wrap, then place in a zip-top freezer bag. The bread will keep for up to 3 months. Thaw at room temperature or toast straight from frozen for sandwiches and breakfast.

FAQs for Honey Whole Wheat Bread
Choose breads where the first ingredient is a whole grain (like stone ground whole wheat flour, whole rye, or whole oats). Look for simple ingredients, such as flour, water, yeast, salt, and a small amount of oil or honey. Avoid loaves with refined flours (such as wheat flour, which is usually white flour) listed first, lots of added sugar, or long lists of preservatives.
No, whole wheat bread is not gluten-free because it’s made from wheat, which naturally contains gluten. If you need gluten-free bread, look for recipes using flours like oat, rice, or almond instead.
To keep whole wheat bread soft, add natural tenderizers like milk, honey, or butter. A short rest period (autolyse) before kneading and a small splash of lemon juice or vinegar also help soften the gluten, making the bread light and tender.
For homemade loaves, choose freshly milled or high-quality stone-ground whole wheat flour. White whole wheat flour yields a milder, less nutty loaf, while traditional whole wheat flour produces a heartier flavor and a darker color.
Yes, I give the full single loaf recipe in the recipe card; but basically you halve all of the ingredients, everything else stays the same!
High Altitude Adjustments
This is an overview; find the full method in the recipe card at the end of the post.
- 5,000–6,000 ft: Add 1–2 tablespoon extra liquid and 1–4 tablespoon extra flour if needed. Shorten rises by 5–15 minutes. Bake at 355–365°F. (Mine baked 45–50 minutes at 350°F without changes.)
- Above 6,000 ft: Add 2–3 tablespoon extra liquid and up to ⅓ cup extra flour. Reduce yeast slightly (about 1 tablespoon + 1 tsp). Shorten rises by 30–50%. Bake at 360–365°F; a pan of hot water during the first 10 minutes helps prevent early crust setting.
- Oven Tip: If your oven only adjusts in 25° increments, use the closest setting and adjust time (2–3 minutes longer at 350°F, 3–5 minutes less at 375°F). Cover with foil if browning too quickly. Bread is done when internal temp reaches 190–200°F.

More of our popular bread recipes:
Like this recipe?
Don’t forget to give it a ⭐️⭐️⭐️⭐️⭐️ star rating and leave a comment below the recipe!

Simple Whole Wheat Bread Recipe
Video
Ingredients
- 6 to 6½ cups whole wheat flour divided (720–780g)
- 2 cups warm water 105–110°F (40–43°C)
- ½ cup whole milk warmed to 105–110°F (40–43°C) 120g
- 4 teaspoons instant yeast or active dry yeast 11g — see note 12 g
- ½ cup honey I used raw honey 170 g
- ½ cup salted butter melted, or oil — see notes 113 g
- 2 ½ teaspoons kosher salt 15 g, use 2 teaspoons if using table salt
- 2 teaspoons lemon juice or apple cider vinegar
Instructions
Step 1: Make the Sponge (Autolyse Stage)
- In a large mixing bowl (or stand mixer bowl), combine the warm water, warm milk, yeast, honey, and 2 cups of the measured whole wheat flour. Mix until smooth. Cover and let rest for 15–20 minutes, until bubbly and slightly risen.What's happening here: This rest, called an autolyse, lets the flour fully absorb liquid, softens the bran in whole wheat, and begins gluten development without kneading. It improves dough handling and helps create a softer, better-rising loaf.2 cups warm water, ½ cup whole milk, 4 teaspoons instant yeast , ½ cup honey , 6 to 6½ cups whole wheat flour


Step 2: Mix the Dough
- Add melted butter, lemon juice, salt, and 2 more cups of the measured flour. Mix until the dough begins pulling from the sides of the bowl. Switch to a dough hook (or turn out onto a floured surface), then add 2 more cups of flour, ½ cup at a time, until the dough is tacky but not overly sticky. Knead 6–7 minutes by machine or 10 minutes by hand, adding the remaining flour a few tablespoons at a time until the dough is soft, smooth, and springy.The exact amount of flour you use will depend on humidity and altitude. Ultimately, go by feel: when the dough is tacky but no longer sticky and springs back when pressed, you've added enough flour.
- Transfer the dough to a lightly floured surface and knead by hand a few times, until the dough is smooth and springy. Return the dough to the bowl (if using a new bowl, add 1 teaspoon oil) turn dough to cover lightly with oil and cover and let rise in a warm place until puffy (but not necessarily doubled in volume), about 1 – 1 ½ hours. I tested this recipe on a warm summer day, mine took about 45 minutes to rise.


Step 3: Shape the Loaves
- Lightly flour your work surface. Gently punch the dough down, then divide the dough evenly into two pieces. Working with one piece of dough at a time, gently pat it into a 12×18-inch rectangle. Fold the short ends toward the center, overlapping slightly, and press gently to flatten. Starting from the top, roll the dough toward you into a tight log, pressing lightly as you go to eliminate air pockets. Pinch the seam to seal. Place seam-side down into greased loaf pans. Use 8½×4½" pans or 9×5" pans, a larger pan will yield a slightly shorter loaf.

Step 4: Final Rise
- Cover loaves and let rise in a warm place until the tops are ½–1 inch above the rim of the pans, about 60 minutes (longer if your kitchen is cool, shorter if your kitchen is overly warm). Mine only took about 30 minutes to rise. If the bread rises quickly and your oven is not fully preheated, put the covered loaf in the fridge until ready to bake.
- Watch for overproofing: In a warm kitchen (above 75°F), the dough can rise much faster, sometimes in half the time. Check early and often; I set my timer for every 15 minutes. The loaf is ready when it slowly springs back after a gentle fingertip press. Slightly underproofed is better than overproofed, which can cause collapse during baking.


Step 5: Bake
- For a shiny crust: Brush the tops of the loaves with beaten egg white before baking.Preheat oven to 350°F (177°C) about 30 minutes before the end of the rise. Bake 35-45 minutes, rotating pans halfway through if needed, until golden brown and internal temperature reaches 190–200°F. Remember it keeps baking after removing from the oven.
Step 6: Cool and Finish
- Remove immediately from pans and cool completely on a wire rack before slicing.For a soft, buttery crust: Brush the hot loaves with 1-2 tablespoons melted butter right after removing from the oven.
- Cool on wire rack for at least one hour before slicing, bread straight from the oven continues to bake, if you slice too soon you will have gummy undercooked bread. I cooled mine 2 hours before slicing, the bread was still warm.

Notes
- Flour Options: Use regular whole wheat, white whole wheat, or whole wheat bread flour. A blend of whole wheat and unbleached all-purpose flour (about 25–30% AP) produces a lighter loaf, but this is a really light loaf! I used 100% stoneground whole wheat flour.
- Yeast: If using active dry yeast, dissolve it in approximately ¼ cup of warm (reduced from the total) water and let it stand for 5–10 minutes, until it becomes foamy, before adding the flour during the sponge stage.
- Fat Choice: Butter adds rich flavor and tenderness; oil results in a slightly more open crumb and can extend shelf life by one day. When using oil, I like avocado oil or refined coconut oil. Using unrefined coconut oil will yield a coconut taste.
- Milk Tip: Replacing ½ cup of the water with milk (as in this recipe) yields a softer crumb and deeper browning, but may slightly reduce loaf height compared to a dough made with water only.
- Storage: Store at room temperature in a breadbox or bread bag for up to 3 days. Alternatively, freeze wrapped tightly in plastic wrap and then place in a ziplock bag for up to 3 months.
- 5,000–6,000 ft: If needed, add 1–2 tablespoons extra liquid and 1–4 tablespoons extra flour. I did not have to make flour/liquid adjustments at 5280 feet. Shorten rises by 5–15 minutes. Increase oven temp to 355–365°F*. Mine took about 45-50 minutes at 350.
- Above 6,000 ft: Add 2–3 tablespoons extra liquid and up to a ⅓ cup extra flour. Reduce yeast to 1 tablespoon + 1 teaspoon. Shorten rises by 30–50%. Increase oven temp to 360–365°F* and consider adding a pan of hot water for the first 10 minutes of baking.
- *If your oven only adjusts in 25° increments as mine does, choose the closest setting and adjust bake time slightly, at 350°F, bake 2–3 minutes longer; at 375°F, bake 3–5 minutes less. And if needed, cover with aluminum foil if it’s browning too quickly. Remember to take the internal temperature; it should be 190–200°F when done.
- 3 to 3¼ cups (360–390 g) whole wheat flour, divided
- 1 cup (237 g) warm water, 105–110°F (40–43°C)
- ¼ cup (60 g) whole milk, warmed to 105–110°F (40–43°C)
- 2 teaspoons (6 g) instant yeast (or active dry yeast ~5.5 g)
- ¼ cup (85 g) honey
- ¼ cup (57 g) salted butter, melted (or oil)
- 1¼ teaspoons (7.5 g) salt
- 1 teaspoon lemon juice (or apple cider vinegar)
- Make the Sponge: In a large bowl, combine warm water, warm milk, yeast, honey, and 1 cup of the measured flour. Mix until smooth. Cover and let rest 15–20 minutes until bubbly.
- Mix the Dough: Add melted butter, lemon juice, salt, and 1 more cup of flour. Stir until combined. Add remaining flour, about ½ cup at a time, until dough is soft, smooth, and tacky but not sticky.
- Knead: Knead by hand 8–10 minutes or by mixer 6–7 minutes until the dough springs back when pressed.
- Shape: Pat dough into a rectangle, fold the ends toward the middle, then roll into a log. Pinch seam to seal and place seam-side down in a greased loaf pan.
- Rise: Cover and let rise until the dough crowns about ½–1 inch above the pan rim, about 45–60 minutes (watch closely in a warm kitchen to avoid overproofing).
- Bake: Preheat oven to 350°F (177°C). Bake 30–35 minutes, until golden brown and internal temperature reaches 190–200°F.
- Cool: Remove from pan and cool completely on a wire rack before slicing.
Nutrition


Miss Karen
Hi. Can I rate this recipe higher than 5? I learned a LOT from your video on shaping the loaves. It’s SO nice to have the high elevation adjustments already done!!! THANK YOU.
The only (minor) chage I did was to use orange juice instead of lemon juice. I just wasn’t up to a grocery run. Now, the tricky part is waiting until it cools completely. Lol.
FWIW: I also grew up in Southern California and now I live in Colorado Springs. Sounds like you might be near the Air Force Academy…(?)
Awe, Miss Karen, you made my month! Thank you for your sweet comment, love your twist using orange juice!
Debbie
HI Kathleen! What altitude are you? I saw your statement (Mine baked 45–50 minutes at 350°F without changes.) We are at 5100′ here in Fort Collins, we live on a ridge.
That’s awesome Debbie, I’m at 5830, so glad it worked for you!