


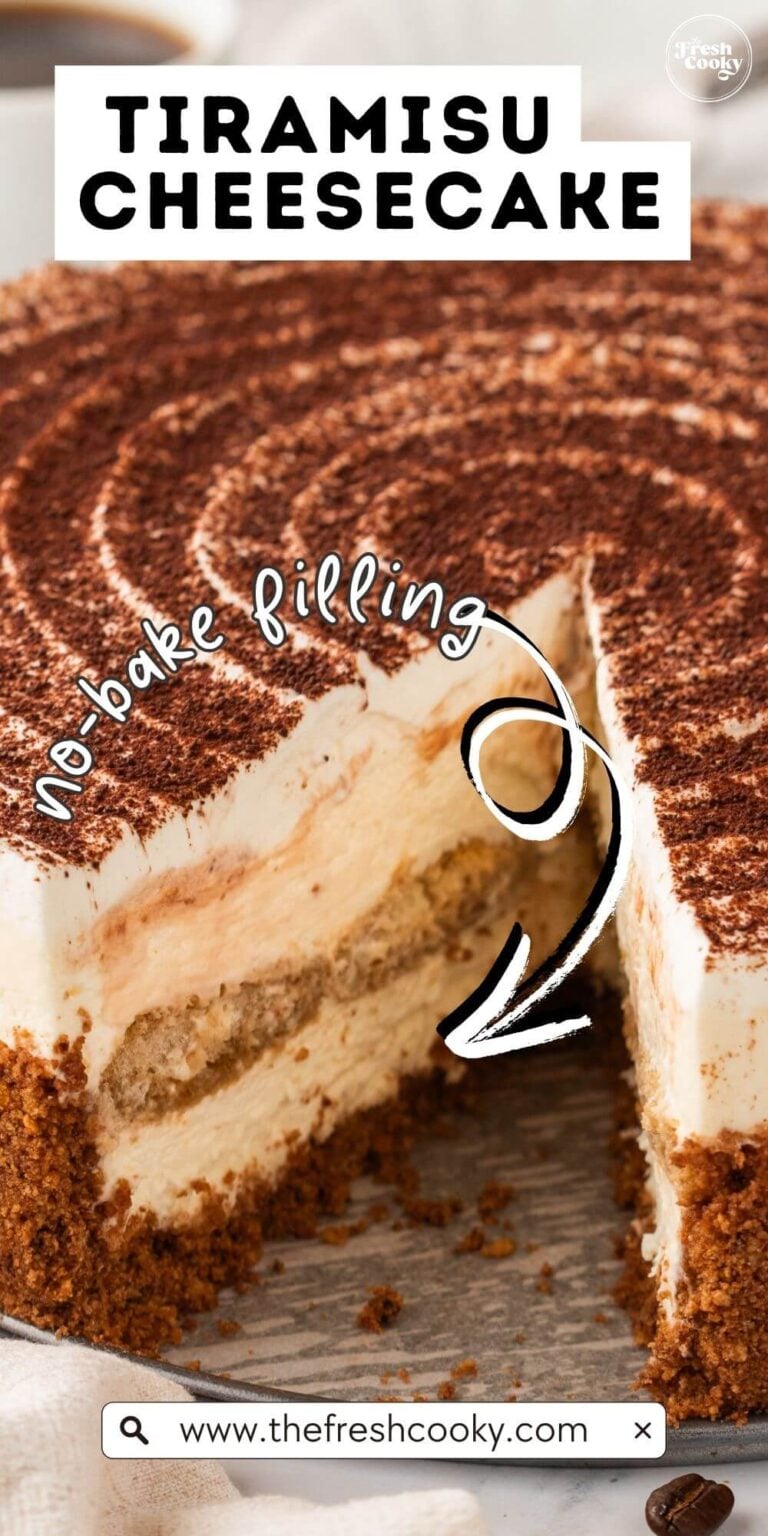
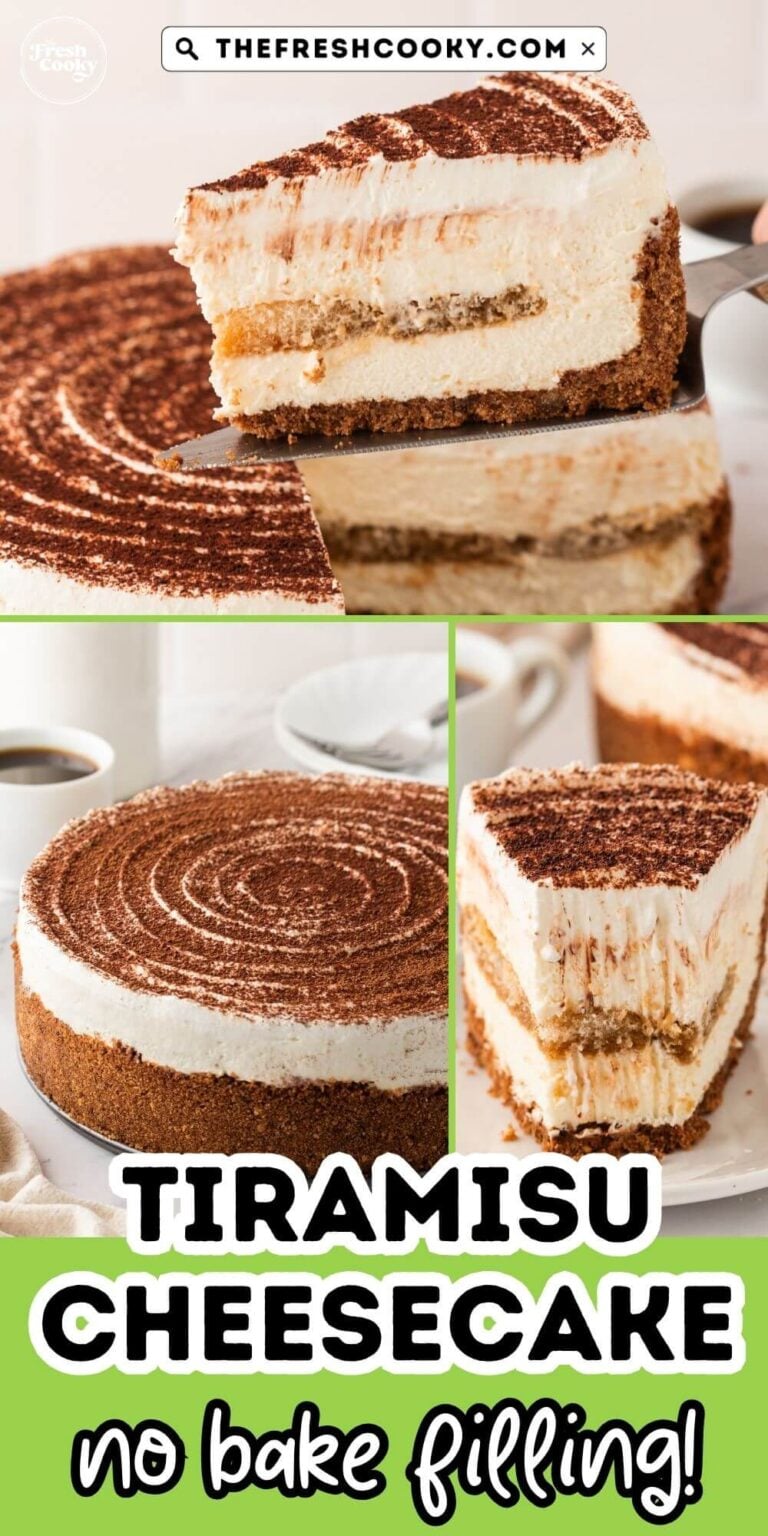
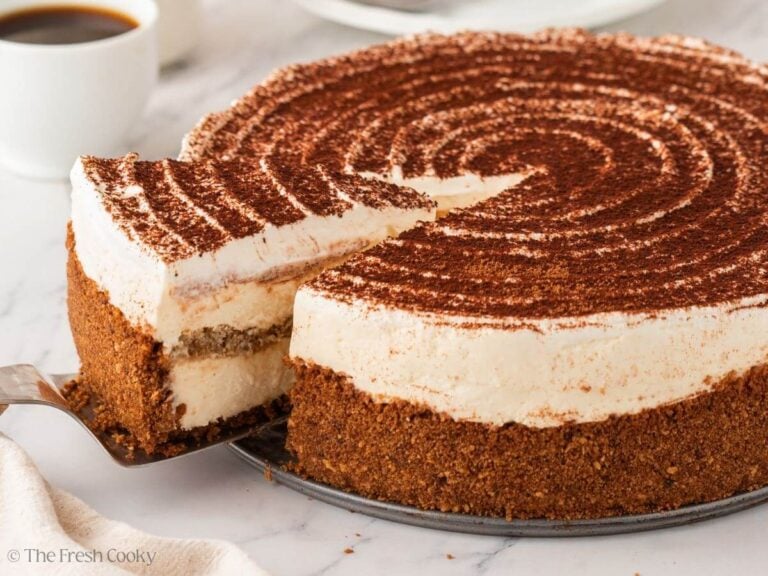
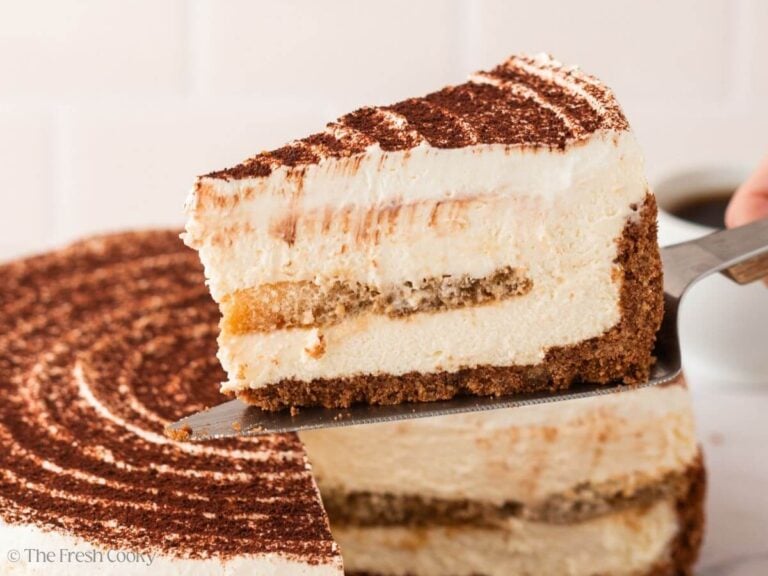
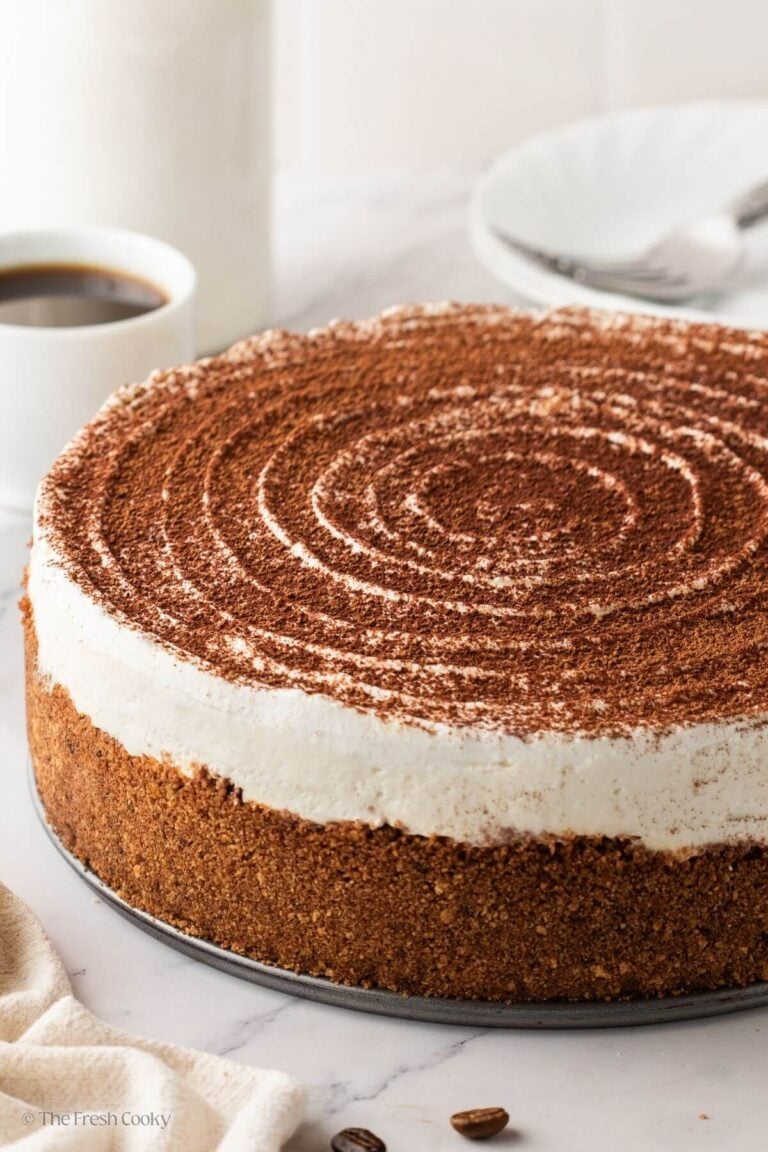
This Tiramisu Cake is actually a cheesecake, and it’s everything a coffee lover dreams of! With a chocolatey graham cracker crust, whipped filling, and classic cocoa dusting, it brings two iconic desserts together into one.
What is Tiramisu Cake?
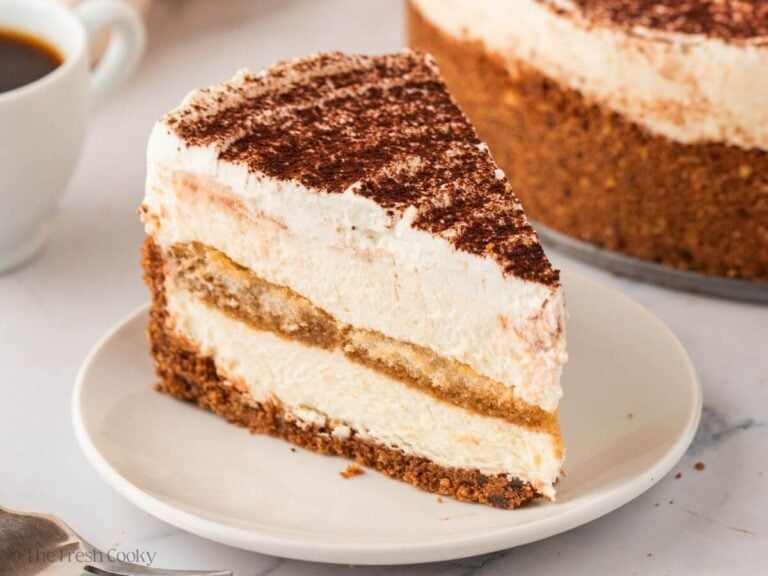
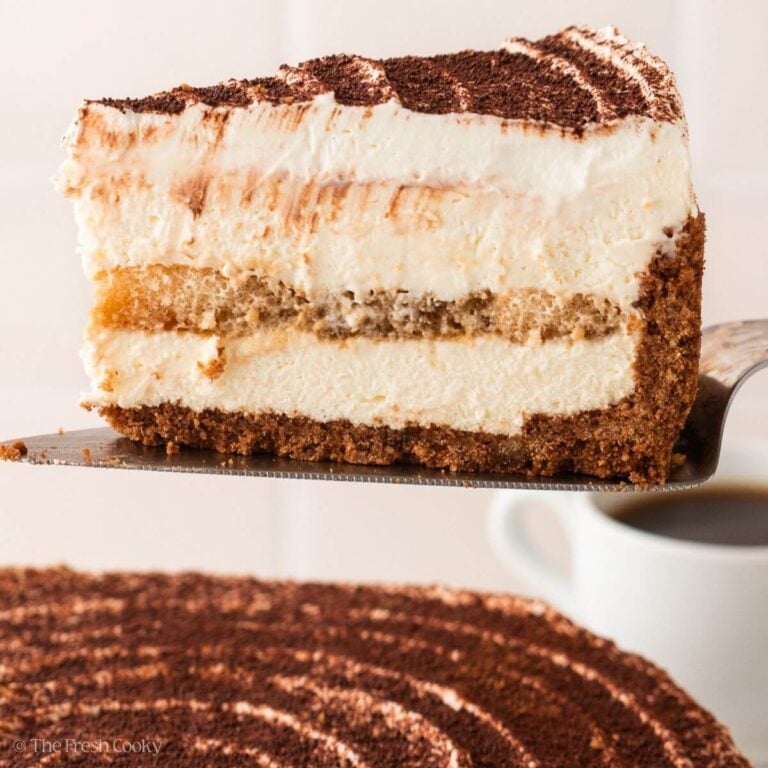
Tiramisu cake is a dreamy dessert that brings together the best of two classic treats: tiramisu and cheesecake. Instead of custard, this version uses a creamy no-bake cheesecake filling with mascarpone and espresso-soaked ladyfingers tucked in between. It’s built on a chocolatey graham cracker crust and topped with fluffy whipped cream and a dusting of cocoa powder. You can think of it as a no-fuss twist on the classic Italian dessert, tiramisu.
Why you should make this tiramisu cheesecake recipe
I wasn’t always a cheesecake fan, crazy, I know. My mom made them all the time when I was growing up, so I knew how to make them early on. But I didn’t fall for cheesecake until recently. Now? I can’t get enough of that rich, creamy texture, especially when it’s paired with coffee and cocoa. This tiramisu cheesecake is my love letter to both desserts.
What I love about this no-bake cheesecake (OK, you do bake the crust quickly, but the rest is no-bake), no eggs, no flour, no fuss!
Tiramisu Cake Ingredients
- Graham cracker crumbs: The base of the crust. You can crush whole graham crackers in a food processor or buy pre-crushed.
- Unsweetened cocoa powder: Adds a hint of chocolate to the crust.
- Brown sugar: Provides just a touch of sweetness and moisture to the crust.
- Butter: Melted butter binds the crust together. You can use salted or unsalted, depending on your preference.
- Brewed espresso: Strongly brewed coffee adds bold flavor and soaks into the ladyfingers. Just make sure it’s fully cooled before using. You can also use instant espresso powder dissolved in hot water.
- Coffee liqueur: Optional, but it deepens the coffee flavor. Kahlúa, dark rum, or even amaretto work well.
- Cream cheese: Use full-fat and make sure it’s at room temperature for easy mixing.
- Mascarpone cream cheese: A traditional tiramisu ingredient that adds richness and a mild tang to the filling.
- Powdered sugar: Sweetens the filling without making it gritty!
- Pure Vanilla extract: Balances the bold coffee flavor with a warm, sweet undertone.
- Heavy whipping cream: Adds lightness to the cheesecake when whipped and folded in. Also used for the topping!
- Ladyfingers: Classic tiramisu sponge cookies that soak up the espresso and create a soft cake-like layer in the middle.
- Cocoa powder (for dusting): A finishing touch that ties everything together with a slightly bitter contrast to the sweet filling.
Get the full recipe in the recipe card below.

How to Make Tiramisu Cake
Step 1 – Prepare the Crust
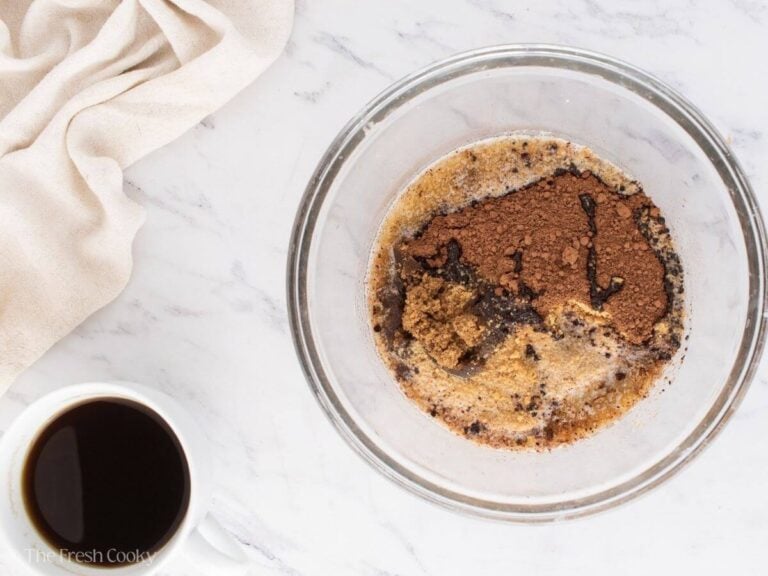
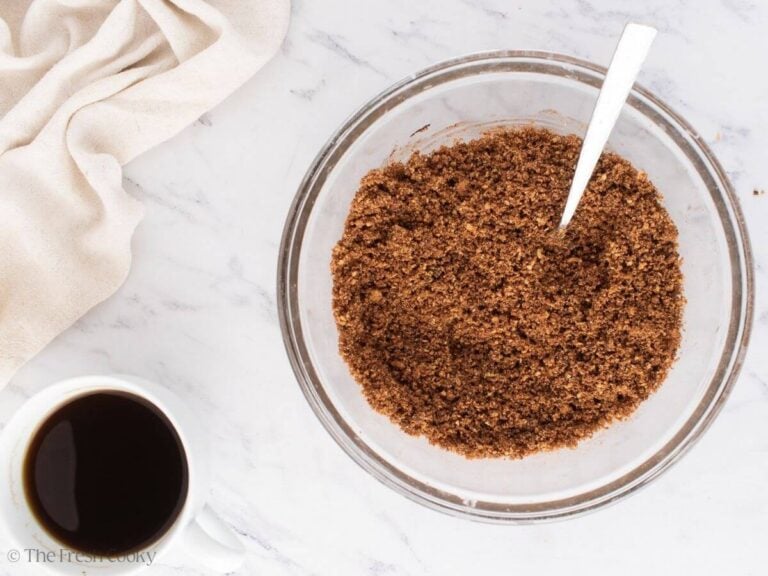
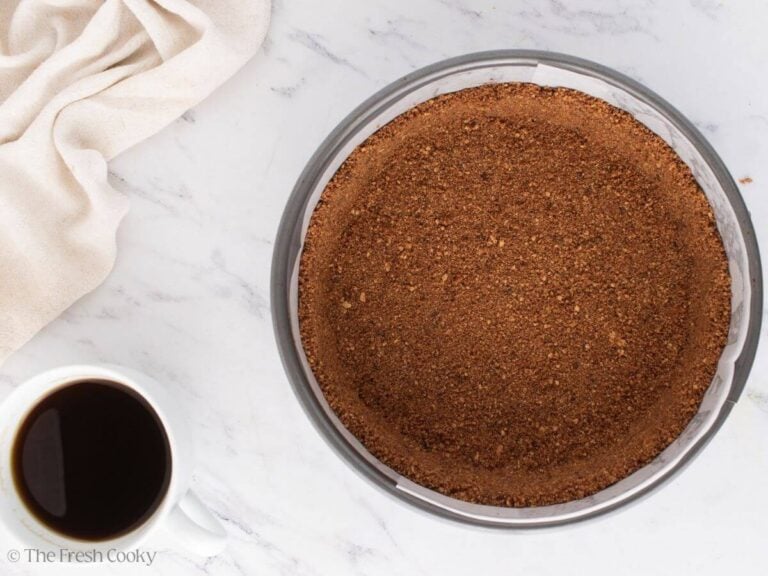
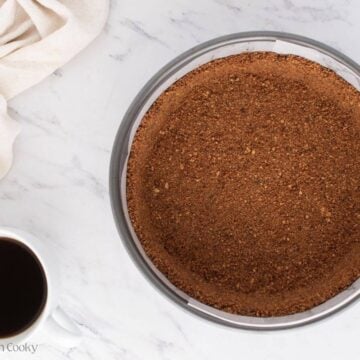
Preheat your oven to 350°F (175°C). Mix graham cracker crumbs, cocoa powder, brown sugar, and melted butter until combined. Press firmly into the bottom and sides of a 9-inch springform pan. Bake for 10 minutes, then let cool.
Step 2 – Make the Cheesecake Filling
Brew espresso or strong coffee and let it cool. Stir in the coffee liqueur or rum if using.
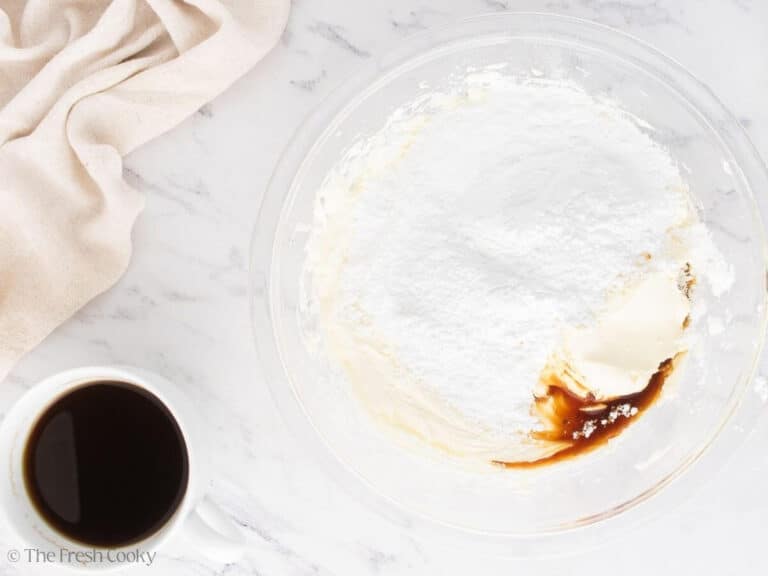
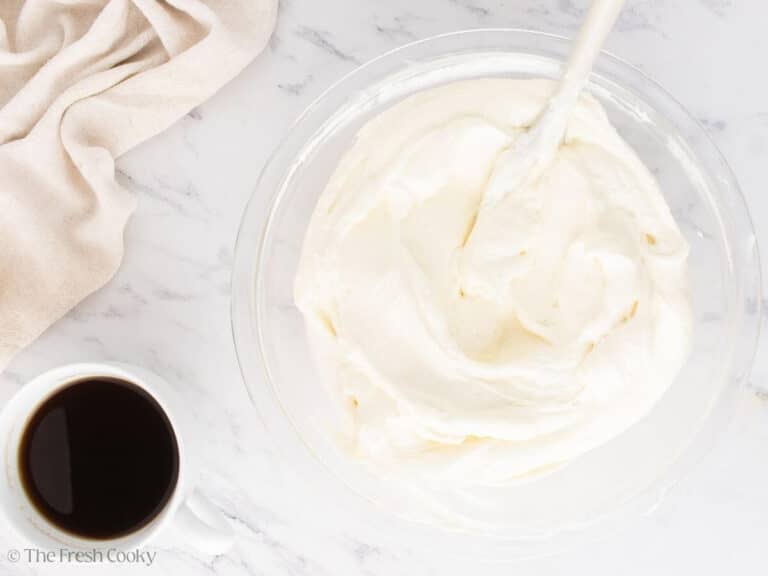
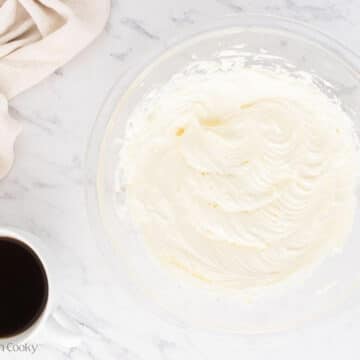
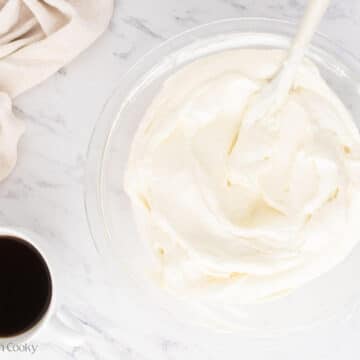
In a large bowl with a hand mixer or in the bowl of a stand mixer on medium speed, beat cream cheese until smooth. Add mascarpone, powdered sugar, and vanilla, and mix well. In a separate bowl, whip the cream until stiff peaks form. Gently fold the whipped cream into the cream cheese mixture until smooth.

Step 3 – Assemble & Chill
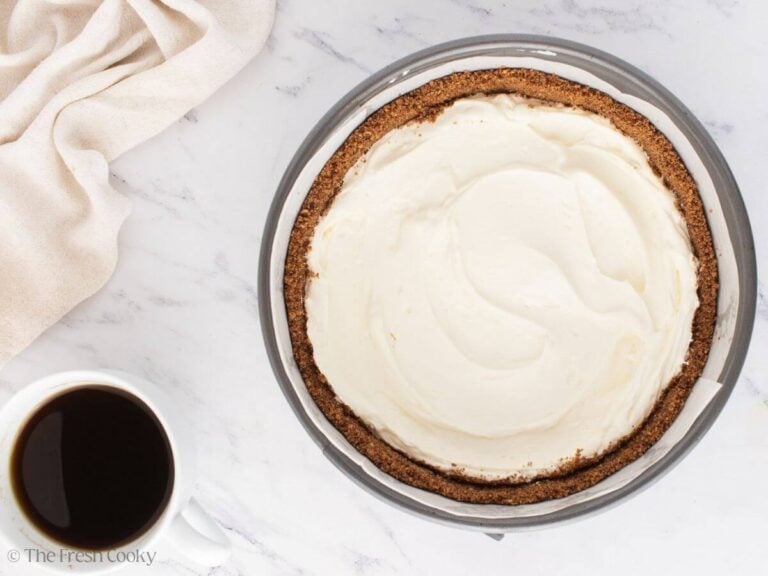
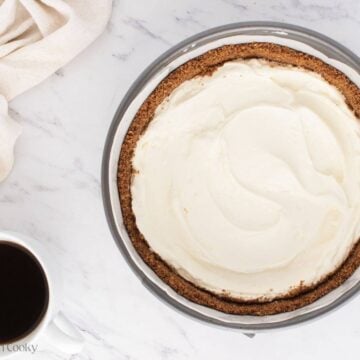
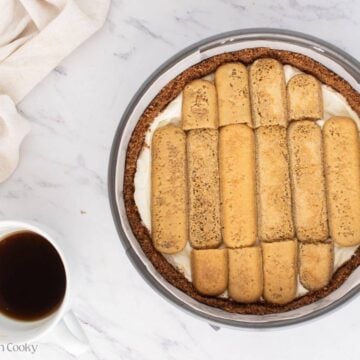
Spread half the filling over the crust. Quickly dip ladyfingers into the espresso (don’t oversoak!) and layer over the filling. Top with the remaining cheesecake mixture and smooth the top of the cake. Cover and refrigerate at least 6 hours or overnight.


Step 4 – Top & Serve
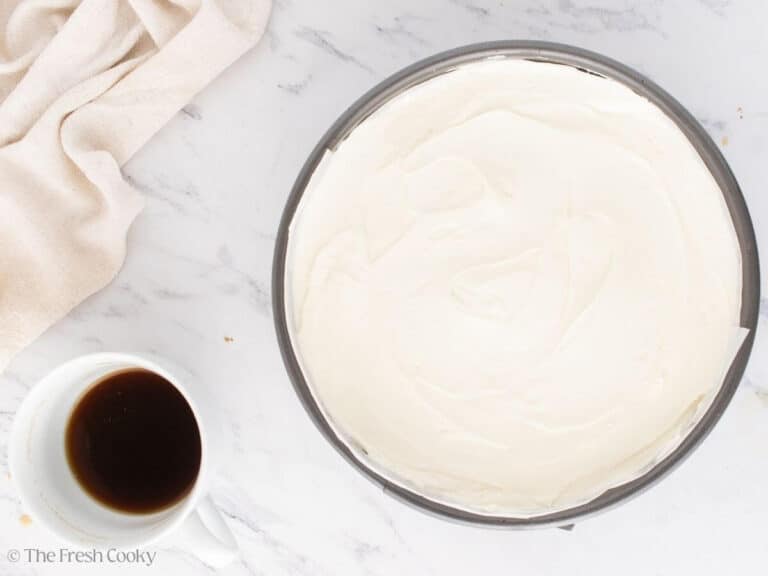
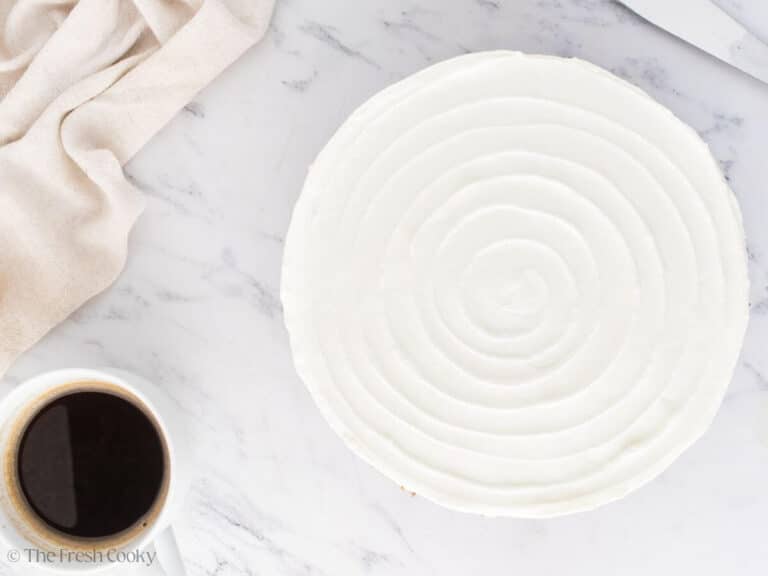
Whip the topping ingredients to stiff peaks. Spread or pipe over the chilled cheesecake. Dust with cocoa powder before serving.
How to Make Tiramisu Cake ahead of time
Tiramisu cheesecake is the perfect dessert to make ahead of time! Since it needs time to chill and set, it’s actually better made in advance. You can prep the whole cake 1–2 days ahead and store it in the fridge. Wait to add the whipped topping and cocoa powder until just before serving for the best presentation and texture.
Tiramisu Cheesecake Recipe Variations
- Boozy: Use dark rum, coffee liqueur, or amaretto for added flavor.
- Crust options: Swap graham crackers for chocolate cookies or Biscoff.
- Chocolate lovers: Add a layer of shaved chocolate or a drizzle of ganache between the filling layers.
- Gluten-free: Use gluten-free graham crackers and certified gluten-free ladyfingers.
- Mini cheesecakes: Make individual servings in muffin tins or ramekins for parties.
Tiramisu Cake Recipe FAQs
You can often find packaged ladyfingers in the international aisle, bakery section, or deli area of the grocery store, or try checking your local Italian market for the best ones. You can definitely find them online. If you can’t find ladyfingers, sponge cake, or pound cake (cut into thin slices) are good alternatives. Angel food cake, shortbread cookies, or even sugar cookies can be used if you’re in a bind, but they will have a different texture. Biscotti is a firmer option that adds a crunchy contrast, and of course, homemade ladyfingers are always a delicious choice!
Dutch-processed cocoa powder is ideal for tiramisu because it has a smoother, deeper chocolate flavor and a darker appearance, making your dessert look and taste more decadent. You can also use natural cocoa powder if that’s what you have, but the flavor and color may be slightly lighter and more acidic.
Storage Tips for Tiramisu Cake
- Refrigerator: Store covered in the fridge for up to 4–5 days. Best enjoyed within the first 2–3 days.
Freezer (without cocoa or whipped topping): Freeze whole or in slices for up to 2 months. Wrap tightly in plastic wrap and foil or use an airtight container. - Thawing: Thaw overnight in the fridge before serving. Add fresh cocoa powder and whipped cream after thawing for best results.
Serving from Frozen: Not recommended; texture is best when fully thawed. - Make-Ahead Friendly: Can be made 1–2 days in advance and stored in the fridge until ready to serve.
Expert Tips
- Use room temperature cream cheese and mascarpone so they blend smoothly.
- Don’t soak the ladyfingers for too long, just a quick dip! If they get too wet, they’ll fall apart and make the cake mushy.
- Chill the cake overnight for the best flavor and structure. It allows the filling to set completely and the flavors to meld.
- Use a springform pan lined with parchment for clean removal. It also makes slicing and serving much easier!
Our Favorite Italian Recipes
Most popular recipes on The Fresh Cooky
Like this recipe?
Don’t forget to give it a ⭐️⭐️⭐️⭐️⭐️ star rating and leave a comment below the recipe!
Ingredients
Graham Cracker Crust
- 2 cups graham cracker crumbs about 2 sleeves
- 2 tablespoons unsweetened cocoa powder
- 2 tablespoons brown sugar dark or light
- 6 tablespoons butter melted (if using unsalted butter add ¼ teaspoon salt)
Cheesecake Filling
- 1 cup espresso brewed, cooled or strong coffee
- 1 tablespoon coffee liqueur such as Kahlua or try light or dark rum (optional)
- 24 ounces cream cheese room temperature (that’s 3 8-oz bricks of cream cheese)
- 6 ounces mascarpone cheese room temperature
- 1 ½ cups powdered sugar
- 2 teaspoons vanilla extract
- 1 ½ cups heavy whipping cream not whipped topping, heavy cream
- ½ package ladyfingers about 3.5 ounces
Topping
- 1 cup heavy whipping cream chilled
- 1 ½ – 3 tablespoons powdered sugar depending on how sweet you want it
- 1 teaspoon vanilla extract
- Unsweetened cocoa powder for dusting
Instructions
- Start by brewing the coffee and set it aside to cool. Stir in the coffee liqueur or rum if using.
For the crust
- Preheat the oven to 350°F (175° C). Prepare a 9-inch springform pan with a parchment paper circle.
- In a small mixing bowl, combine the graham cracker crumbs*, cocoa powder, brown sugar, and melted butter. Mix until completely combined. *To make crumbs, whir in a food processor until fine crumbs form or place in a ziplock baggie and crush using a rolling pin.

- Add the mixture to the springform pan and firmly press it along the bottom and sides. I like using a straight-edged measuring cup.
- Bake for 10 minutes. Remove from the oven and allow to cool while making the filling. Make sure it's cooled before adding filling, if needed cool 10 minutes on counter, then move to fridge.

For the filling
- In a large mixing bowl with a hand mixer or stand mixer fitted with paddle attachment, beat the softened cream cheese until smooth and creamy.
- Add the mascarpone, powdered sugar, and vanilla extract, then mix until fully combined, scraping down the sides of the bowl as needed.
- In a separate bowl, whip the heavy cream until stiff peaks form, then gently fold it into the cheesecake mixture until smooth.
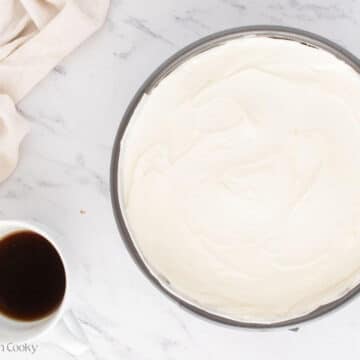
- Spread half of the cheesecake filling over the chilled crust, smoothing it out with a spatula or offset spatula.
- Quickly dip the ladyfingers into the coffee mixture, ensuring they’re lightly coated but not oversaturated. Arrange the dipped ladyfingers in an even layer over the filling, cutting ladyfingers to fit.
- Spread the remaining cheesecake filling evenly over the ladyfingers. Cover the pan with plastic wrap and refrigerate for at least 6 hours or overnight.
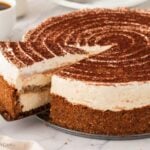
- For the topping, whip the heavy cream, powdered sugar, and vanilla extract together until stiff peaks form. Spread or pipe the whipped cream on top of the chilled cheesecake. Just before serving, dust the top with cocoa powder. I used an icing spatula to create a spiral pattern on top.


Notes
Store cheesecake covered in the fridge for up to 5 days; best enjoyed within 2–3 days for freshest flavor. Freezing:
For best results, freeze before adding whipped cream. Freeze whole or sliced until solid, then wrap well. Keeps up to 2 months. Thawing:
Thaw in the fridge overnight. Add whipped topping and cocoa just before serving. Individual slices can be thawed as needed.
Nutrition


Rate & Comment