


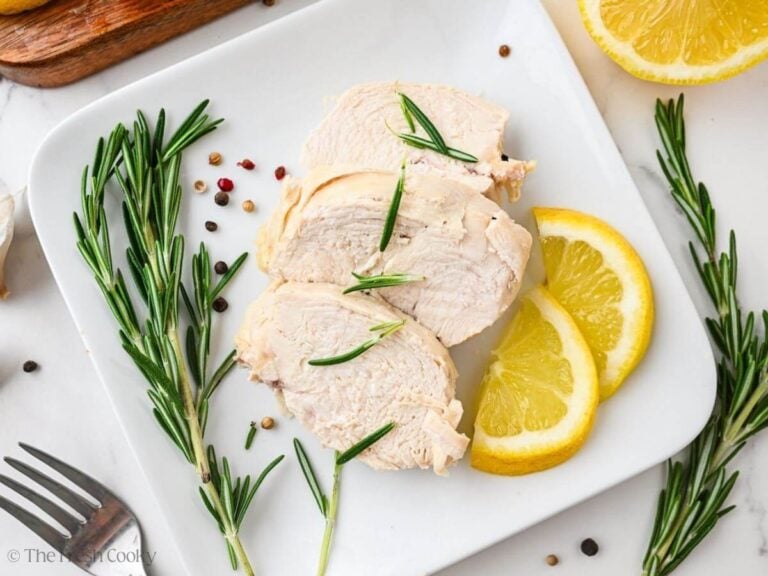
If you’ve ever stared down a bowl of dry, rubbery chicken and wondered where it went wrong, yeah. Me too. More times than I’d like to admit. Learning how to cook chicken for chicken salad the right way makes all the difference, and the best method is poaching, not boiling. Once you know how to poach chicken, you’ll never go back to guessing, boiling, or crossing your fingers that it turns out okay. Tender, juicy, shreddable chicken salad chicken is closer than you think.
Cooking Chicken for Chicken Salad
Real talk from someone who has made a lot of chicken salad…the chicken matters more than any other ingredient in the bowl. I know the dressing, the mix-ins, and the crunch are all important, but I’ve ruined more than a few batches by starting with dry, rubbery, bland chicken, and no amount of mayo can save that situation.

I went on something of a personal mission (my hubby might call it an obsession, we had a lot of cooked chicken in our house for a while!) to find the best method for cooking chicken specifically for chicken salad. I tried baking it, slow cooking it, steaming it, and yes, poaching it in various ways. Some methods were good. One method? Game-changing. The secret is gentle heat and patience. And once I landed on it, I’ve never looked back.

Best Way to Cook Chicken for Chicken Salad
Let’s talk options, because you’ve got a few:
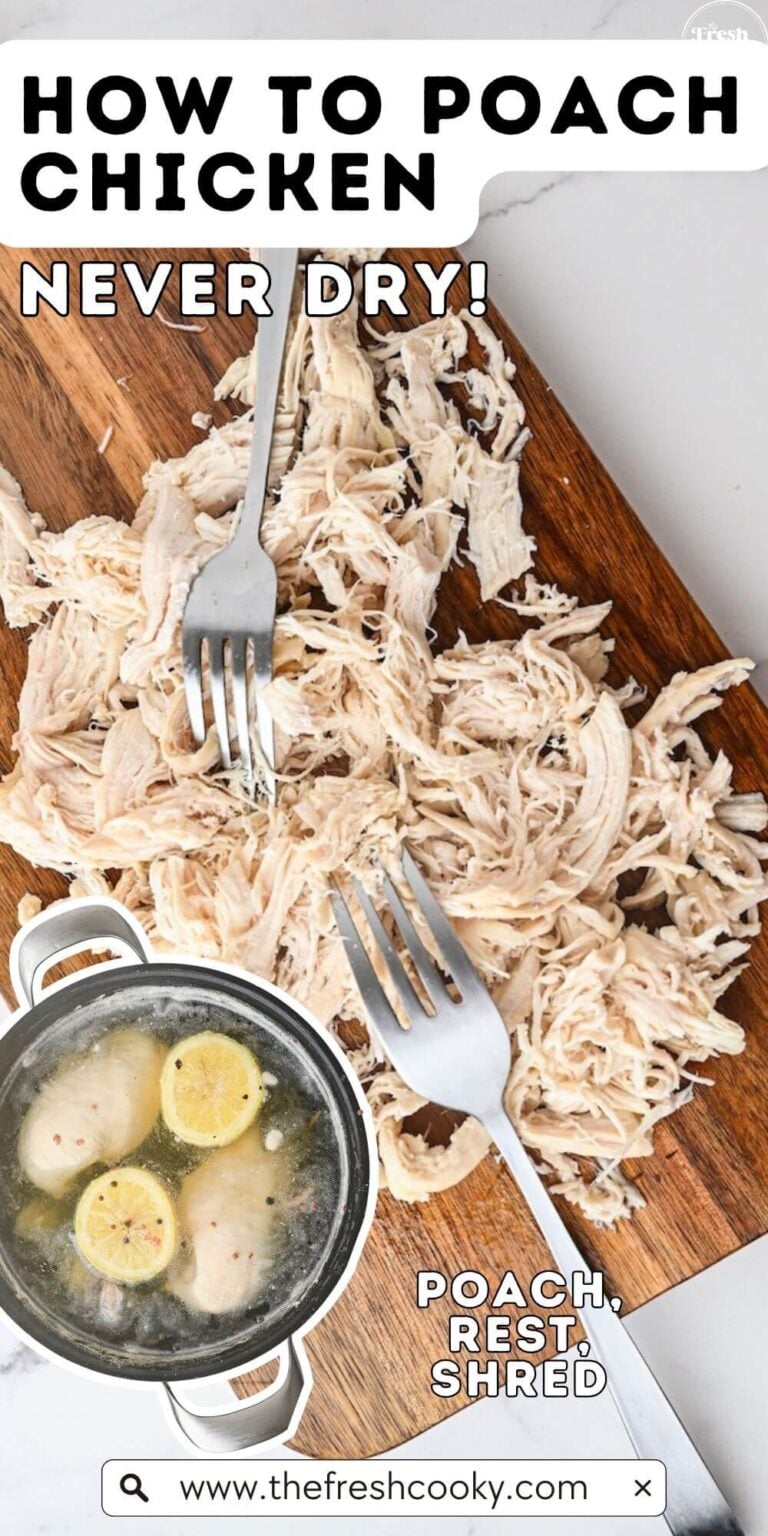
- Poaching is my top pick, hands-down. No special equipment, no oven preheating, no guessing. You place chicken in a pot, cover it with water and a few flavor boosters, bring it to a boil, pull it off the heat, and let it finish cooking gently in that hot liquid. So is poaching the same as boiling chicken? Not quite. Boiling keeps the water at a rolling, aggressive boil the whole time, which is exactly what makes chicken tough. Poaching uses that initial boil to build heat, then lets the chicken finish off-heat in the hot water. Same pot, completely different result.
- Roasting a whole chicken (or chicken pieces) is a great option if you’re already making a roast or have leftovers to use up. The flavor is rich and slightly more complex thanks to the oven browning. The tradeoff is it takes longer and you do need the oven. Try my instant pot whole chicken done in about an hour!
- Rotisserie chicken from the store is a shortcut and I use it often! It’s already cooked and flavorful; all you have to do is shred it. Check out my Top Rotisserie Chicken Recipes for tons of ways to put that bird to work.
- Baking chicken breasts works fine in a pinch, but it’s the method most prone to dryness if you overshoot the cooking time even slightly.
- Slow cooker and Instant Pot methods both yield wonderfully tender chicken and are great for meal prep. They take a bit more time (or equipment), but if you’re cooking a large batch, they’re worth it. Try my crockpot shredded chicken.
My verdict? Poaching wins. It’s the easiest, most forgiving method with zero equipment requirements. Just a pot, water, and a few pantry staples. For perfectly shreddable chicken salad chicken, nothing beats it!
Cooking Comparison Chart
| Method | Texture | Flavor | Time | Best For |
|---|---|---|---|---|
| Poaching (my way) | Tender, juicy, shreddable | Clean, mild, takes on aromatics | 20-25 min | All chicken salad styles |
| Boiling | Can dry out if overcooked | Mild | 15-20 min | Heavily dressed salads |
| Roasting | Firm, slightly chewy | Rich, complex, savory | 40-50 min | Chunky, hearty salads |
| Rotisserie | Tender, varies by brand | Bold, smoky, seasoned | 0 min (store-bought) | Quick meals, any style |
| Baking | Driest if overcooked | Mild | 25-30 min | Only if that’s all you have |
| Slow Cooker | Very tender, easy to shred | Mild, deeper with long cook | 3-4 hours | Big batch meal prep |
| Instant Pot | Tender, consistent | Mild | 15-20 min total | Meal prep, large quantities |

Is Poaching the Same as Boiling Chicken?
Not even close, and the difference matters more than you’d think.
Boiling is 212°F, the full rolling bubble, the kind that spatters the stovetop. It’s perfect for pasta, eggs, blanching green beans. Chicken? Not so much.
Simmering runs between 180 and 205°F. You’ll see small bubbles working their way up but nothing dramatic. Soups and sauces live here.
Poaching is the sweet spot. The water stays between 160 and 180°F. You’re barely seeing any movement at all. At that temperature, the chicken cooks slowly, keeping moisture locked in instead of squeezing it out. The result: chicken that actually tastes like chicken.
| Method | Temp | What It Looks Like | Best For |
|---|---|---|---|
| Poaching | 160-180°F | Still, barely a shimmer | Chicken, fish, eggs |
| Simmering | 180-205°F | Small bubbles rising slowly | Soups, sauces, stews |
| Boiling | 212°F | Hard rolling bubbles | Pasta, potatoes, vegetables |
My method uses a boil-then-off approach: bring the water to a boil, pull it off the heat, and let the chicken finish in that cooling, covered liquid. The temperature drops right into that poaching sweet spot as it sits. You get all the benefits without babysitting a thermometer.
Already a chicken salad pro looking for your next recipe? Check out my roundup of the best chicken salad recipes for everything from classic to creative.
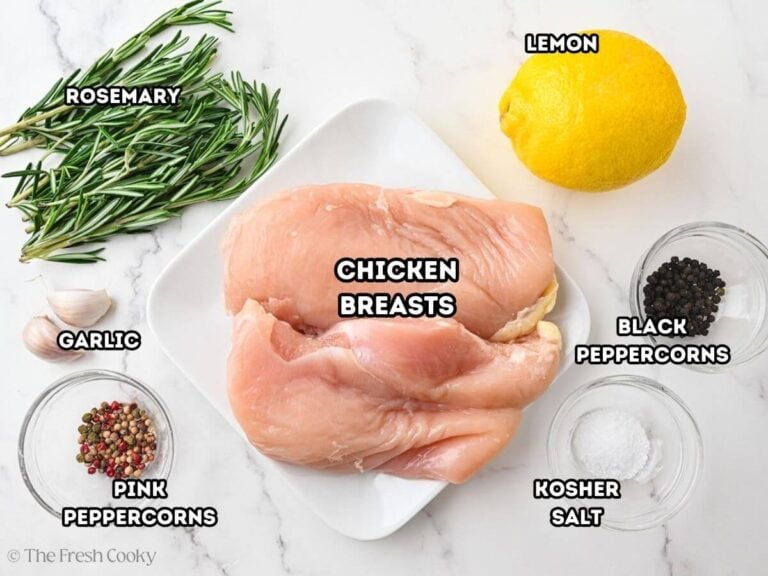
Simple Ingredients
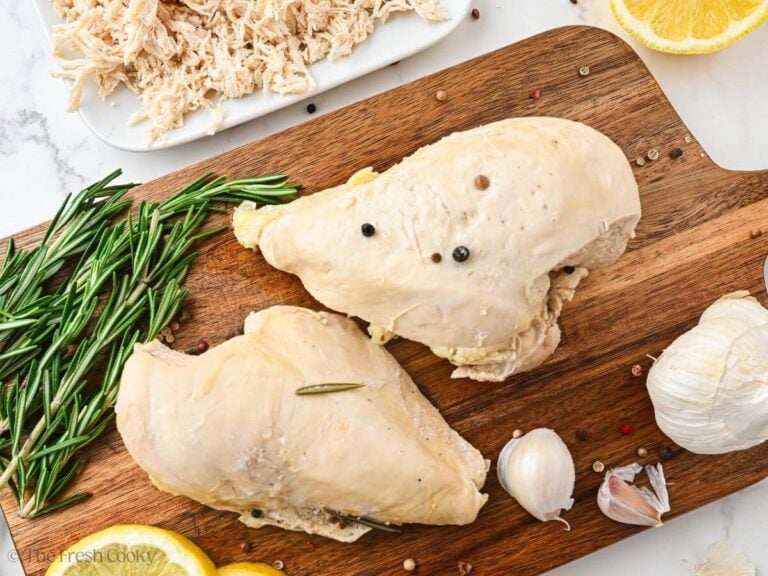
My typical favorites are salt, pepper, lemon, garlic, rosemary and thyme, I typically have those even fresh in the winter, but always in the summer! Sometimes I’ll pop in a bay leaf if I remember too!
- Boneless skinless chicken breasts: About 1 pound, fully thawed. Yields 2 to 3 cups shredded. Organic if you can, but any will work. Boneless skinless chicken thighs work great too, same weight, same method.
- Kosher salt: Non-negotiable, this is what seasons the chicken from the inside out. Table salt works, just use a little less.
- Black and/or pink peppercorns: Whole peppercorns release flavor slowly without turning the water bitter, compared to ground black pepper. Pink are milder.
Optional add-ins — pick 2 to 3 that match the chicken salad you’re making:
- Lemon, halved: Squeeze it in, then drop the halves right into the pot. The rind adds as much as the juice.
- Garlic cloves, smashed: Flat of your knife, skin off. Background warmth, not garlic-forward. Dried: ¼ teaspoon garlic powder per clove.
- Celery: Got some celery toppings you have from another recipe, throw them in!
- Fresh rosemary: 2 sprigs. Woody and fragrant without overpowering. Dried:1 teaspoon per pound.
- Fresh thyme: 2 sprigs. Pairs beautifully with rosemary and lemon. Dried: 1 teaspoon per pound.
- Bay leaves: 2 leaves. Pull them out before shredding. You won’t taste them directly, but you’d notice if they weren’t there.
- Other fresh herbs: Try tarragon, oregano, dill, parsley, chives, not necessarily combined. Dried: ½-1 teaspoon per pound.
Get the full recipe in the recipe card below.
How to Poach Chicken for Chicken Salad
Step 1 | Prep your chicken
Pull your chicken out of the fridge about 20 to 30 minutes before you start. Cold chicken straight from the fridge extends the cooking time unevenly, meaning the outside overcooks before the thick center catches up.
While it’s sitting out, give each breast a gentle pound with a meat mallet or the bottom of a heavy pan. You don’t need to go flat, just even it out so the thickest part isn’t dramatically thicker than the rest. Even thickness means even cooking, and even cooking means no dry edges with an undercooked center.
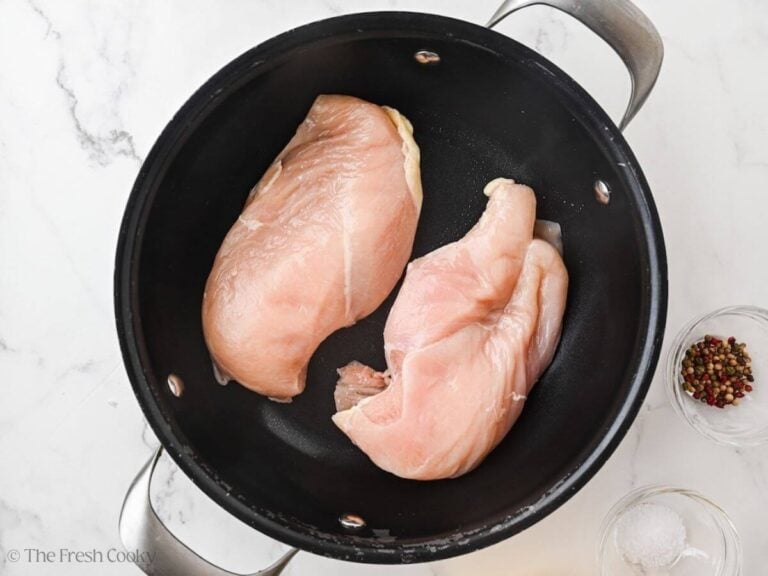
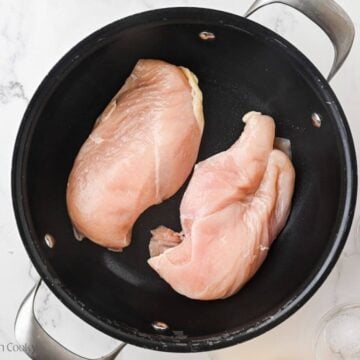
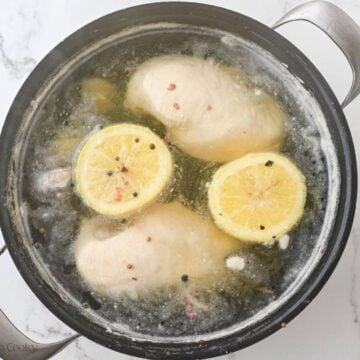
Then place your thawed, room-temperature chicken breasts in a single layer in a large pot. Do not overlap.
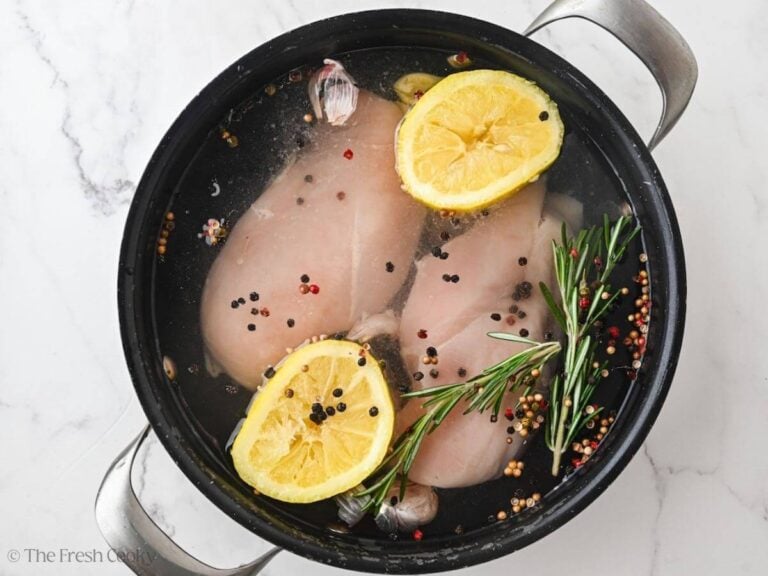
Place raw (thawed) chicken breasts in a single layer in a large pot – do not overlap. Cover with enough water, by about 2 inches.
Step 2 | Add Aromatics
What to Add to the Poaching Water
Salt is non-negotiable. Beyond that, you have a lot of room to play, and here’s where you can customize for whatever chicken salad you’re making.
The basics (always good):
- Kosher salt, at least 1 teaspoon per quart of water
- Whole black peppercorns
- 1 to 2 bay leaves
- 2 to 3 smashed garlic cloves
Add these for extra depth:
- Half a lemon, sliced
- A few sprigs of fresh thyme or rosemary
- A small chunk of onion or a few shallot halves
- A stalk or two of celery
Customize by chicken salad style:
- Making Cranberry Chicken Salad? Add a cinnamon stick and a few whole cloves. Subtle but it makes the chicken taste like it belongs in that salad.
- Going for Green Goddess Chicken Salad? Fresh tarragon or dill in the water will carry right through into the chicken.
- Want something Asian-inspired? Try fresh ginger slices, a smashed garlic clove, and a splash of soy sauce. The chicken picks up just enough of those flavors to feel intentional.
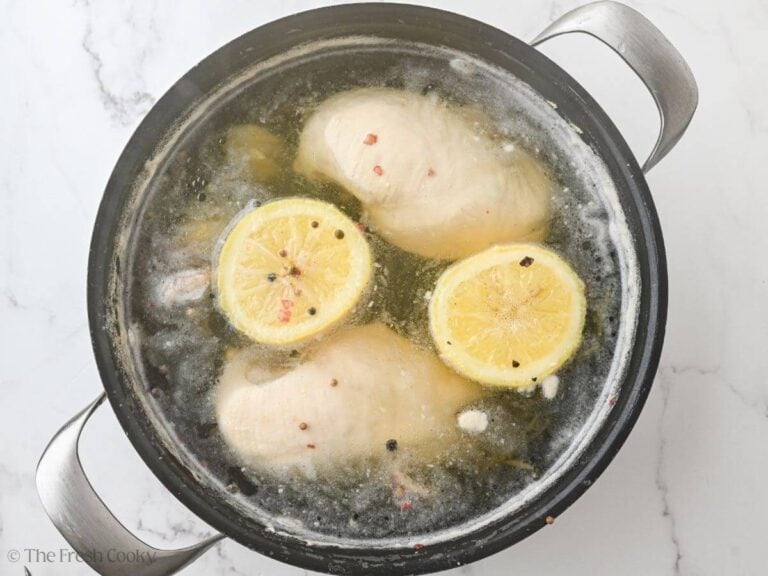
Step 3 | Bring to a Boil
Bring to a gentle rolling boil (simmer) over medium-high heat. Once boiling, cover with lid and remove from stove.
Let the chicken sit in the hot water, covered:
- At sea level (typical): 10–15 minutes.
- Check at 10 minutes for smaller breasts; check at 15 minutes for larger ones.
- See chart below for size of chicken breasts, high altitude and more.
Step 4 | Check Doneness & Shred
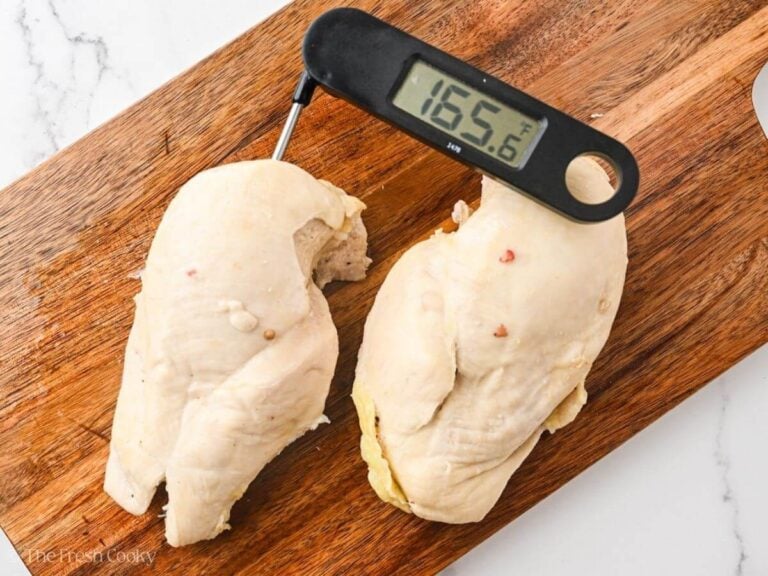
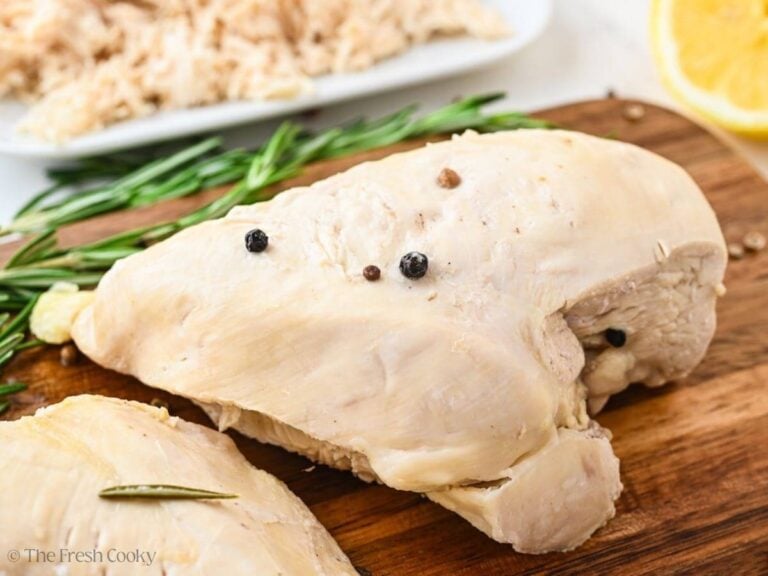
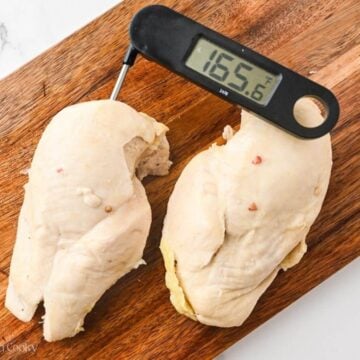
To check doneness, remove a breast (return the cover to the pot so heat doesn’t escape) and verify the internal temperature with an instant-read thermometer — it must read 165°F (74°C). If not yet at 165°F (or realy close), return the covered pot to the hot water and check every 2–3 minutes. As long as it’s within a few degrees, it will keep cooking out of the water.
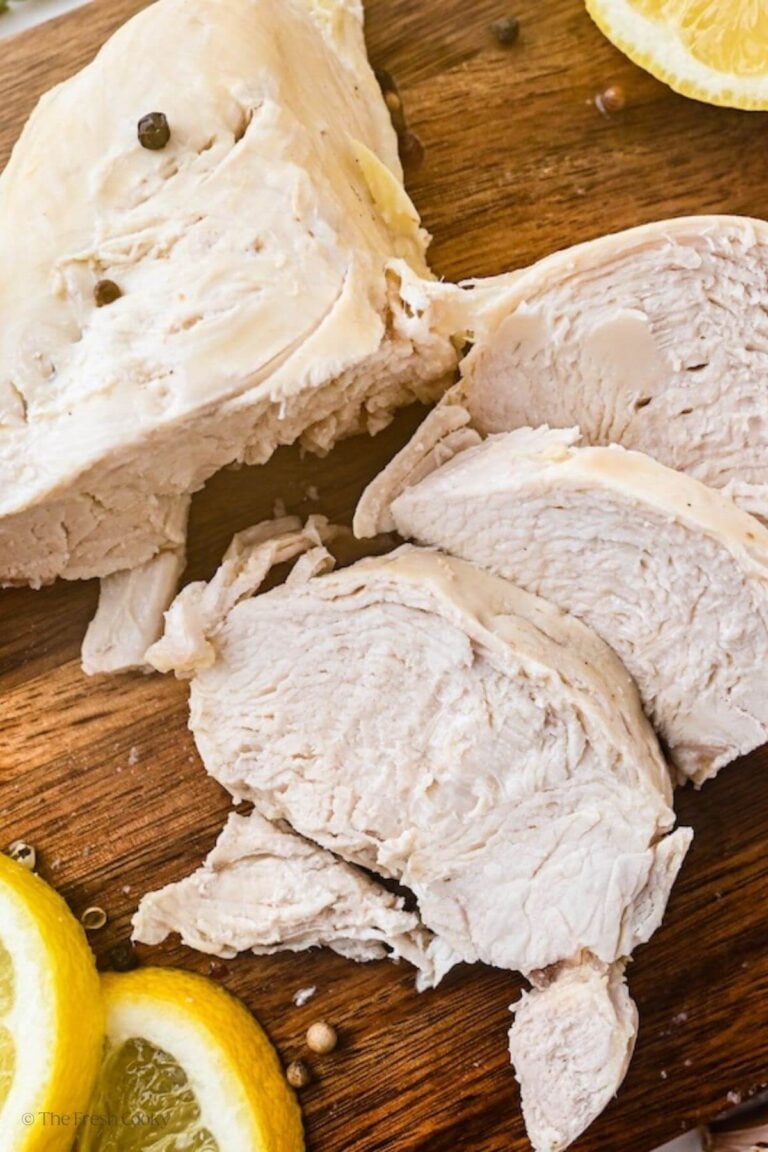
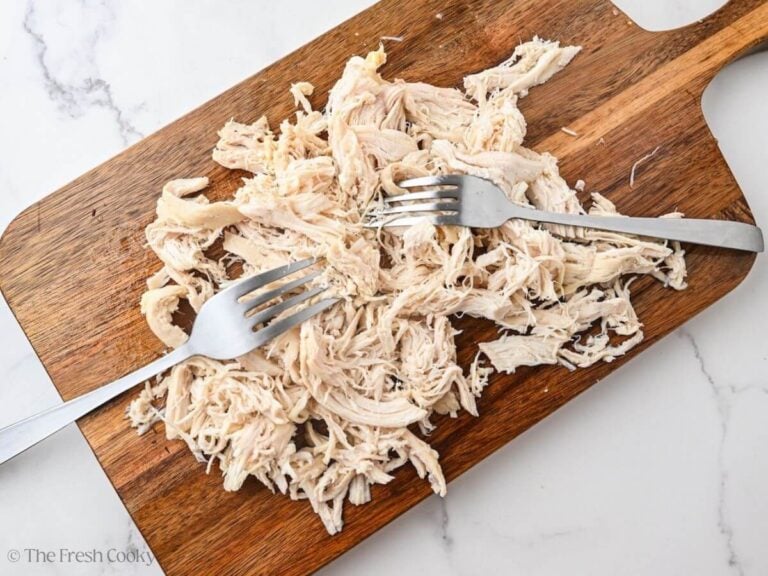
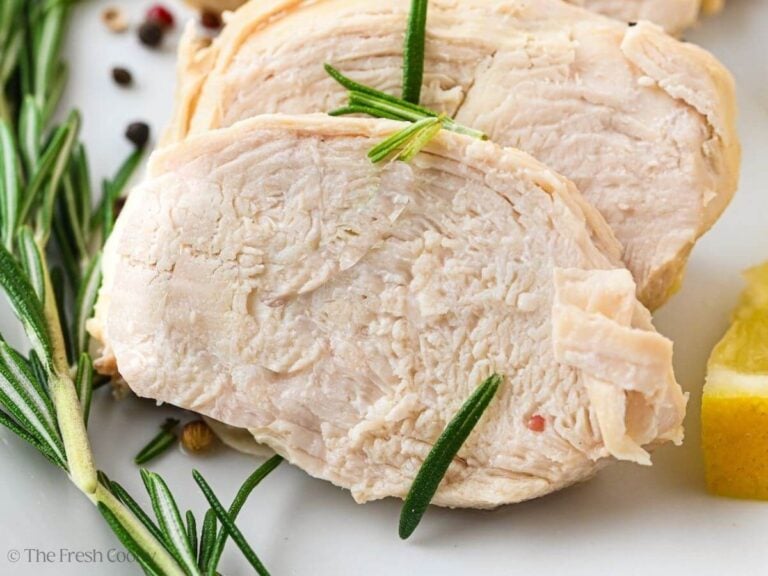
Remove chicken to the cutting board and let rest 5 minutes before shredding.
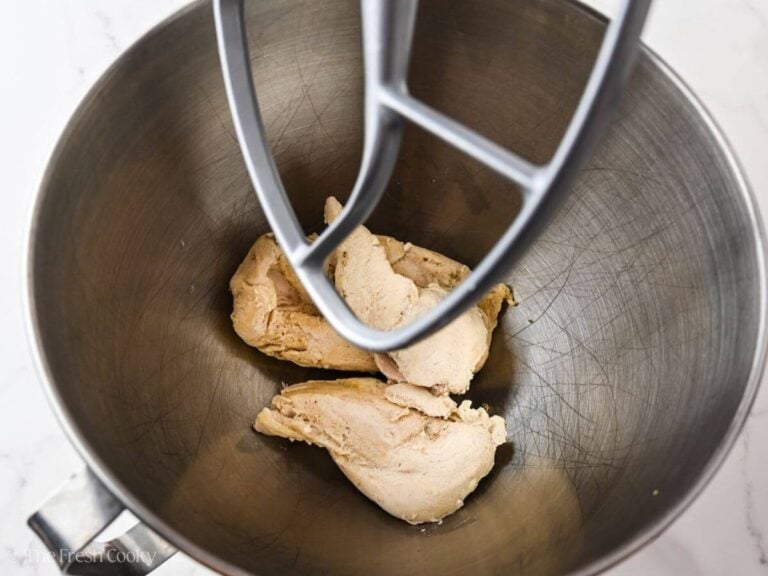
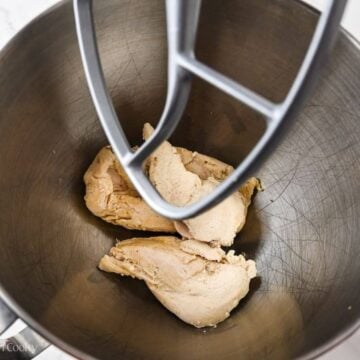
Shred with two forks, pulse briefly in a food processor (go easy, it turns to mush fast), or use a stand mixer with the paddle attachment on low. That last one is my favorite trick.
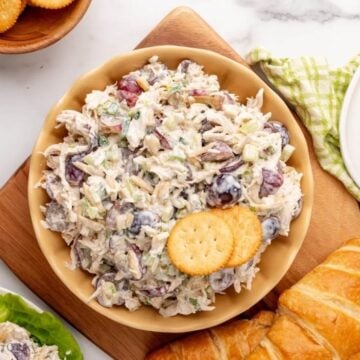
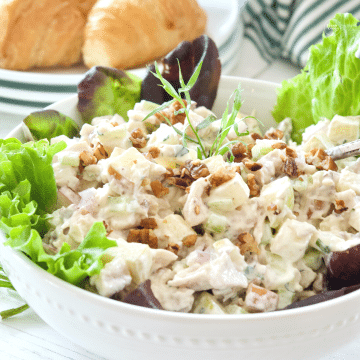
Use the shredded chicken in your favorite chicken salad recipes! Some of my favorites are:
- Green Goddess Chicken Salad
- Chicken Salad Chick Chicken Salad
- Cranberry Chicken Salad
- Sassy Scotty Chicken Salad Chick
How Long to Poach Chicken Breast
| Breast Size | Sea Level Time | High Altitude (~5,280 ft) |
|---|---|---|
| Smaller breasts (under ¾ lb) | Check at 10 min | 14-16 min |
| Average breasts (¾ to 1 lb) | Check at 12-13 min | 14-18 min |
| Larger breasts (over 1 lb) | Check at 15 min | 18-20 min |
Cooking at altitude? Water boils at a lower temperature the higher you climb, so that hot water bath isn’t quite as hot as it would be at sea level. Your chicken needs more time. At 5,280 feet (hi, Denver!), I plan for 16 to 20 minutes for average-sized breasts.
Chicken thighs: Use boneless, skinless thighs at the same weight. They often finish a bit faster, so check around 10 to 12 minutes, though larger thighs may take up to 18 minutes. An instant-read thermometer is your best friend here.
Frozen chicken breasts: Thaw completely before poaching whenever possible, it gives you much more even cooking and better texture. If you must cook from frozen, increase the off-heat sitting time by about 50% and verify 162-165°F before removing.
Boiling Chicken for Chicken Salad
Since ‘boiling chicken’ is how a lot of people search, let’s talk about what boiling actually does and when it might make sense.
Boiling means keeping the water at a hard, rolling boil the entire time the chicken is in the pot. Faster, yes. And it works, sort of. The chicken cooks through, it shreds, you can make chicken salad with it.
But here’s what you give up. That aggressive heat contracts the muscle fibers quickly and forces moisture out. If you’ve ever ended up with chicken that shreds into dry, almost chalky strands, boiling is usually why.
When is boiling actually okay?
If you’re making a heavily dressed chicken salad with lots of mayo, celery, herbs, and mix-ins, the dressing can carry drier chicken. It’s not ideal, but it won’t be a disaster. Grandma’s classic chicken salad with sweet pickle relish? Boiled chicken is probably fine there.
But if your chicken salad is lighter, like my Green Goddess or Cranberry Chicken Salad where the dressing is thinner and the chicken has to stand on its own, boiling will let you down.
If you must boil:
- Use heavily salted water
- Don’t boil longer than 15 minutes for average-sized breasts
- Pull at 160°F and let carryover heat finish the job getting it to 165°F
- Rest at least 5 minutes before shredding
My honest recommendation? Start the water at a boil, then pull it off the heat and cover it. You get the speed of boiling with the result of poaching. Best of both.
Don’t Throw Out That Poaching Liquid
This is the part nobody talks about and it drives me a little crazy. You just made a light, flavorful chicken stock and most people pour it right down the drain.
After you pull the chicken, taste the liquid. If you seasoned it well and added aromatics, it’s going to taste genuinely good.
Use it immediately:
- Cook rice or farro in it instead of plain water. The difference is noticeable.
- Use it as the base for a quick soup. Add noodles, a handful of spinach, a squeeze of lemon juice. Done.
- Deglaze a pan with it to make a quick pan sauce.
Save it for later: Let it cool, strain it, and refrigerate for up to 4 days or freeze for up to 3 months. Label it. It’s light and clean, not as rich as a long-simmered stock, but it’s perfect for cooking grains, thinning soups, or anywhere you’d reach for a mild chicken broth.
Make it richer: Leave it on low heat for another 20 to 30 minutes after you’ve removed the chicken. It’ll reduce and deepen. Add a Parmesan rind if you have one.
Real food doesn’t waste anything. This is free flavor.
How Much Chicken Do You Need?
I usually figure about 3 cups of shredded meat per pound of raw chicken breast, though it varies a little depending on size and how much you trim. Here’s a quick reference:
| Raw Chicken | Shredded Yield | Good For |
|---|---|---|
| 1 lb | ~3 cups | 2-3 servings of chicken salad |
| 1.5 lb | ~4.5 cups | 4-5 servings |
| 2 lb | ~6 cups | 6-8 servings, or meal prep |
Roasting Chicken for Chicken Salad
Roasted chicken brings a different depth to chicken salad. Richer, more savory, with that golden-brown flavor you only get from the oven. It’s a wonderful option if you’ve made a whole roast chicken and have leftovers, or if you’re batch-cooking for the week.
To roast chicken specifically for chicken salad, season bone-in, skin-on chicken breasts (or a whole bird) with olive oil, salt, pepper, and your favorite herbs. Roast at 425°F until the thickest part hits 165°F, typically 35 to 45 minutes for bone-in breasts. Let it rest, then remove the skin and shred or dice the meat.
One of my favorite shortcuts? Grab a rotisserie chicken! It’s essentially pre-roasted for you, and the flavor is hard to beat.
How Do You Store Poached Chicken?
- Refrigerate: Cool shredded chicken to room temperature (no more than 2 hours), then place in an airtight container and refrigerate for up to 3–4 days.
- Freeze: Portion into airtight freezer bags or containers (label with date). Freeze up to 3 months. Thaw overnight in the fridge before using.
FAQs
It really comes down to personal preference! Finely shredded chicken gives you that classic, creamy texture where everything melds together, while diced chicken holds its shape for a chunkier, heartier bite.
Yes, adding warm chicken to your mayo-based dressing can cause it to break down and turn greasy, so always let it cool to room temperature first. For the best flavor and texture, refrigerate the shredded chicken for 30 minutes before assembling.
Chicken salad, obviously, but also great for sandwiches, burritos, tacos, enchiladas, wraps, simple salads, and so much more!
More Easy Recipes to Try
Related Recipes You Might Like


Like this recipe?
Don’t forget to give it a ⭐️⭐️⭐️⭐️⭐️ star rating and leave a comment below the recipe!

How to Make Chicken for Chicken Salad
Equipment
Ingredients
- 2 chicken breasts boneless skinless thawed (about 1 pound) see notes for thighs
- 1 teaspoon kosher salt
- 2 teaspoons black or pink peppercorns or mix of both
Optional flavor add-ins
- 2 – 3 sprigs Fresh Herbs see notes for options
- ½ – 1 teaspoon Dried Herbs 1 teaspoon added to the pot, per pound, see notes for options
- 2 garlic cloves smashed, about 2 per pound
- 1 lemon halved (squeezed and tossed into water)
Instructions
- For even cooking, remove chicken breasts from fridge, 20-30 minutes before cooking and then pound between plastic wrap or parchment paper. You don't have to be super aggressive, but about the same thickness will help them cook evenly.2 chicken breasts

- Place raw (thawed) chicken breasts in a single layer in a large pot, do not overlap. Cover with filtered water by about 2 inches.
- Add salt, peppercorns, and any optional add-ins (see notes)1 teaspoon kosher salt, 2 teaspoons black , 2 – 3 sprigs Fresh Herbs, ½ – 1 teaspoon Dried Herbs, 2 garlic cloves, 1 lemon
- Bring to a gentle rolling boil over medium-high heat. Once boiling, cover the pot and remove from heat.
- Let the chicken sit in the hot water, covered:At sea level: 10–13 minutes (tested at sea level)High Altitude: 14–20 minutes (tested at 5280) Mine were done about 16 minutes.Check at 10 minutes for smaller breasts; check at 15 minutes for larger ones.
- To check doneness: remove a breast (return cover to pot, so heat doesn’t escape) and verify internal temperature with an instant-read thermometer, it should read 165°F (74°C) or just a few degrees below, it will continue cooking while it rests. If not yet 165°F, return covered to the hot water and check every 2–3 minutes.
- Remove chicken to cutting board and let rest 5 minutes before shredding, double check internal temperature.
- Once cooled, you may slice, chop or shred the chicken depending on your use. To Shred: Use two forks or pulse briefly in a food processor (careful — it can become mush), or place in a stand mixer with paddle on low until shredded, my favorite way. The chicken should not be overly warm when doing this, allow to cool for 10-15 minutes before shredding.

Notes
Nutrition


Rate & Comment