


If you’ve ever been to Texas Roadhouse, you know the rolls are the real reason everyone goes. Those soft, buttery, slightly sweet yeast rolls practically melt in your mouth, especially when slathered with that dreamy cinnamon honey butter. After testing multiple versions, I finally nailed the texture and flavor so you can make these irresistible Texas Roadhouse Rolls right in your own kitchen!

Why you’ll love this recipe for Texas Roadhouse Rolls
These rolls are everything you crave from the Texas Roadhouse version! They’re pillowy soft, lightly sweet, fluffy rolls, and best hot from the oven. I adapted my popular cinnamon roll dough for this recipe, swapping sugar for honey and adding just the right amount of milk and yeast to achieve that signature tender crumb.
I tested and tweaked this recipe four times (yes, four!) to make it simpler for your dinner menu. Just toss everything into your mixer, let the dough work its magic, and before you know it, you’ll have a tray of seriously great rolls coming out of the oven, ready to impress your family and guests!
All of my recipes are tested at high altitude (by me) and at other altitudes by a team of recipe testers across the country, so you can count on consistent results no matter where you bake.
Copycat Texas Roadhouse Rolls Ingredients
- All-Purpose Flour: I used organic, unbleached all-purpose flour. It gives these rolls their perfect soft, fluffy texture!
- Honey: Adds a touch of sweetness and helps create that golden crust. I tested using sugar and preferred using honey instead.
- Instant Yeast: Quick and reliable with no need to activate.
- Whole Milk: Use warm milk to activate the yeast! Just make sure it isn’t too hot, or it will kill the yeast instead. You can use a lower % of milk, but the crumb won’t be as tender; the same goes for plant-based milks.
- Salted Butter: For a perfectly soft crumb, if using unsalted butter, simply increase the salt by ⅛- ¼ teaspoon.
- Kosher Salt: For extra flavor.
- Egg: I use room temperature large eggs in my baking, they add structure, flavor and tenderness to these rolls.
- Homemade Cinnamon Butter: My homemade Texas Roadhouse Honey Butter is sweet, whipped, and perfectly spiced. You will need softened butter, honey and cinnamon! Adding a bit of sweetness to your homemade rolls.
Get the full recipe in the recipe card below.

How to Make Texas Roadhouse Rolls (Copycat Recipe)
Step 1 – Warm the Milk & Combine Dry Ingredients
Warm the milk in a small saucepan to 100–110°F. It should feel warm, not hot, to the touch. In the bowl of a stand mixer fitted with a paddle attachment, mix together 2 cups of flour, instant yeast, and salt.
Step 2 – Make the Dough
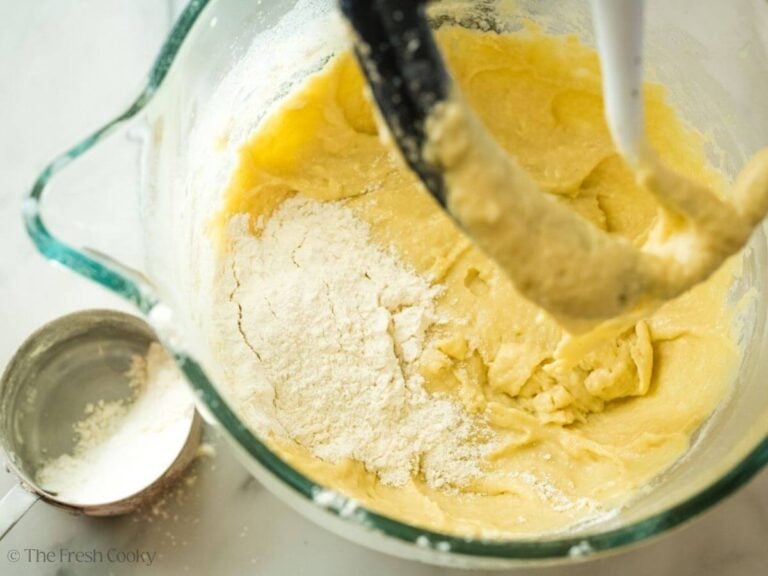
Add ⅓ cup of honey, egg, and melted butter to the dry mixture, stirring until a thick paste forms. Then pour in the warm milk and the rest of the flour (1½–2 cups), mixing until the dough is soft and tacky but not sticky. Add more flour 1 tablespoon at a time, if needed.


Step 3 – Knead & Let Rise
Switch to the dough hook attachment and knead on low speed for about 8 minutes, until smooth and elastic. The dough should come away from the sides of the bowl. (By hand: knead 5–8 minutes on a lightly floured surface.)
Transfer dough to a greased bowl, cover, and let rise in a warm spot for 1–2 hours, until soft and puffy.


Step 4 – Shape & Rise Again
Punch down the dough and roll it out to ½–¾ inch thick. Cut into 2-inch squares and arrange on a parchment-lined baking sheet about 1 inch apart. Cover loosely with plastic wrap and let rise for a second time for 1–2 hours, or until doubled and touching. You may also cover with a clean dish towel, just make sure your rolls are dusted well with flour, I had a batch that stuck to the towel and deflated them as I took it off.


Step 5 – Bake
Preheat the oven to 375°F (or 350°F convection). Bake the rolls for 12–16 minutes, rotating halfway through, until golden brown. Brush with melted butter as soon as they come out of the oven. Serve warm rolls with butter and enjoy!


How to Store Leftover Texas Roadhouse Yeast Rolls
Store cooled rolls in an airtight container or freezer bag at room temperature for up to 2 days. For longer storage, refrigerate for up to 5 days or freeze for up to 2 months. To freeze, wrap the rolls tightly in plastic wrap, then place in a freezer-safe bag.
When ready to serve, thaw overnight at room temperature, then reheat as directed below.
How to Reheat Texas Roadhouse Rolls
To reheat leftover rolls, wrap them in foil and warm in a 300°F oven for 5–8 minutes, or until soft and heated through. For a quick option, place a roll on a microwave-safe plate, cover it with a damp paper towel, and microwave for 10–15 seconds, just until warm. Not preferred as it tends to make bread tough.
Before serving, brush with melted butter to restore that irresistible, fresh-from-the-oven flavor.

Texas Roadhouse Dinner Rolls FAQs
I tested both bread flour and unbleached all-purpose flour, and I personally prefer the texture of all-purpose flour. They’re soft and tender without being chewy. You can use a mix of whole wheat and white flour, too, but you may need a bit more liquid since whole wheat absorbs more moisture!
Nope! Just spoon and level your flour for accuracy, no sifting necessary!
Dense rolls are usually caused by liquid that’s too hot (which kills or stunts the yeast), too much flour, or not enough rise time. Make sure your milk is warm, not hot, and let your dough rise fully until soft and puffy before baking! The temperature of your kitchen can affect your rise time!

High Altitude Texas Roadhouse Tips
I bake at 5800 feet above sea level, so all my baking recipes have been tested for high altitude. I reduced the yeast to a scant tablespoon (probably around 2 ¾ teaspoons) and added a little extra flour (about ¼ cup) to the dough. If baking above 8,000 feet, you may need additional flour and reduce the yeast by another ⅛-¼ teaspoon, adding a little extra liquid. If extra liquid is needed, use lukewarm water to make up the difference.
What’s the Difference Between Active Dry, Instant, and Rapid Rise Yeast?
- Active dry yeast needs to be dissolved in warm liquid before using. It’s a bit slower to activate, but reliable for most recipes. If using, dissolve yeast mixture in ¼ cup of the warm milk mixture and, if desired, a teaspoon of sugar, let rest 5-10 minutes until foamy.
- Instant yeast (also called quick-rise or bread machine yeast) can be mixed directly into the flour without proofing; it starts working faster and helps the dough rise a little more quickly. This is what I use.
- Rapid-rise yeast is a type of instant yeast that’s formulated to work even faster, often used for single-rise breads. So it’s not recommended for this recipe.
How to Tell if Your Yeast Is Still Good
When in doubt, give your yeast a quick proof test (like you would with active dry yeast). Stir a teaspoon of yeast into a little warm water or milk with a pinch of sugar and let it sit for about 5–10 minutes. If it foams and bubbles, it’s alive and ready to use. If it stays flat, it’s time to toss it and grab a fresh batch.
Fresh Tips & Tricks
- By Hand: Mix ingredients in a large bowl with a wooden spoon, then let rest 5 minutes before adding the remaining flour. Beat in the egg and stir until sticky. Turn onto a floured surface and knead 5–8 minutes, adding flour as needed until the dough is tacky but not sticky; it’ll soften and come together as it rises.
- Rising & Baking: Place rolls close together so they touch after rising for that classic soft, pull-apart texture. Makes 20–28 rolls; use a half sheet pan or two baking sheets.
- Butter: Use grass-fed butter for a tender crumb, and keep yeast fresh by storing it in the fridge (or freezer for long-term storage). Bring your egg and butter to room temperature. If you forget, place the egg in a bowl of warm (not hot) water for 5–7 minutes.
- Rising Spots: Rise dough in a warm oven (turn off the heat source or use a proof setting and place a pan of boiling water inside) or on a heating pad set to low. Every kitchen varies; my first rise took about 2 hours, and the second about 90 minutes on a cool day. The top of a fridge also works for a warm environment, but if you have time, they will eventually rise even in a cool kitchen.

More fabulous bread recipes
Like this recipe?
Don’t forget to give it a ⭐️⭐️⭐️⭐️⭐️ star rating and leave a comment below the recipe!
Equipment
Ingredients
- 3 ½ – 4 cups all-purpose flour unbleached, divided
- ⅓ cup honey or use sugar
- 1 tablespoon Instant Yeast see notes for Active Dry Yeast & high altitude
- 1 ¼ cups whole milk warmed 100-110°F
- 6 tablespoons salted butter melted (if using unsalted butter, add ¼ teaspoon salt)
- 1 teaspoon kosher salt
- 1 large egg room temperature
- 2 tablespoons butter melted
- Cinnamon Honey Butter
Instructions
- Warm the milk in a small saucepan to about 100–110°F — it should feel warm, not hot, to the touch. If it’s too hot, it can kill the yeast. Melt the butter (on the stovetop or in the microwave) and let it cool slightly while you gather the remaining ingredients.1 ¼ cups whole milk, 6 tablespoons salted butter
- In the bowl of a stand mixer fitted with a paddle attachment, add 2 cups of flour (spooned and leveled), yeast, and salt; mix to combine. Because we’re using instant yeast, there’s no need to activate it (see notes if using active dry yeast).

- Add honey and egg, mixing to combine. Pour in the warm, melted butter and mix until a thick paste forms, scraping the bottom if needed.⅓ cup honey, 1 large egg
- Add the remaining 1½–2 cups flour and the warm milk, mixing until combined. Add additional flour 1 tablespoon at a time until the dough is tacky but not overly sticky — it should stick to the bottom of the bowl but not the sides.
- Switch to the dough hook and knead on low speed for about 8 minutes, adding a tablespoon of flour at a time as needed. Cover the bowl and let the dough rise in a warm place for 1–2 hours, until soft and spongy (it won’t quite double).
- Punch the dough down lightly and roll it out on a lightly floured surface to about ½–¾ inch thick. Cut into roughly 2-inch squares using a pizza cutter or knife. Arrange on a parchment-lined baking sheet about 1 inch apart. Cover loosely with sprayed plastic wrap and let rise in a warm spot for 1–2 hours, or until doubled and touching.
- While the rolls rise, whip the butter until light and fluffy, then mix in honey and cinnamon for the cinnamon butter.Cinnamon Honey Butter
- About 30 minutes before the rolls finish proofing, preheat the oven to 375°F (or 350°F convection). Bake for 12–16 minutes, rotating halfway through, until golden brown. Brush with melted butter and serve warm with the cinnamon butter.2 tablespoons butter


Notes
- Active Dry Yeast: If using active dry yeast (1 packet or 2¼ tsp), activate it first: stir yeast into ¼ cup warm milk and let it sit until foamy, about 5–10 minutes. Allow slightly longer rise times for each stage.
- By Hand: In a large mixing bowl, mix ingredients as directed above with a wooden spoon. Let rest 5 minutes before adding the remaining 1½–2 cups flour. Beat the egg before adding, then mix until a sticky dough forms. Turn onto a floured surface and knead 5–8 minutes, adding flour as needed until the dough is tacky but not overly sticky. It will soften as it rises.
- Rising & Baking: Arrange rolls close together so they touch once risen—this creates soft, pull-apart edges. Makes about 20–28 rolls; use a half sheet pan or divide between two baking sheets.
- Ingredients & Tools: Grass-fed European butter adds a tender crumb thanks to its higher butterfat. For yeast, I love this bulk instant yeast—keep a small jar in the fridge and store the rest in the freezer for freshness. Unsure if it’s still active? Test it first; better to lose a bit of milk than a full batch. See post for how to test.
- Temperature Tips: Bring your egg to room temp so nothing chills the dough. Forgot? Submerge the egg in warm water for 5–7 minutes before using.
- High Altitude: Slightly reduce yeast (a scant tablespoon) and add up to ¼ cup extra flour. At 5800 ft, my second rise took about 90 minutes, and the rolls puffed beautifully. At 8000 ft or above increase liquid by a few tablespoons and reduce yeast a littel more, another ⅛-¼ teaspoon.
- Warm Rising Spots: If you have double ovens, rise dough in one while preheating in the other—add a pot of boiling water and close the door. With one oven, rise the first 1½ hours inside, then move to the counter while preheating. A heating pad on low beneath the pan works well in cool kitchens.
- Rise Times: Every kitchen will be different based on humidity and temperature. My first rise took about 2 hours and the second rise about 90 minutes, be patient, they are so worth the wait. And as long as your yeast is good, they will rise, just might take longer in a cooler kitchen.
Nutrition


Susan E.
Can the dough be made in a bread machine on the dough setting?
Hi Susan, sure it could, I haven’t tried it, then pick up shaping, rising and go from there! Let me know how it goes, these really are super easy though too!
Susan P
These turned out perfect! Delicious. I used the dough setting on my bread machine I used 4 cups of flour. As it was kneading I could tell it needed more flour so I added about 1/2 cup.
So happy it worked out! Good thing you could tell it needed more flour.