


“My husband ate all the leftovers before I could serve them the next night.” That’s a real reader review, and honestly, the most accurate description of this apple crisp I have. I’ve had this recipe for over 30 years, passed to me from a dear friend whose mom made it forever ago, truly old-fashioned and truly tested. I lightened up the topping by cutting the butter, brown sugar, oats and flour in half, and nobody has noticed yet. (Want the original, more generous topping? Double it and use a 9×13. No judgment here!)
⭐️⭐️⭐️⭐️⭐️ Janie raved, “I made this for my MomCo group. Eight women and they raved about it. Then my husband ate all the leftovers before I could serve some for dessert the next day! I made it exactly as the recipe says in an 8×11 pan though. Yummy and perfect for fall!”
This post was originally published in 2020 alongside an online cooking class where I taught this recipe live. It has been updated in 2026 with fresh photos, new tips including my freezer crunch trick, an expanded FAQ, and additional variations for gluten-free, dairy-free and sugar-free bakers. Same beloved recipe, better everything else.
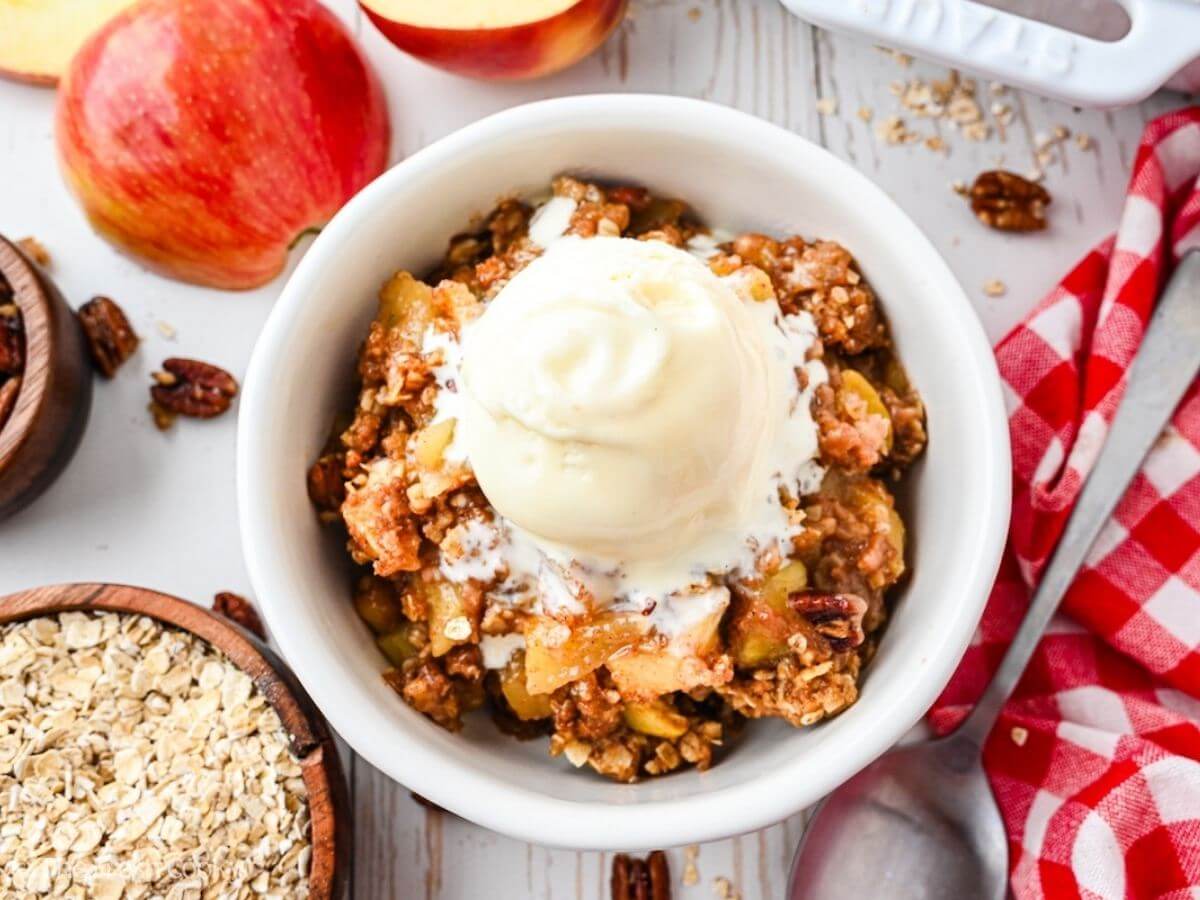
The Apple Crisp Our Girls Brunch Requested Every Single Month
Back in the early 90s, a group of us girls got together every month for brunch and Bible study. No husbands, no kids yet, just good friends, good food and a lot of laughs. My dear friend Pentor brought this apple crisp to that brunch time after time, always at our request. Her mom had been making it for decades before it ever landed on our table, and honestly it showed. There was nothing flashy about it, just perfectly spiced apples under a crunchy oat topping that somehow tasted like it had been made with thirty years of love behind it. Because it had.

I have been making it ever since, and a few years back I taught it in an online cooking class, walking a group of ladies through every step including real-time gluten-free and dairy-free modifications. Reader KC said it perfectly: “I love that it uses more oatmeal than flour, especially since I have to use gluten-free flour.” That is exactly why this recipe works for every table, every season, not just fall. If you love baking with apples, my Apple Crumb Cake and German Apple Cake are both reader favorites worth bookmarking too.
Why You’ll Love This Apple Crisp
- A genuinely old-fashioned recipe with decades of proof behind it, this one has been requested, tested and loved long before it ever landed on a blog.
- The oat-forward topping delivers real crunch, subtle nuttiness and a natural gluten-free swap that actually works.
- Lightened up from the original, with a no-judgment option to double the topping for a 9×13 crowd.
- Tested gluten-free and dairy-free
- Any apple, any pan, any season, and if you want a faster weeknight version, my Air Fryer Apple Crisp has you covered in half the time


Ingredients You’ll Need for this Old Fashioned Apple Crisp
For the Topping
- Rolled Oats | Old-fashioned rolled oats only, not instant. If you are baking for someone with Celiac, make sure your oats are certified gluten-free, they are processed on shared equipment more often than you’d think.
- All-Purpose Flour | A good 1-to-1 gluten-free flour swaps in seamlessly here, no other adjustments needed.
- Real Butter | Softened to room temperature. See my tips section for why soft butter actually works better here than cold. I used salted, but unsalted butter works too, just add an additional ¼ teaspoon salt.
- Brown Sugar | Light or dark, your call. I use organic light brown sugar, but dark will give you a slightly deeper, more molasses-forward flavor.
- Baking Powder | Just a touch, but don’t skip it. It raises the pH of the topping and helps it brown beautifully.
- Cinnamon & Nutmeg | Generous, always, these spices are a must!
- Kosher Salt | Brings out the nuttiness of the oats in a way that table salt just doesn’t.
- Vanilla Extract | Not in the original recipe, but once you add vanilla to a fruit crisp topping you simply cannot go back. Consider this your permission slip.
- Pecans | Roasted and chopped, totally optional but highly encouraged for extra crunch and richness.
- Flaky Sea Salt | Optional finishing touch sprinkled over the hot crisp right out of the oven. That sweet-salty contrast is something special.
For the Apple Filling - Apples | Coarsely chopped rather than sliced, which gives you hearty, rustic bites that hold their shape without turning to mush. About 5-6 small apples or 3-4 larger ones. See the FAQ below for the best varieties to use.
- Cane Sugar | I use organic, all-natural cane sugar, but regular granulated sugar works perfectly.
- Flour | Just enough to help thicken the juices as the apples bake. Swap with a 1-to-1 GF flour if needed.
- Cinnamon and Nutmeg | Fresh grated nutmeg if you have it, the difference is noticeable.
- Vanilla Extract | Yes, here too. A small splash in the apple filling ties everything together and makes the whole dish smell even more incredible while it bakes.
Get the full recipe in the recipe card below.

Recommended Equipment: Two tools I genuinely reach for every time I make this: my Staub 8×11″ ceramic baking dish, which bakes evenly, goes straight to the table, and cleans up spotless, and my Microplane for freshly grating cinnamon and nutmeg right over the finished crisp. Both are tools I use constantly and recommend without hesitation.
How to Make Old Fashioned Apple Crisp
Step 1: Make the Topping
- Preheat oven to 350°F (175° C) and move rack to bottom third of oven for more even baking.
- In a medium bowl combine oats, flour, brown sugar, salt, cinnamon, baking powder and vanilla extract. Mix until well combined.
- Add softened butter and use your hands to smoosh it into the dry mixture until you have some larger marble-sized pieces and everything is evenly mixed. See my tip below for the secret to the crunchiest topping every single time.
- Place the topping in the freezer while you prepare the apples, at least 10-15 minutes.


Step 2: Prepare the Apples
- If you haven’t already, preheat your oven to 350°F (175° C). Butter or spray an 8×11-inch pan for a thicker crisp, or a 9×13-inch pan for a thinner one.
- Coarsely chop your apples into rustic, hearty pieces. No need to be precise here, uneven pieces actually give you a better mix of tender and slightly firm bites.
- In a large bowl stir the chopped apples with sugar, flour, cinnamon, nutmeg and vanilla extract until every piece is well coated.
- Pour the apple mixture evenly into your prepared pan.


Step 3: Assemble and Bake
- Pull your chilled topping from the freezer and break it up into uneven chunks over the apples, covering them as evenly as you can. Don’t pack it down, those irregular chunks are what give you the best crunch.
- If using pecans, scatter them over the topping now.
- Bake at 350 degrees F for 45-60 minutes, until the apples are tender and the topping is golden brown. Bake toward the longer end for very soft, almost jammy apples, or pull it a little earlier if you prefer some bite.
- Remove from the oven and if desired, sprinkle with fleur de sel and a little fresh grated nutmeg right over the top while it is still hot.
- Serve warm with a scoop of vanilla ice cream. Fresh grated cinnamon or nutmeg over the top is never a bad idea.


The Fresh Cooky Secret to a Crunchy Topping Every Single Time: Most apple crisp recipes call for cold butter cut into the topping. I do it differently, and it makes all the difference. I use softened butter, smooshing it directly into the dry ingredients with my hands until I have a mix of small and marble-sized clumps. Then I pop the whole thing in the freezer for 10-15 minutes while I prep the apples. The butter firms back up inside those clumps, so when it hits the oven it melts slowly and evenly, giving you a genuinely crunchy, crumbly topping rather than a greasy or dense one. I usually mix mine right in a zip-lock bag for easy cleanup and toss the whole bag in the freezer. Works every time.
Tips for the Best Apple Crisp
- Oven rack placement matters. Bake your crisp on the lower middle rack. It helps the topping brown evenly while giving the apples enough heat to cook through without the topping getting too dark too fast.
- If your topping starts browning before your apples are done, loosely tent a piece of foil over the top and keep baking. No need to press it down, just lay it gently over the dish.
- Chop, don’t slice. Coarsely chopped apples give you hearty, rustic bites that hold their shape better than thin slices in a crisp. If you prefer slices, go ahead, just know they will soften more quickly.
- Don’t skip the vanilla. Adding vanilla extract to both the topping and the apple filling is not in the original recipe, but once you try it you will not go back. It ties the whole dish together and makes your kitchen smell absolutely incredible.
- Fresh grated nutmeg over real ground nutmeg. If you have a microplane, use it here. Freshly grated nutmeg has a warmth and brightness that the pre-ground stuff just cannot match.
- Want the original, more generous topping? Double the topping ingredients and use a 9×13 pan. I won’t judge, not even a little.A note on butter. If your butter feels soft the moment it comes out of the fridge, check your label. Real butter should be firm cold and soften at room temperature. This matters for the texture of your topping.

Variations for Apple Crisp Recipe with Oats
Dietary Variations
- Gluten-Free Apple Crisp: Swap the all-purpose flour with a good 1-to-1 gluten free flour in both the apple filling and the topping. Make sure your oats are certified gluten-free as well, especially if you are baking for someone with Celiac. A few extra dimes for certified GF oats is absolutely worth it.
- Sugar-Free Apple Crisp: Swap both the granulated sugar and brown sugar with a quality monk fruit blend, cup for cup. I recommend a blend specifically labeled as a 1-to-1 cup for cup replacement for the most reliable results. To reduce the carbs further, cut the oats in half and add an equal amount of chopped pecans or walnuts in their place. You still get that satisfying crunch, just with fewer carbs per serving. This version is naturally a good fit for anyone watching their sugar intake without wanting to miss out on dessert.
- Dairy-Free Apple Crisp: Replace the butter with coconut oil (solid or liquid) or a good-quality vegan butter; I like Miyoko’s. If desired, swap one tablespoon of brown sugar for an equal amount of maple syrup for a little extra depth. Pop it in the freezer for 10 minutes to firm back up slightly, then bake as directed.
Flavor Variations
- Caramel Apple Crisp Drizzle my Bourbon Caramel Vanilla Sauce or Butterscotch Sauce over the warm crisp just before serving. You can also drizzle a little caramel directly over the apple filling before adding the topping and bake it right in. Either way, it is incredible. For a truly over the top dessert, try my Caramel Apple Dump Cake next.
- Pear Crisp Swap the apples for ripe but firm pears, or use a combination of both. Bartlett and Bosc pears both work beautifully here. The pears will bake a little softer and sweeter than apples, so you may want to reduce the sugar in the filling slightly.
- Peach Crisp Fresh or frozen peaches work wonderfully in place of apples. Add 1-2 teaspoons of my Homemade Bourbon Vanilla Extract to the peach filling, the same amount you would use in the apple filling. Bourbon vanilla and peaches together is one of those combinations that just makes sense, warm, fruity and a little unexpected.
- Mixed Berry Crisp Frozen mixed berries work perfectly here, no need to thaw first. The berries will release more juice as they bake, so add an extra teaspoon of flour to the filling to help thicken. The topping browns beautifully over berries and the color contrast when you scoop it is absolutely gorgeous.
- Make it for a Crowd Double the topping ingredients and use a 9×13 inch pan. Add a couple more apples to fill the larger dish and bake as directed, checking at the 50-minute mark. No judgment, the original recipe had a more generous topping for a reason.
Storage and Freezing
- Room Temperature After cooling completely, cover with foil or plastic wrap and store at room temperature for up to 3 days. Do not cover tightly before the crisp has cooled completely or the topping will steam and go soggy.
- Refrigerator Refrigerate covered for up to 4-5 days. Note that the topping will soften in the fridge. See my reheating tip below to bring the crunch back.
- How to Reheat and Re-Crisp the Topping Soggy crisp happens, no panic needed. Preheat your oven to 300°F (150°C) and place the crisp uncovered in the oven for about 20 minutes. The topping will crisp back up beautifully.
- Freezer: Baked Cool completely, then double wrap in aluminum foil. Freeze for up to 3 months. To reheat, place covered in a preheated 300°F oven for about 30 minutes, removing the foil for the last 10 minutes to re-crisp the topping. Bake longer if needed until warmed through.
- Freezer: Unbaked Assemble the crisp completely, wrap well and freeze unbaked. When ready to bake, place covered in a preheated oven straight from the freezer for the first 30 minutes, then remove the foil and bake until the topping is golden and the apples are tender. If the topping starts browning too quickly, loosely tent the foil back over the top.
- Make Ahead Assemble the crisp up to several hours ahead, cover and refrigerate until ready to bake. Bake straight from the fridge as directed, adding a few extra minutes if needed.

Best Apple Crisp FAQs
A crisp has an oat-based topping, that crunch is the whole point. A crumble skips the oats, just flour, butter and sugar. A cobbler has a biscuit or cake-like topping. A buckle is actually a cake with fruit folded in that sinks and buckles as it bakes. And then there are the grunt and the slump, which I genuinely had to look up. Both are stovetop fruit desserts with dumplings. Real things, apparently! If it has oats, it is a crisp. We are in the right place.
Whatever you have on hand, this recipe is not fussy. That said, my favorites are Honeycrisp, Granny Smith, Fuji, Sweet Tango and Braeburn. A mix of tart apples and one sweet variety gives you the best flavor. I buy organic when I can since I love leaving some of the peel on.
Totally your call. I leave some or all of the peel on for the fiber, color and texture, especially with red apples. If you prefer a smoother filling, peel away. Buy organic if you are keeping the skin on.
Yes! My friend Wendy from Washington state taught me this. Peel, core and slice your apples, soak in 1 tablespoon lemon juice per quart of water for 5 minutes, drain, then flash freeze in a single layer for 1 hour before bagging. They keep 5-10 months. When ready to use, thaw partially, drain well and toss with 1-2 tablespoons of cornstarch since frozen apples release extra liquid during baking.
Usually the topping was covered before cooling, or the apples released too much liquid. Fix it by placing the uncovered crisp in a 300°F oven for about 20 minutes. Crispy topping restored. Adding a tablespoon of flour to the apple filling helps prevent it in the first place.
Yes and I encourage it. Double the topping, add a few more apples and use a 9×13 pan. Check at 50 minutes. The original recipe had a more generous topping anyway, no judgment here.
Jump to my full storage section for everything on making ahead, refrigerating and freezing both baked and unbaked.
I have been making this at mile high in Colorado for over 30 years without a single adjustment. My recipe testers bake all over the country at every altitude and it has never let anyone down. Make it exactly as written.
More Apple Recipes to Love
Well, there you have it! A recipe with over 30 years of proof behind it, a foolproof crunch technique, and enough variations to keep it interesting all year long. If you make it, I want to hear about it! Drop a star rating and comment below, it truly makes my day and helps other readers find this recipe too.
Related Recipes You Might Like


First published in 2020, refreshed in 2026. Same recipe, same crunch, better everything else.
Like this recipe?
Don’t forget to give it a ⭐️⭐️⭐️⭐️⭐️ star rating and leave a comment below the recipe!

Ingredients
TOPPING
- ¾ cup old-fashioned rolled oats not instant; be sure to confirm Gluten Free if you are Celiac
- ⅓ cup all purpose flour unbleached; substitute with GF flour
- ½ cup butter softened, I used salted, if using unsalted, add an additional ¼ teaspoon salt
- ¾ cups brown sugar packed; light or dark, your preference. I used organic light
- ½ teaspoon baking powder
- 1 teaspoon cinnamon
- ½ – 1 teaspoon vanilla extract
- ¾ teaspoon kosher salt
Optional
- ¼ cup pecans roasted, chopped or your favorite, walnuts, almonds all work great
- Flaky sea salt adds bright contrast to the oats
Apple Mixture
- 5 – 6 cups apples peeled, and diced. Try Honeycrisp, Granny Smith, Braeburn, Golden Delicious, Jonagold or Pink Lady- about 5-6 small apples
- 3 tablespoons granulated sugar I used all-natural cane sugar
- 2 tablespoons all purpose flour sub with GF flour if desired
- 2 teaspoons cinnamon
- ¼ teaspoon nutmeg fresh grated, plus more to grate on top
- 1 teaspoon vanilla extract use pure vanilla extract
Instructions
- Preheat oven to 350°F (175°C) and butter or spray with oil an 8×11 baking dish (thicker crisp) or 9×13 pan (thinner crisp). Place rack in the bottom third of the oven for even baking.
- Crisp Topping: In a medium bowl add oats, flour, brown sugar, salt, cinnamon and baking powder, mix to combine. Add softened butter, using your hands, squish into the dry mixture until you have some larger marble sized pieces and the ingredients are mixed well. Place topping in freezer while you prepare the apples, just 10-15 minutes if longer, just place in fridge.¾ cup old-fashioned rolled oats, ⅓ cup all purpose flour, ½ cup butter, ¾ cups brown sugar, ½ teaspoon baking powder, 1 teaspoon cinnamon, ¾ teaspoon kosher salt, ½ – 1 teaspoon vanilla extract
- Peel, partially peel or leave skins on if desired, then coarsely chop apples. Toss with sugar, flour, cinnamon, vanilla and nutmeg; coating well. Pour evenly into prepared pan.5 – 6 cups apples, 3 tablespoons granulated sugar, 2 tablespoons all purpose flour, 2 teaspoons cinnamon, 1 teaspoon vanilla extract, ¼ teaspoon nutmeg
- Top with chilled crisp oat topping, breaking up larger chunks and evenly covering the apples. If desired, sprinkle some chopped nuts on top and grate some fresh nutmeg on top.¼ cup pecans
- Bake at 350°F for 45-60 minutes until apples are soft, crisp topping is lightly browned. Bake longer for soft and tender apples, less time if a crisp tender apple is desired.
- Remove from oven and if desired, sprinkle with a little flaky sea salt, and a little fresh grated nutmeg.
Notes
- Room Temperature: Cover loosely and store for up to 3 days. Do not cover tightly before fully cooled or the topping will go soggy.
- Refrigerator: Cover and refrigerate for up to 4-5 days. Reheat uncovered at 300 degrees F for about 20 minutes to bring the crunch back.
- Freezer: Double wrap baked and cooled crisp in foil and freeze for up to 3 months. Reheat covered at 300 degrees F for 30 minutes, removing foil for the last 10 minutes.
- Make Ahead: Assemble up to several hours ahead, cover and refrigerate until ready to bake.
Nutrition


Janie Roos
I made this for my MomCo group. Eight women and they raved about it. Then my husband ate all the leftovers before I could serve some for dessert the next day! I made it exactly as the recipe says in an 8×11 pan though. Yummy and perfect for fall!
I love this so much Janie! Thank you so much for sharing your sweet words!!
KC
So yummy! I used 5.5 c. apple slices cut into bite size pieces. I love that it uses more oatmeal than flour, especially since I have to use gluten free flour. I think next time I’ll add more apples, but everyone thought it was delicious!
Thank you! So glad you loved it! I love more oats too personally. And that’s the beauty of a recipe like this you can easily add more apples.
Chris
My sister found your recipe and shared it. We’ve been making it over and over again for our families and when delivering meals to friends. So delicious warmed with vanilla ice cream. Everyone loves it!
Hi Chris, thank you so much!! It’s on repeat at our house too!!
Jenna Sellers
This crisp is so delicious and easy on my sensitive stomach. Thank you for the alternative ingredients that make this possible for me to eat in confidence.
Tasia ~ two sugar bugs
This is the perfect season for apple crisp! I love that generous and buttery topping!
Thank you Tasia! I agree love the buttery topping!