
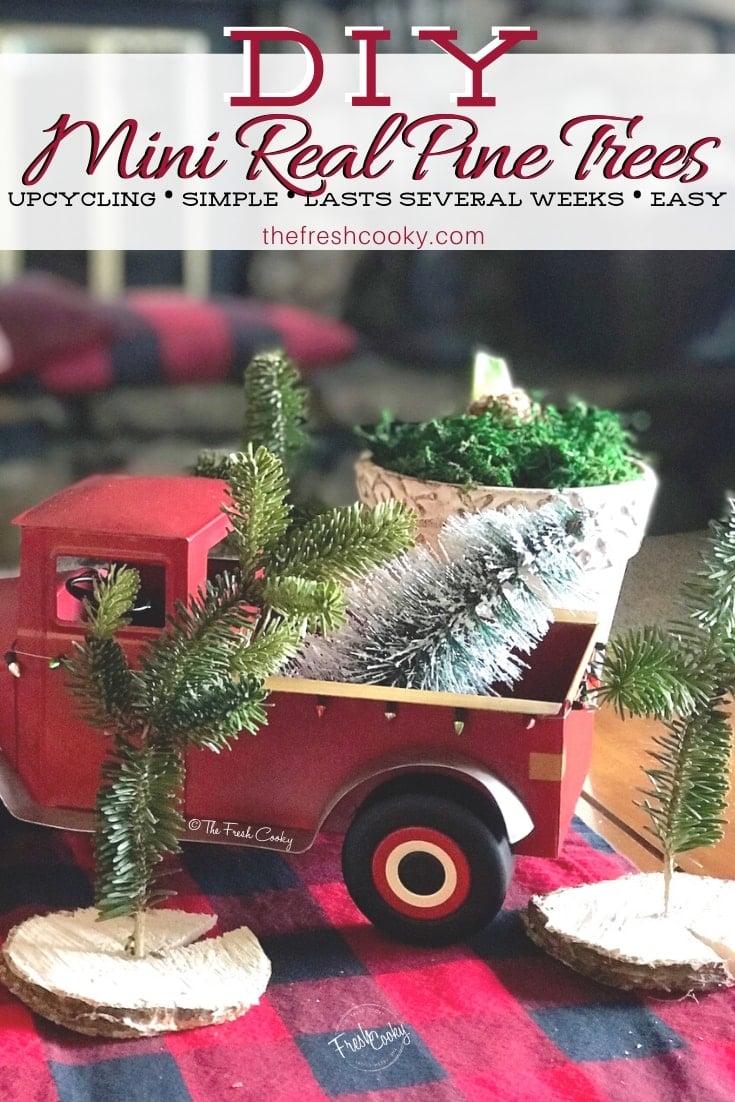
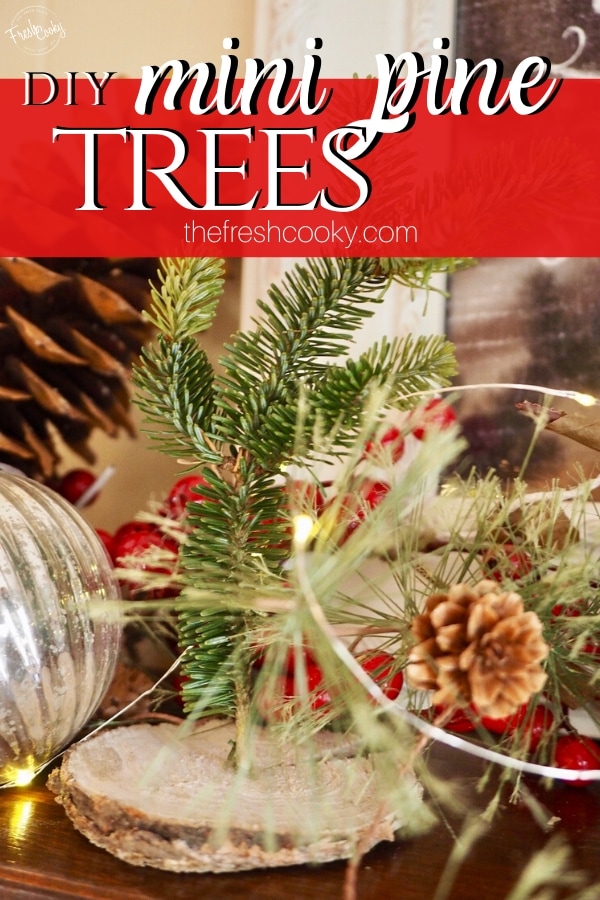
These cute little DIY Fresh Mini Christmas trees are perfect for adding pops of seasonal color to your mantle, Christmas Village scene, texture and height to a holiday vignette, or on your holiday table as a unique place card holder or accent.

I saw these last year, I think on Instagram and I wish I remember who did them, because I would give them all the credit! I am not a terribly creative person, but I can be creative off of somebody else’s creativity! Plus it’s a bit of upcycling!
I made them for a Christmas Tea I was hosting, and just look at the whimsy and festive touch they provide! Check out the post on my eggnog scones that shares a bit about this Christmas tea.

And once the tea was done, I used them on my mantle and on my table vignette, how cute is this little red truck! I’m obsessed!
Supplies for Mini Pine Tree
- Visit a nursery or Christmas tree lot and ask for those trimming the trunks of the trees (you know how they always ask you if you’d like a fresh cut? Well you want what they cut off.)
- Or you can purchase pre-cut pine slices.
- As you are walking around the lot, look on the ground for any discarded branches, or stems of evergreen. Anything works, you can even use what you buy in the store. For mine I used fraser fir, but cedar, long needle pine, juniper, any evergreen works! Sprigs of Berries or Holly would be so very cute this way too!
- Garden Wilt Stop Spray (seals in moisture)
- Garden nippers
- Glue Gun
- Large nail or Ice Pick (that’s what I used!)
- Wax or parchment paper, cut into circles to protect surface from sap
How to ASSEMBLE the DIY Fresh Mini Christmas Trees
- Lay out a sheet of wax paper or parchment paper on a cutting board or cookie sheet.
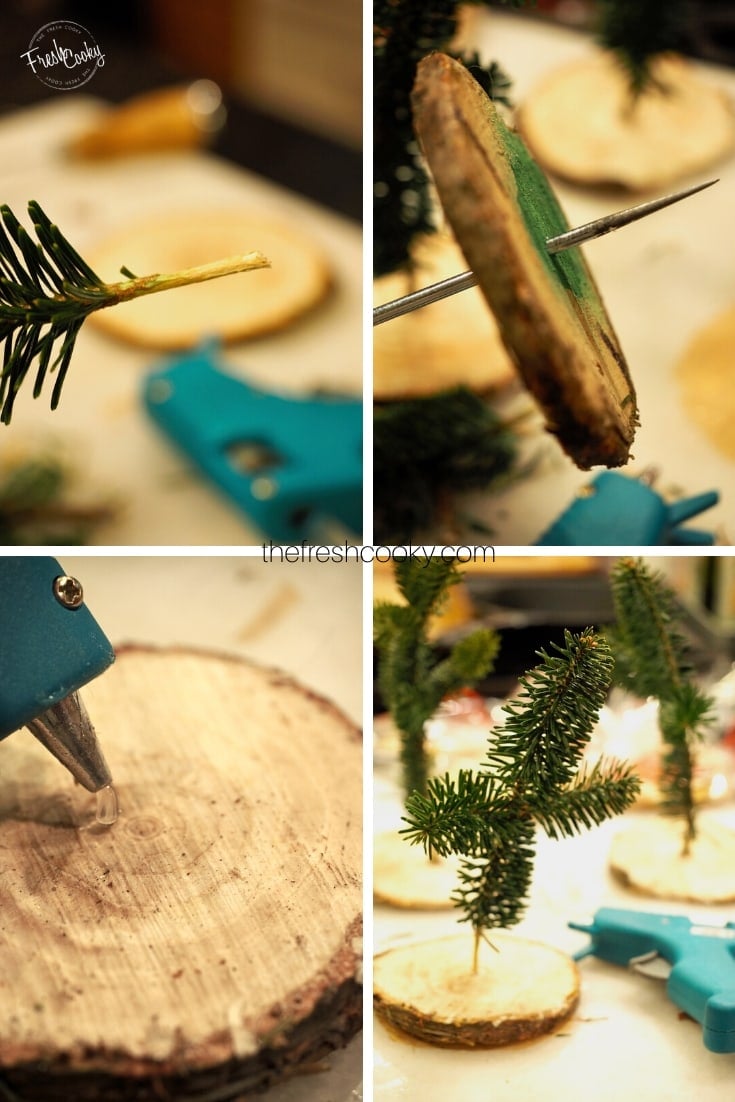
- Trace wood discs & cut out circles onto wax or parchment paper. Attach to bottom of wood to protect surfaces.
- Clean off an inch or two from the bottom of the branches and cut to size, spray outside with anti wilt spray, they will last fairly fresh a few weeks.
- Push a nail or ice pick through the center of the wood slice (be sure you do this on a cutting board), wriggling in until it’s large enough to push the stem of the tree branch piece through. Pine is pretty soft, so you should be able to do this with hand strength.
- Once you are sure the branch fits, squeeze in some hot glue and immediately press in the branch stem, adding a little extra glue around the base.
- You may want to try it without glue first, to make sure your tree is not to heavy and will still stand.
- PRESTO! Make as few or as many as you need!

Check out a few of my Holiday Posts
- Stocking Stuffers for Tweens & Teens (and even college kids)
- Gift Ideas for the Entertainer in your Life
- Feeling creative; make and gift Cookie Dough!

DIY Fresh Mini Christmas Trees
Equipment
- Garden Nippers
- Glue Gun
- Large Nail or Ice Pick
Materials
- Visit a nursery or Christmas tree lot and ask those trimming the trunks of the trees for the discarded discs you know how they always ask you if you’d like a fresh cut? Well you want what they cut off.
- Or purchase pre-cut pine slices.
- Gather discarded branches or stems of evergreen from Christmas Tree lot. Ideas: Fraser fir, cedar, long needle pine, juniper, any evergreen. Try sprigs of berries or holly too!
- Garden Wilt Stop Spray seals in moisture
- Wax or parchment paper cut into circles to protect surface from sap
Instructions
- Lay out a sheet of wax paper or parchment paper on a cutting board or cookie sheet.
- Trace wood discs & cut out circles onto wax or parchment paper. Attach to bottom of wood to protect surfaces.
- Clean off an inch or two from the bottom of the branches and cut to size, spray outside with anti wilt spray, they will last fairly fresh a few weeks.
- Push a nail or ice pick through the center of the wood slice (be sure you do this on a cutting board), wriggling in until it’s large enough to push the stem of the tree branch piece through. Pine is pretty soft, so you should be able to do this with hand strength.
- Once you are sure the branch fits, squeeze in some hot glue and immediately press in the branch stem, adding a little extra glue around the base.
- You may want to try it without glue first, to make sure your tree is not to heavy and will still stand.
- PRESTO! Make as few or as many as you need!


Lynn Spencer
Good Morning! I love those wee trees! What a fun idea…whimsical for sure! And, we can all use a little whimsy in our world!
Hugs and Merry Christmas.
Lynn
Thanks Lynn, yes for sure, we can use more whimsy in our world!! THanks and Merry Christmas to you too!
Tania
That’s so creative! Another use for wood slices!
Tania
Yes!! I love it!
Jenny
These trees add such a natural touch to the table. Adorable & look so fun and easy to make.
Thanks Jenny, they do add a fun touch!
Super Mom - No Cape!
What a cute idea. And so easy to do.
Thanks, that means a lot coming from THE Super Mom!!! 🙂
Marie
These could real trees would bring that fresh pine smell into the home when you put up an artificial tree. Cute idea!
Absolutely Marie, crush the ends with pliers and it will release the fragrance even more! Thanks!
Rachelle
Cute trees, and it looks like something I could do!
If I can do it Rachelle, you can do it!
Cherryl Ehlenburg
Really cute idea! I love what they add to the table scape!
Thanks Cherryl!!