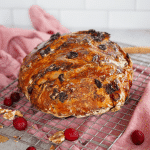
Cranberry Walnut Bread (No Knead)
A rustic no knead cranberry nut bread that is so delicious and easy, it will make a bread baker out of anyone! An easy yeast bread recipe that requires minutes to mix, requiring very little hands on time.
Have questions?Find the full recipe, including tips, step-by-step photos, storage instructions, and save to your account at: https://www.thefreshcooky.com/cranberry-walnut-bread-no-knead/
Servings 12 servings = 1 loaf
Calories 232kcal
Equipment
Ingredients
- 3 cups all-purpose flour + 3 tablespoons May substitute gluten free all purpose flour. See Kathleen's tips at the bottom for more details.
- ½ teaspoon instant yeast make sure your yeast is fresh, see notes
- 2 teaspoons kosher salt
- 1 cup walnuts chopped
- 1 cup dried cranberries or replace with fresh, rough chopped
- 1 ½ cups water room temp or slightly warm
- ¼ cup honey
Special Equipment Needed
- [5 qt or larger Dutch Oven] make sure your Dutch oven is safe up to 500 degrees
- While a dutch oven works best for even heating and mimicking a steam oven; in a pinch a large pot or roaster with lid may be used.
Instructions
- Add flour, yeast and salt to large bowl (large enough for dough to double), stirring yeast into one portion of flour, salt the other, then stir together. Toss cranberries and walnuts and stir well to coat in the flour mixture.
- Pour honey into warm water and stir to combine. Pour honey water into flour mixture. Stirring to combine, it will be sticky, that's okay!
- Cover the bowl with plastic wrap, placing bowl in a draft-free , warm spot for at 12-18 hours (yes, hours!). I place in my oven, with a tea towel over the top of the plastic wrap.
- NEXT DAY | Once the dough has risen, and place a piece of parchment paper on the counter and dust with flour; with floured hands, gently scrape the dough away from the bowl and onto the parchment paper, the dough will be stringy and sloppy.
- Gently shape the dough into a round or oval shape. It will feel different than other breads, kind of fluid, that's alright it lends to the rustic look. Cover the shaped dough with a piece of plastic wrap (sprinkle a little flour on top of your dough if it's still really sticky) and then with a tea towel. Let rise for another 45 minutes.
- While dough is doing second rise, adjust your oven rack so that the dutch oven sits several inches above the bottom, but still has plenty of clearance on the top. PLACE DUTCH OVEN with LID INSIDE THE OVEN TO HEAT WITH THE OVEN. Preheat oven to 450 degrees F.
- Remove the plastic wrap, don't worry if it doesn't look like the dough has risen too much, it will puff up once it hits the heat of the oven.
- CAREFULLY (it's really hot!) remove the pot from the oven, set the lid to the side and using the excess parchment paper as a sling, gently transfer bread dough to the dutch oven, cover with lid (it's hot too!) and place back in hot oven for 30 minutes -- no peeking!! This is when the crispy crust develops. See notes if bottom burns below.
- After 30 minutes, remove the lid (remember it's still hot!), baking for another 15 minutes. Place on wire rack to cool completely. You can leave it in the pot, I prefer to remove it using the parchment and cool on a wire rack. If desired, brush or drizzle with a little extra honey, while warm.
- Resist cutting into the bread until it has mostly cooled, breads continue to bake while cooling and if you cut into it too soon it could make it gummy inside.
Video
Notes
If bread is too crisp on the bottom try this:
I have discovered at times that the bread can sometimes burn on the bottom slightly, while not ruining the loaf bread, it does make it difficult to slice. My tips that have been successful are below:
- Try reducing the heat once place the dough in the dutch oven to 425 and bake covered for 30-35 minutes.
- Remove lid and continue baking for 15 minutes uncovered.
- If you have a temperature probe (highly recommend) place in center of bread and bake until temperature reaches between 190-200 degrees, this will ensure the bread is done without over baking it.
- Swap out dried cranberries with dried raisins, cherries, blueberries, apples, dates probably just about any dried fruit, heck even chocolate chunks! Now we're baking!
- Replace with fresh cranberries, it will be more tart, but still so yummy. Do a rough chop of them, ahead of time. I haven't tried with fresh blueberries, but I think it would work too.
- My oldest has a tree nut allergy, so when he's home (he's away at college now, sniffle) I make one with nuts and one without. Feel free to omit the nuts all together, you could add additional dried fruit if desired.
- Substitute the walnuts with pecans, almonds, hazelnuts, even sunflower seeds or cashews; just make sure to do a rough chop ahead of time! Except with the sunflower seeds cause that would just be weird!
- Try toasting the nuts ahead of time, cooling completely for a deeper, roasted flavor.
- Toss in orange or lemon zest!
- Make it vegan by swapping honey with maple syrup.
Gluten Free?
- The texture is very different, it's dryer, soaking up more of the liquid, I mixed in about ⅛-¼ cup additional warm water.
- As it sat overnight, the texture didn't change much and raise like a regular flour would, however; treating it the same it still baked up nicely. Still not as lofty as the regular flour, but a decent rustic loaf of bread..
- I would suggest using a good gluten free All Purpose flour, my favorite is Bob's Red Mill 1-to-1 which is what I used here, maybe even substitute out a small portion of of your GF flour for oat flour, but I haven't tried that.
- The texture was a bit gummy, it could have baked longer.
- My suggestion would be to heat the oven with the Dutch Oven to 450 degrees, reducing to 400 degrees once you place the dough in the oven.
- Bake for 30 minutes covered, uncover and bake an additional 20-25 minutes until the internal temperature reaches 190 degrees when a probe is placed into the center of the loaf. I should have done that, I was in a hurry!
- If it does come out gummy, slice and toast until crispy which is my preferred way to eat this bread anyway!
Nutrition
Serving: 1serving | Calories: 232kcal | Carbohydrates: 40g | Protein: 5g | Fat: 7g | Saturated Fat: 1g | Polyunsaturated Fat: 5g | Monounsaturated Fat: 1g | Sodium: 391mg | Potassium: 90mg | Fiber: 2g | Sugar: 13g | Vitamin A: 3IU | Vitamin C: 0.2mg | Calcium: 17mg | Iron: 2mg